Creating WhatsApp Campaign
Need a powerful way to send valuable information to your customers?
CINNOX allows you to send out WhatsApp campaigns and connect with your customers in a meaningful and impactful way. Effortlessly schedule your powerful WhatsApp campaign with just a few clicks. Please choose your desired timezone and sending options, upload your template or set it manually, set the date and time, and get ready to make a lasting impact. Revolutionise your customer engagement strategy with CINNOX today.
WhatsApp Campaign is an engagement method that helps enterprises and brands reach their target customers through WhatsApp, building strong relations and increasing sales.
📘
Before you create a WhatsApp Campaign, ensure you already have a 360dialog WhatsApp source and connect it to a WhatsApp channel in CINNOX.
Creating WhatsApp Campaign
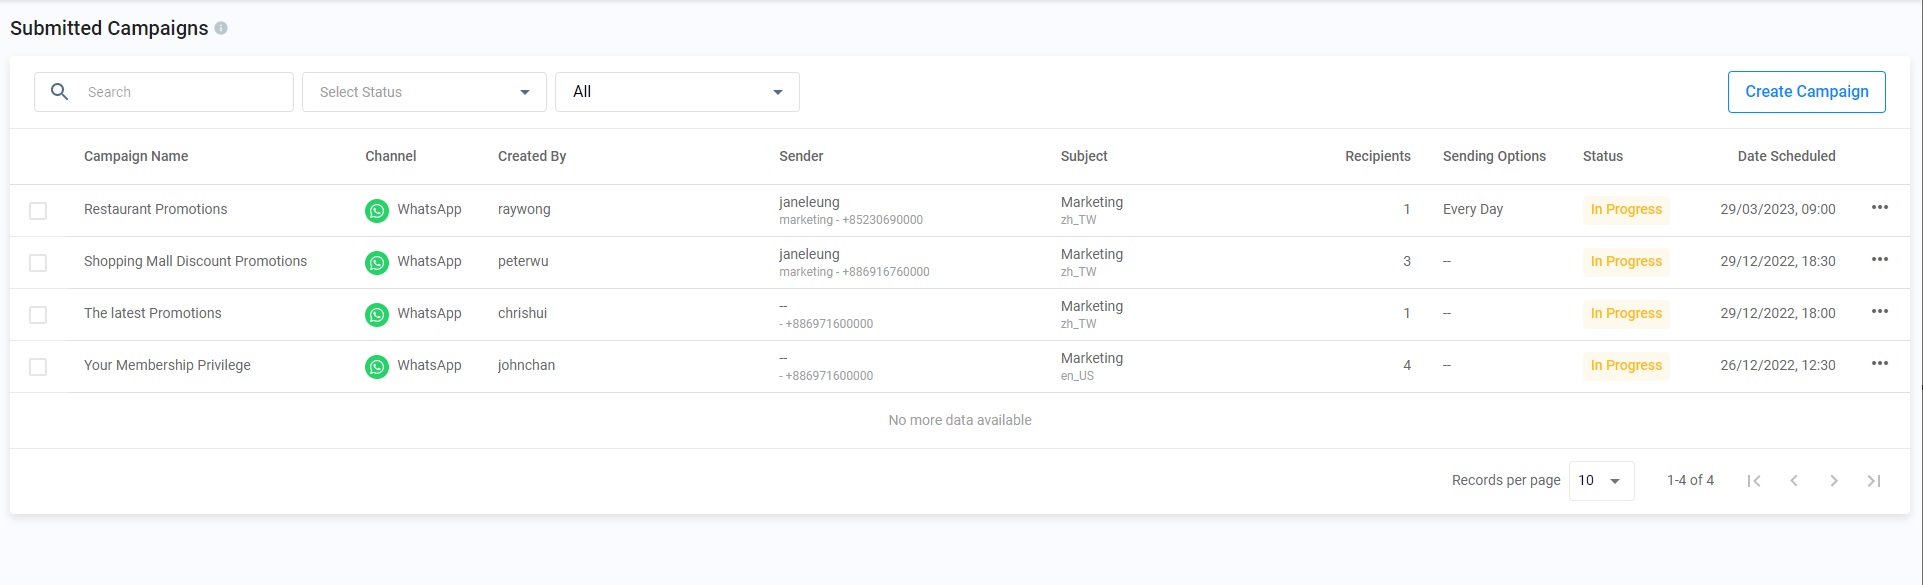
- Click Campaigns from the Dashboard navigation menu, and navigate to Submitted Campaign, Draft Campaign, or Sent Campaign.
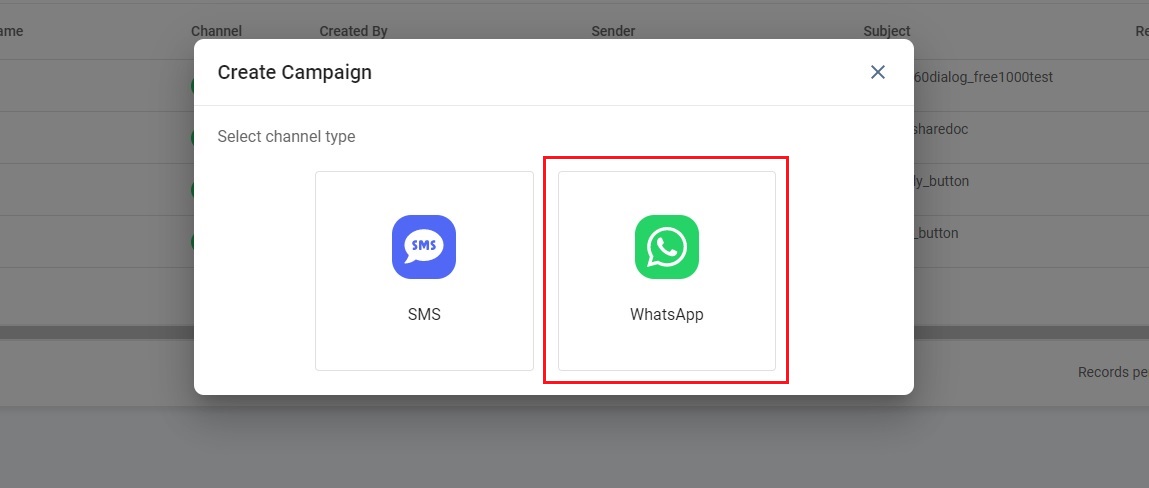
- Click Create Campaign at the top right corner of the page and select WhatsApp as the channel type.
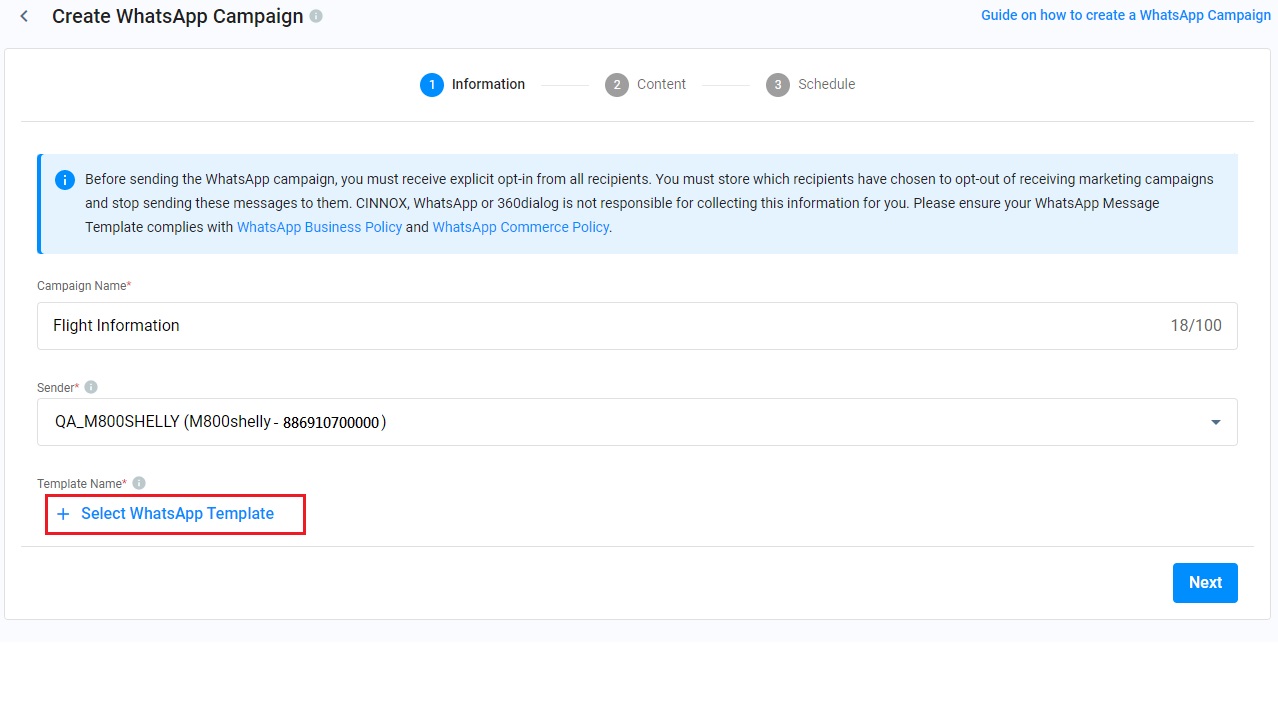
- Enter your Campaign Name. The limit of the campaign name is 100 characters.
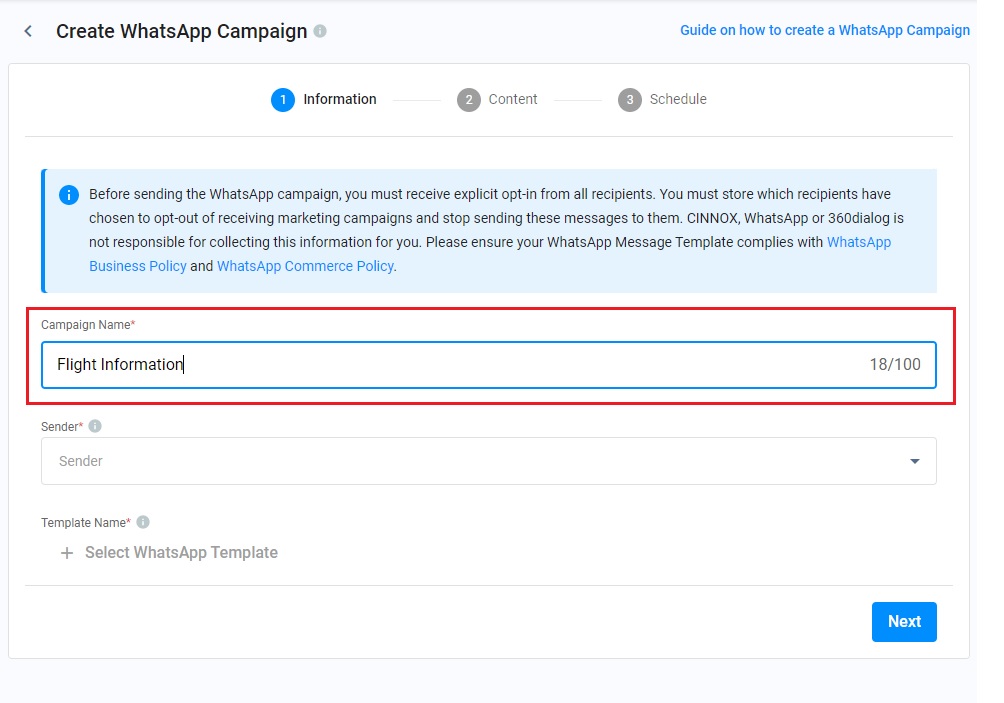
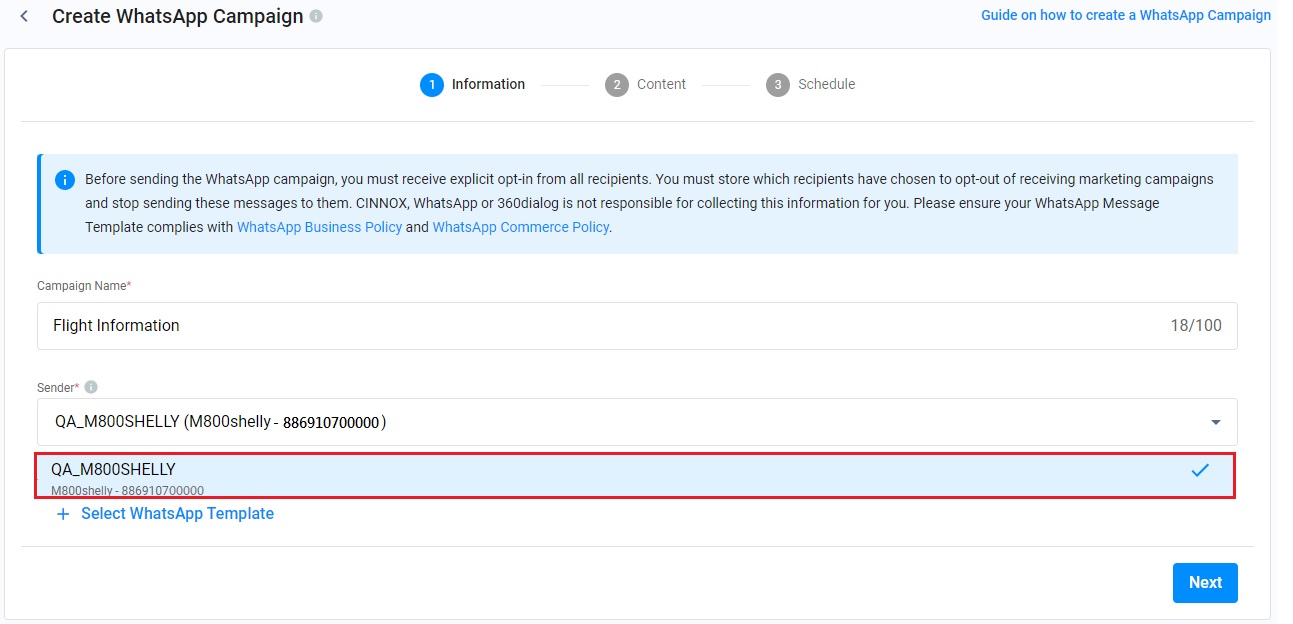
- Click the drop-down list to select what WhatsApp channel (WABA number) you would like to use to send the Campaign as your Sender.
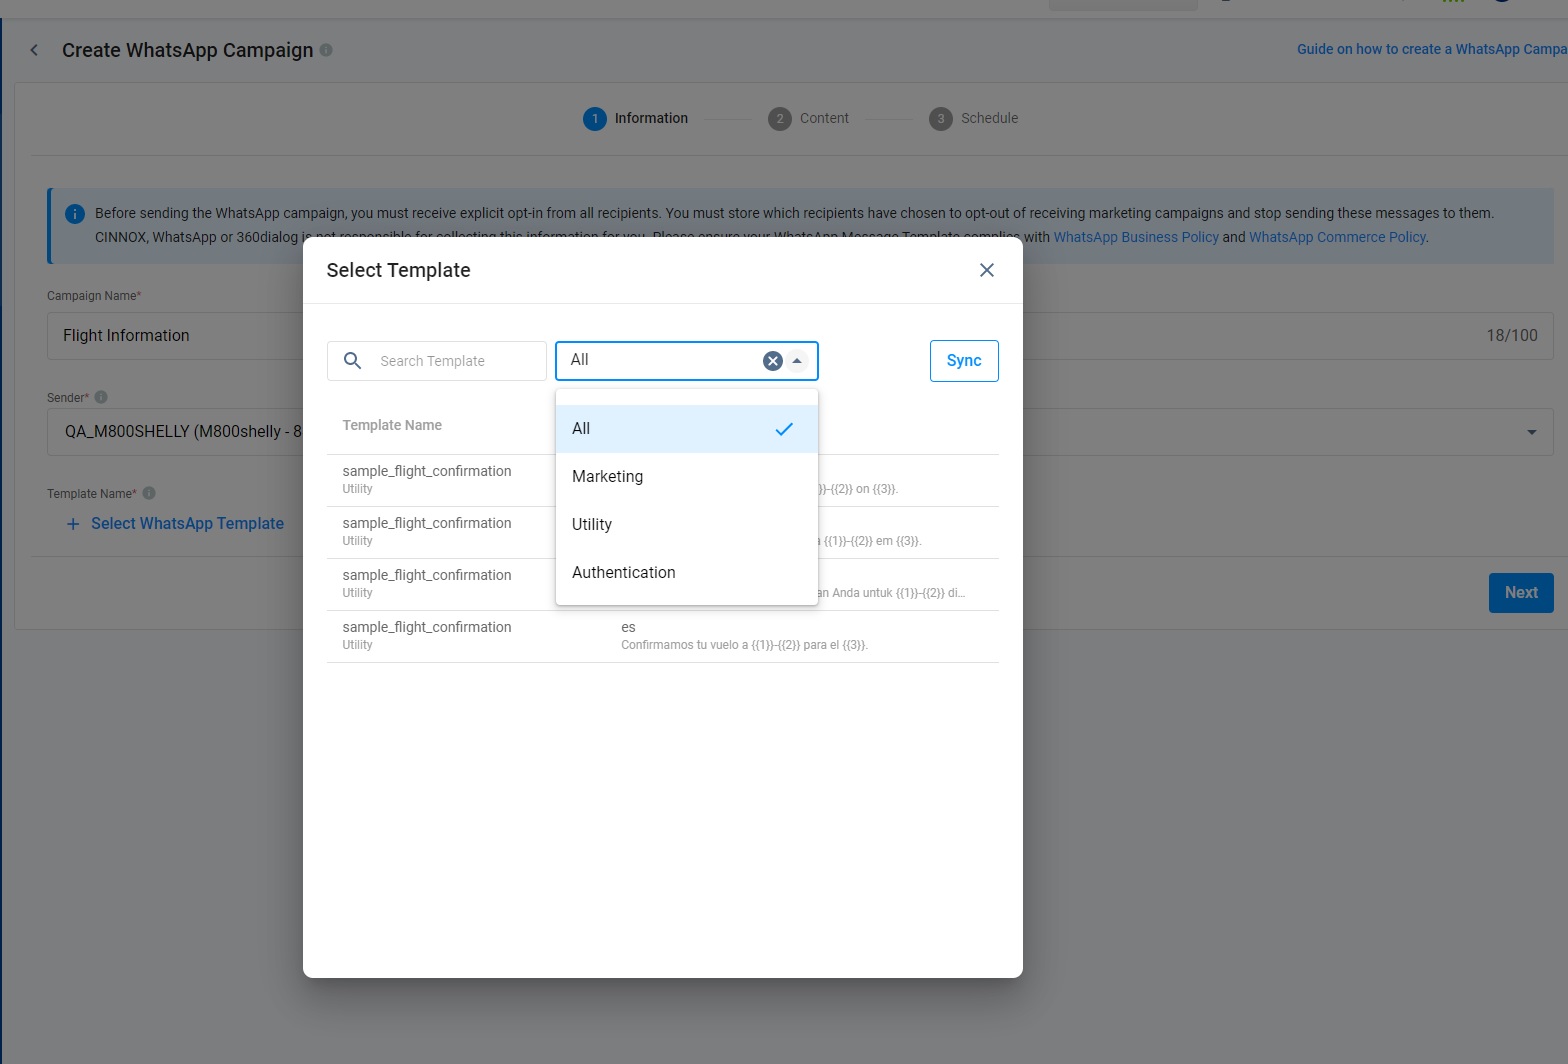
- Click +Select WhatsApp Template to select a WhatsApp Template. You can check our detailed guide for the WhatsApp Templates and their known limitations.
- You can enter the template keywords into the search box to search the required template or filter the template list by selecting one or multiple template types such as All, Marketing, Utility or Authentication from the drop-down list.
- You can also click Sync to update the templates available for you to choose from.
🚧
- Only the approved templates will be displayed in the Select Template pop-up window.
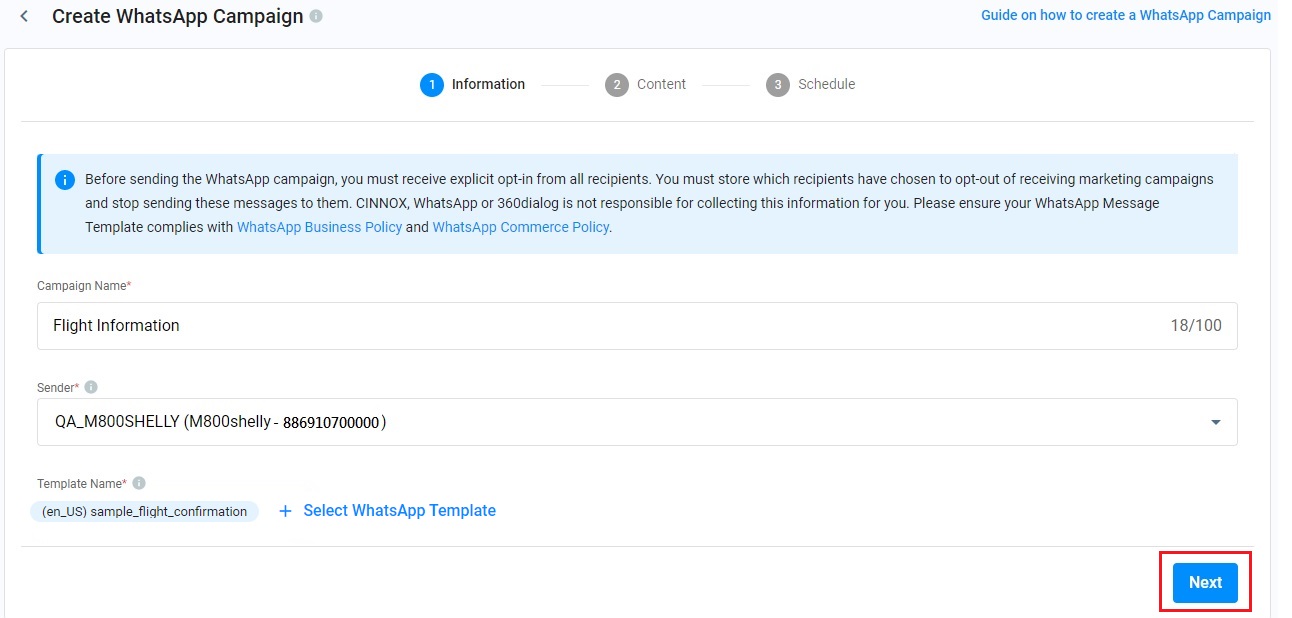
- Click Next.
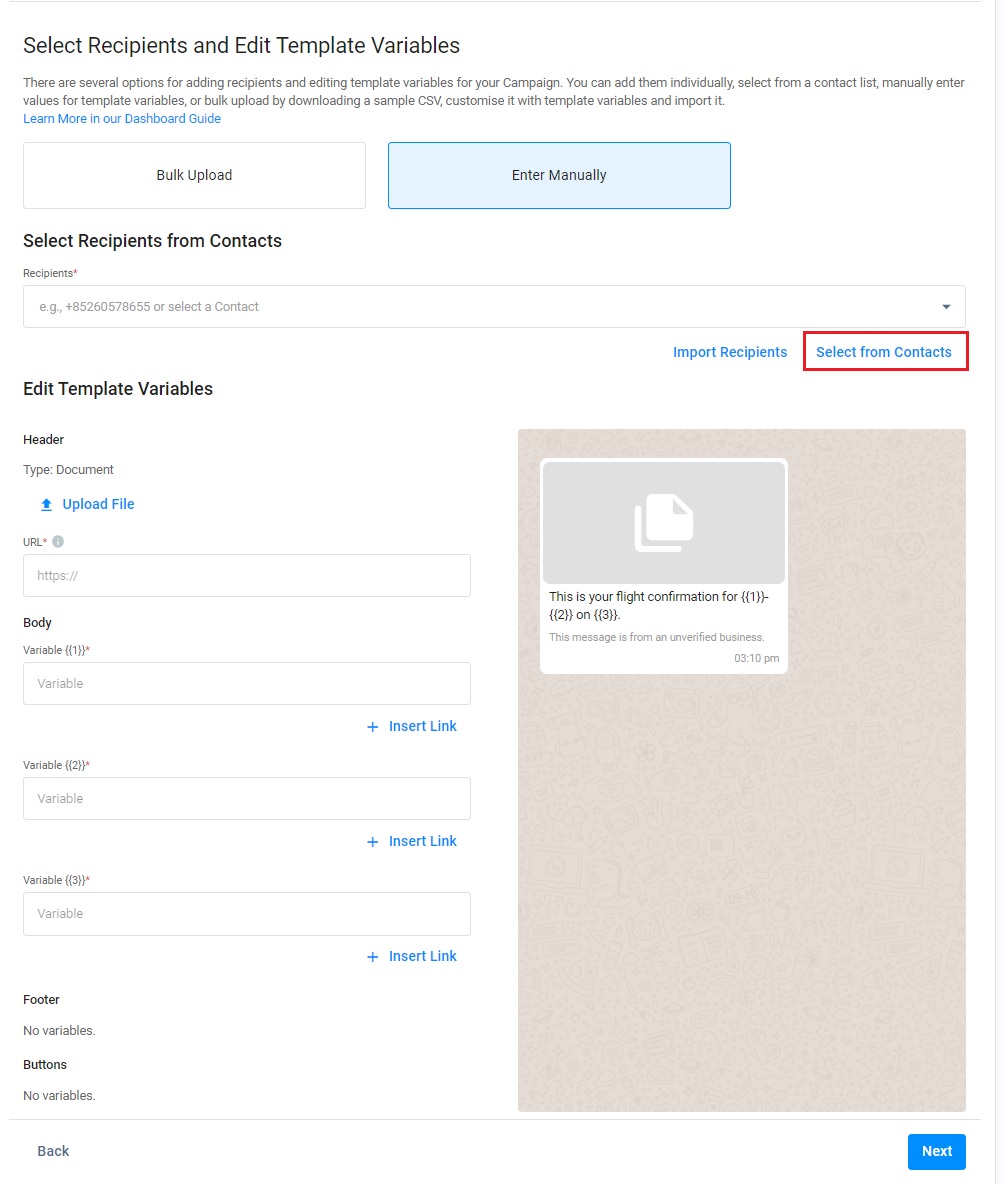
- After clicking Next, you are on the Select Recipients and Edit Template Variables page.
Adding WhatsApp Campaign Recipients
- There are two methods for selecting your target recipients and editing the variables for the selected template.
Option A: Bulk Upload
- On the Select Recipients and Edit Template Variables page, select Bulk Upload.
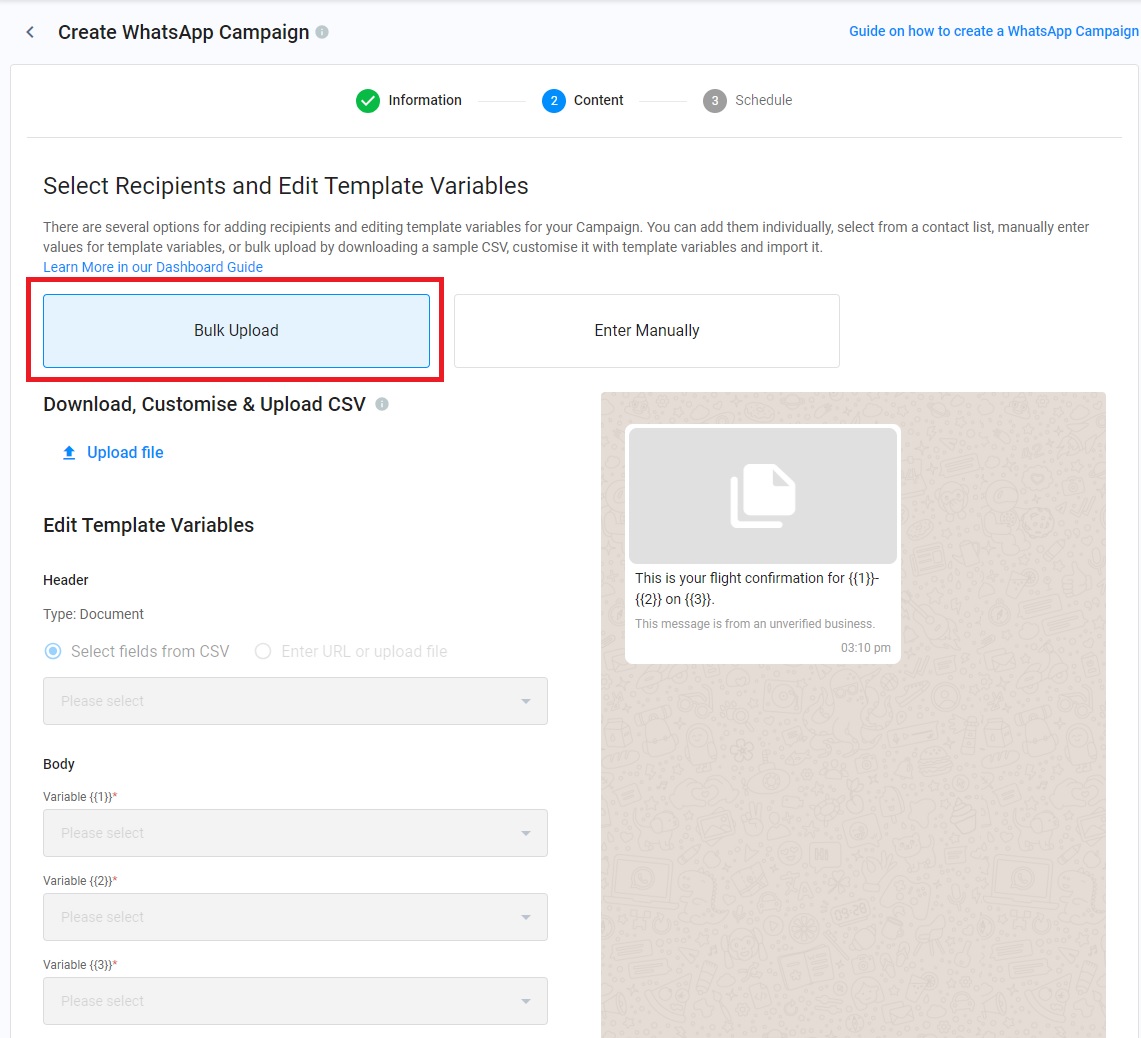
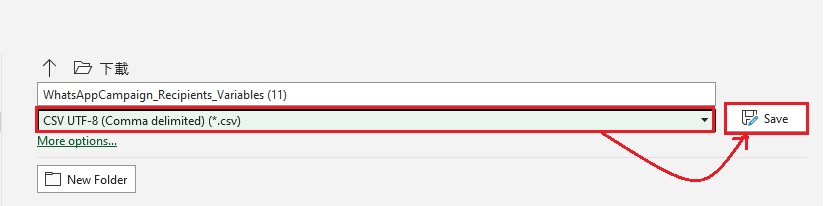
- Click Upload file.

- Click Download the sample CSV file.
- Open the downloaded spreadsheet template containing the Recipients and Variable name columns.
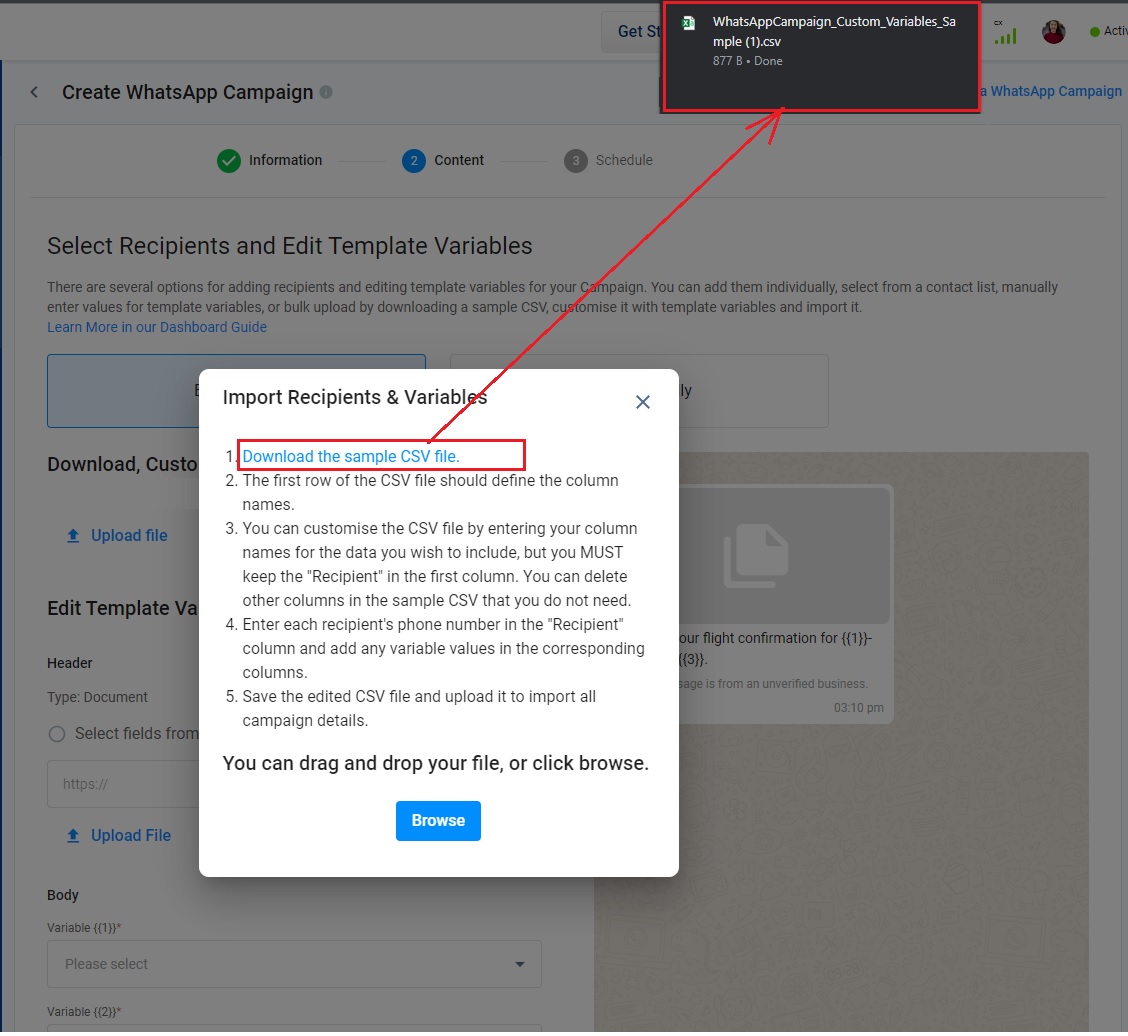
- In the Recipients Number column, add the phone numbers of your target recipients. Make sure it includes the country codes before the numbers.
- In the Variable columns, add the data related to your target recipients.
📘
When you enter the data into the downloaded CSV file, please note
- Header Field
- Each data column must have its header field name and the header fields must be filled.
- Header fields' names are customisable for your needs except the Recipient's header field.
- The header fields must exist in the CSV file's first row. Otherwise, the CSV file will fail to be imported.
- Field
- Any field must be filled.
- Add "+" in front of the recipient phone numbers when you add them to the Excel file.
- New lines, tabs or more than 4 consecutive spaces in fields are not allowed.
- The maximum number of column fields, including the Recipient column field, is 20.
- File size and format
- You can add up to 10,000 recipients to the spreadsheet if the file size does not exceed 5MB.
- Ensure you have save the file as a CSV format.
- Remove the reminder message in the CSV file before uploading it to the dashboard.
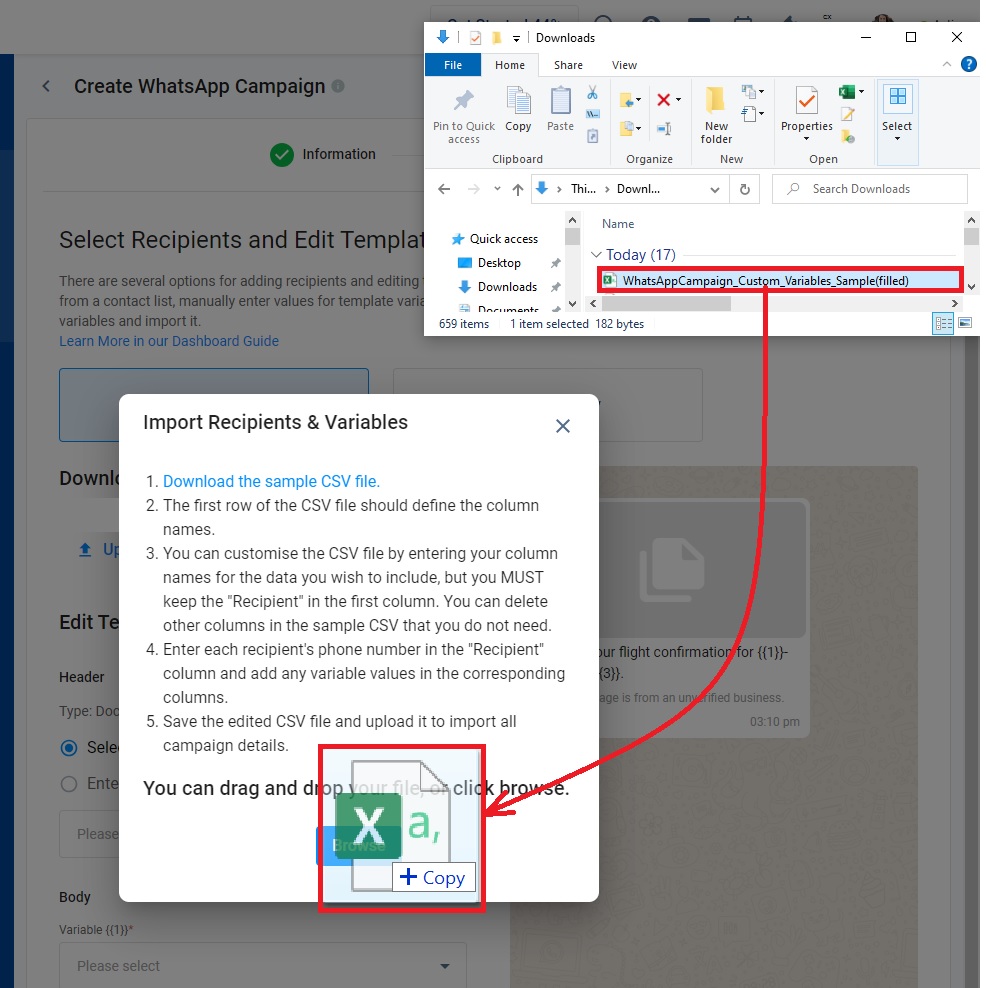
- Once all columns are ready, please save the file and upload it to CINNOX by dragging and dropping it on the designated box in the pop-up window. CINNOX will then validate the uploaded file and create an error log if there are invalid records.
- You may also upload the filled CSV file by clicking Browse and selecting it from its location.
- When some records fail to import, please refer to the subsection Handling Invalid Records in the Creating SMS Standard Campaign section.
- When the input text is split, please refer to the subsection How to handle the case of the splitting text in the CSV file.
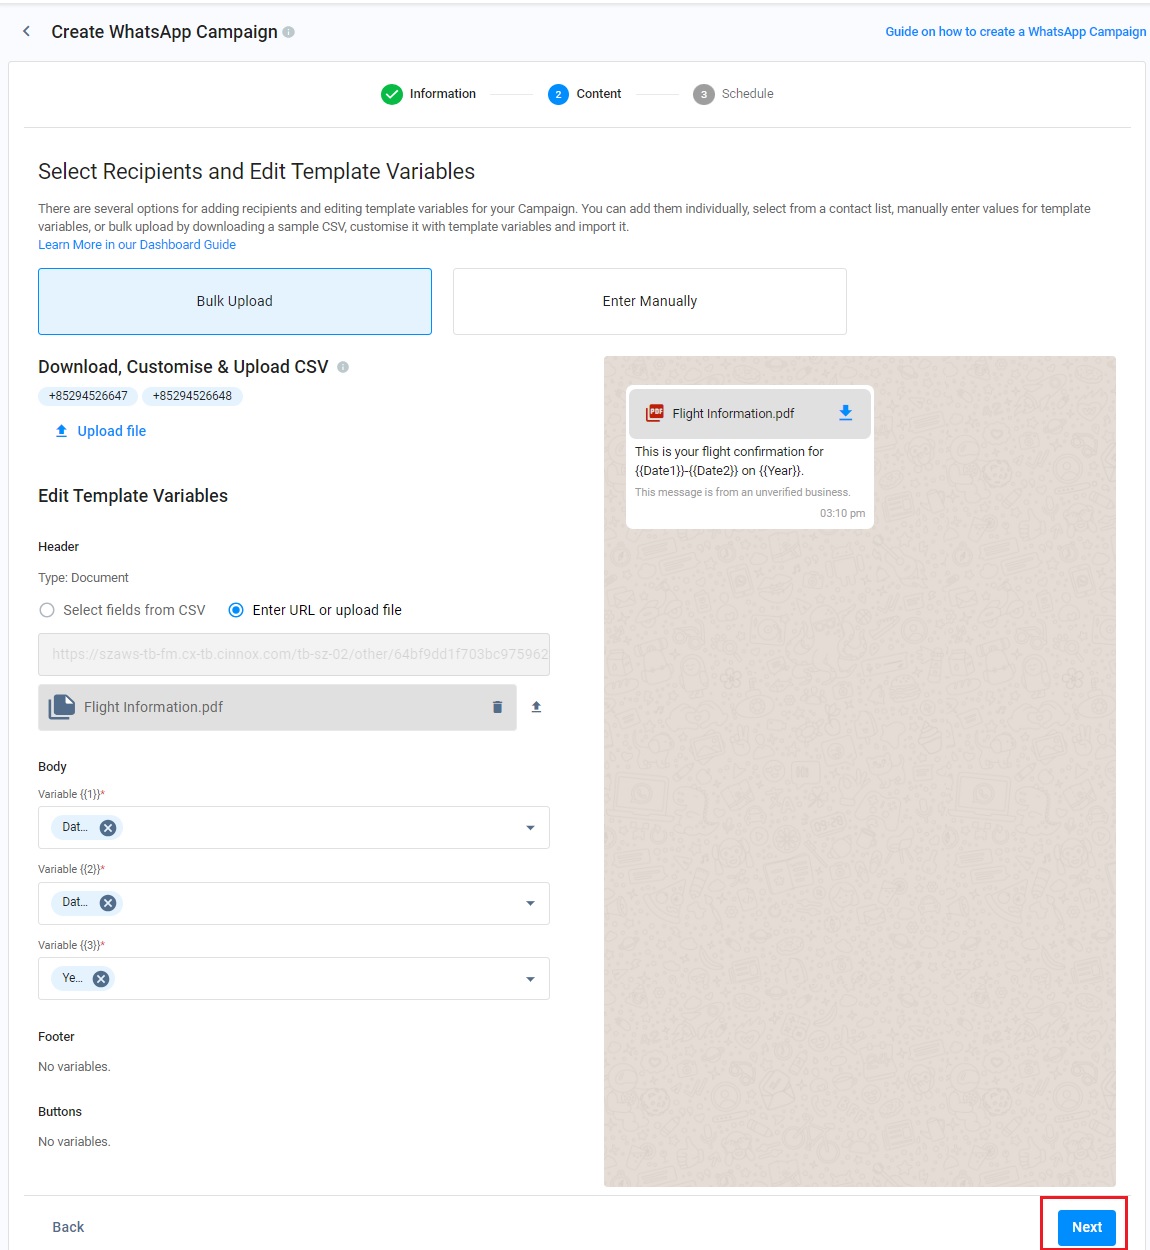
After successfully uploading the filled CSV file, the recipients' phone numbers and variables are displayed on the page.
- The message preview is shown on the right-hand side of the screen.
- You can click Upload file to upload a new file when you need the updated column fields or data.
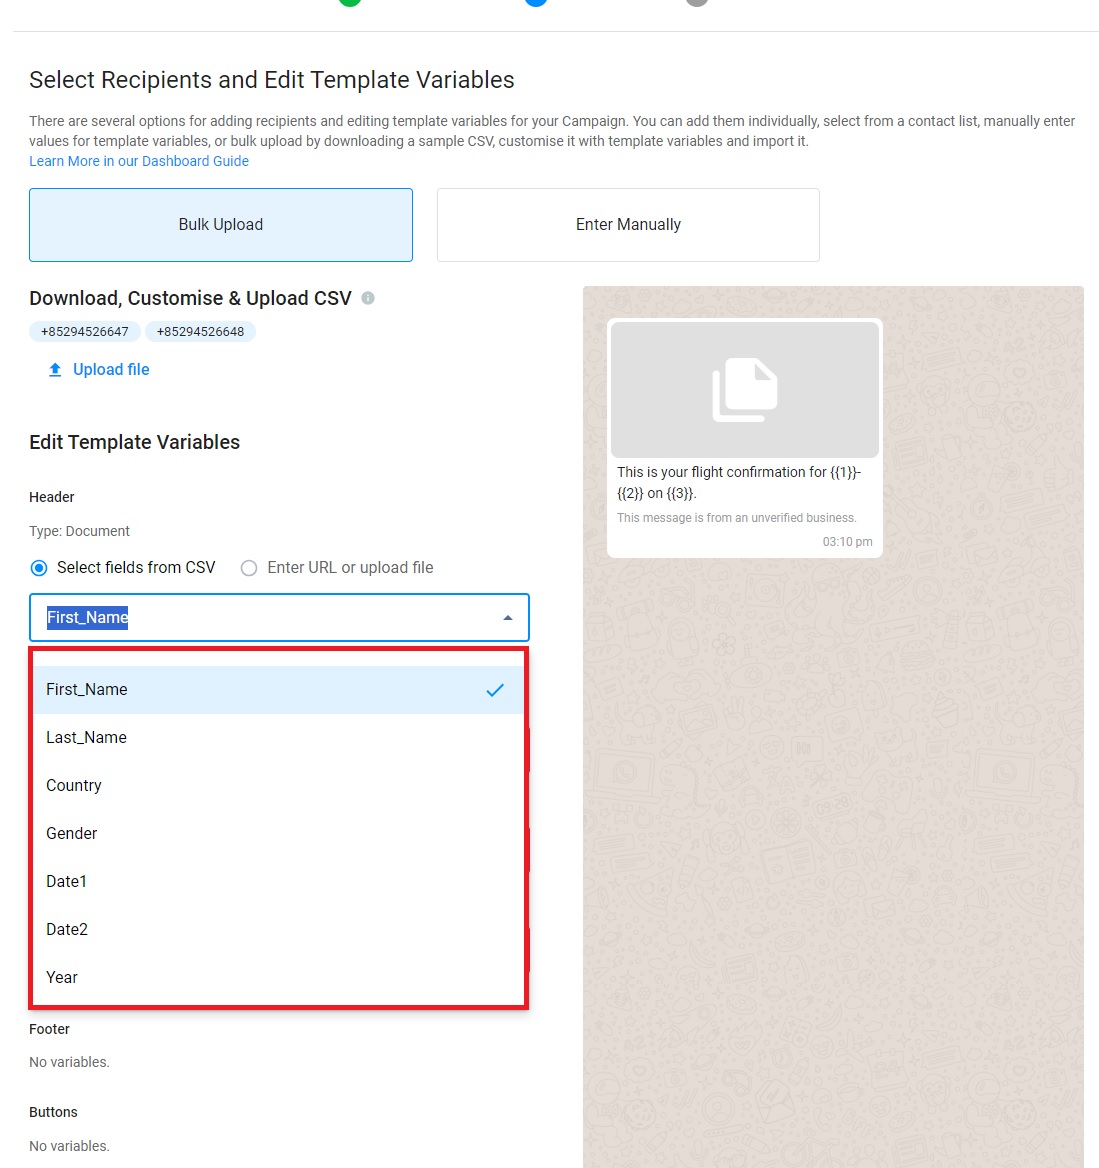
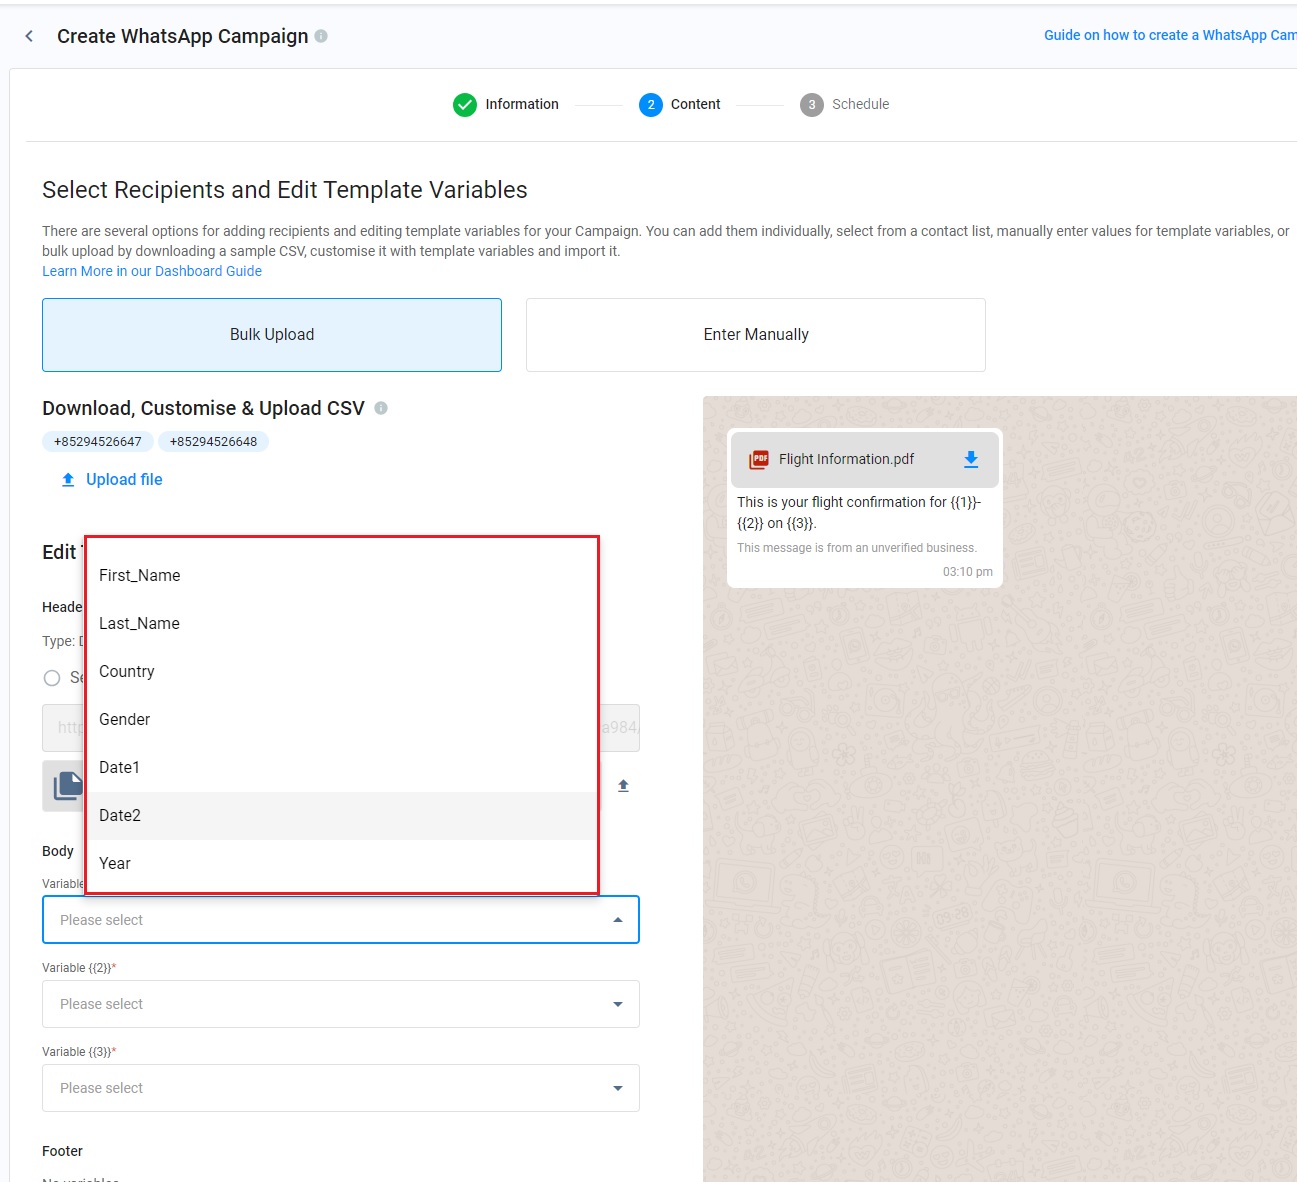
- Under the Edit Template Variables section, you can select Select fields from CSV or Enter URL or upload file for the Header field of the WhatsApp message.
Select fields from CSV
- Selecting Select fields from CSV, you can choose one of the column fields. The values of this selected column field become that of the header.
Enter URL or upload file
- Click Upload File to upload the required file as a header.
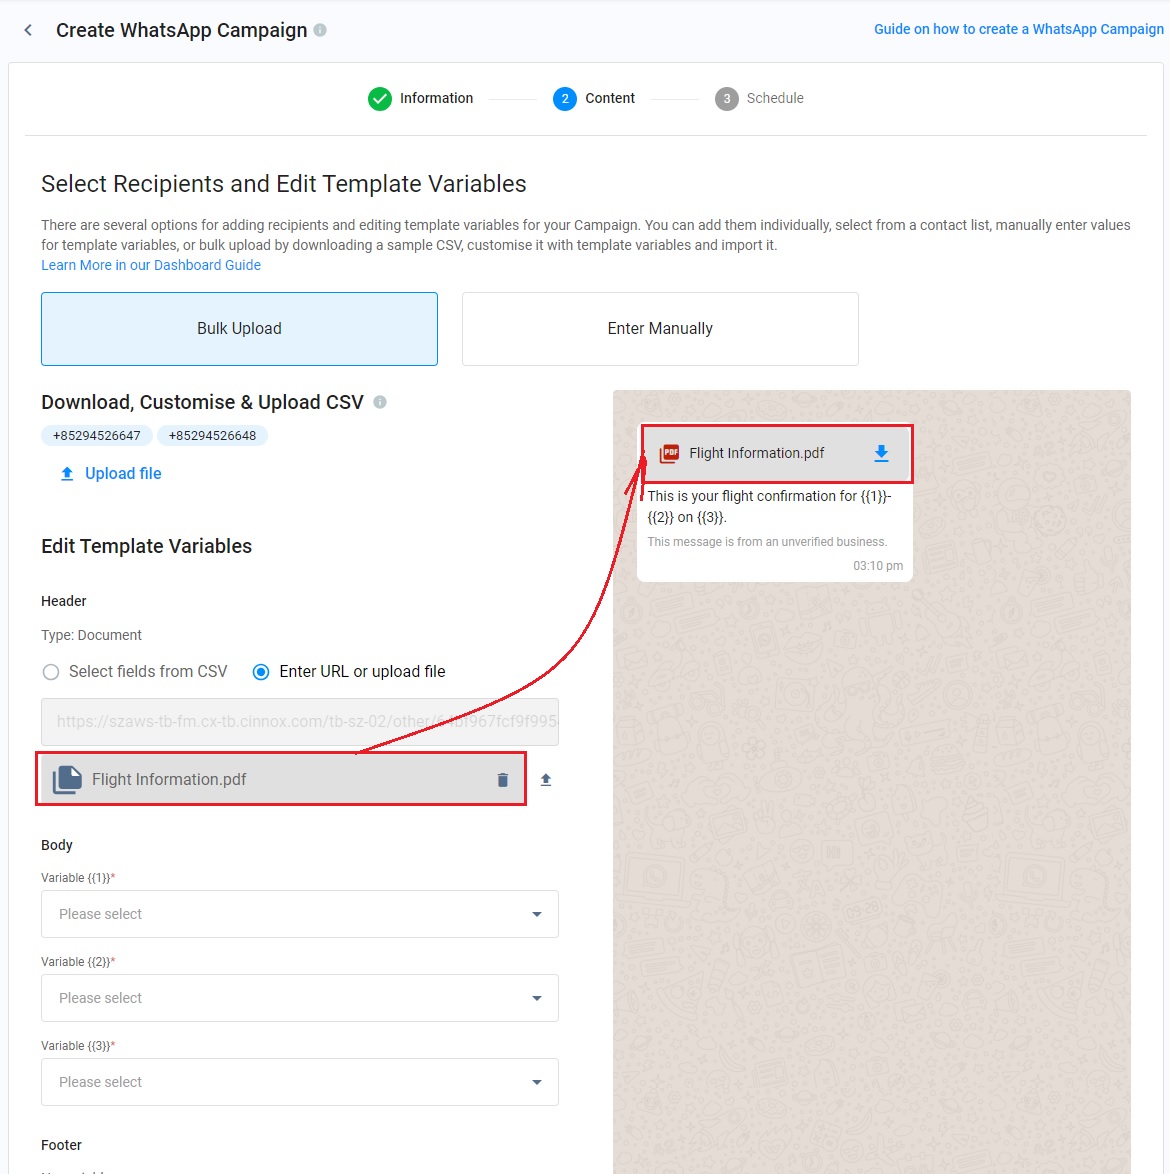
- Select your required column fields as the variable. The values of this selected column field will become the corresponding variable values.
👍
Directly selecting specific column fields with appropriate values from CSV files as variables in different WhatsApp templates means this can save the time spent manually inputting variable values each time. In addition, agents only need to maintain a small number of CSV files.
- Click Next.
After clicking Next, you will be redirected to the Schedule page. Refer to the Scheduling a Campaign to proceed with the next step.

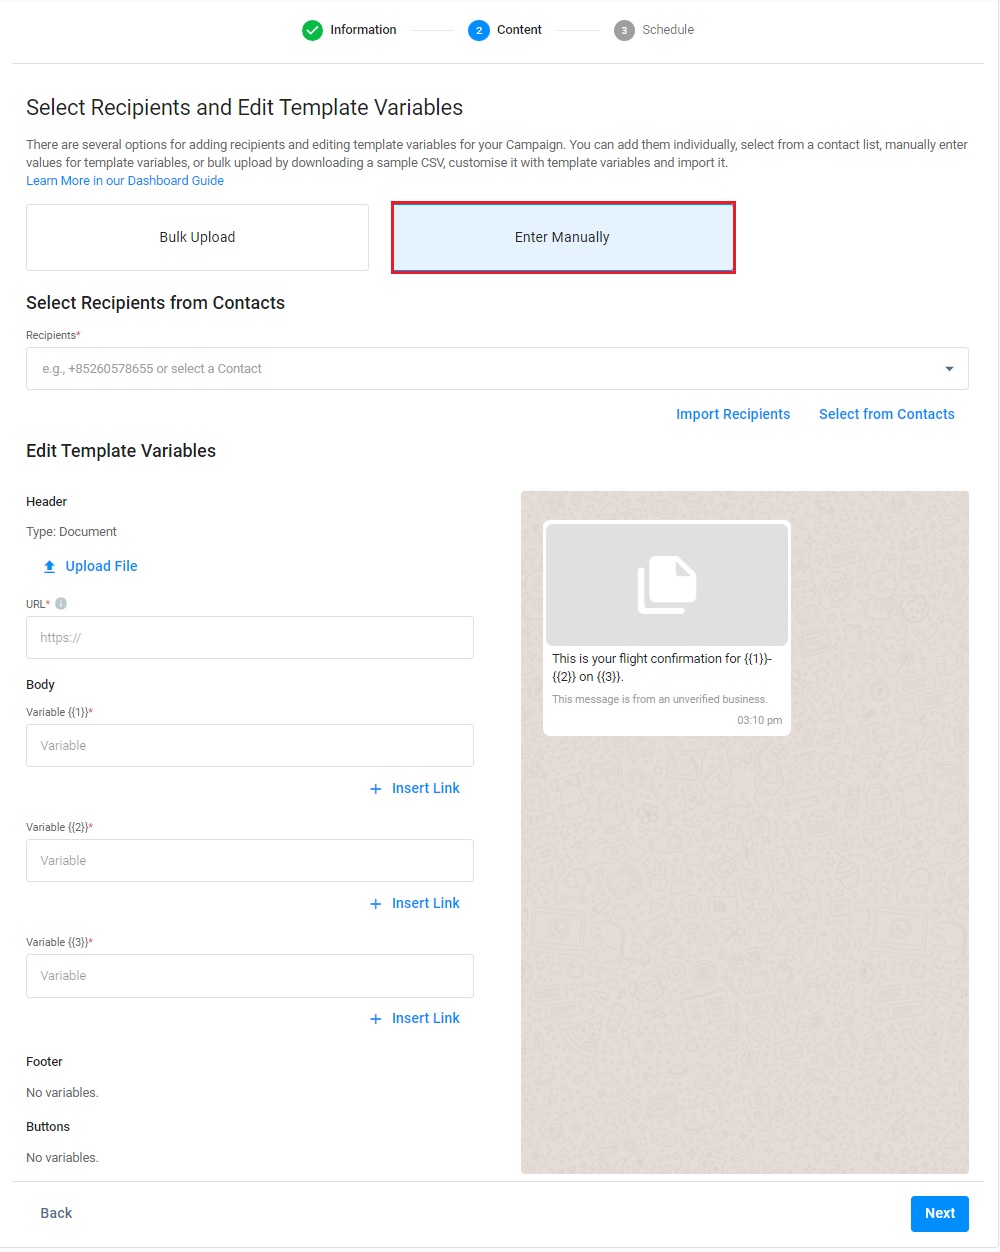
Option B: Manually Input All Variables
- On the Select Recipients and Edit Template Variables page, select Enter Manually.
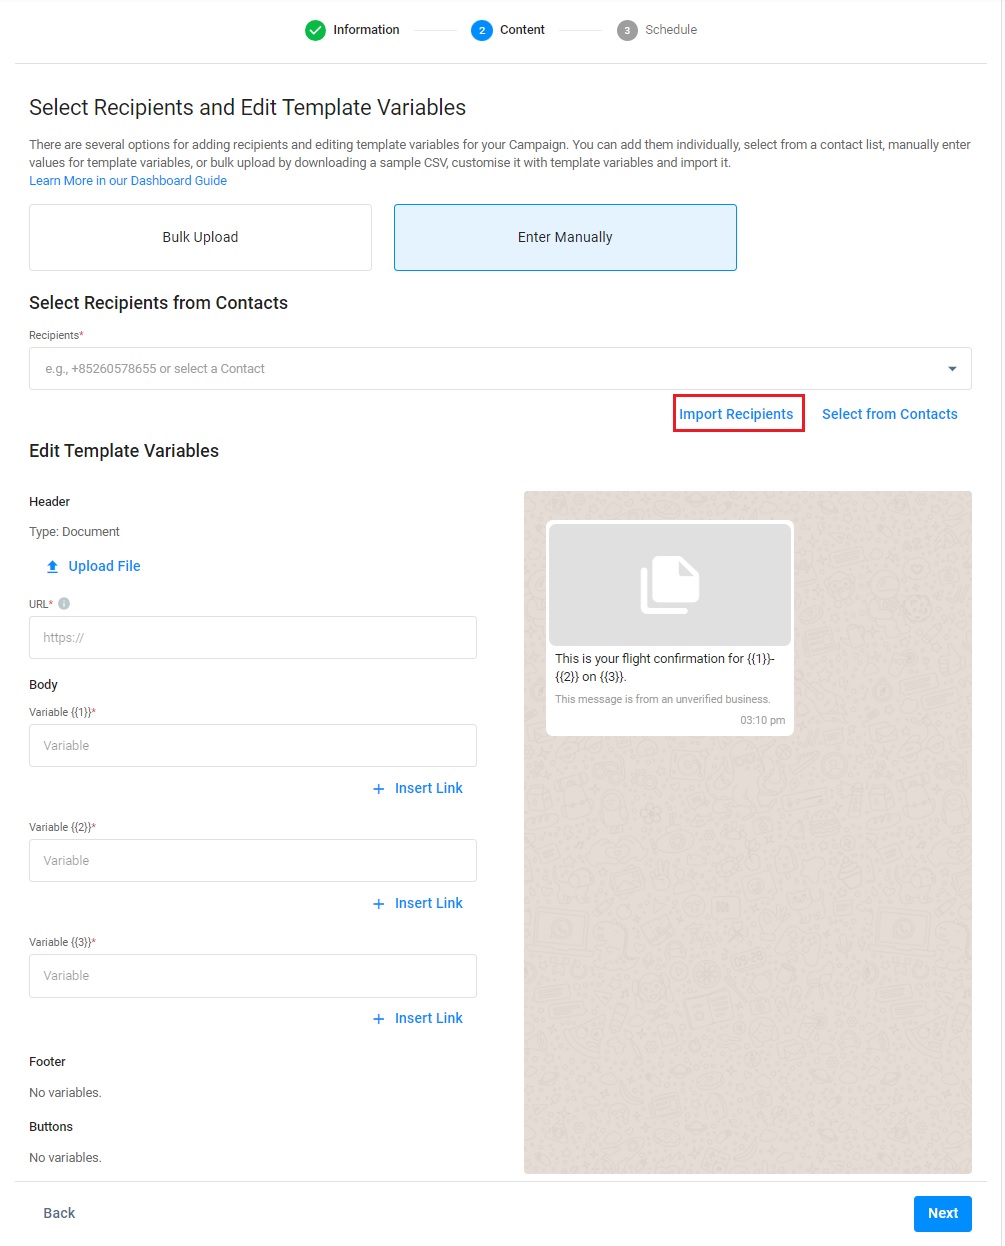
- You can select either Import Recipients or Select from Contacts to enter the recipients' numbers.
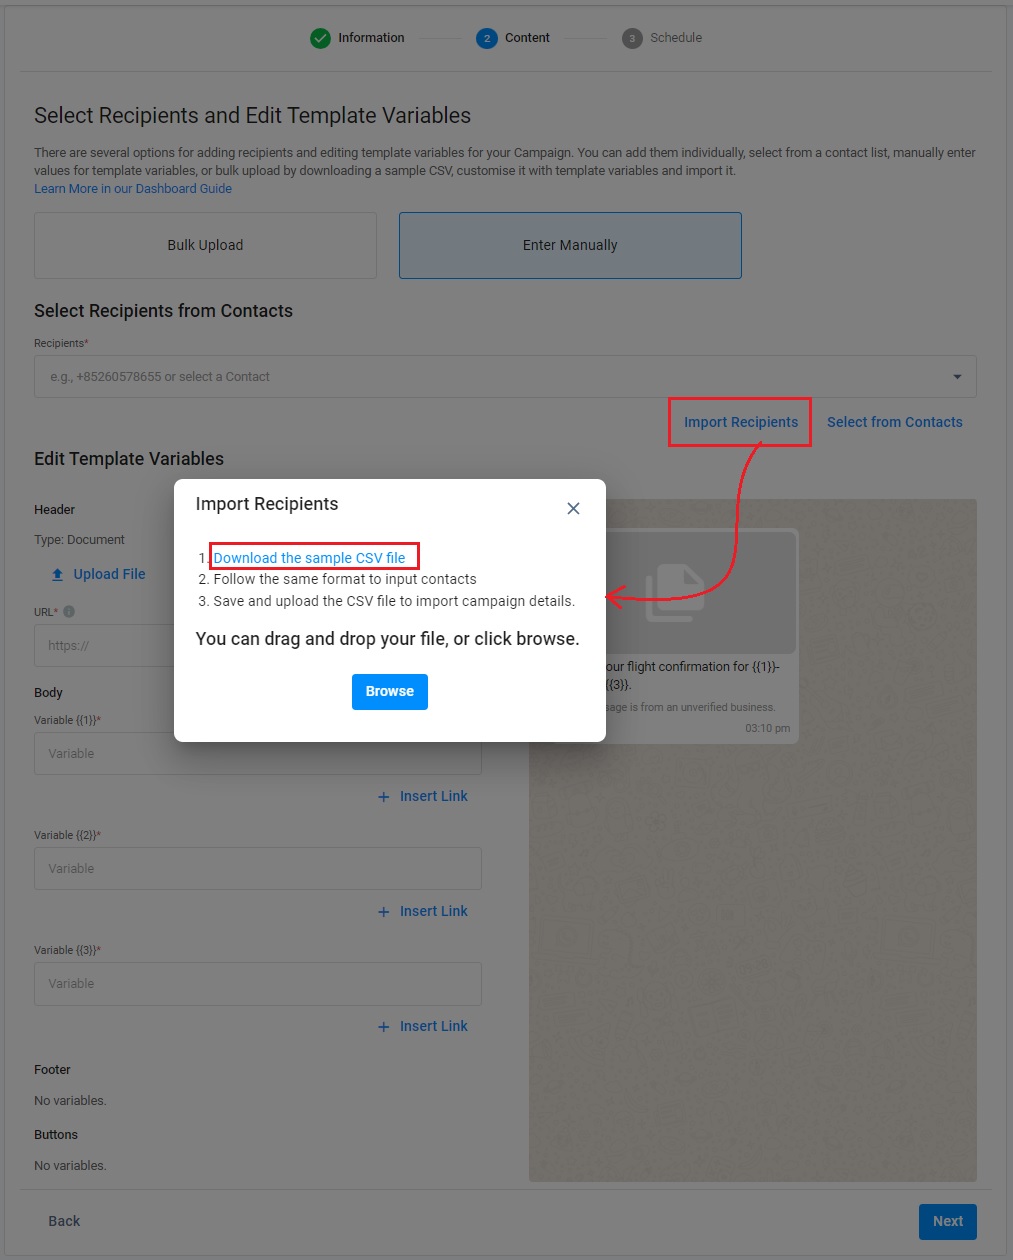
I. Import Bulk Recipient Contacts
- You can click Import Recipients to import multiple phone numbers.
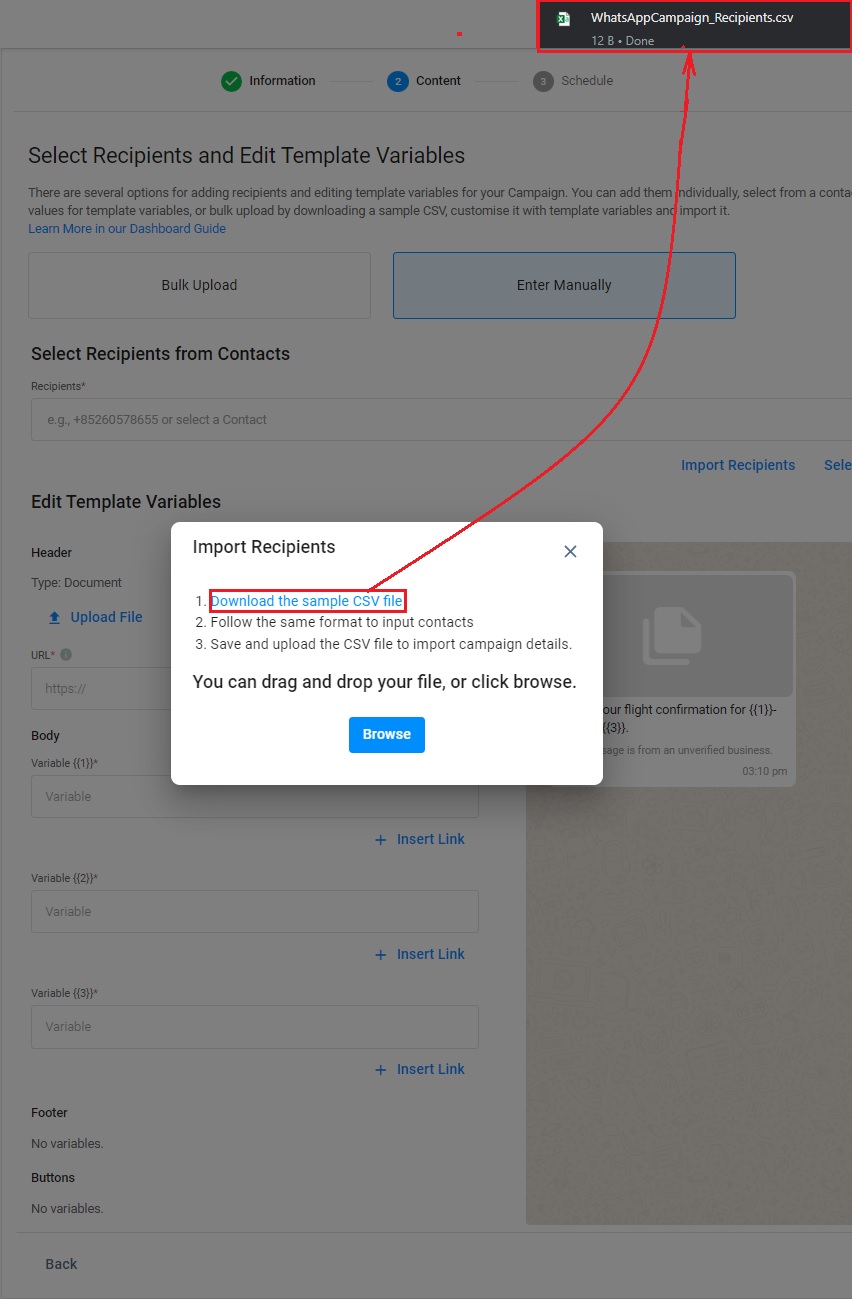
- On the Import Recipients pop-up window that will appear click Download the sample CSV file to download a spreadsheet template.
- Open the spreadsheet template containing the Recipient column. Please DO NOT change the column header name.
- In the Recipient column, add the phone numbers of your target recipients. Make sure it includes the country codes before the numbers.
| Recipient |
|---|
| +85294526641 |
| +85294526642 |
| +85294526643 |
| +85294526644 |
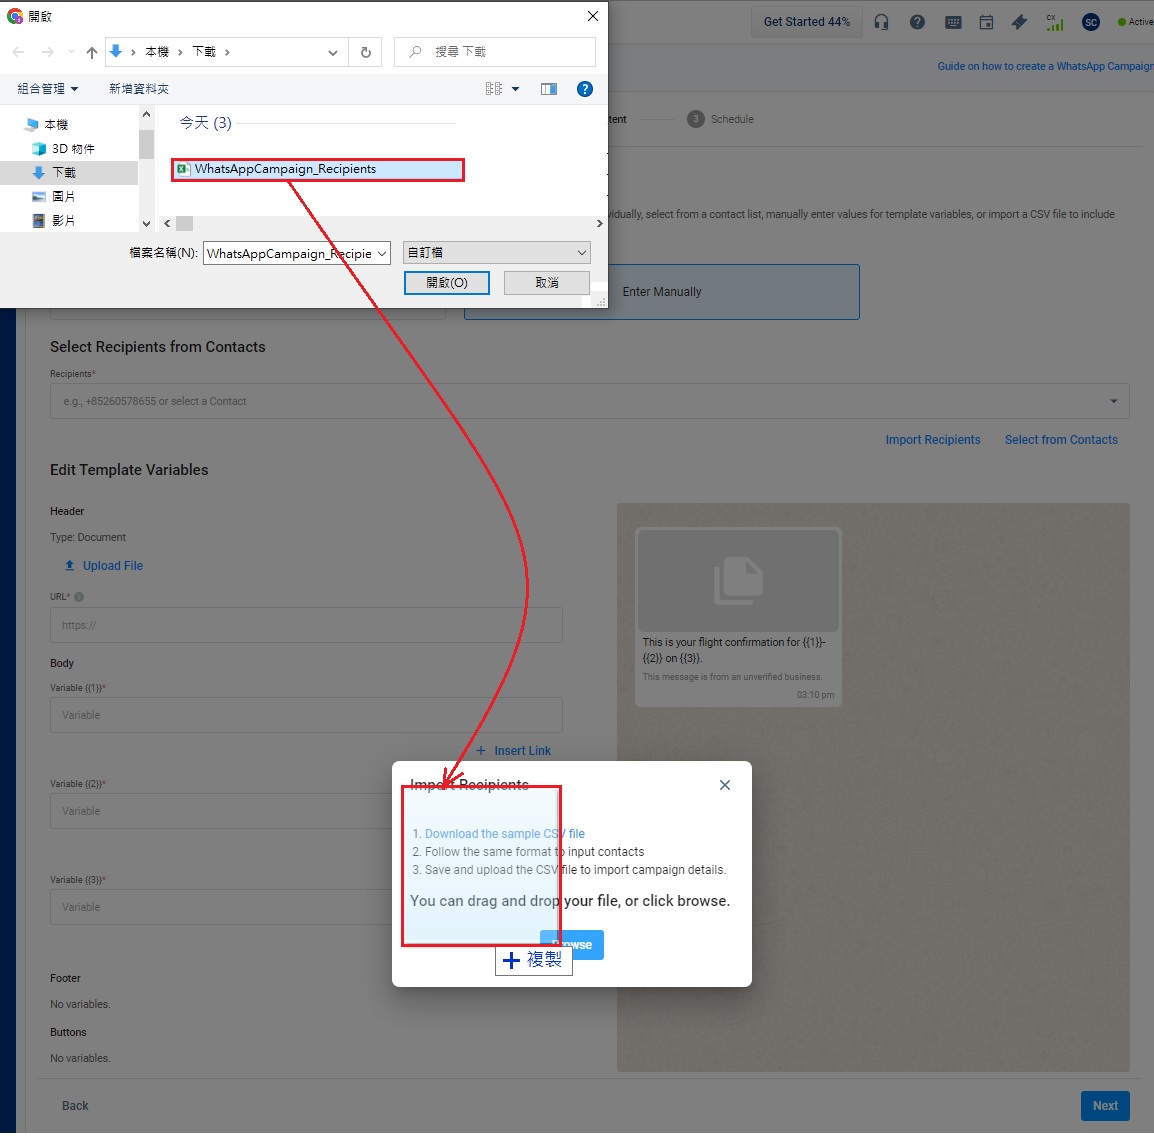
- Once the column is filled, please save the file and upload it to CINNOX by dragging and dropping it on the designated box in the pop-up window. CINNOX will then validate the uploaded file and create an error log if there are invalid records.
- You may also upload the file by clicking Browse and selecting it from its location.
- When some records fail to import, please refer to the subsection Handling Invalid Records in the Creating SMS Standard Campaign section.
- When the input text is split, please refer to the subsection How to handle the case of the splitting text in the CSV file.
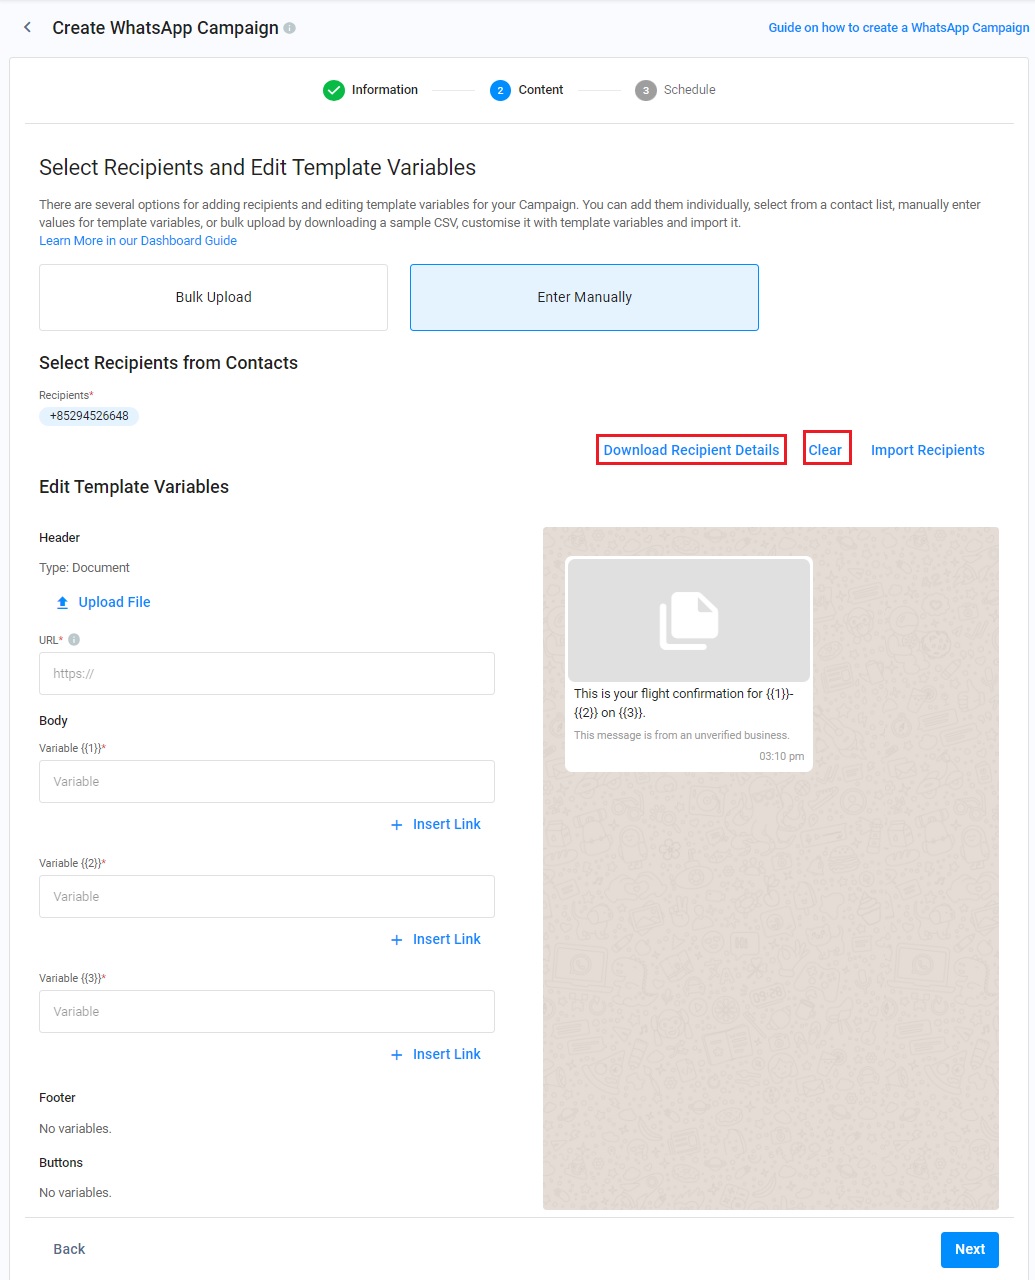
- You can click Download Recipient Details to download recipients' details for your record. Also, You can click Clear to delete all uploaded recipients' numbers.
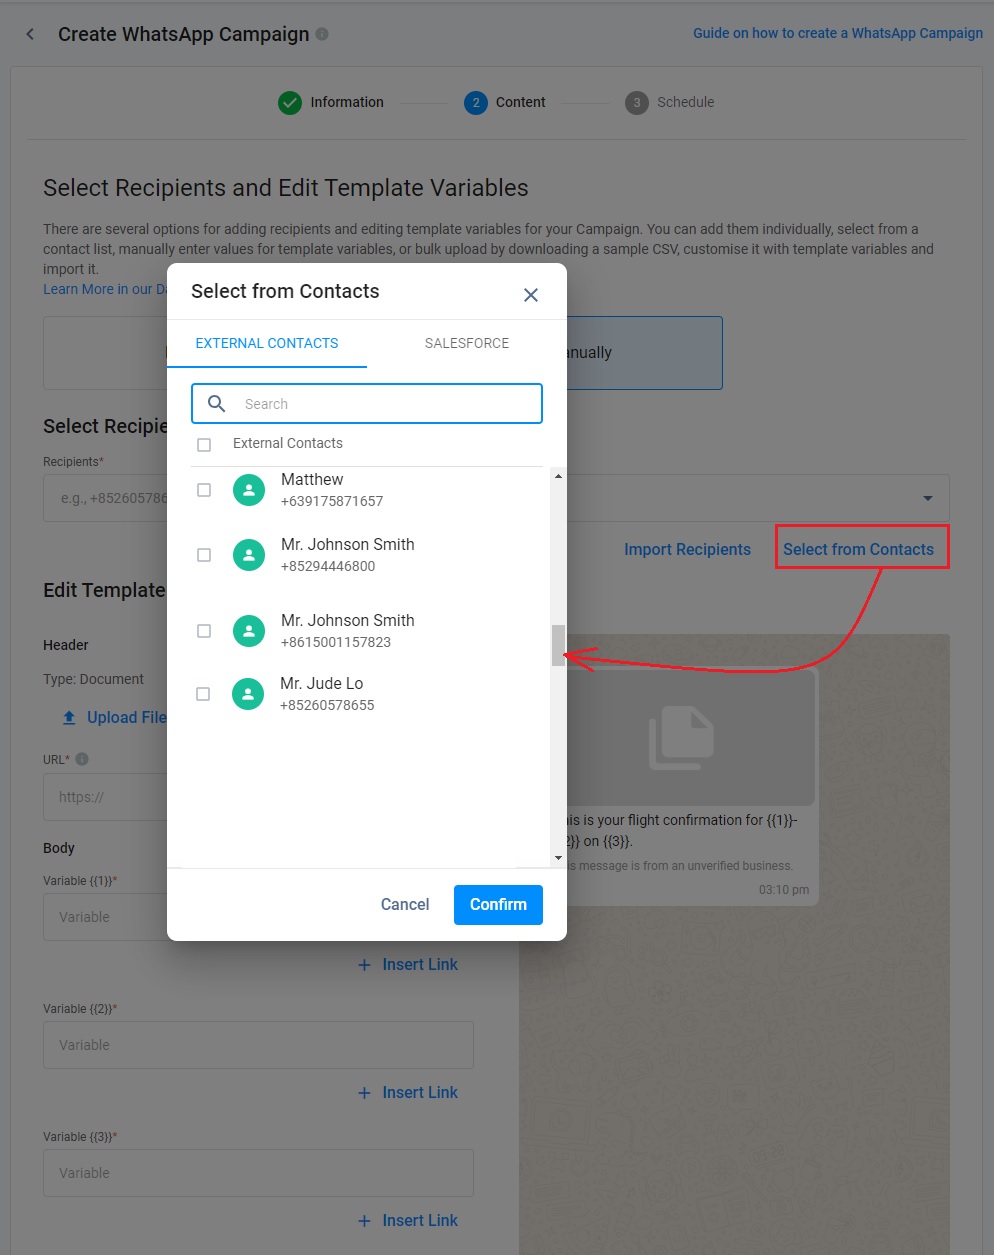
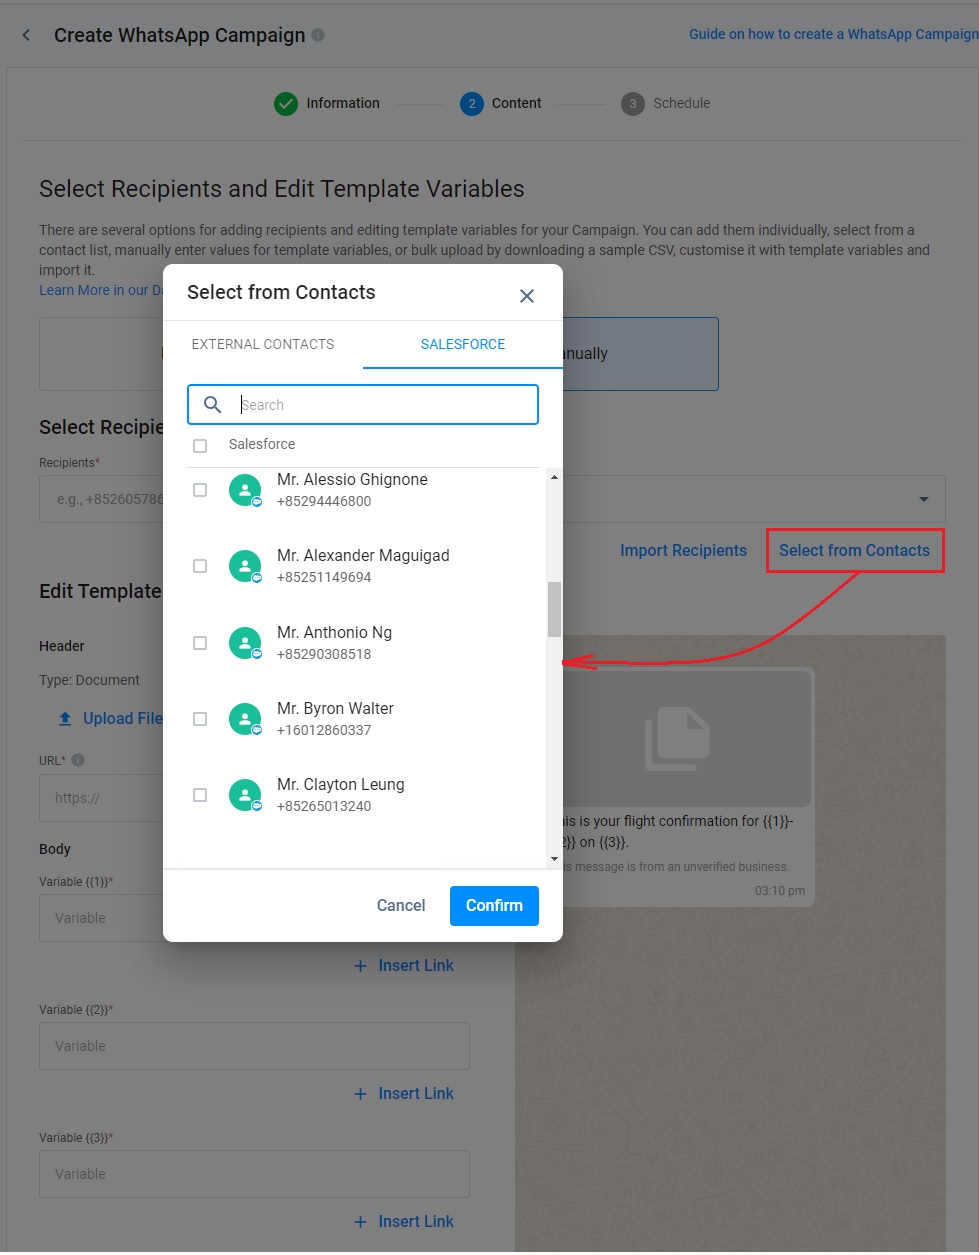
II. Select Recipients from Contacts
- You may also click Select from Contacts on the right corner of the page.
- Select a contact with a phone number from your Contact List that will pop up.
- Click Confirm.
👍
If your Salesforce Contacts are synced in your CINNOX Service, you can select from your Salesforce Contacts to send the WhatsApp Campaign.
The recipients' phone numbers are displayed on the page after successfully uploading the filled CSV file or selecting the recipients.
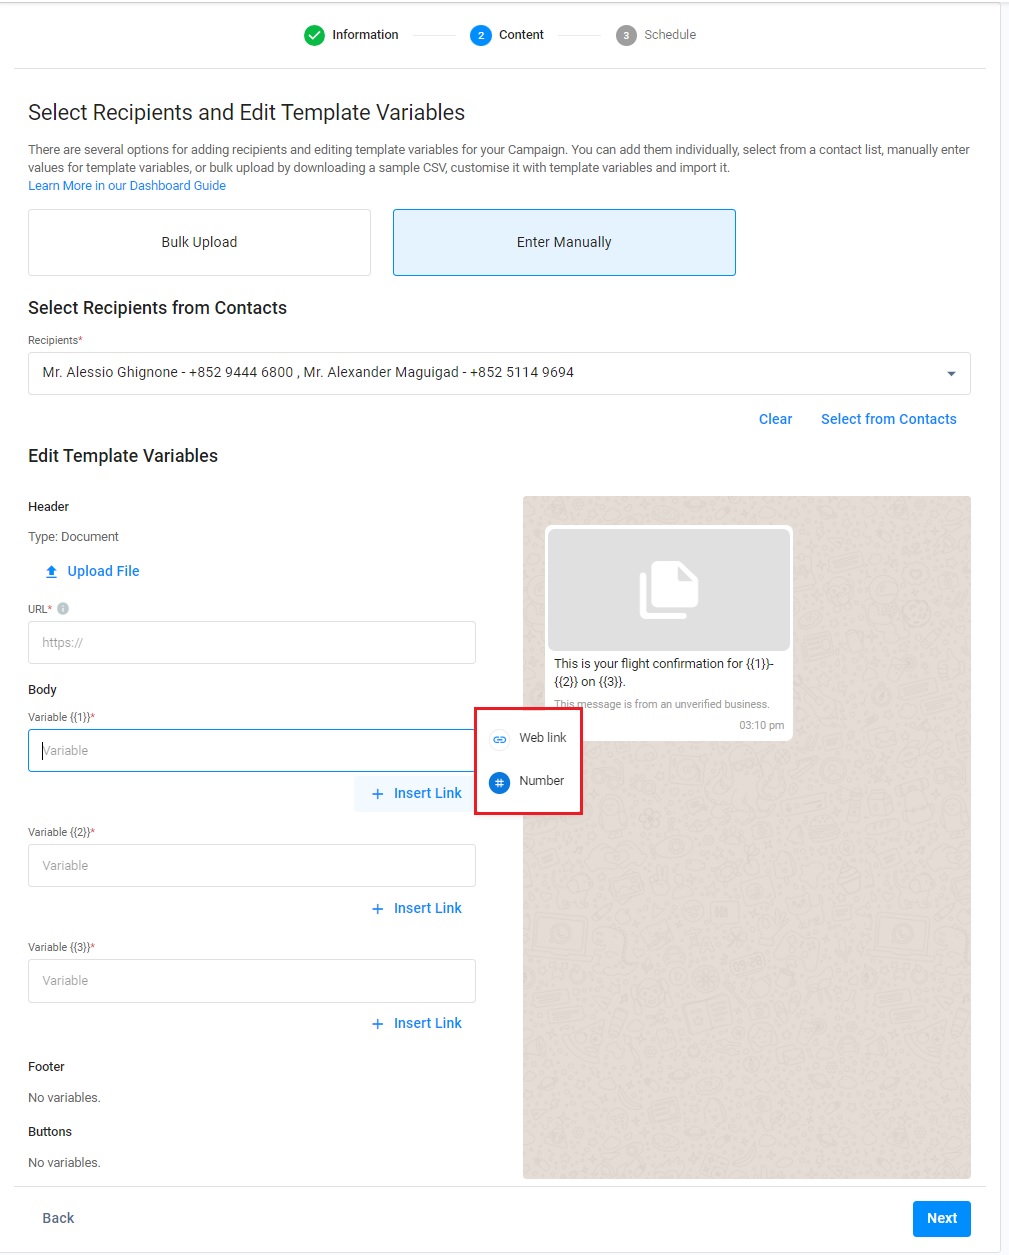
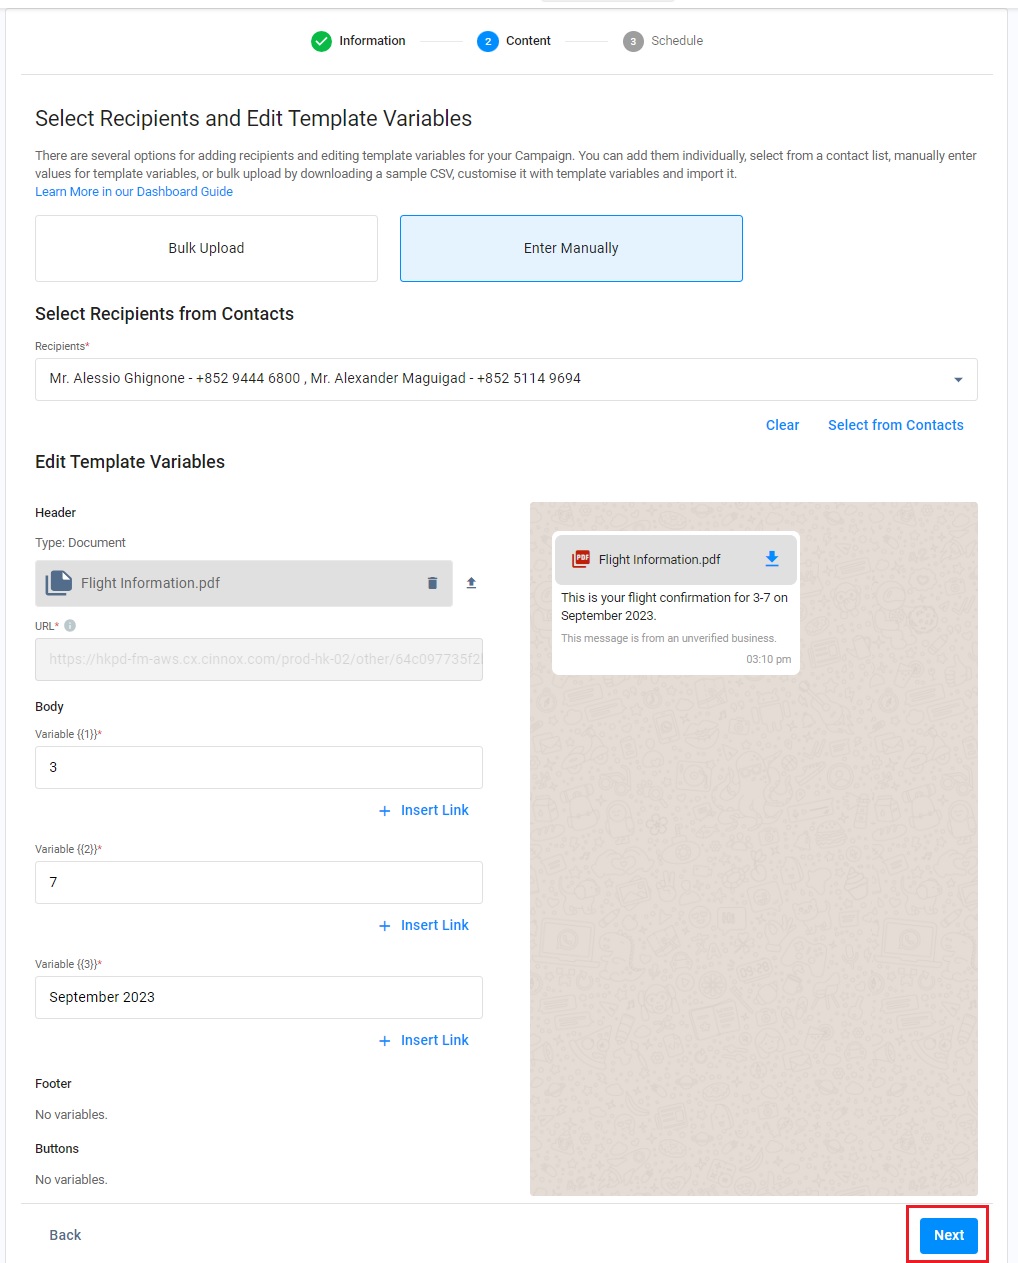
- In the Edit Template Variables section, you must fill up all variable fields under the Header, Body, Footer and Button sections, subject to your selected templates. Clicking +Insert Link, you can insert the Web link and the Number as the required variables.
- You can click Clear to delete the recipients if necessary.
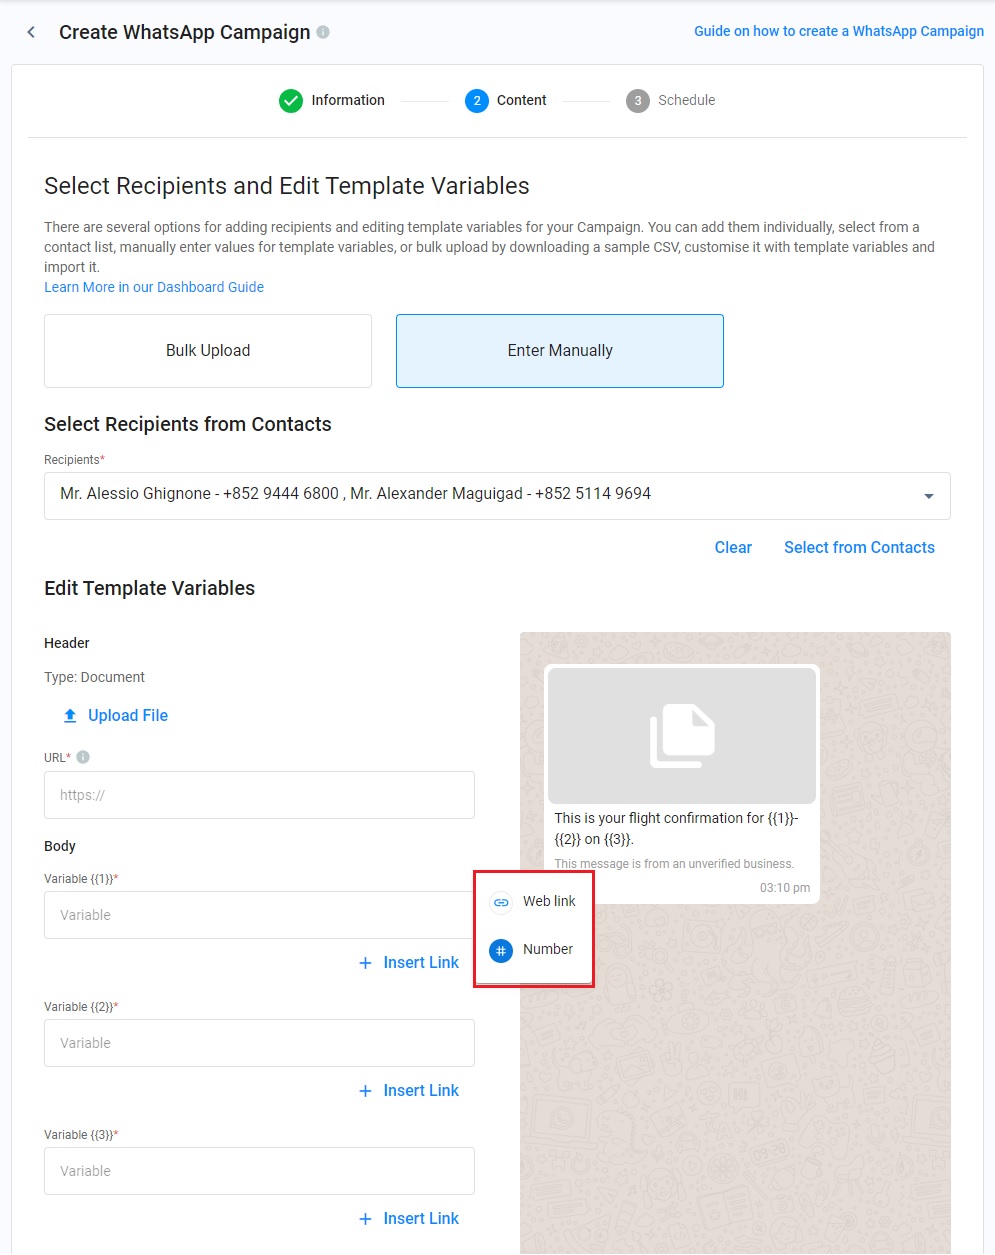
- If the selected template contains media type in the Header, please enter the media file URL into the field. Or you can click Upload File to upload the required file.
- The message preview is shown on the right-hand side of the screen.
- Click Next.
- After clicking Next, you will be redirected to the Schedule page. Refer to the Scheduling a Campaign to proceed with the next step.
✍️
- There is no limit to the number of variables set in message templates.
- Concurrently editing WhatsApp template variables on CINNOX and 360dialog may lead to discrepancies between the template content viewed by the agent and the visitor. In this case, the agent may observe the new template has been sent out via CINNOX, while the visitor may receive the older version.
Handling Split Text in the CSV File
Using a comma (,) to split the text is the function of the CSV file. When importing the CSV file with the comma between texts, the text will be split into the next column in the file after the file upload.
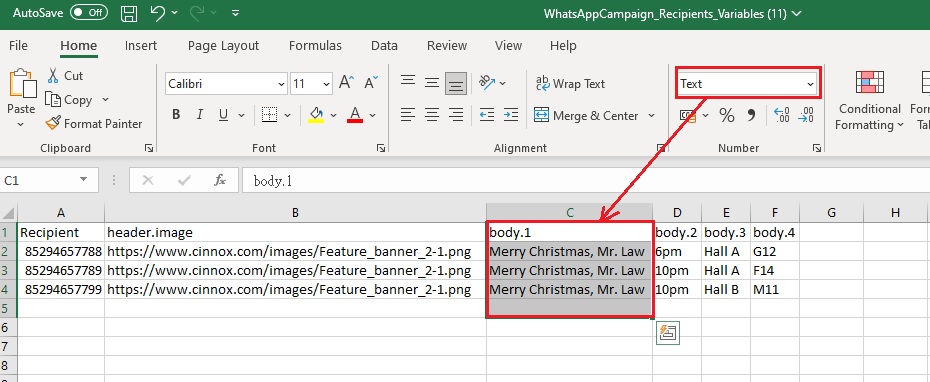
Splitting text in the CSV file
For example, when you enter Merry Christmas, Mr. Law into the column body.1, the file is shown below:

After the file upload, the text is shown below:

As the text Merry Christmas, Mr. Law contains a comma in the body.1. After the filled CSV file is uploaded, the text is split into two columns, Merry Christmas in the body.1 and Mr. Law in the body.2.
How to avoid splitting text
Using a Text Editor
- Put the text with a comma in the double quote (""), like "Merry Christmas, Mr.Law", and save it as a CSV file when you upload the file.
Using Excel or style sheet editors
- Fill in the text in the text format.
- Save the sheet as a CSV file and upload it to the CINNOX.
- The double quote should be added automatically to the file.

Scheduling a Campaign
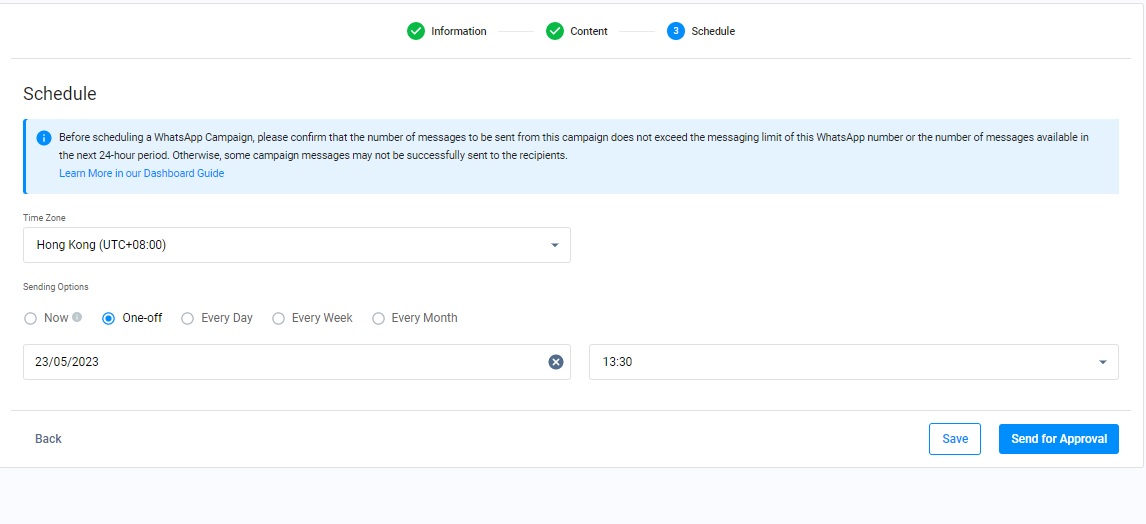
- Click the drop-down menu and select the Timezone, which is preset to UTC+08:00.
- Select the Sending Options:
- One-off
- Every Day
- Every Week
- Every Month
- Set the date the Campaign will be sent, which is preset to the current date.
- Set the time the Campaign will be sent, which is preset to the nearest 30 minutes of the current time.
- Click Send for Approval for the approver to approve your created Campaign.
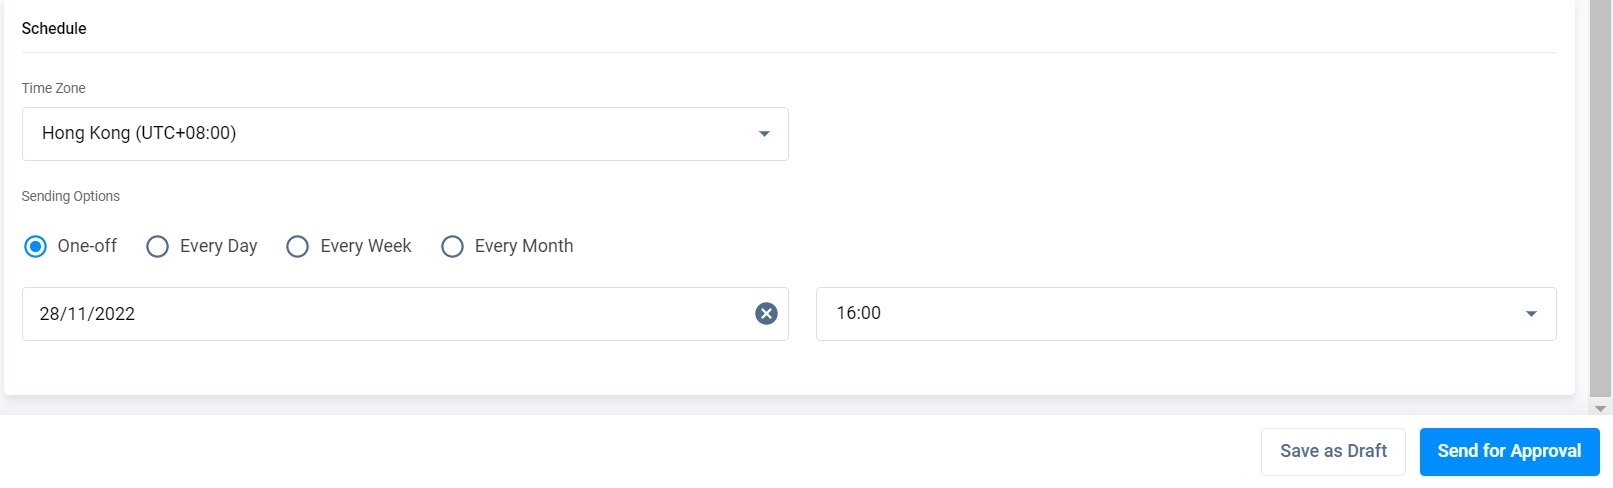
- You can also click Save as Draft to save the Campaign you are creating as a draft campaign. Thus, this Campaign will be moved to the Draft Campaign list.

Sending a Campaign for Approval
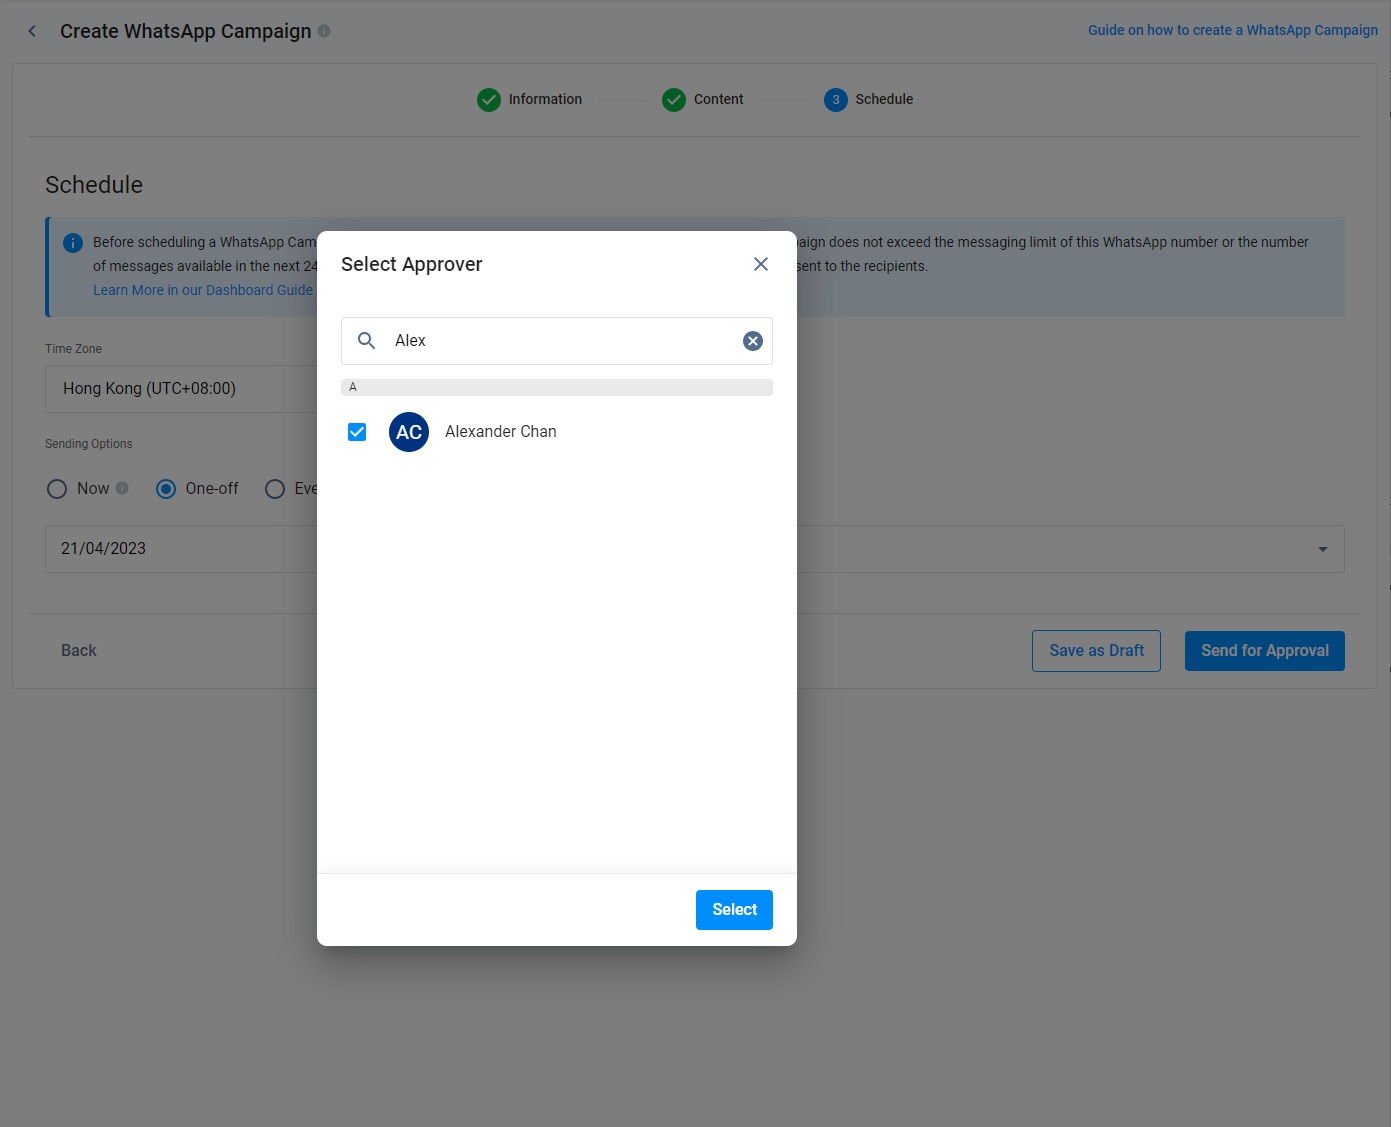
- After your schedule setting and clicking Send for Approval, on the Select Approver pop-up window that will appear, select the staff member required to approve your Campaign.
- Click Select. A CINNOXBot message and an email will be sent to the selected approver, alerting them about the Campaign pending approval.
👍
- If the campaign creator is also the assigned approver, CINNOX will automatically approve the campaigns they create.
- The Administrator, Supervisor, or any custom role with the approval permission can be assigned to approve the campaigns to send out.
After finishing all steps for creating an SMS or WhatsApp Campaign, the Campaign is successfully submitted and displayed on the Submitted Campaign page.