Get a Woztell Account and Create Channels
Ready to take your WOZTELL integration to the next level?
Follow the seamless process of signing up and obtaining an access token, unlocking a world of possibilities. Dive into the comprehensive step-by-step cases tailored to guide you through creating WOZTELL channels for WhatsApp Cloud, Facebook, and Instagram. Fuel your communication strategy and enhance your reach with CINNOX.
PART I - Get a WOZTELL channel account
Step 1 - Sign up for a WOZTELL account
Click Sign Up to register for a WOZTELL account.
You will need to:
- Enter your email address
- Enter your Password
- Enter the password again to Confirm Your Password
- Click on Create Your Account
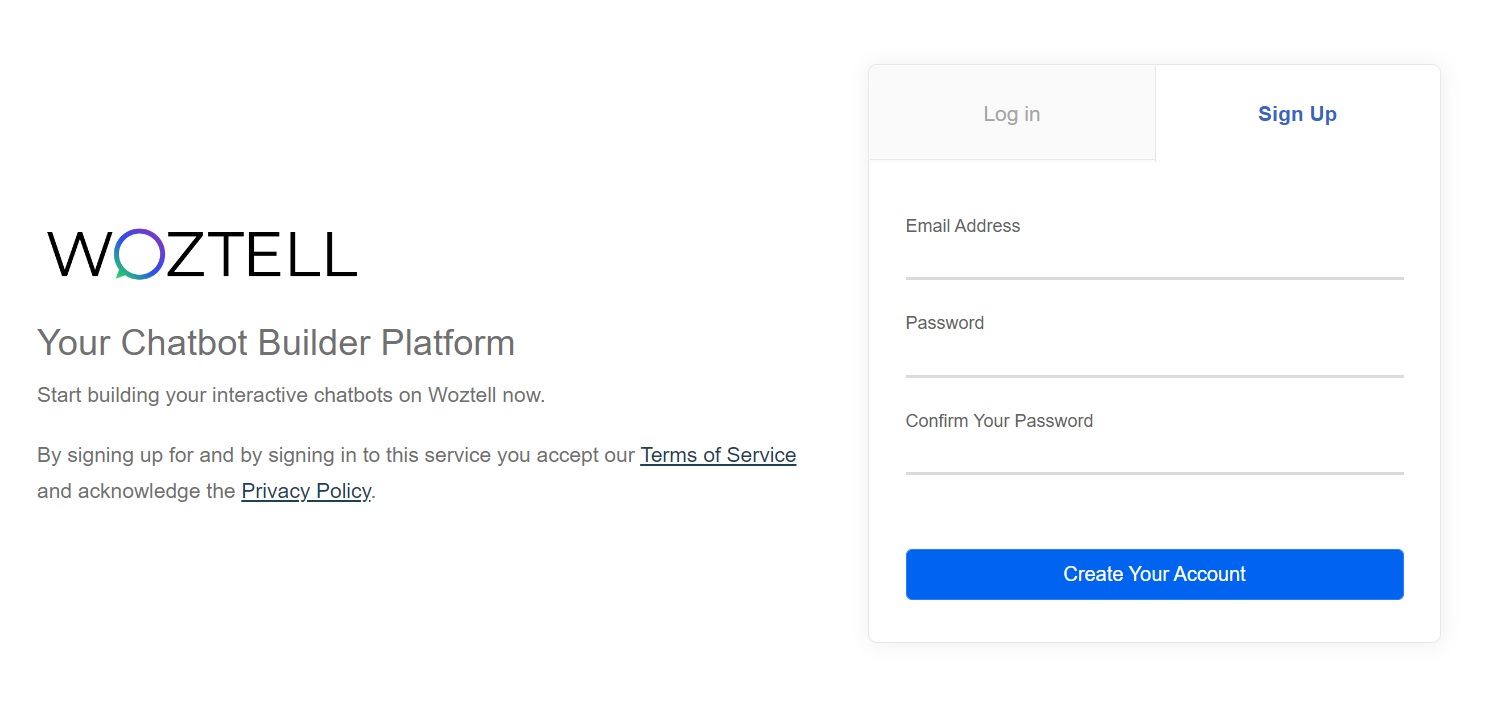
Sign up for the WOZTELL channel account
- After you sign up for the account, you will receive a notification to your registered email address. Click on Verify Now or the link to proceed with the account verification.
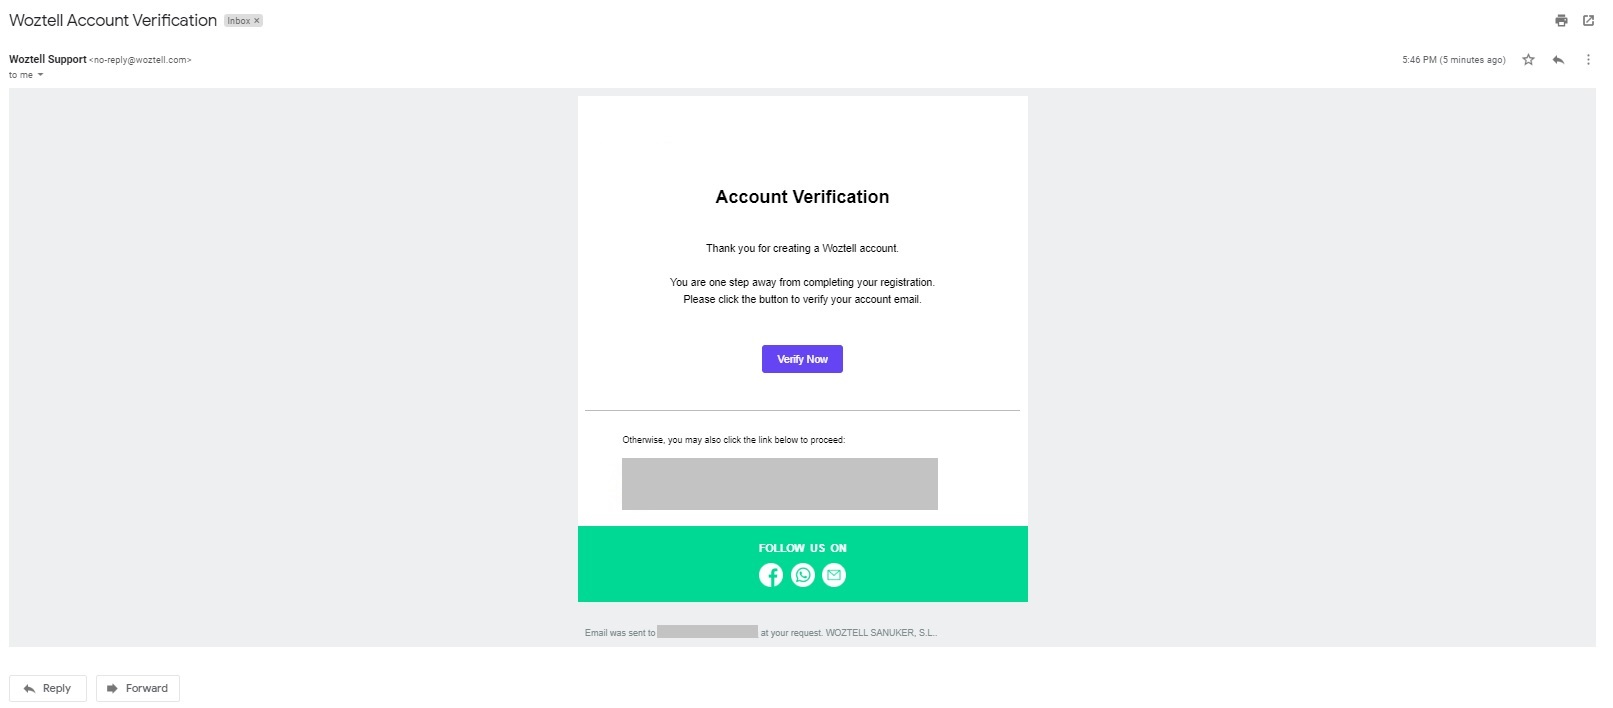
Account verification page from your registered email address
- Log in to the account to verify your WOZTELL account.
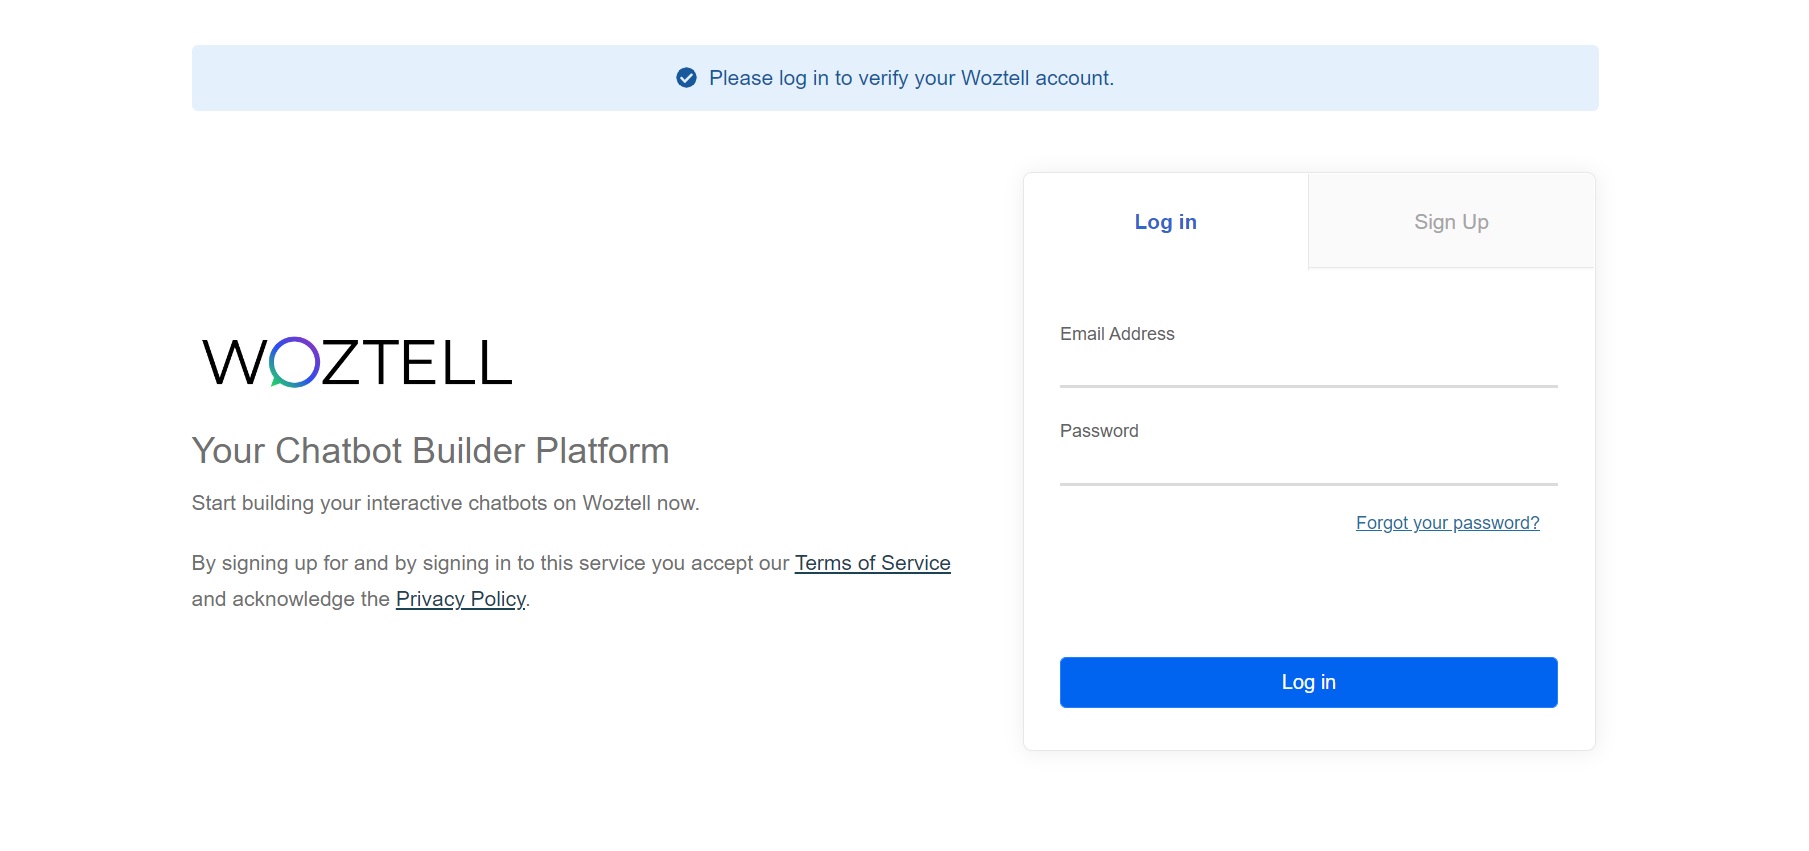
Login page for account verification
- The dashboard is the first page to reach after you log in to the account.
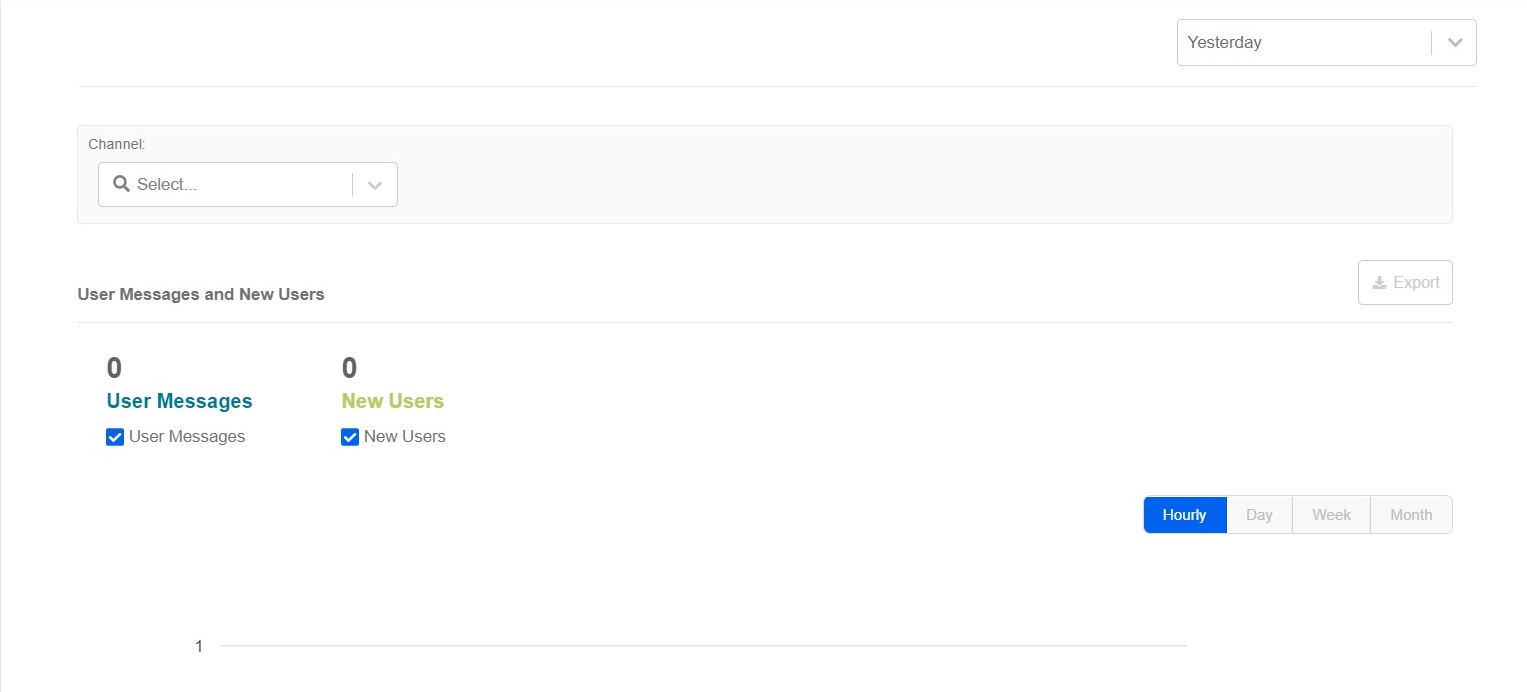
Dashboard page of WOZTELL
Step 2 - Generate the Access Token
- After successfully signing up and logging in to the account, navigate to Settings in the navigation menu.
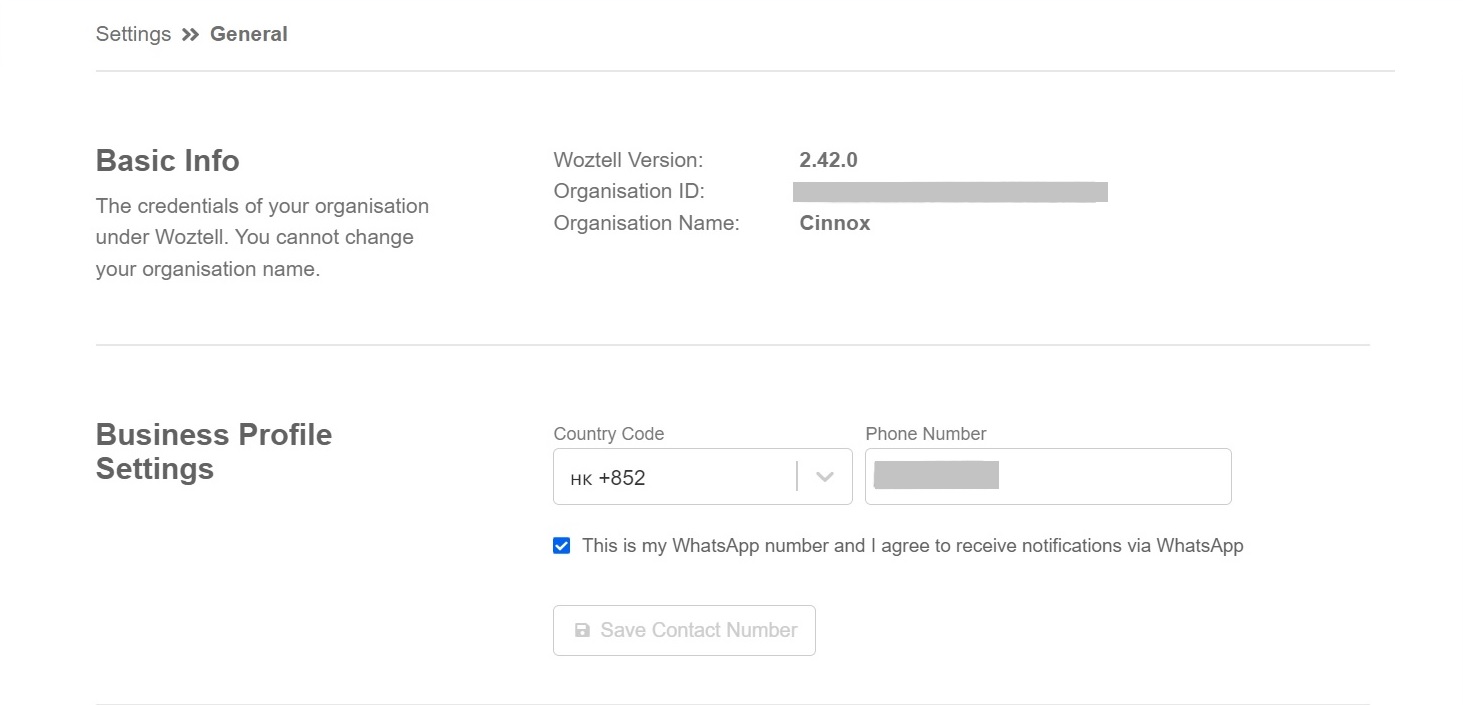
WOZTELL Settings
- Navigate to Settings and Access Tokens in the navigation menu.
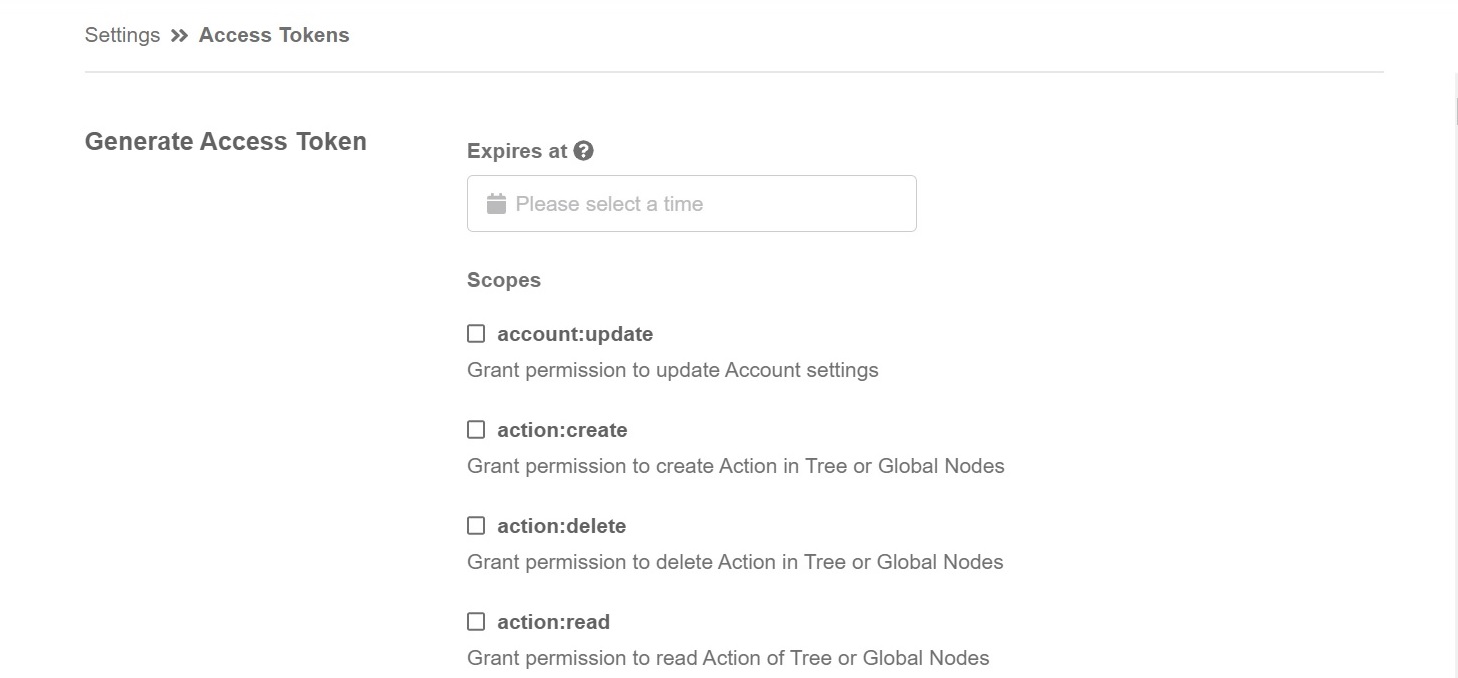
Access Token page
- Choose the expiration date and time.
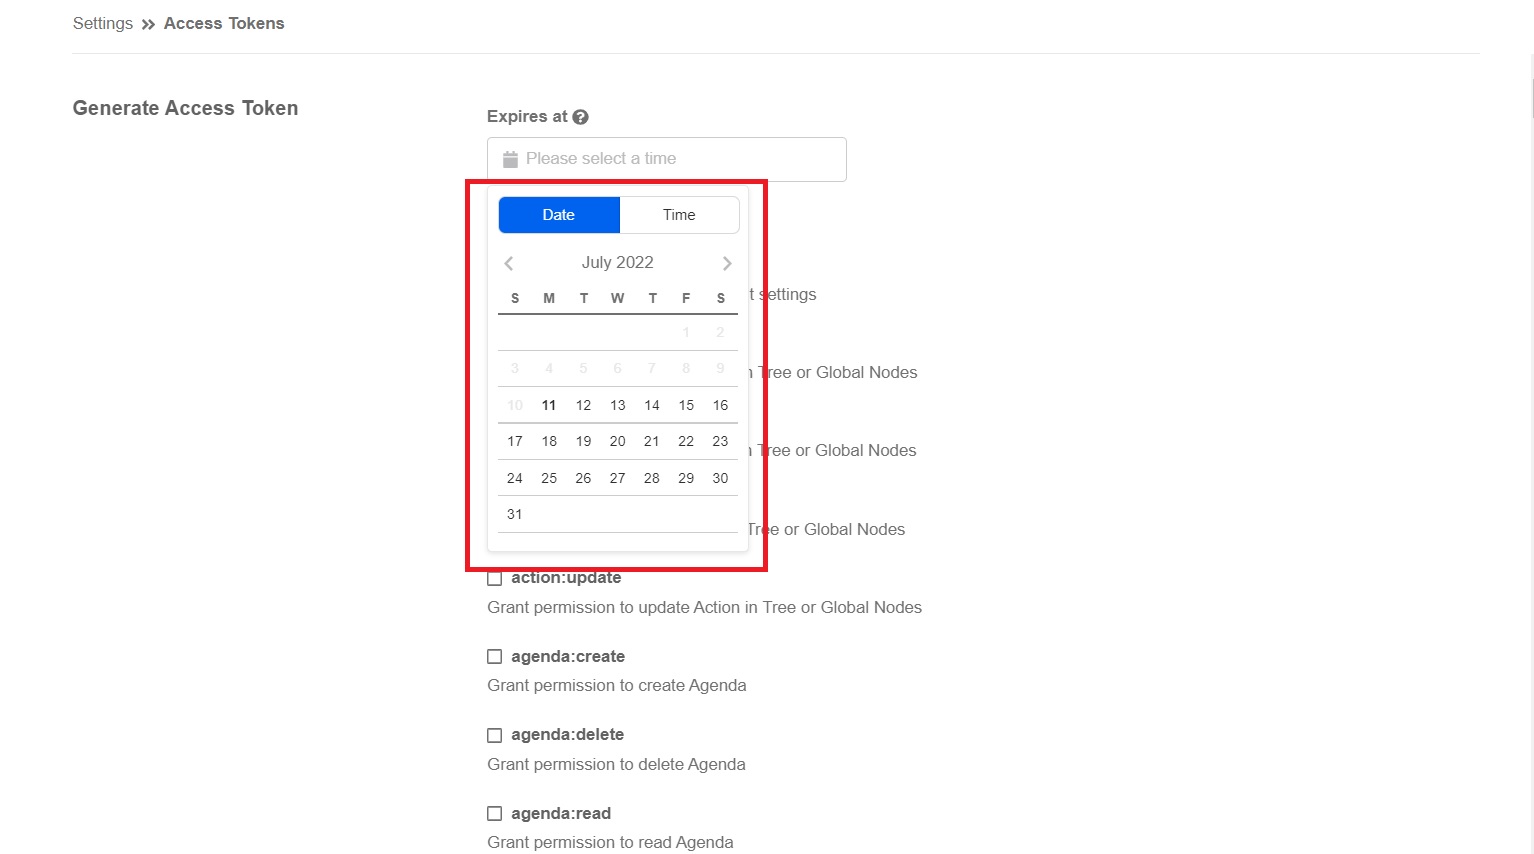
Select the expiration date and time
📘
You can skip the expiration date and time if you want to generate the long-lived access token.
- Select the required scopes and permissions.
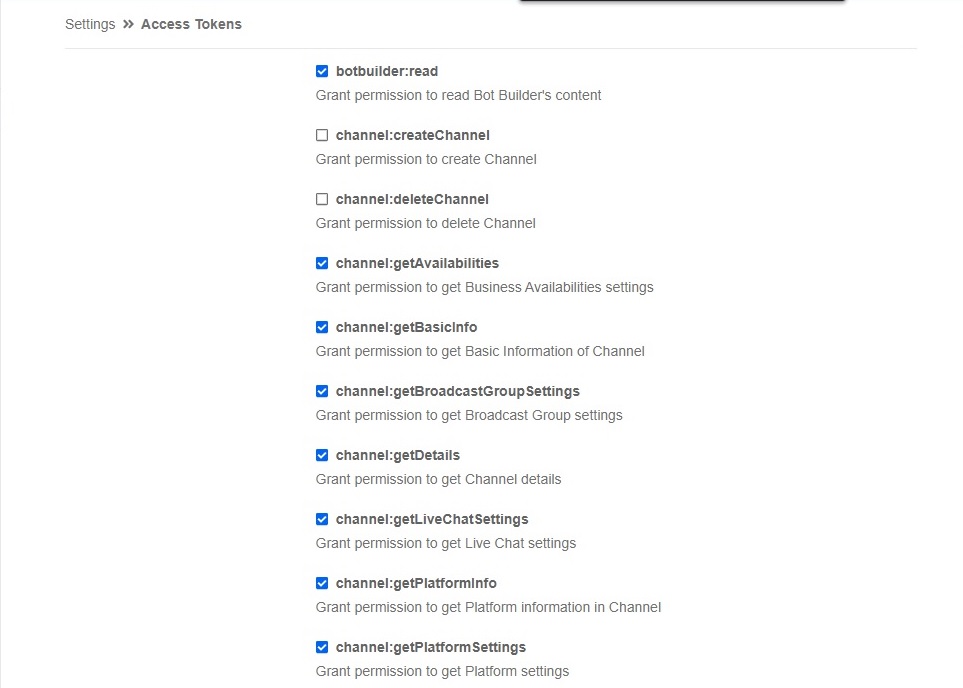
Scopes and permission selection page
📘
Important Note about Account Access Token
Account Access Token is generated based on the scopes and permissions you choose. To avoid scopes of required actions not being executed and required permissions not being granted in the WOZTELL channel, be mindful of the selection before generating the access token.
The scopes and permission to be chosen for access token generation are suggested below:
- appIntegration:update
- bot:sendResponses
- bot:redirectMemberToNode
- channel:updateTreeSettings
- channel:updateBasicInfo
- channel:updateAvailabilities
- channel:updateDetail
- channel:updatePlatformInfo
- channel:getAvailabilities
- channel:getBasicInfo
- channel:getBroadcastGroupSettings
- channel:getEnvironmentInfo
- channel:getLiveChatSettings
- channel:getPlatformInfo
- channel:getPlatformSettings
- channel:getTreeSettings
- channel:getDetails
- tree:getBasicInfo
- tree:getNodes
- botbuilder:read
- file:get
- mediaLibrary:get
- Select Short Token (v2) and Click Generate.
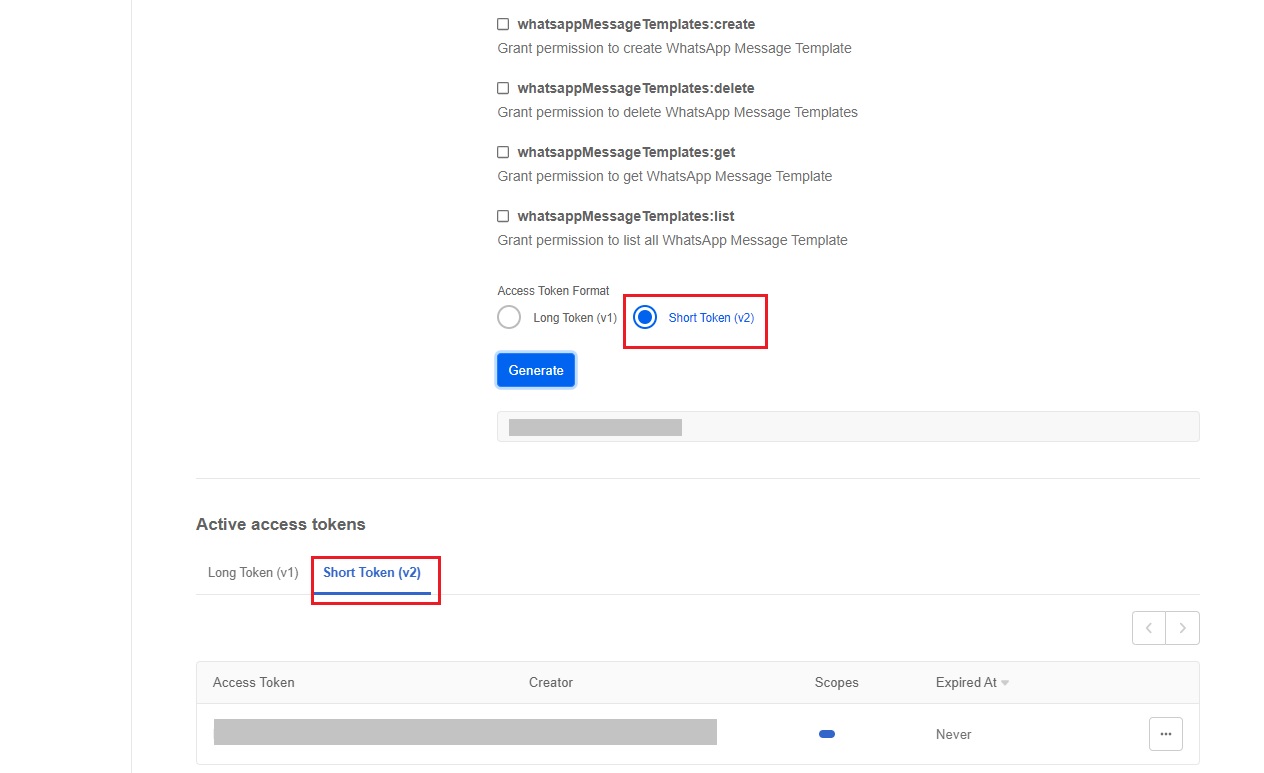
Access token generation page
- The required access token is generated.

The generated access token
📘
Important Note
- In addition to the new Account Access Token generation, you can use the existing Active access token with the required scopes and permissions.
- You can click on the horizontal ellipsis (...) and Revoke to delete the Active access token.
- Please use the Short Token (2) instead of the Long Token (v1) as the Long Token (v1) format of the Account Access Token may be unavailable to use at the end of 2022. For the actual time of its unavailability, please contact WOZTELL.
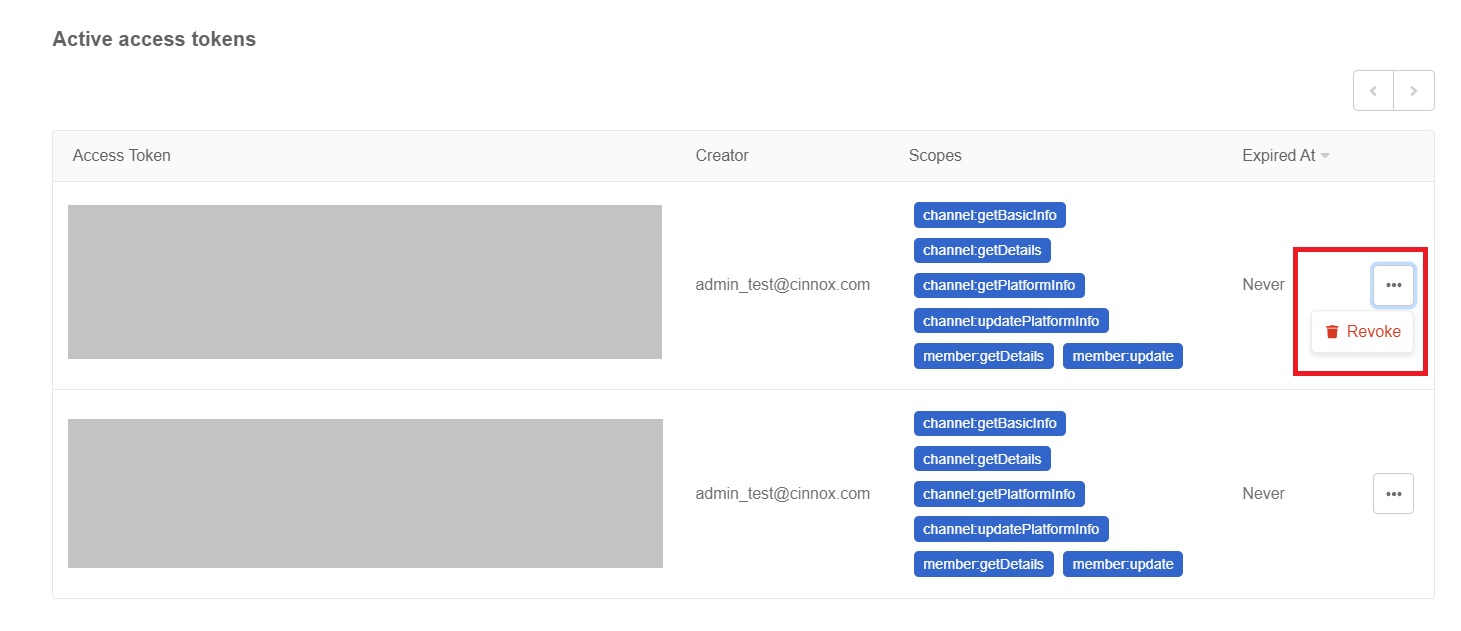
Active access tokens
Step 3 - Create WOZTELL channels
WOZTELL allows you to create channels where you can deploy chatbots.
- Navigate to Channels in the navigation menu and click on +New Channel.
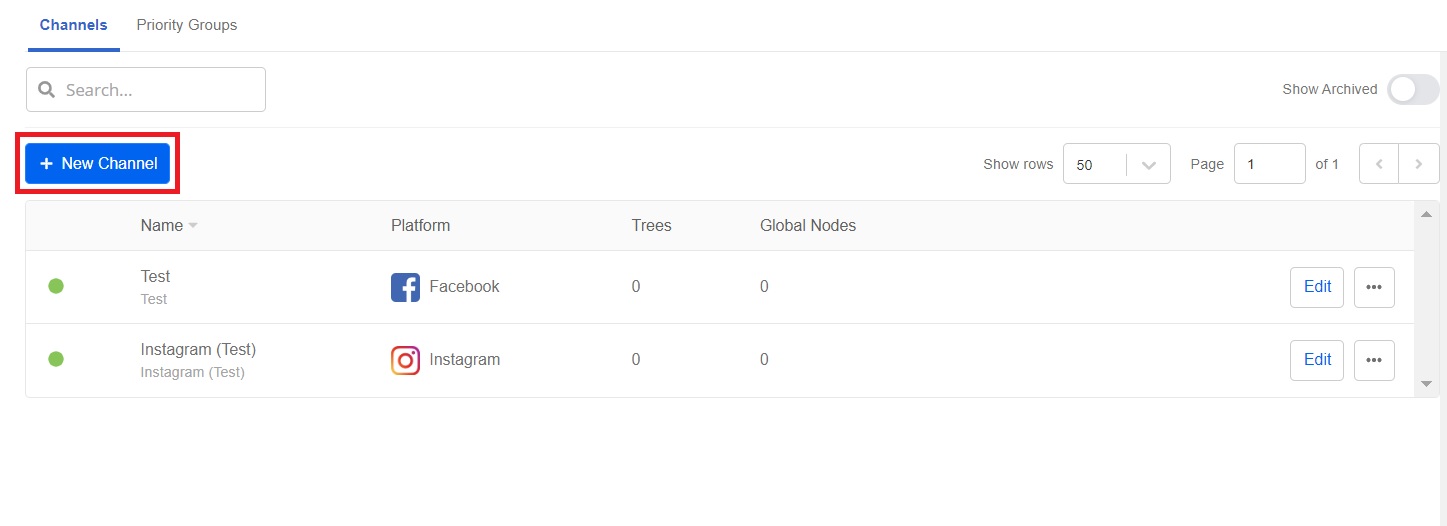
Select channels
- After clicking on +New Channel, you can create three required channels, Facebook, WhatsApp Cloud, and Instagram, for the WOZTELL channel according to your needs.
Refer to the following cases for step-by-step channel creation.
- Case 1: Create WOZTELL Channel for WhatsApp Cloud
- Case 2: Create WOZTELL channel for Facebook
- Case 3: Create a WOZTELL channel for Instagram
📘
For more detailed information about channel creation, please refer to https://doc.woztell.com/
Case 1: Create a WOZTELL channel for WhatsApp Cloud
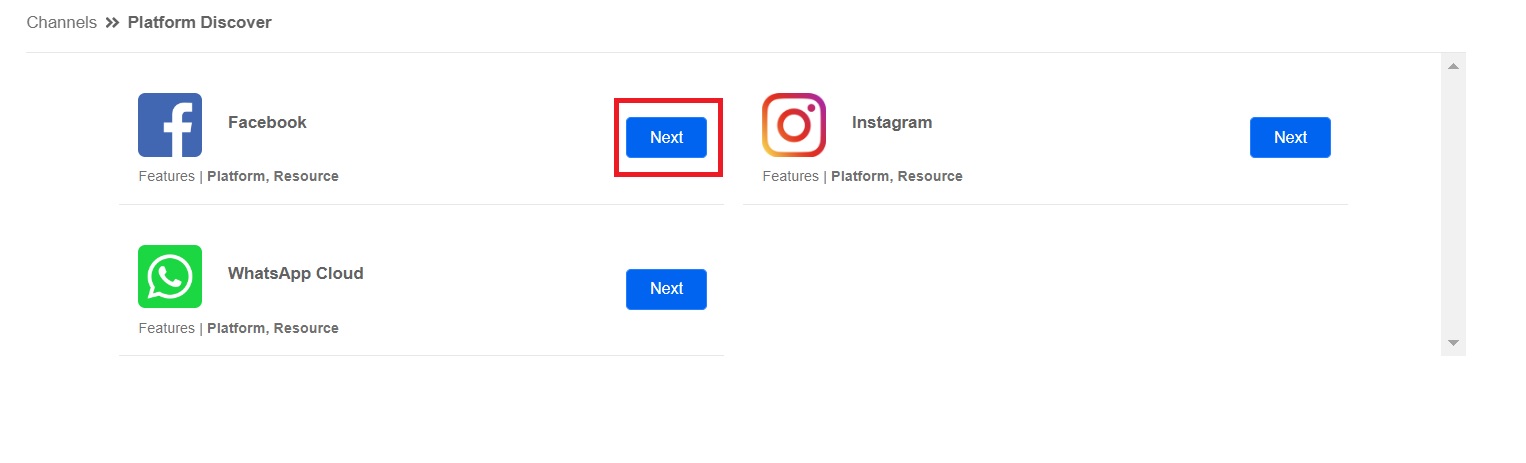
- Click on Next for the WhatsApp Cloud you require to create.
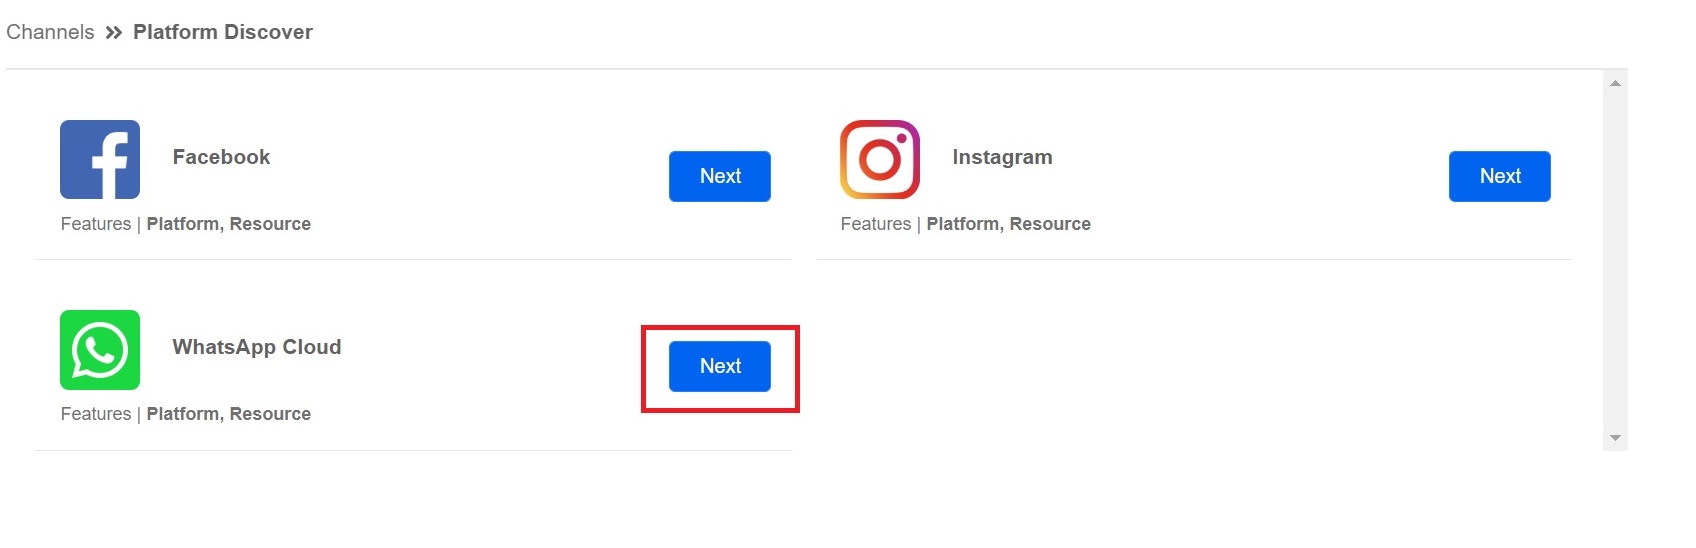
Platform Discover page for the channel creation
- From the drop-down list, choose the required version and click on Create Channel.
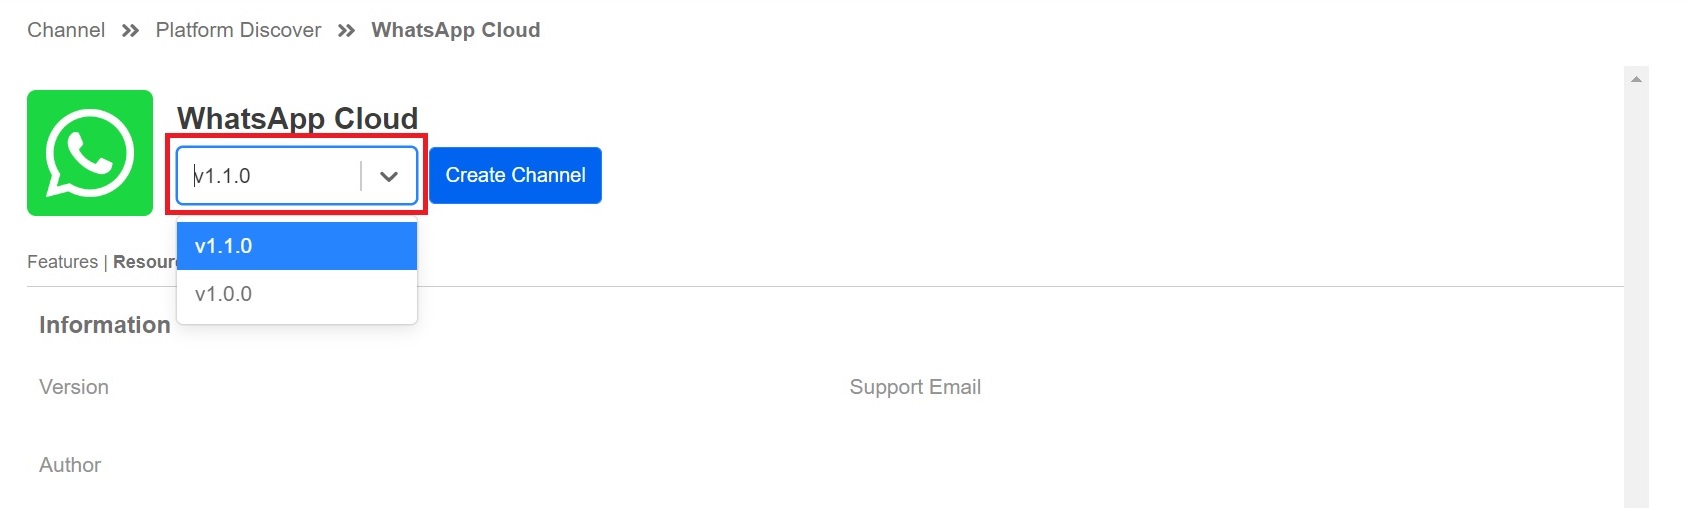
Choose the required version
- Fill in the Channel Name and Description and click on Confirm.
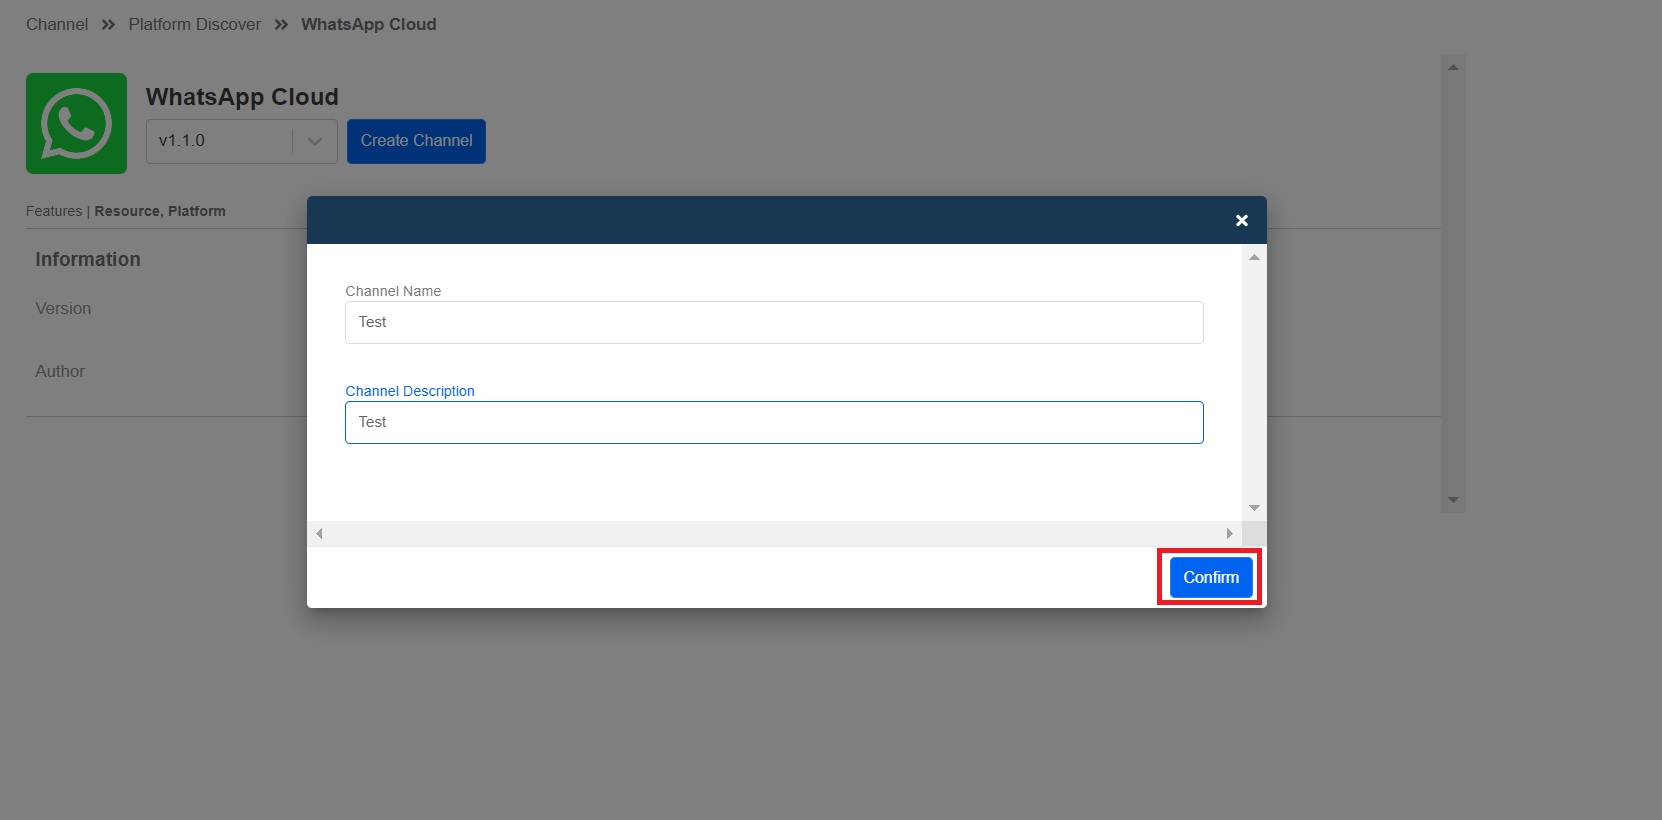
Fill in the Channel Name and Channel Description
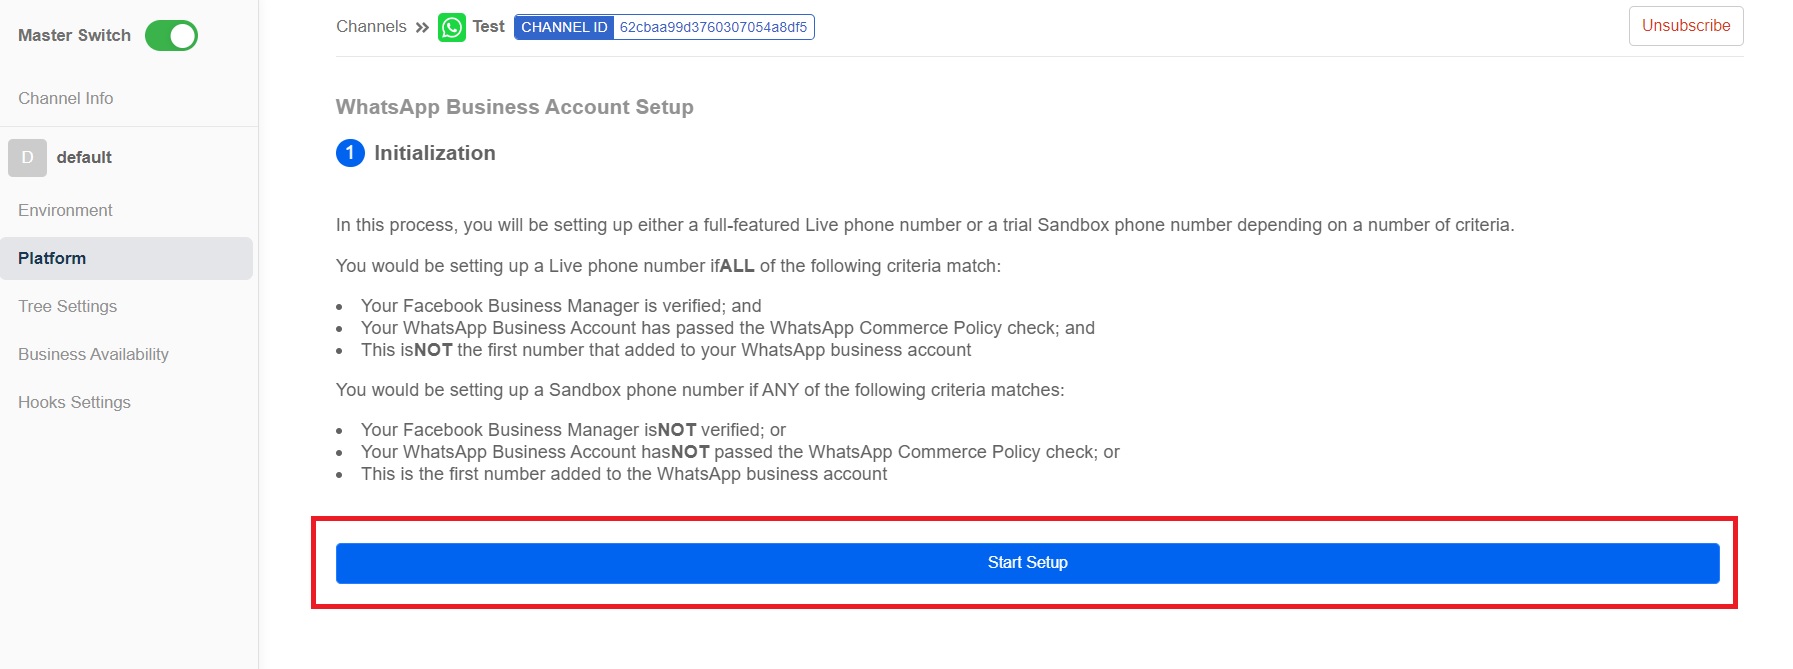
- Click on Start Setup on the WhatsApp Business Account Setup page.
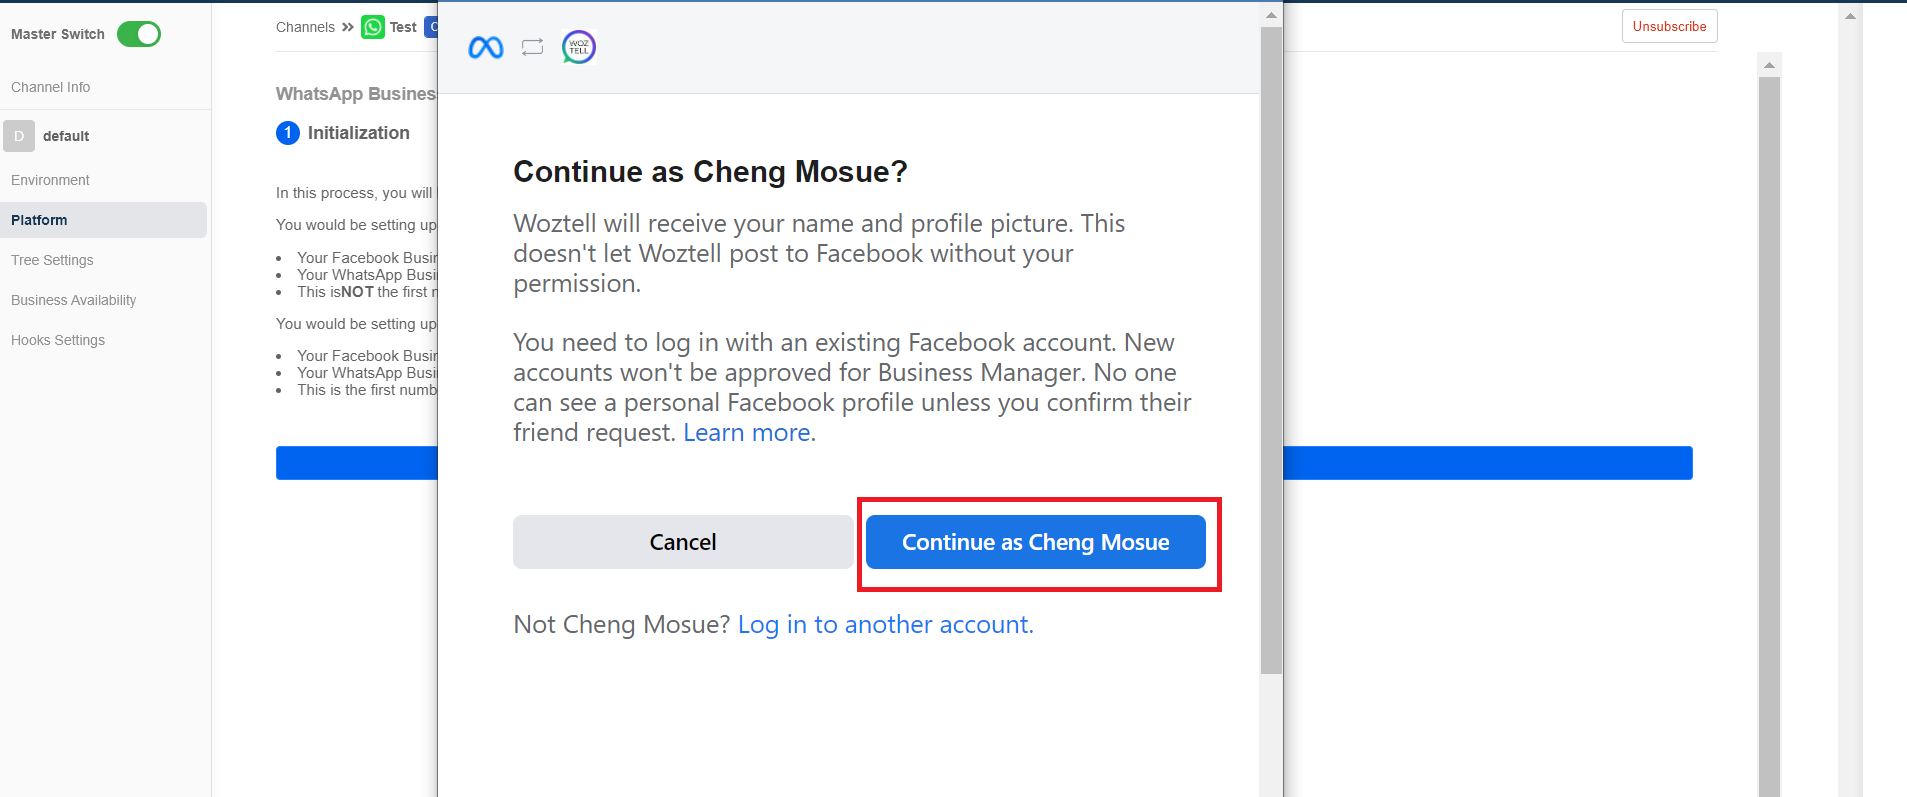
- Click on Continue as {Your Facebook account name} after logging in to your required account.
- Click on Get Started.
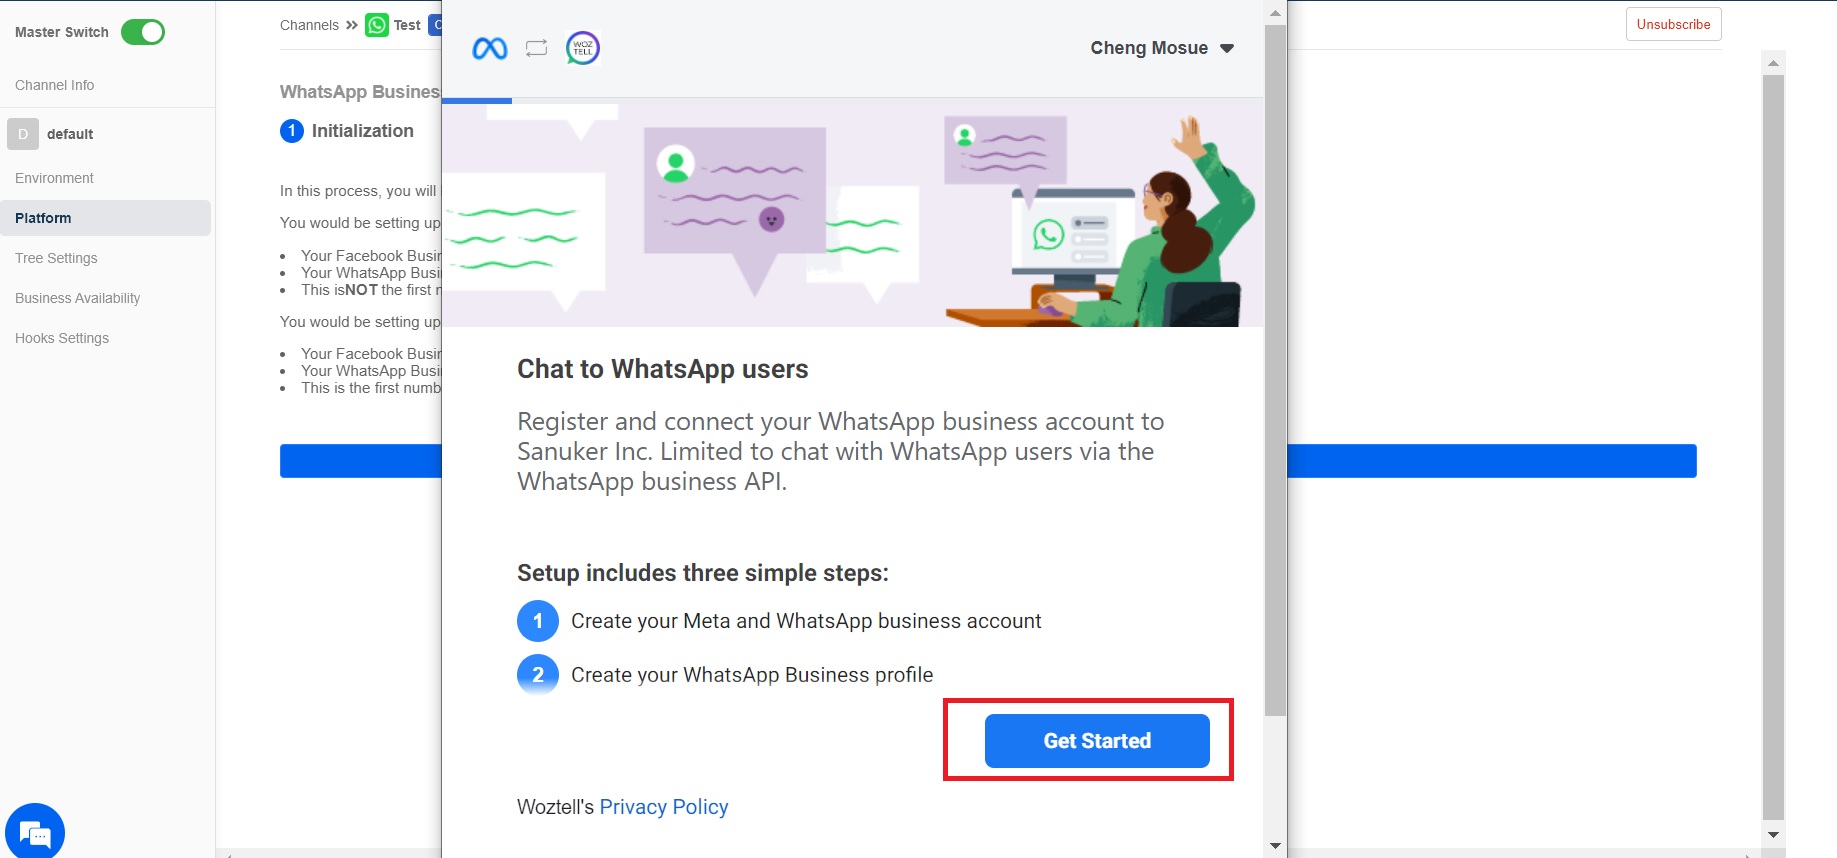
Set up the chat function
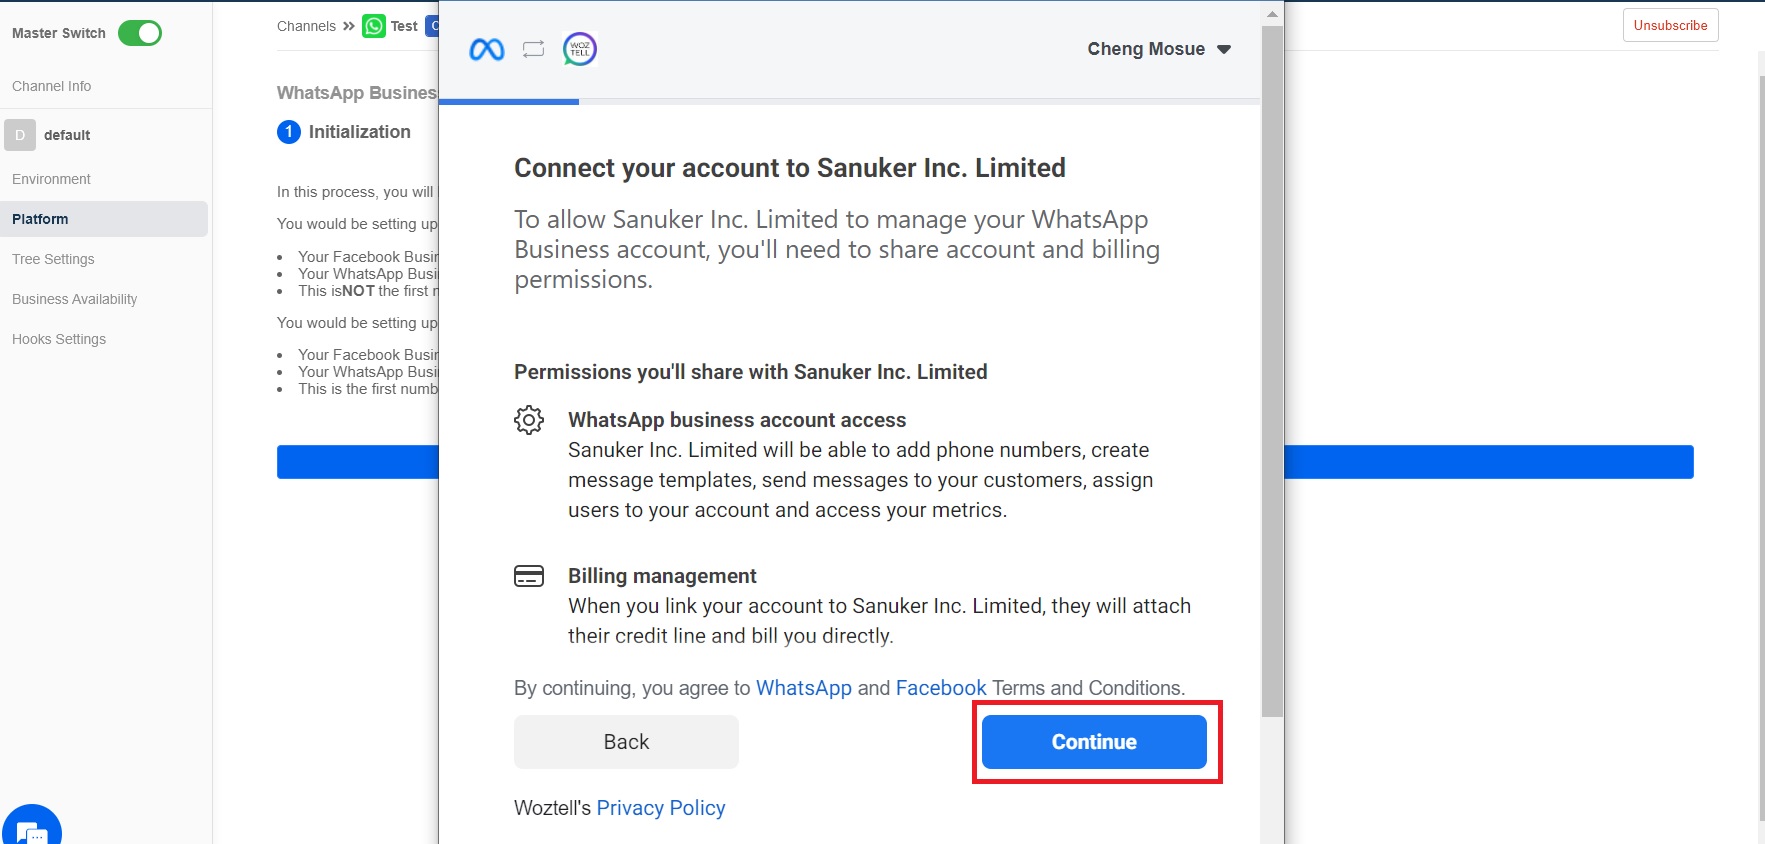
- Click on Continue.
- Choose to Create a new Meta business account and click on Continue.
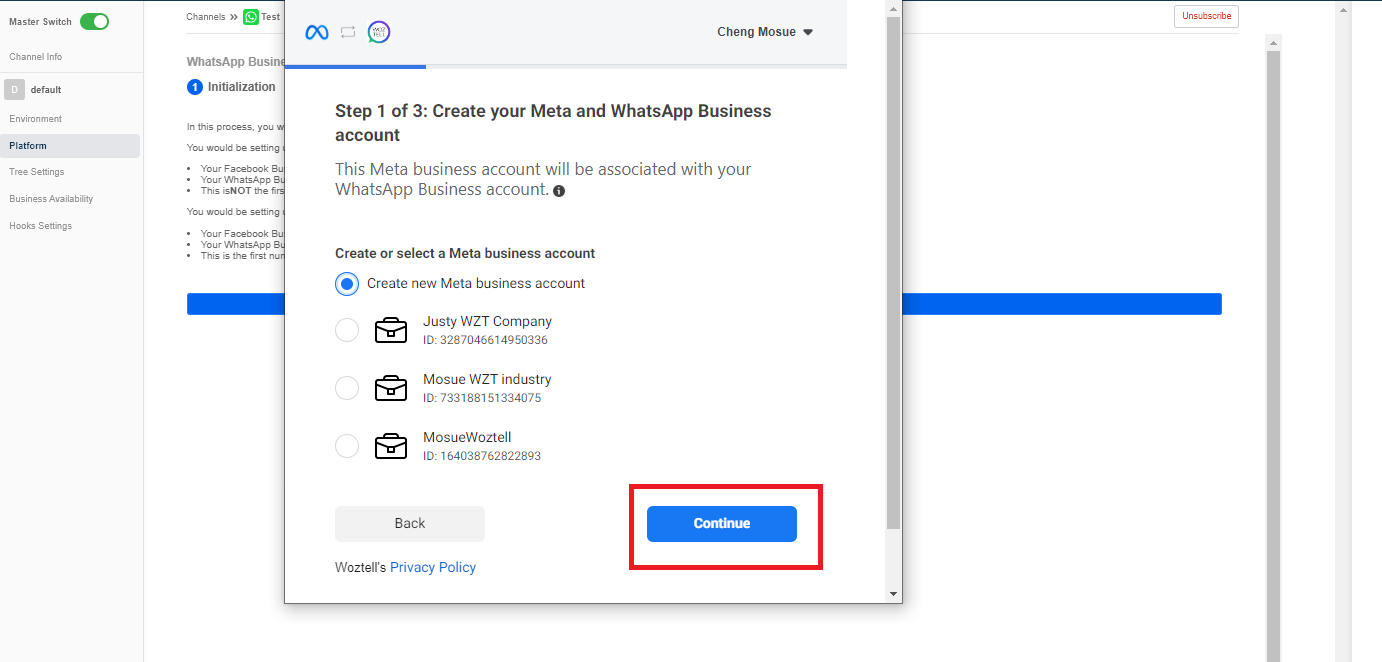
Choose new account
- Fill in the Legal business name, Business phone number, Business website and Your business email address. Click on Continue.
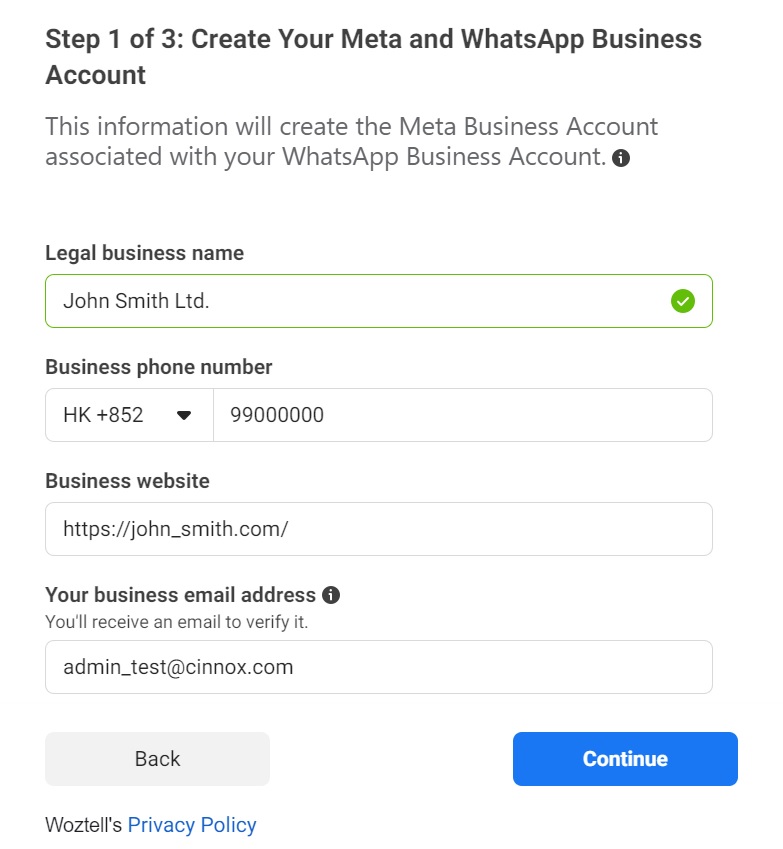
Fill in the form
- Click on the drop-down list to choose Country. Fill in your corporate street address, corporate street address 2/locality, town/city, state/province/region, ZIP/postal code, and time zone. Click on Continue.
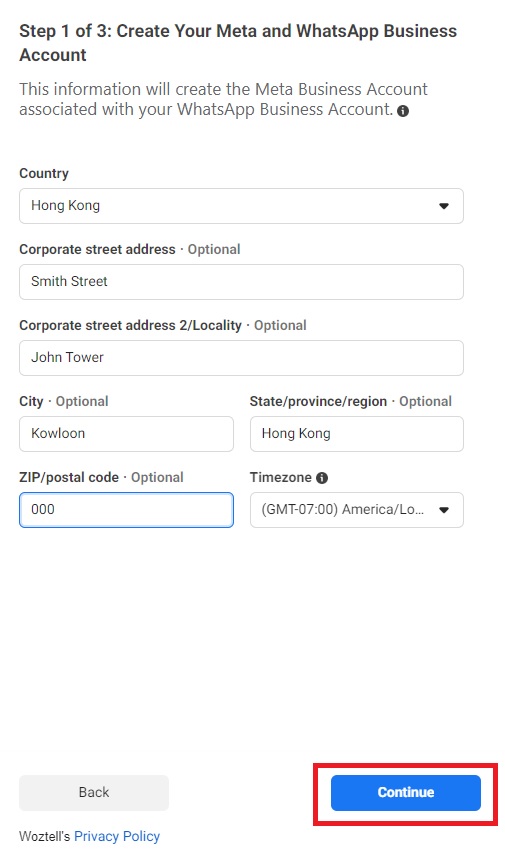
Fill in the corporate information
- After verification, your account has been set up. Click on Continue to Step 2.

Account setup is completed
- Fill in WhatsApp Business Display Name and Click on Continue.
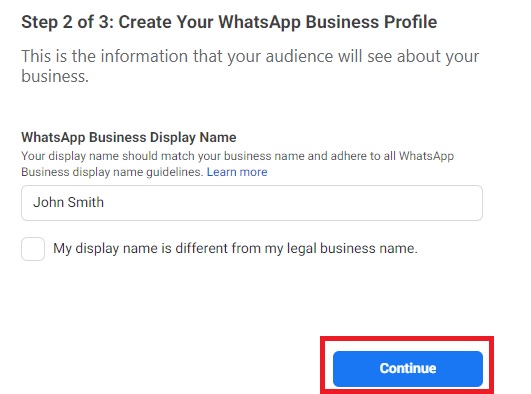
Your WhatsApp Business Display Name
- Click on the drop-down list of Categories to choose your business category. You can also provide more information about your business to Business Description. Click on Continue as Step 3.
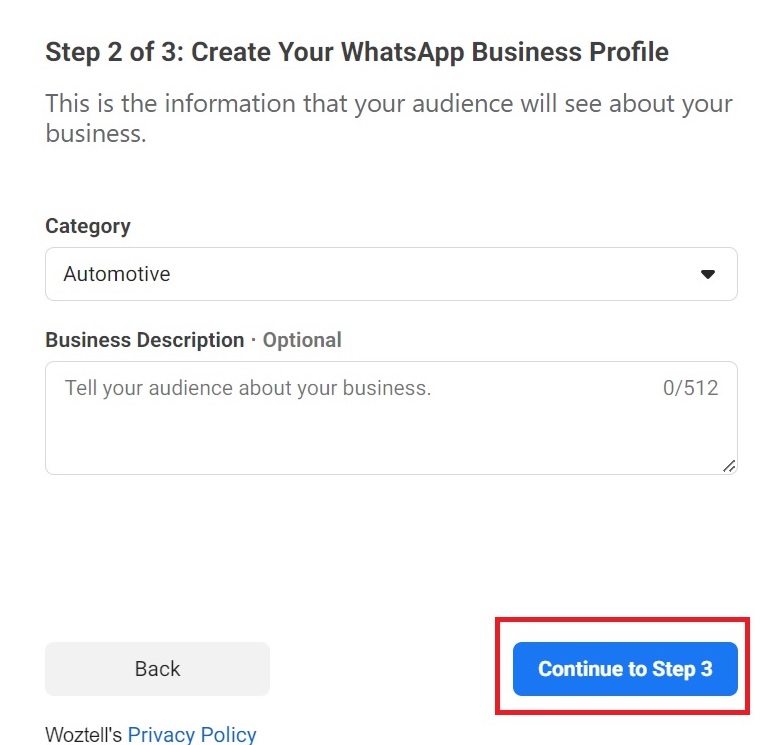
Select your business category
- Register a new number on WhatsApp, choose Text Message and click on Send Code.
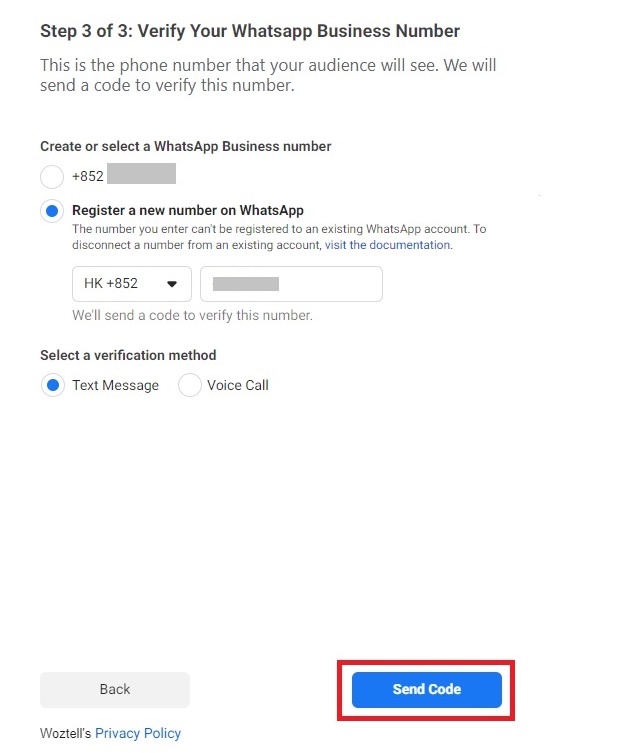
Register a new number for the WhatsApp account
- Fill in the 6-digit verification code just sent to your number via SMS. Click on Verify.
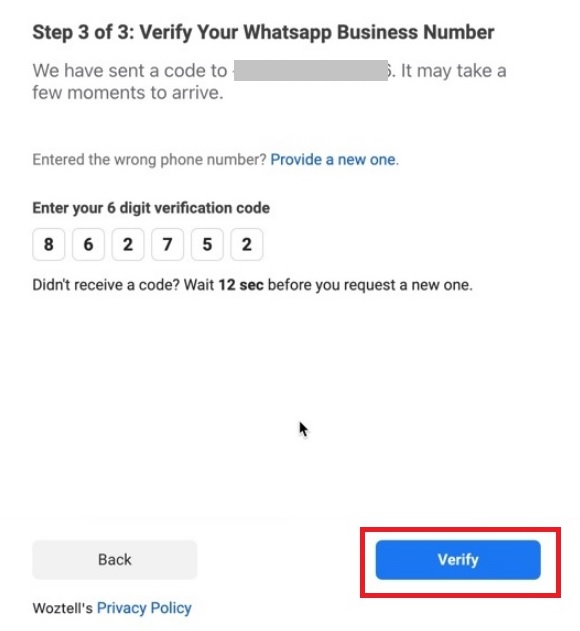
Verify your new number
- Click on OK to confirm your WhatsApp Business account is ready.
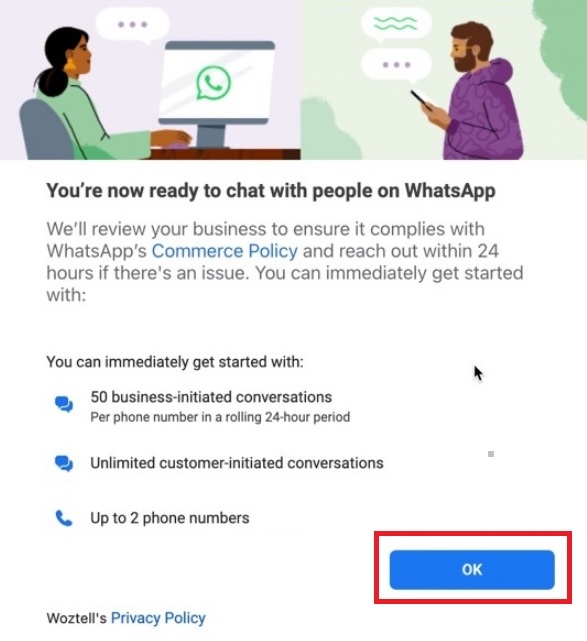
Confirm the readiness for your registered WhatsApp Business account
- When the registered WhatsApp Business account is deployed, please don't leave or refresh the "Platform" page. The deployment will be done within 3 minutes.
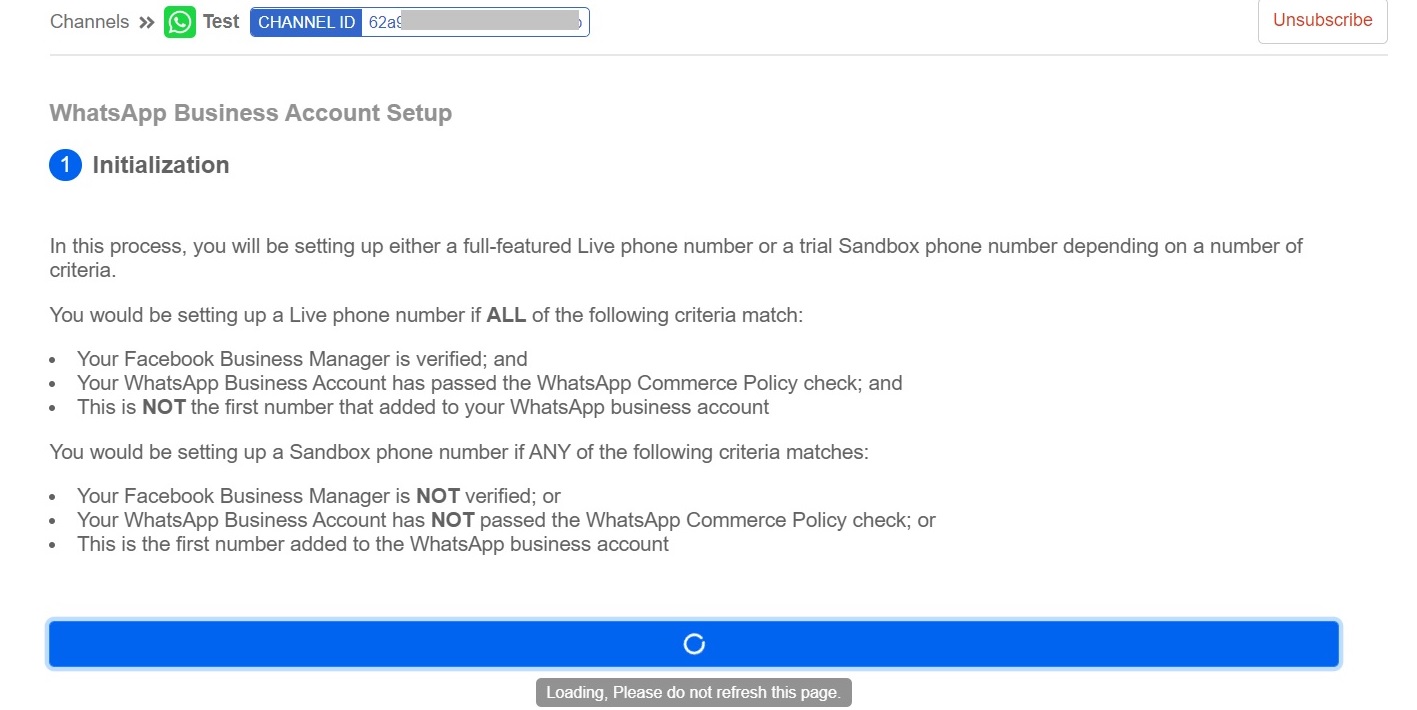
Deploying your registered WhatsApp Business account
Case 2: Create a WOZTELL channel for Facebook
- Click on Next for Facebook, which you are required to create.
Platform Discover page for the channel creation
- From the drop-down list, choose the required version and click on Create Channel.
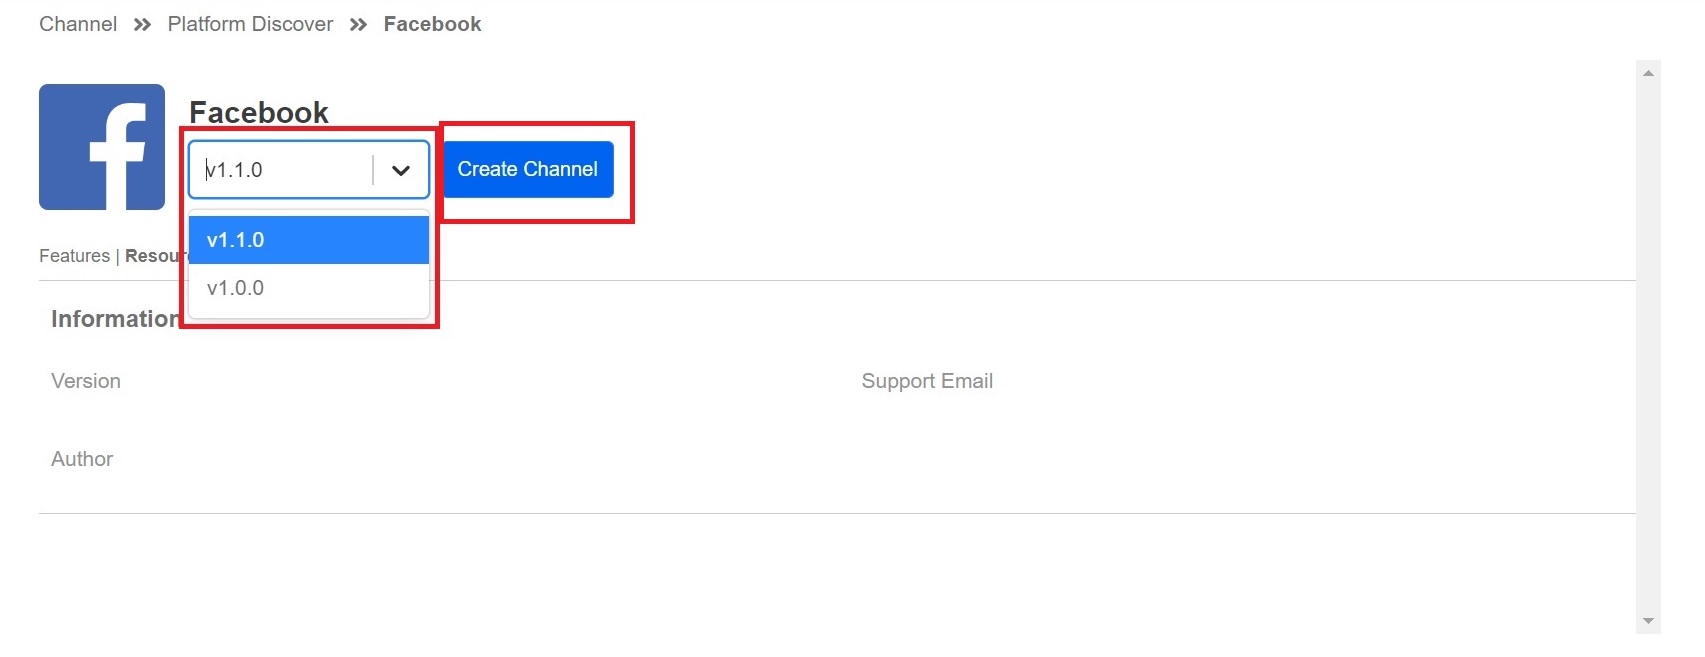
Choose the required version on this page
- Fill in the Channel Name and Description and click on Confirm.
8080
- Choose Default and click on Connect.
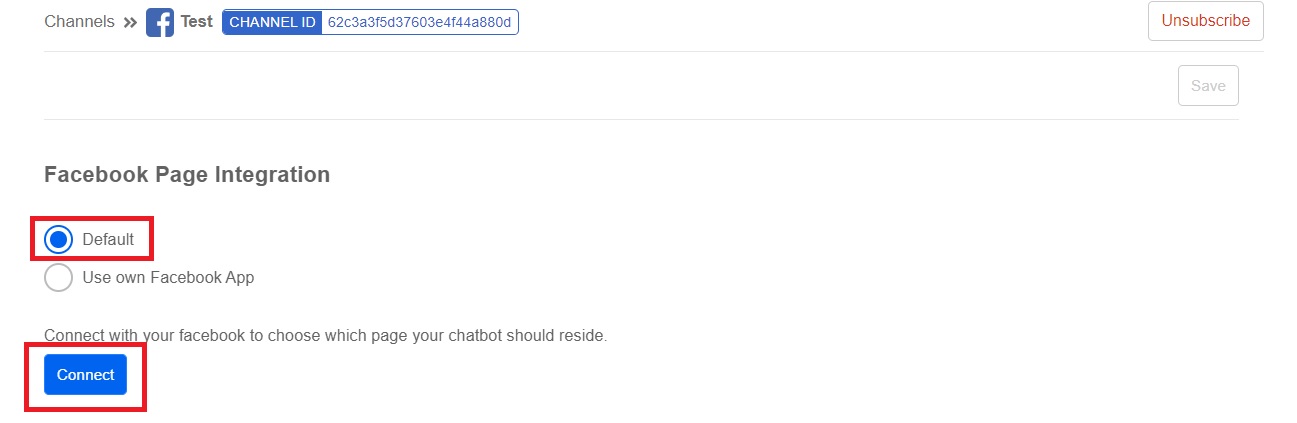
Platform page for Facebook Page Integration
- Log in to your Facebook account with WOZTELL.
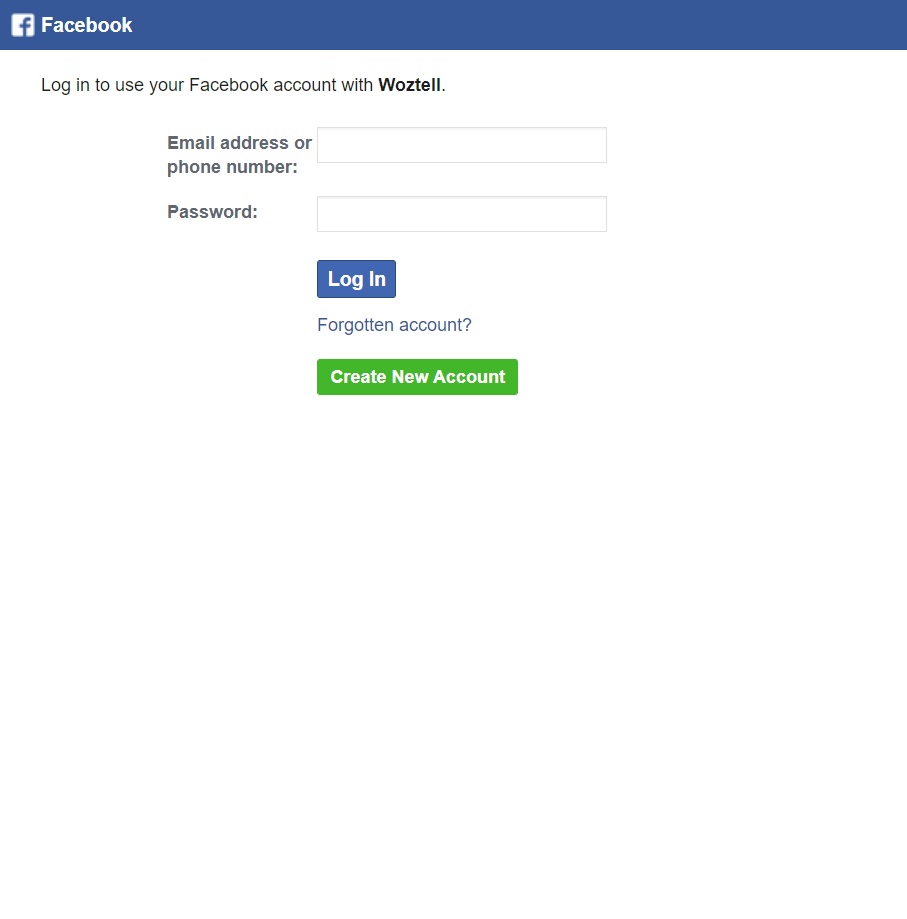
Facebook login page
- You can choose Continue as {Your Facebook account name}.

Confirm your Facebook account to be connected to WOZTELL
- Tick the required page to be connected to the WOZTELL channel.
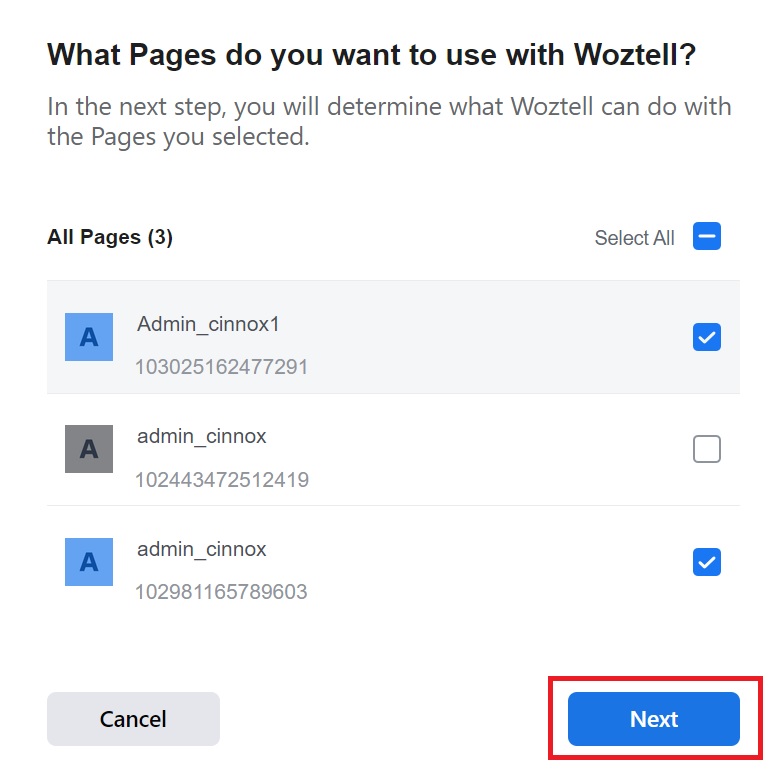
Tick the page to integrate with the WOZTELL channel
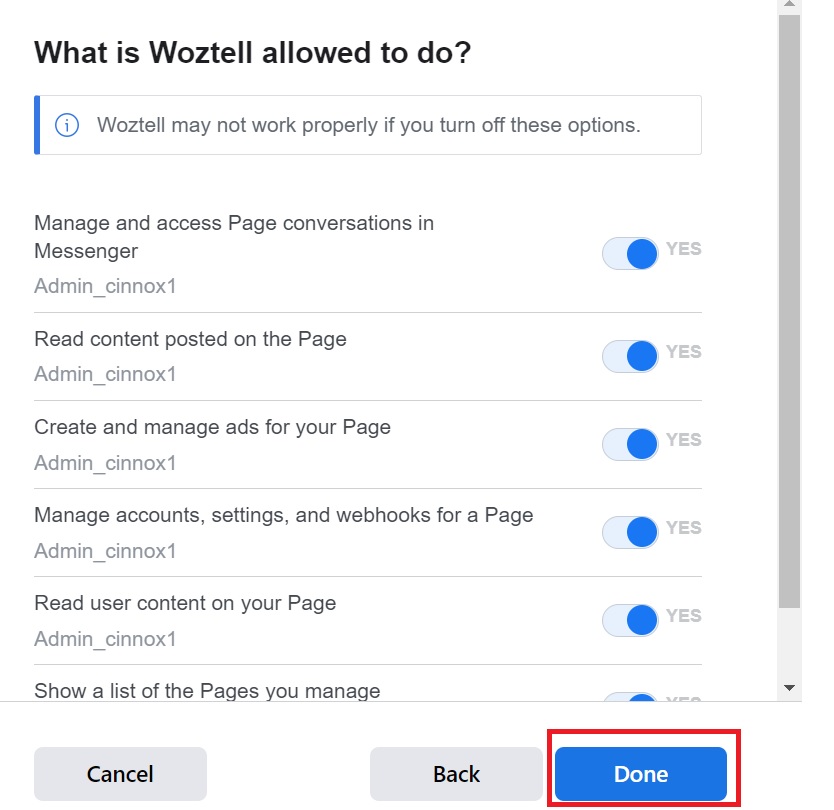
- Toggle to Yes to allow all permissions and click on Done.
Facebook permission page
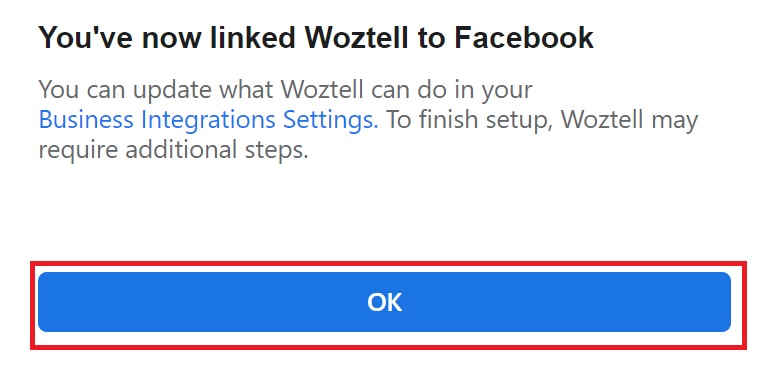
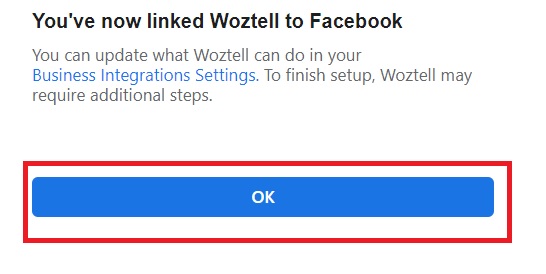
- Click on OK to confirm the linkage between your Facebook account and the WOZTELL channel.
WOZTELL Linkage confirmation
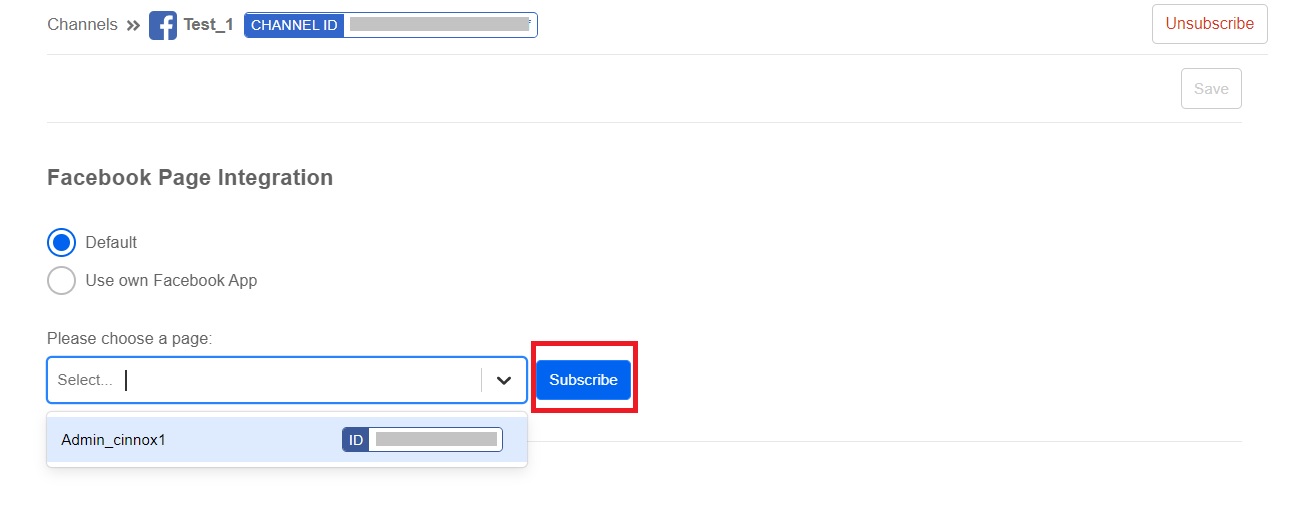
- Choose the registered Facebook page from the drop-down list and click on Subscribe.
Facebook page selection for subscription
- Click on Allow.

Click on Allow for Comment reply automation
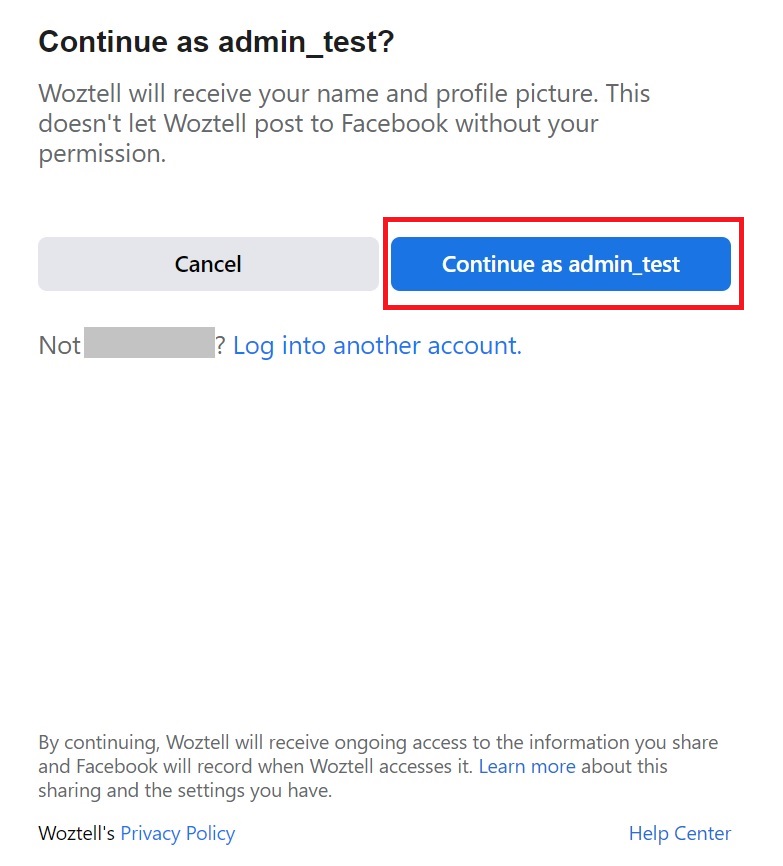
- Click on Continue as {Your Facebook account name}.
Confirm your Facebook account's name and profile picture to be received by WOZTELL
- Tick your registered Facebook page and Click on Next.

Tick the page to integrate with the WOZTELL channel
- Toggle all switches to Yes to allow all permissions and click on Done.

Facebook permission page
- Click on OK to confirm the linkage between Facebook and the WOZTELL channel.
Linkage confirmation
- Click on Save. WhatsApp Business account integration is successful. Make sure Comment reply automation is allowed.
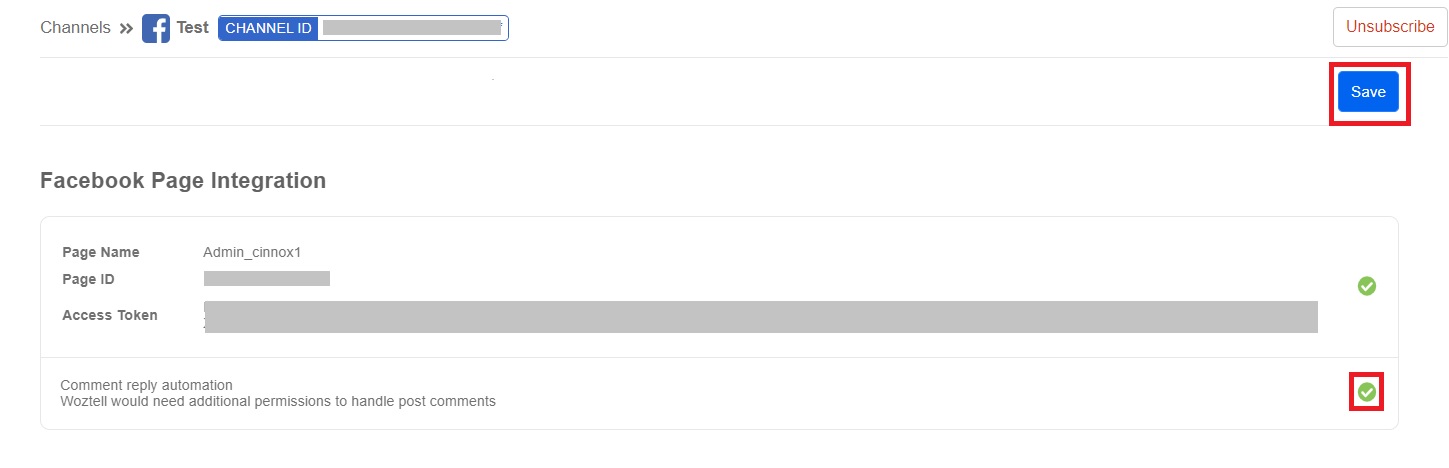
Page of Facebook Page integration
Case 3: Create a WOZTELL channel for Instagram
- Prepare your Instagram account. Click on Edit profile.

Your Instagram account
- Click on Switch to professional account and ✓ at the top right-hand corner.
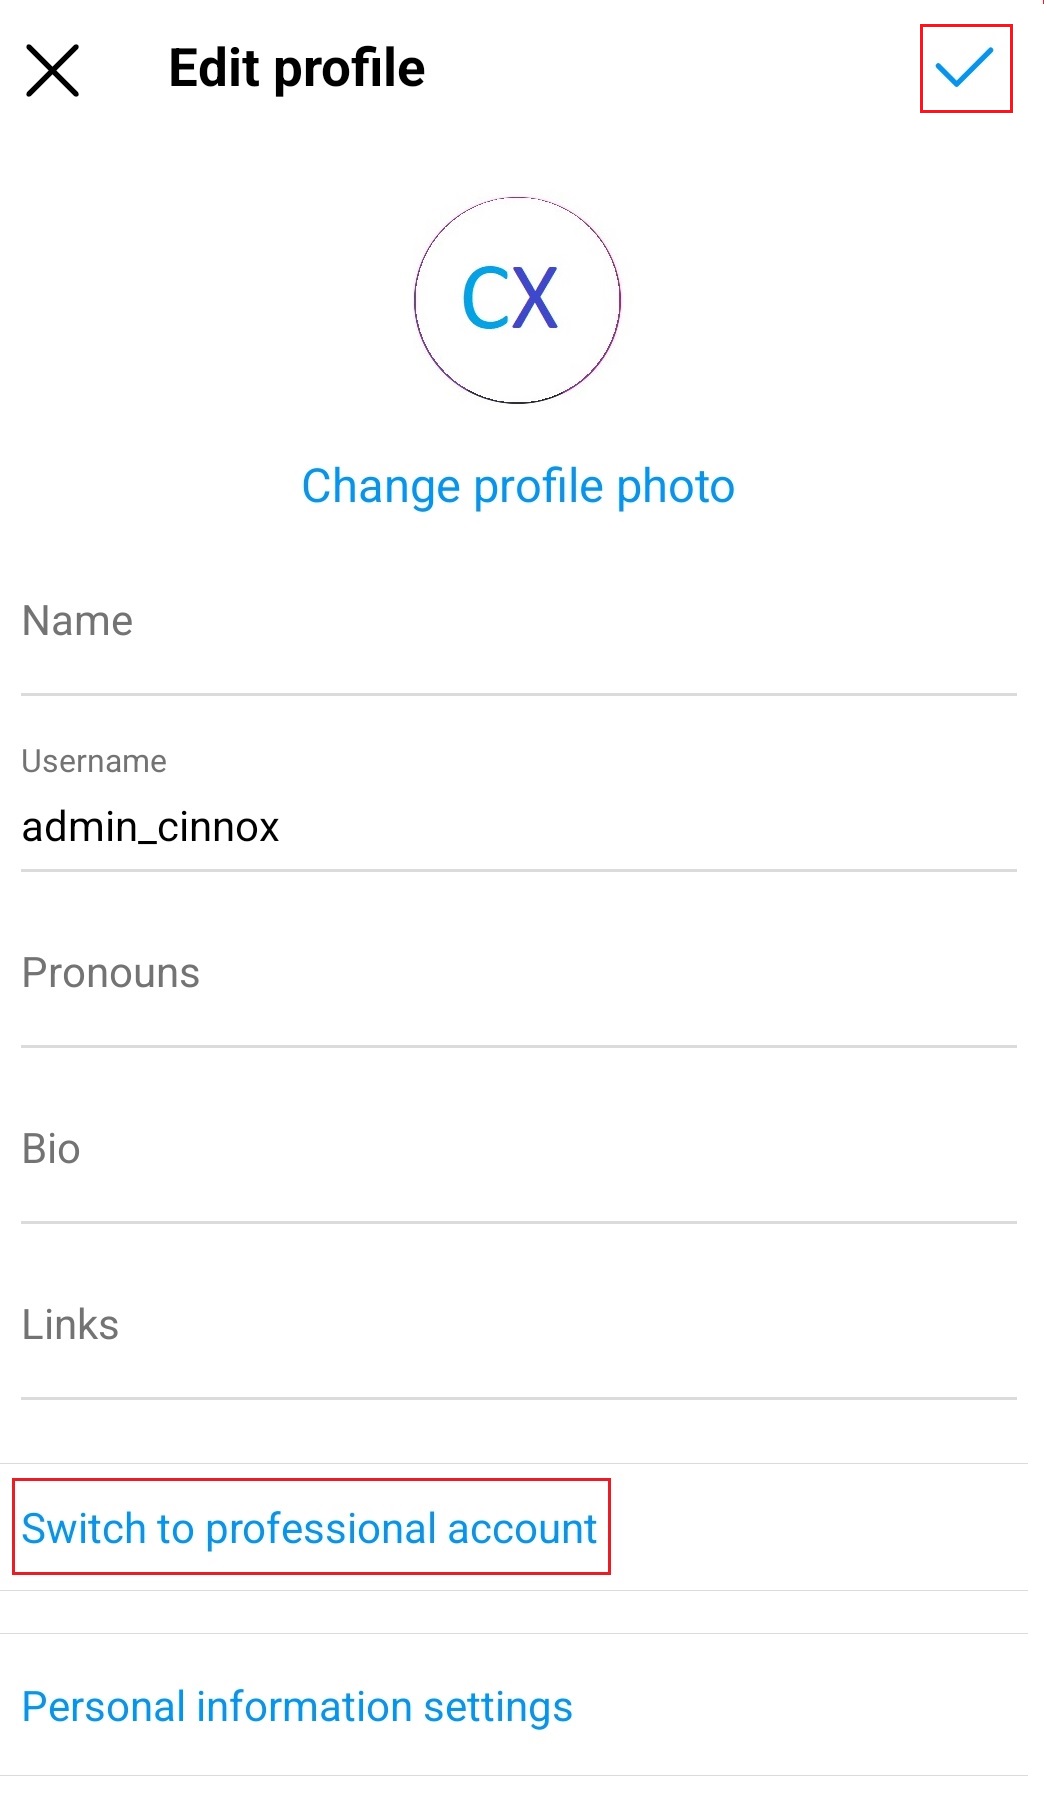
Edit profile page
- Click on Continue until it reaches the final page and Continue again on the last page.
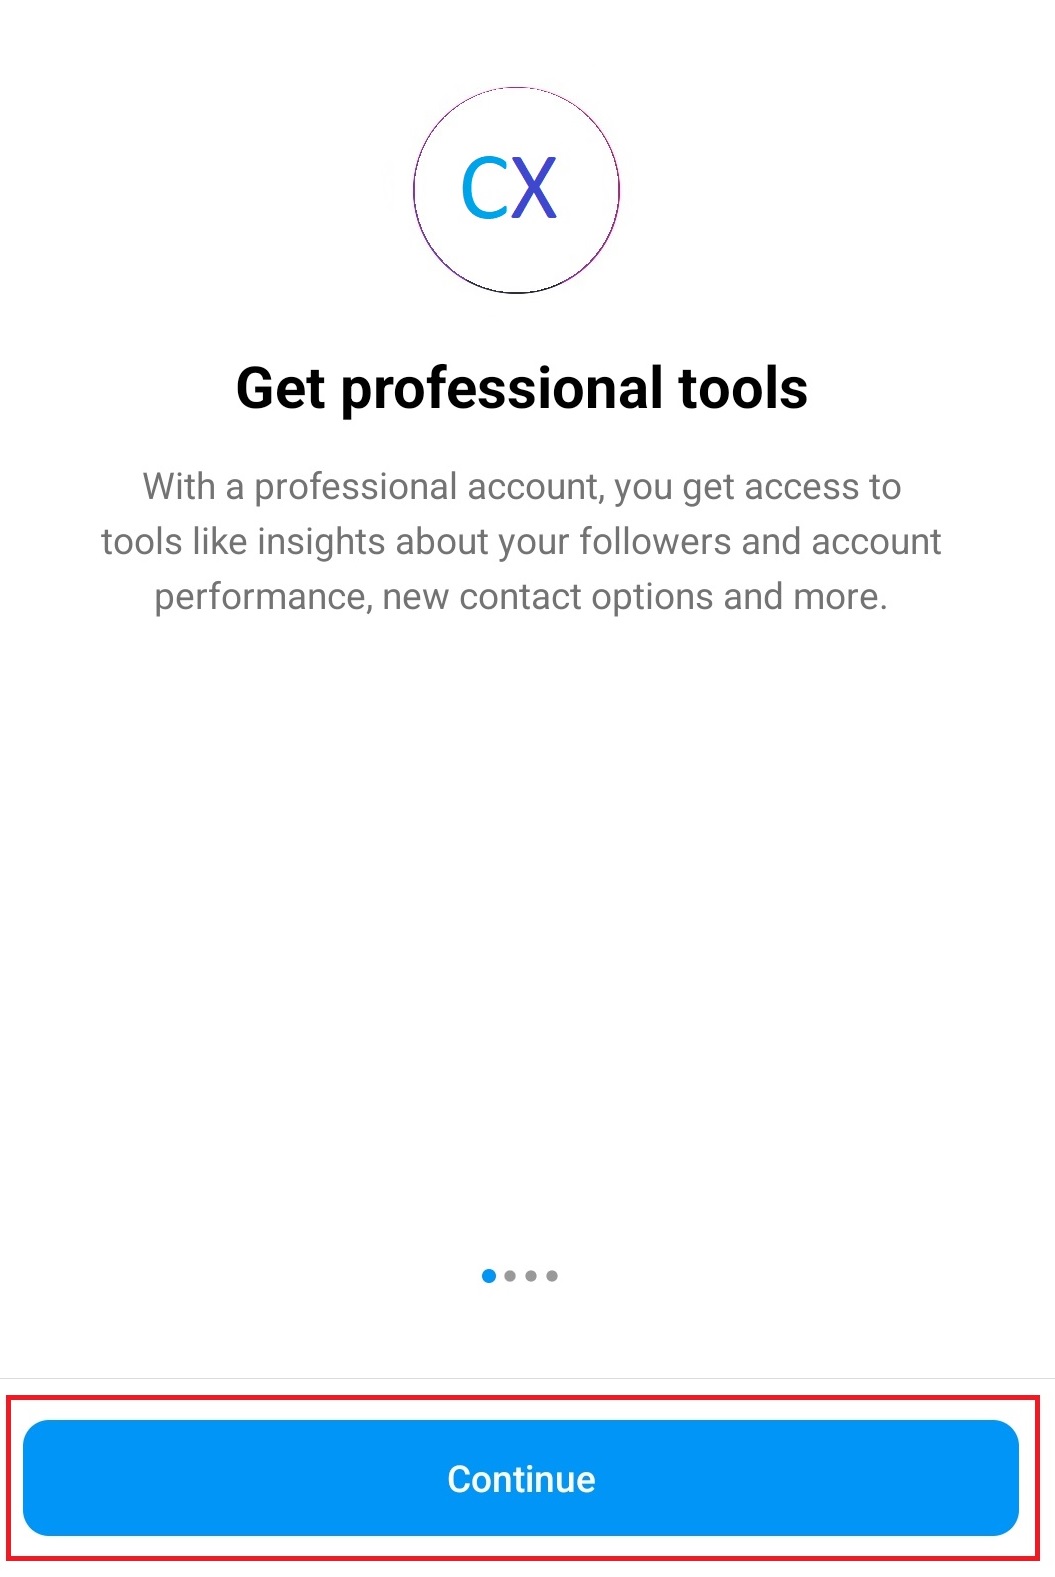
The first page after you switch your account to the professional account
- After selecting your profile information, click on Edit profile again and then Page.
- Click on Connect an existing Page.
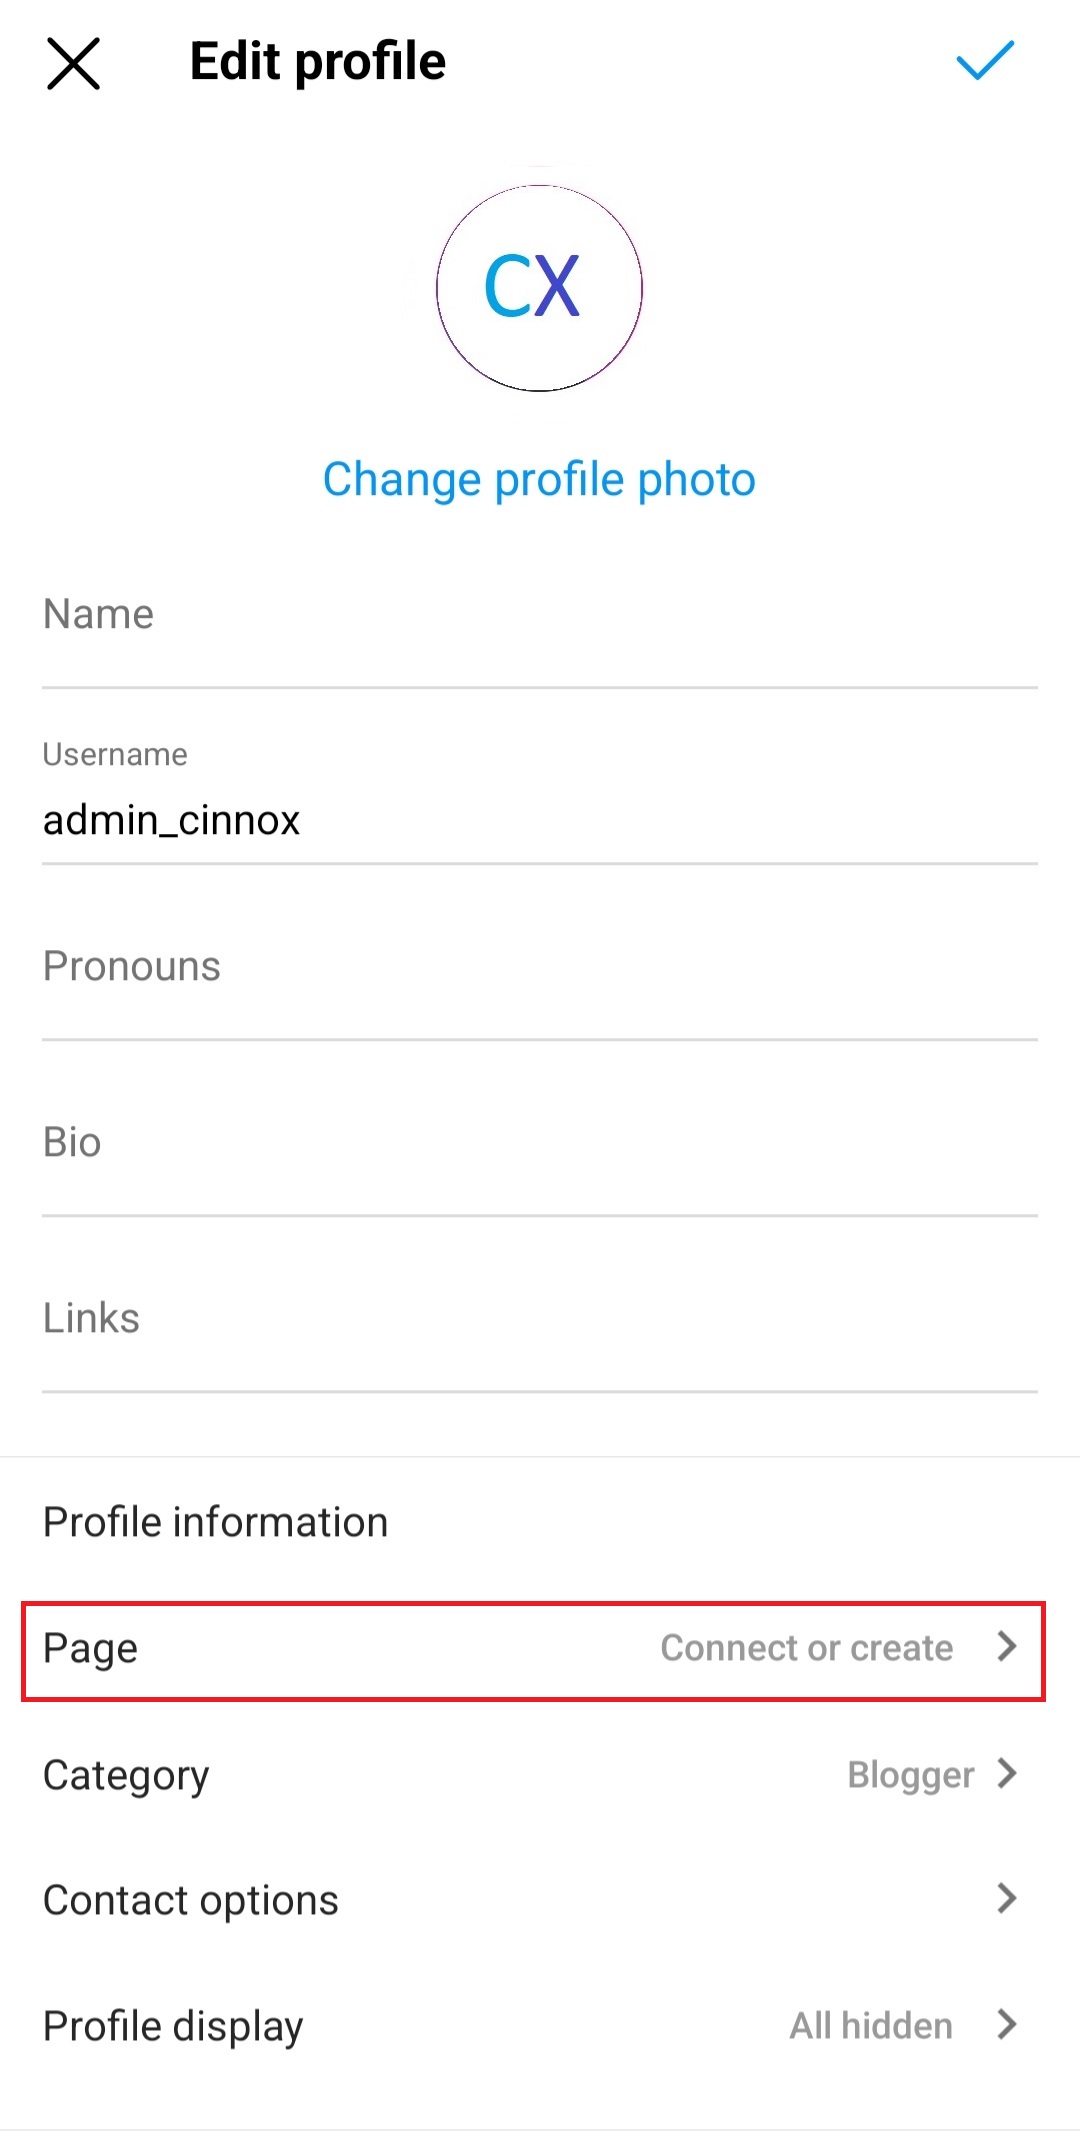
Edit profile page
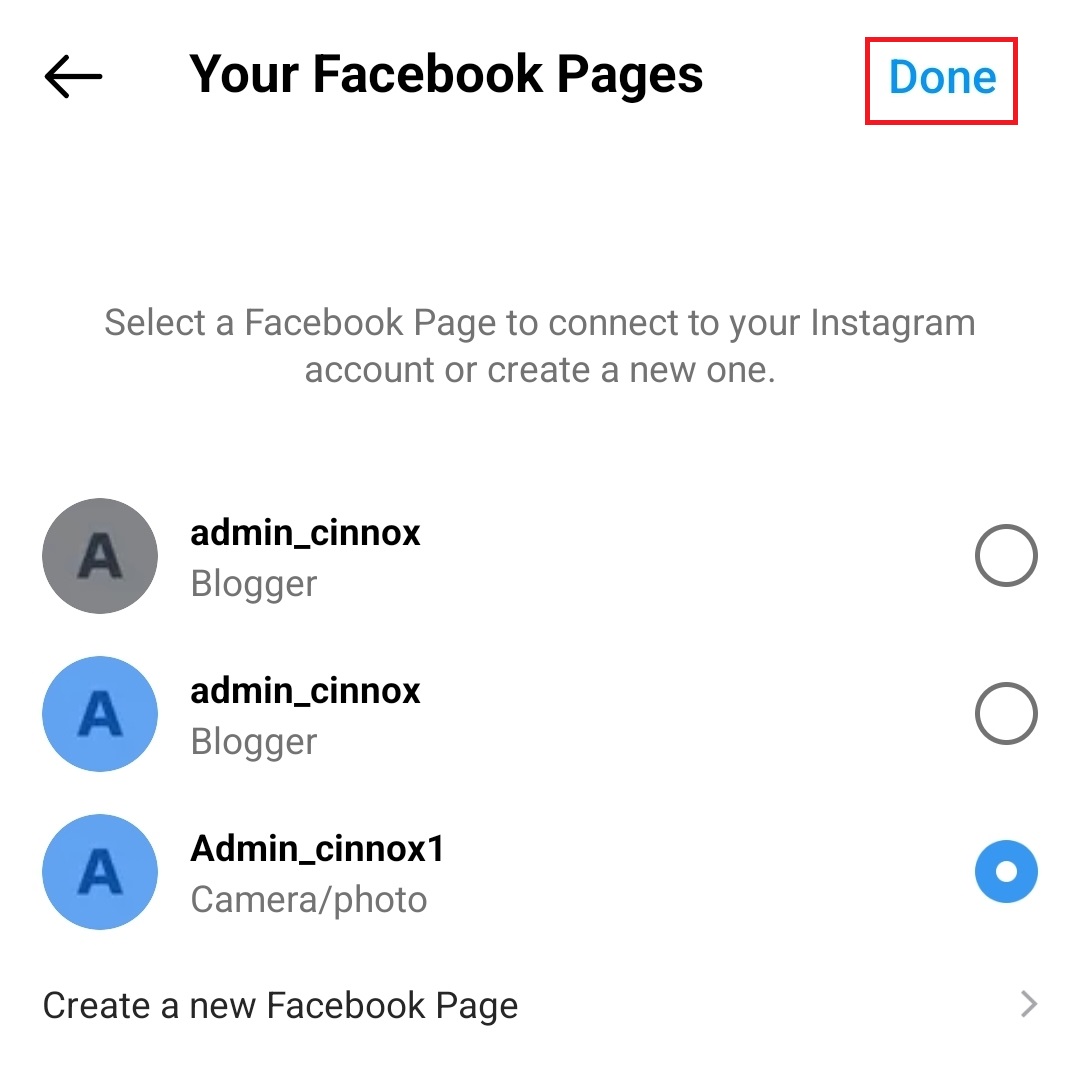
- Log in to your required Facebook page, choose it to connect to your Instagram account and click on Done. Or you can create a new Facebook Page.
Tick the page to integrate with the WOZTELL channel
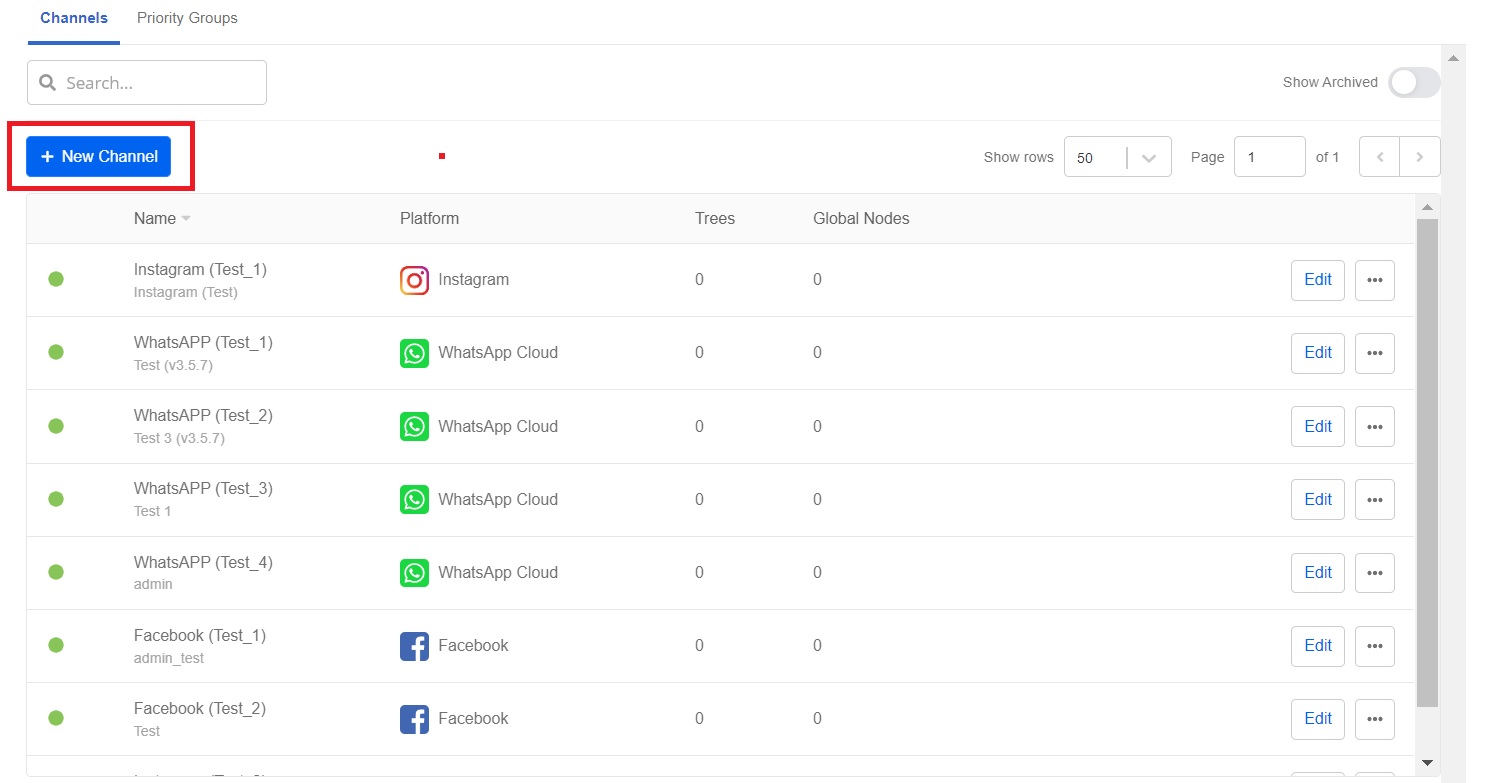
- Log in to your registered WOZTELL channel, navigate to the Channels tab, and click the Channels tab to open the page.
- Click on +New Channel.
Channels page on the WOZTELL channel
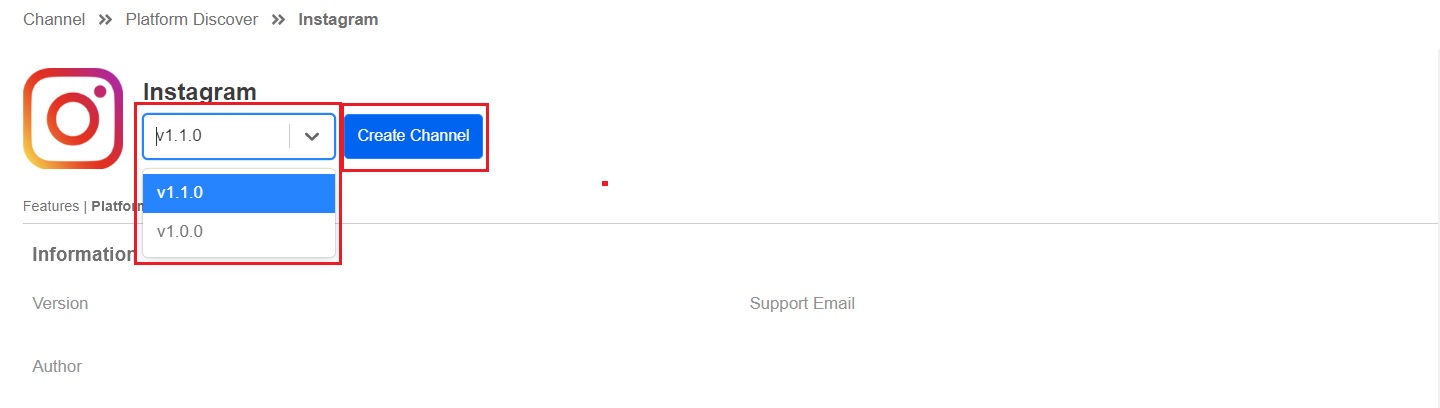
- Click on Next for Instagram.

Integrate your Instagram account to the WOZTELL channel
- From the drop-down list, choose the required version and click on Create Channel.
Create Instagram channel page
- Fill in the Channel Name and Channel Description. Click on Confirm.
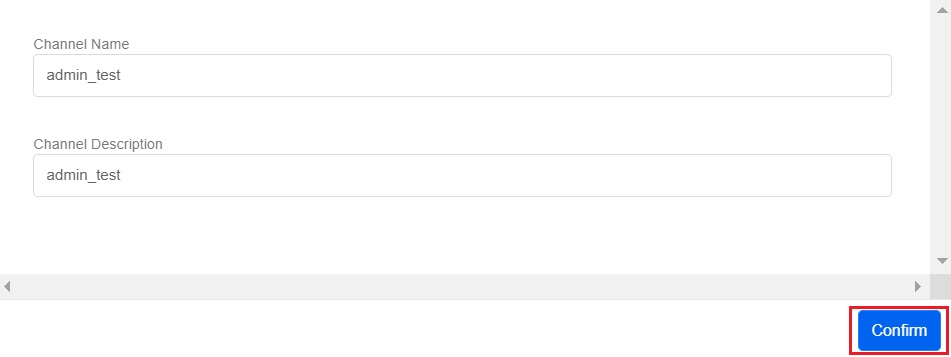
Channel Name and Channel Description
- Choose Default and click on Connect.
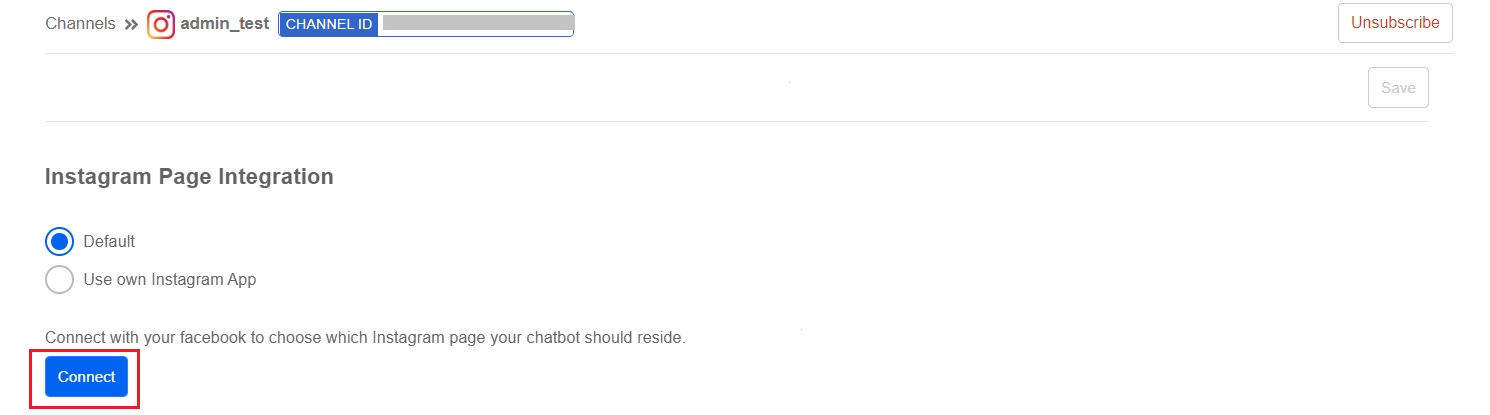
Instagram Page Integration
- Log in to your Facebook account and click on Continue as {Your Facebook account name}.
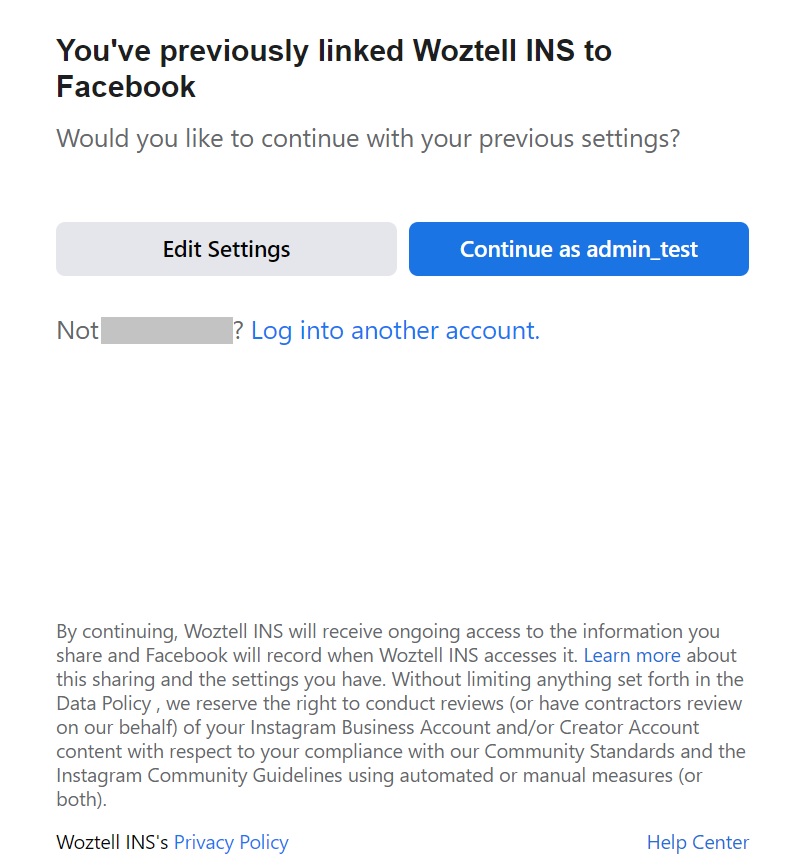
Confirm the linkage between the Facebook account and the WOZTELL channel
- Click on Next if your Instagram account has not yet connected to your Facebook fan page.
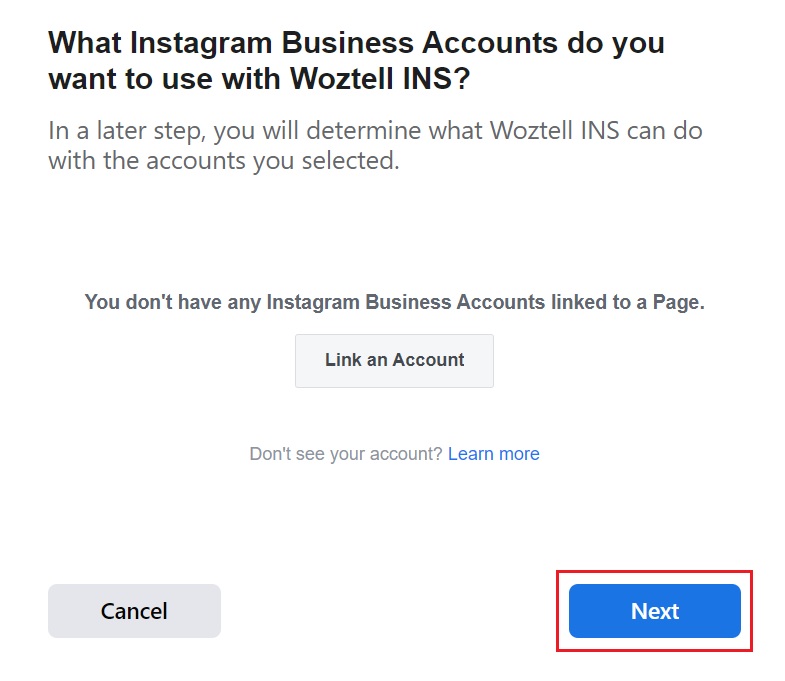
Link your Instagram account to the Facebook fan page
- Tick the required fan page to be connected with the WOZTELL channel. Click on Next.

Choose the required Facebook link to your Instagram account.
- Toggle all switches to Yes to allow all permissions and click on Done.
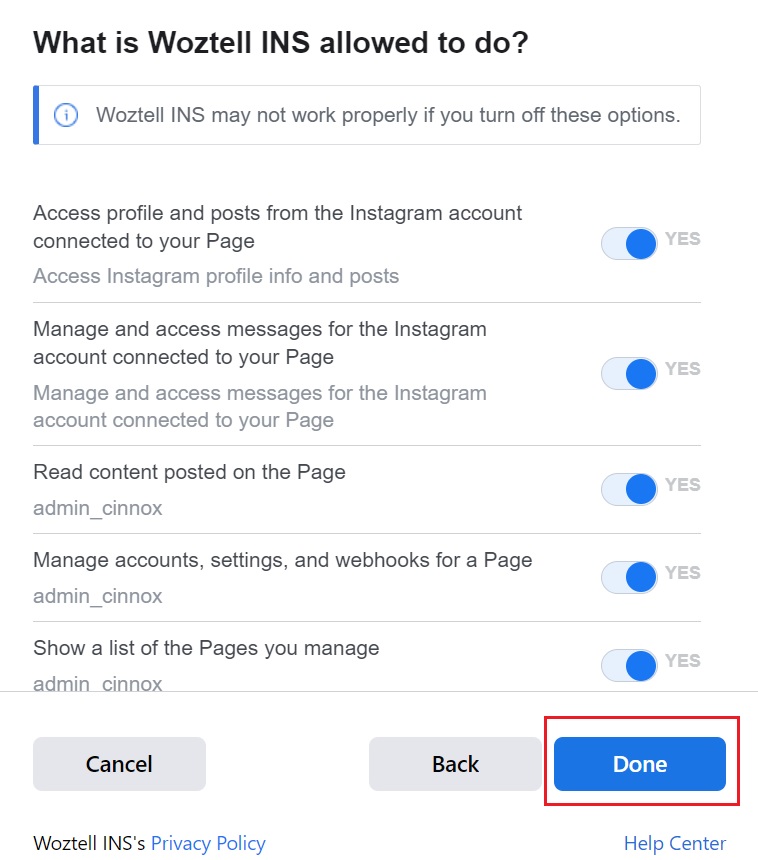
Facebook permission page
- Click on OK to confirm the linkage between the Facebook fan page and the WOZTELL channel.
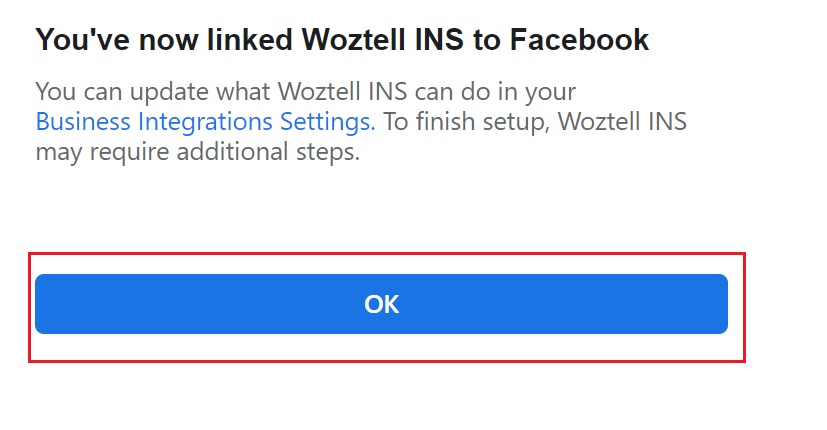
Linkage confirmation
- Choose the registered Facebook page from the drop-down list and click on Subscribe.
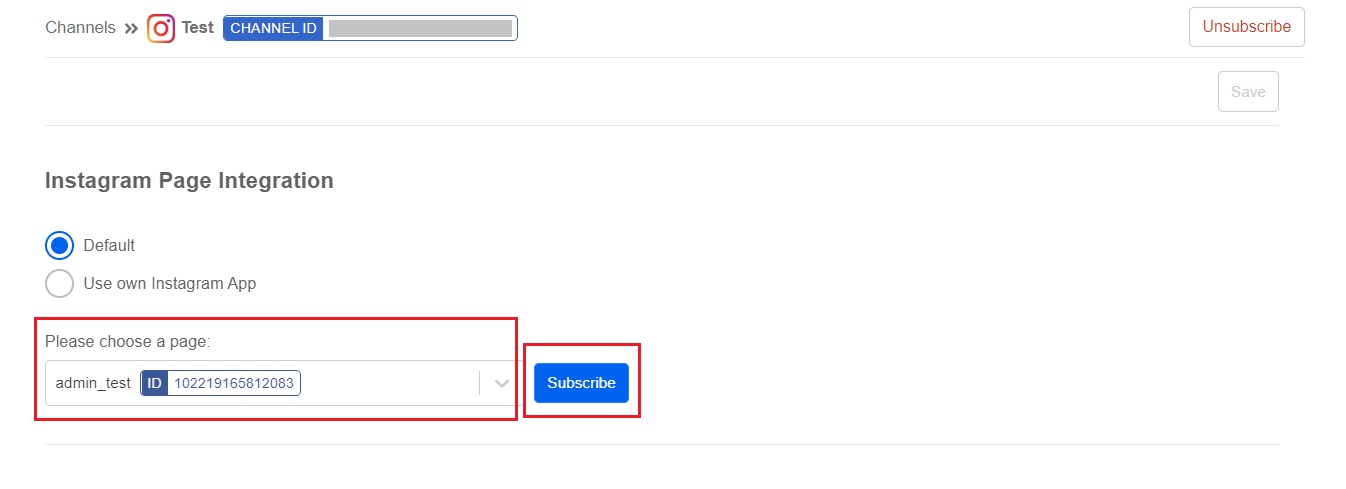
Choose the required page
- Click on Allow for permission setting.
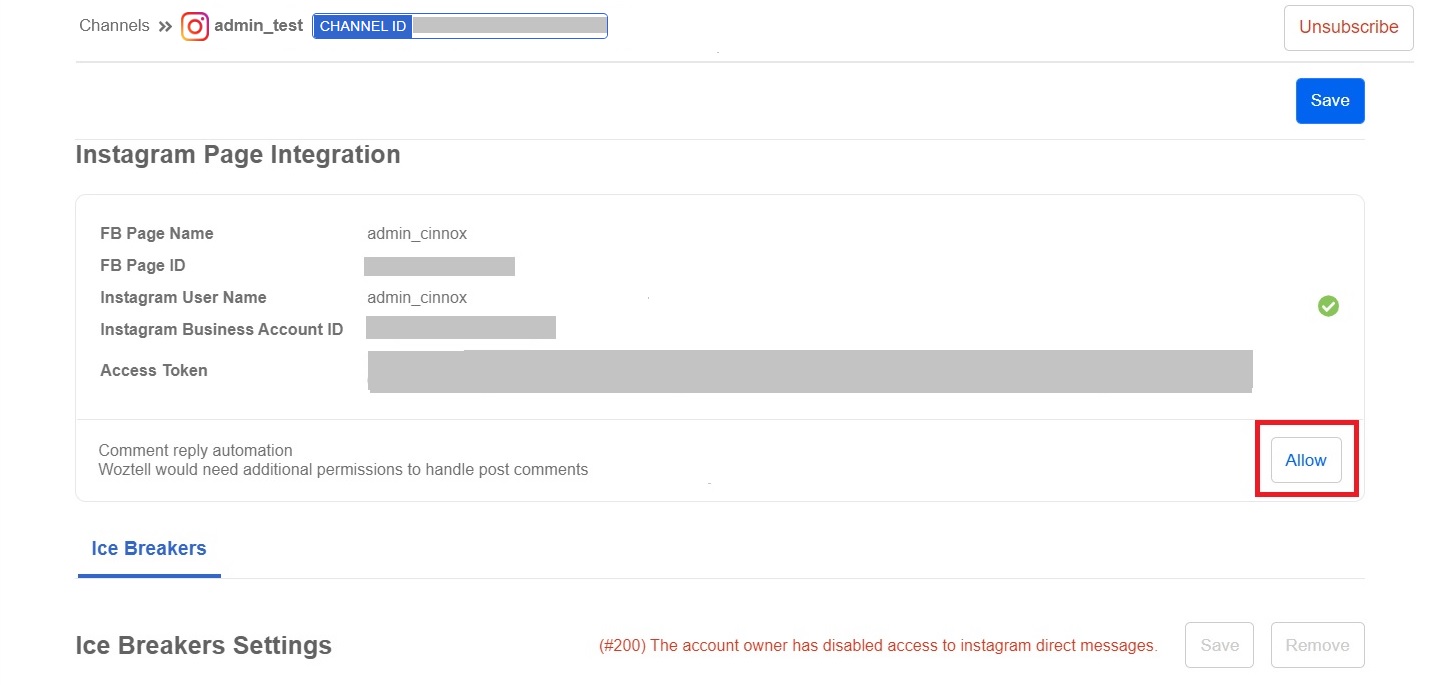
Instagram Page Integration
- Click on Continue as {Your Facebook account name}.
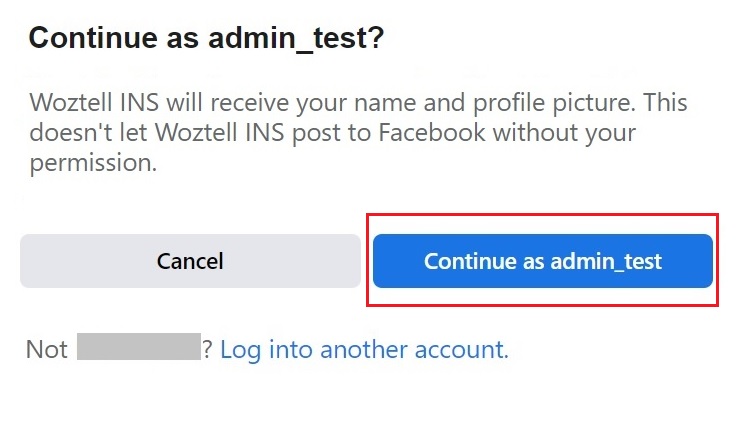
Confirm the Facebook account to be managed by the WOZTELL channel
- Tick the required page to which you are going to grant permission. Click on Next.
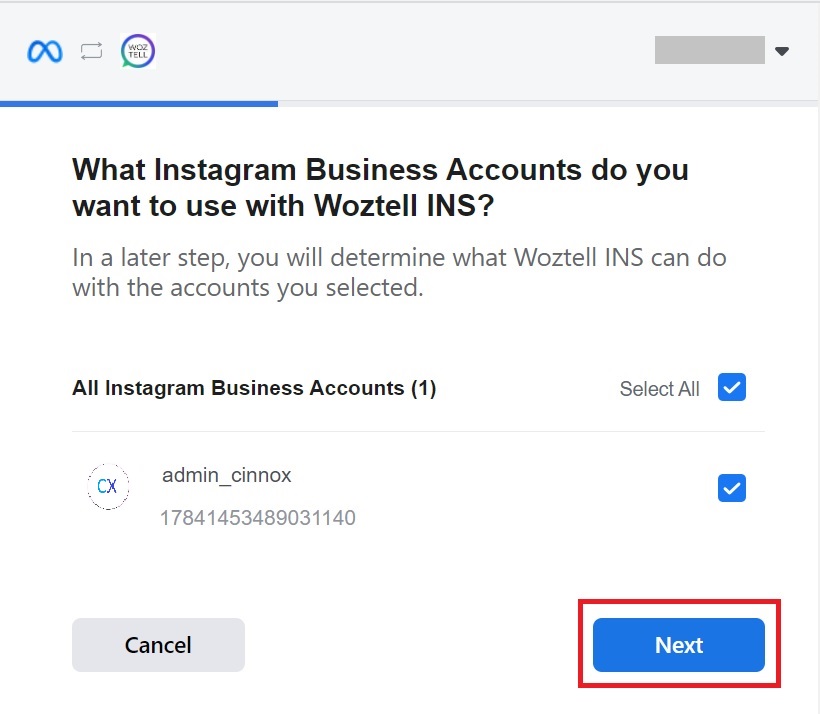
Tick the business account to be connected with
WOZTELL Channel
- Toggle on to Yes to allow permission and click on Done.
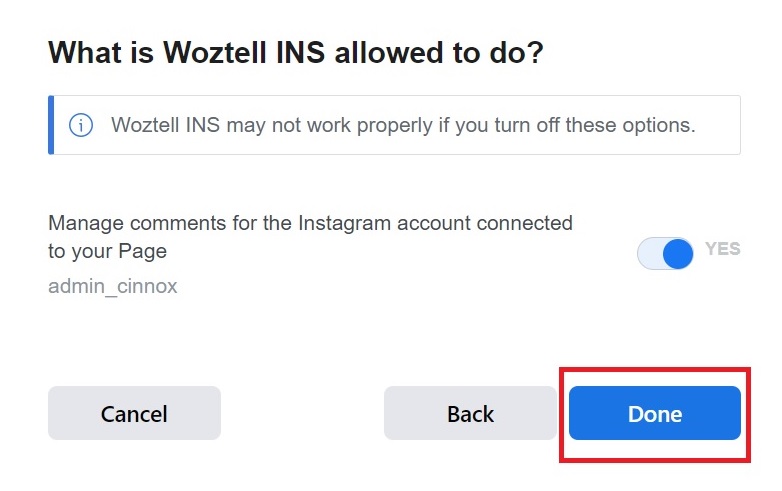
Facebook permission page
- Go to your registered Instagram page again and click on "three horizontal lines" at the right-hand top corner.
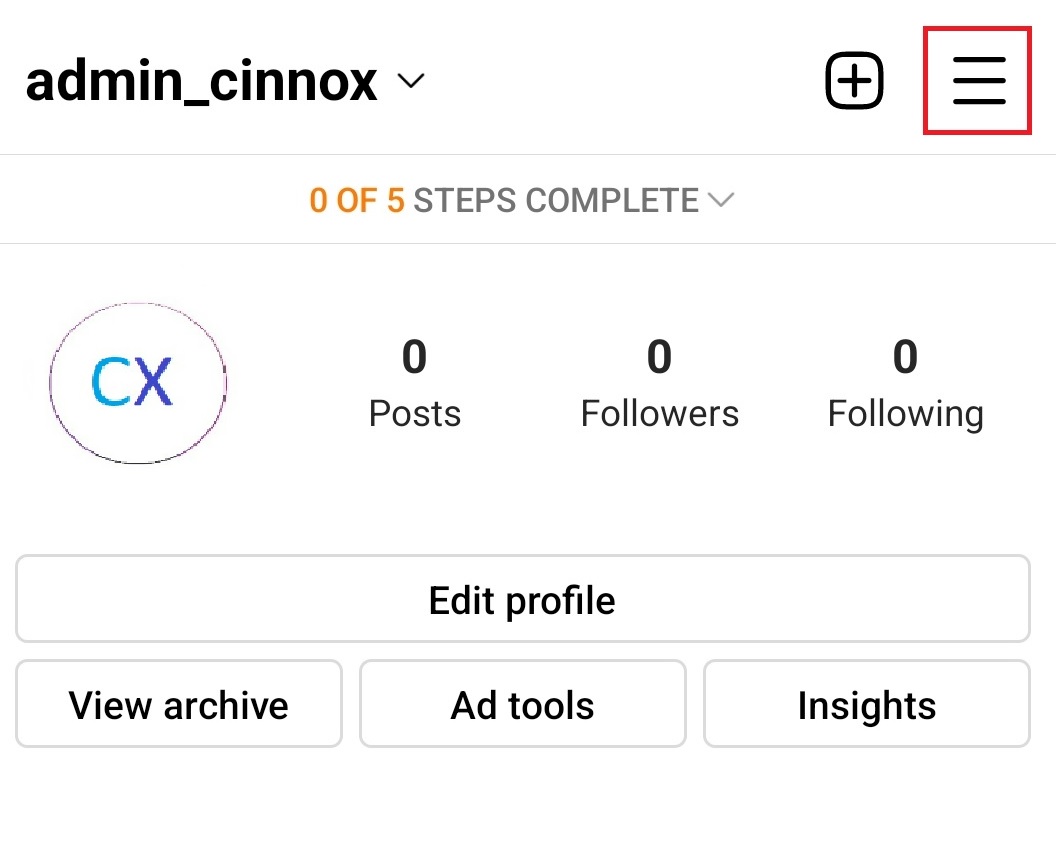
Your registered Instagram account page
-
Click on Settings>Privacy>Messages. Toggle on Allow access to messages.
-
Subscribe to the Instagram page again via the WOZTELL Channel. Ensure Comment reply automation is allowed and there is no error message in the Ice Breakers part.
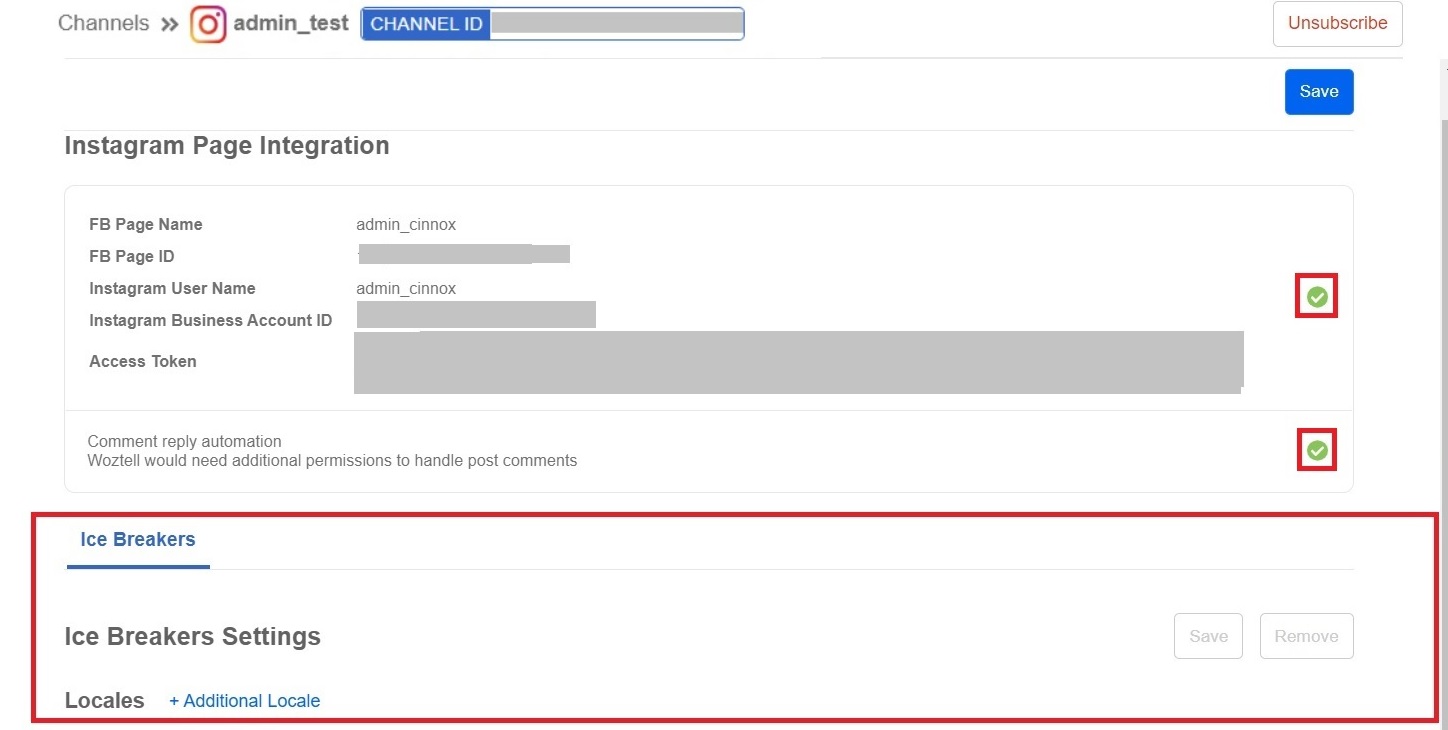
No error in Ice Breakers