Contacts
CINNOX lets you store and find information about people inside and outside your organisation, such as names, email addresses, and phone numbers.
👍
External Contacts vs Contacts
Regarding managing people outside your organisation, External Contacts and Contacts have the same features and functionalities.
However, when uploading, downloading, editing, or deleting external contacts in bulk, we recommend using External Contact Management in your Dashboard - Contacts Management menu.
Meanwhile, the Contacts in your Workspace (Dashboard and App) are best for adding, searching, editing, removing individual contacts, making calls or sending an SMS text to them.
You can view your contacts by category (e.g., External Contacts, Internal Contacts) and keep their information up-to-date.
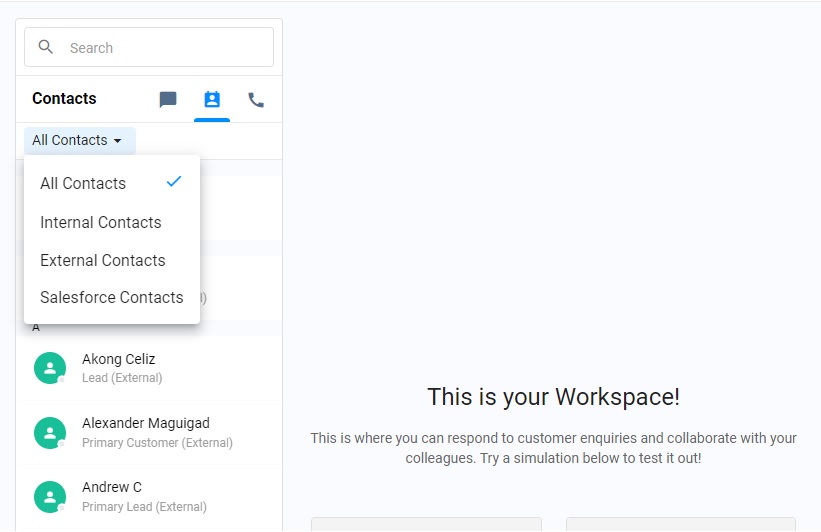
Search Contacts
You can search for internal (Staff) or external contacts by typing their name in your Utility panel's search bar.
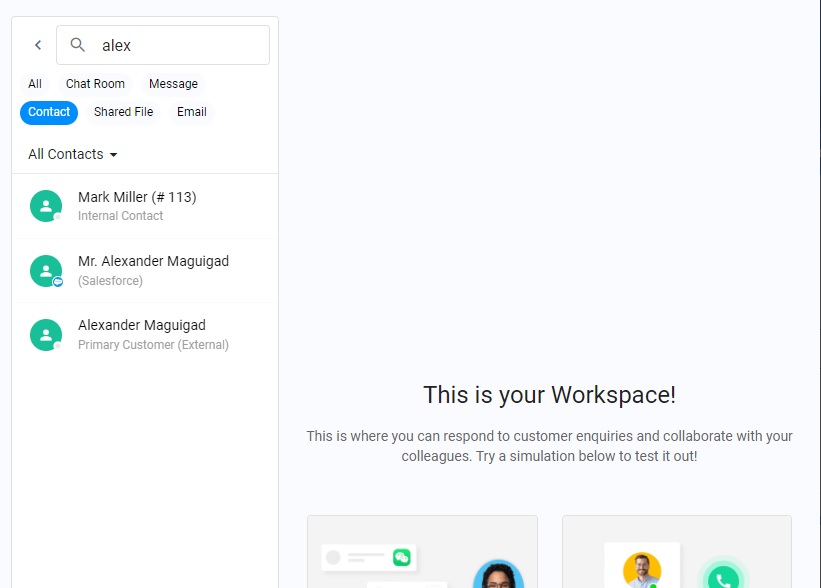
Search Contact
Internal (Staff) Contact List
The Staff Contacts List displays the following details of your fellow staff members or colleagues:
- Profile image/avatar
- Staff name
- Extension number
- Availability Status
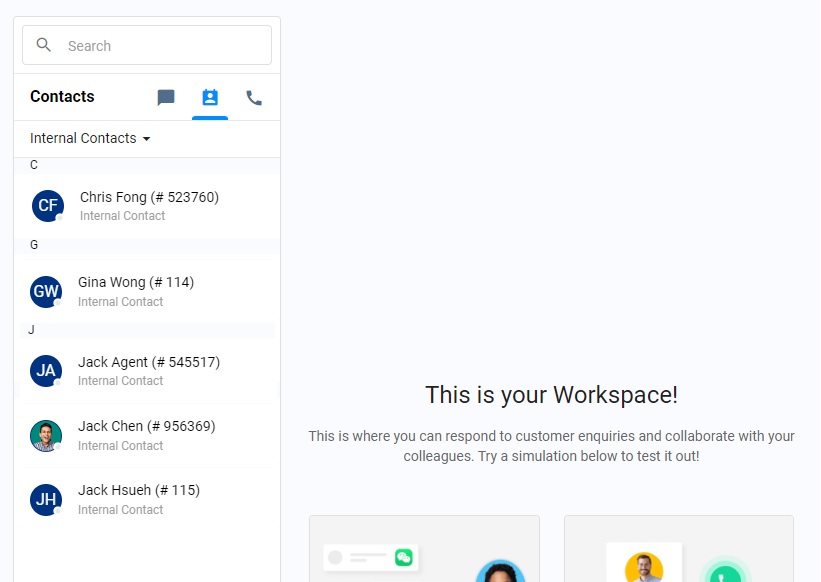
Staff Contact List
Clicking on a staff member's name or avatar will display the following detailed information:
- Profile avatar
- Staff name
- Phone Number
- Email Address
- Role
- Department
- Job Title
- Time Zone
- Extension Number
You can directly make a call (video call, audio, phone number) or send a chat or SMS when the staff phone number is available.
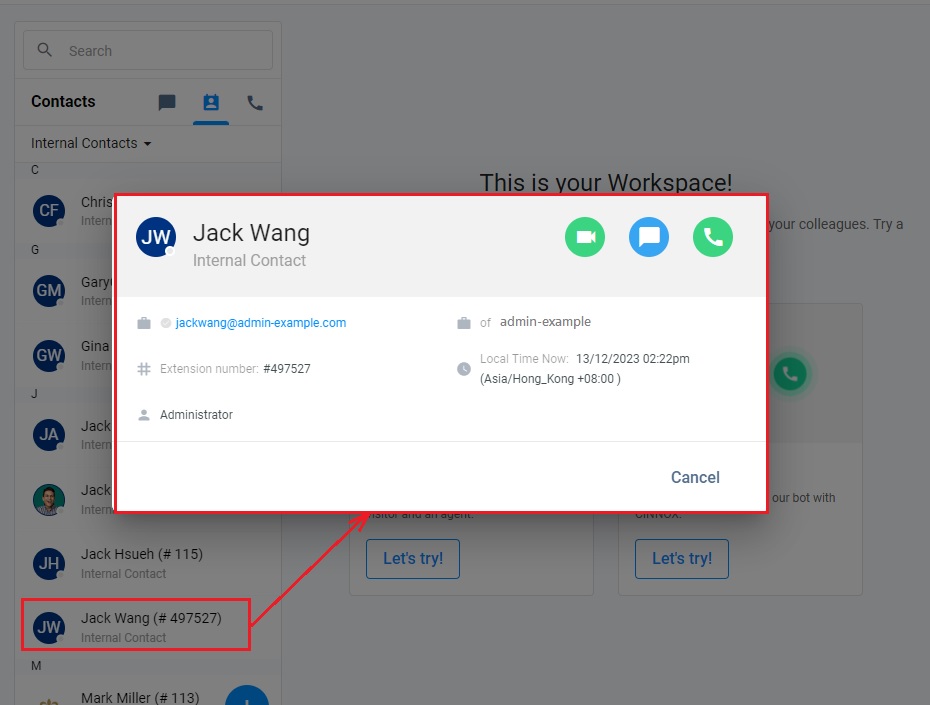
Internal (Staff) Contact Details
External Contact List
The External Contact List lets you store, manage, and share information about people outside your organisation, such as leads, prospects, and customers.
You can add new contacts, search, edit, and remove details from your external contacts.
📘
Reminder
- Please note that all agents can access external contacts, and are allowed to edit, delete and merge external contacts, regardless of who created them.
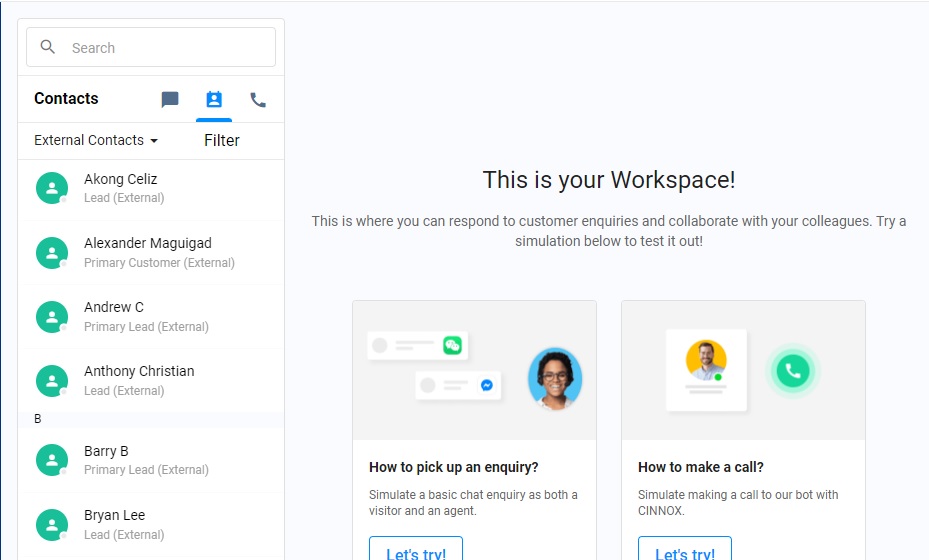
External Contact List
You can make an outgoing off-net call or send an SMS when the external contact phone number is available.
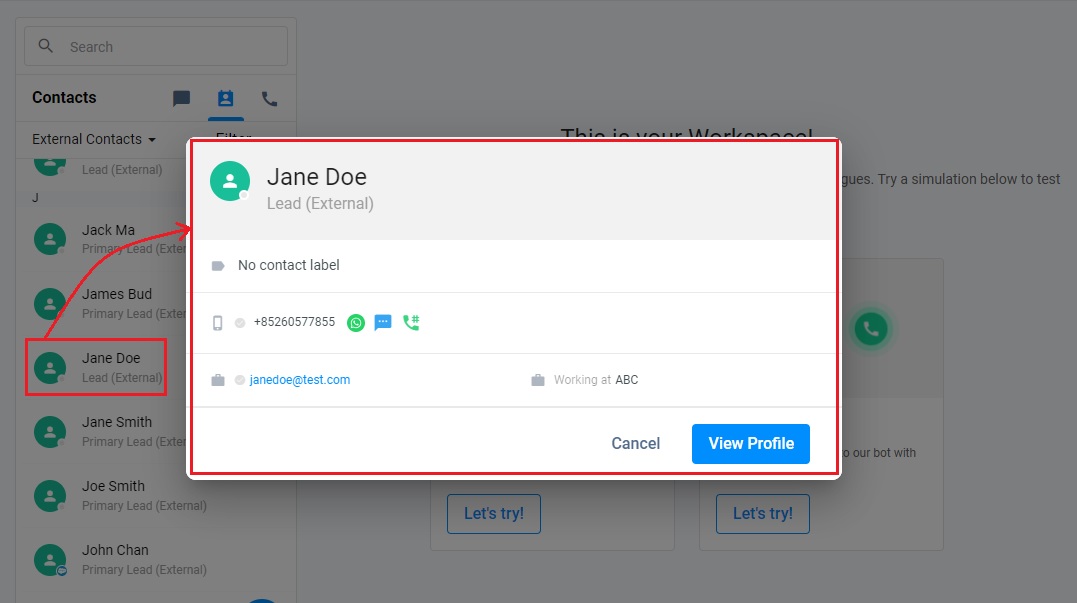
External Contact Details
Creating New External Contacts
To create an external contact:
-
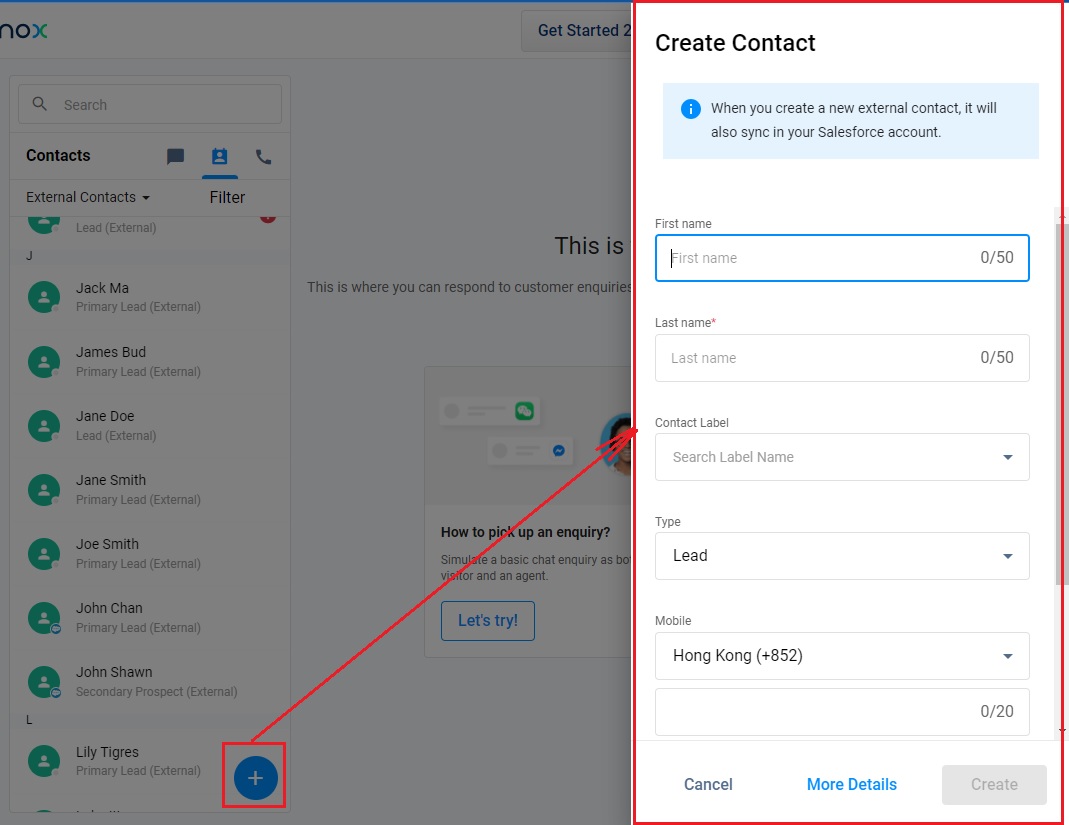
Go to Workspace > Contacts from the navigation menu, then click the ➕ icon at the bottom of the page.
-
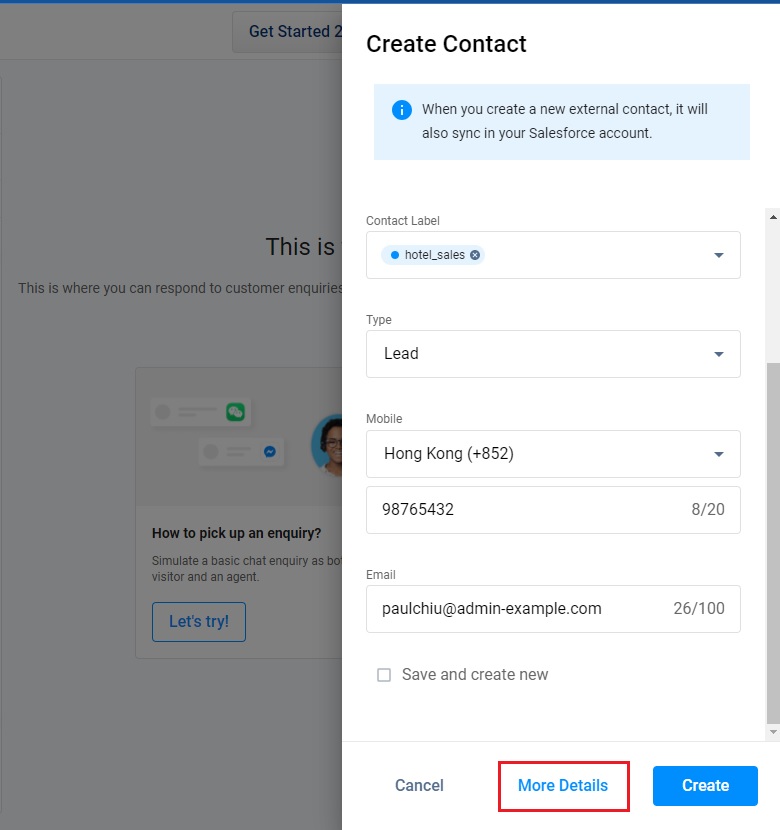
On the Create Contact page that will be displayed on the Type dropdown list, select any of the following values:
- Lead (default selection)
- Prospect
- Customer
- Other
-
Fill out or select the appropriate values for the following fields:
- First Name
- Last Name
- Country Code
- Mobile number
- Email address
-
Click the Contact Label dropdown list to select the suitable contact label.
- Select Save and create new to save the entered details and create a new Contact without leaving the screen.
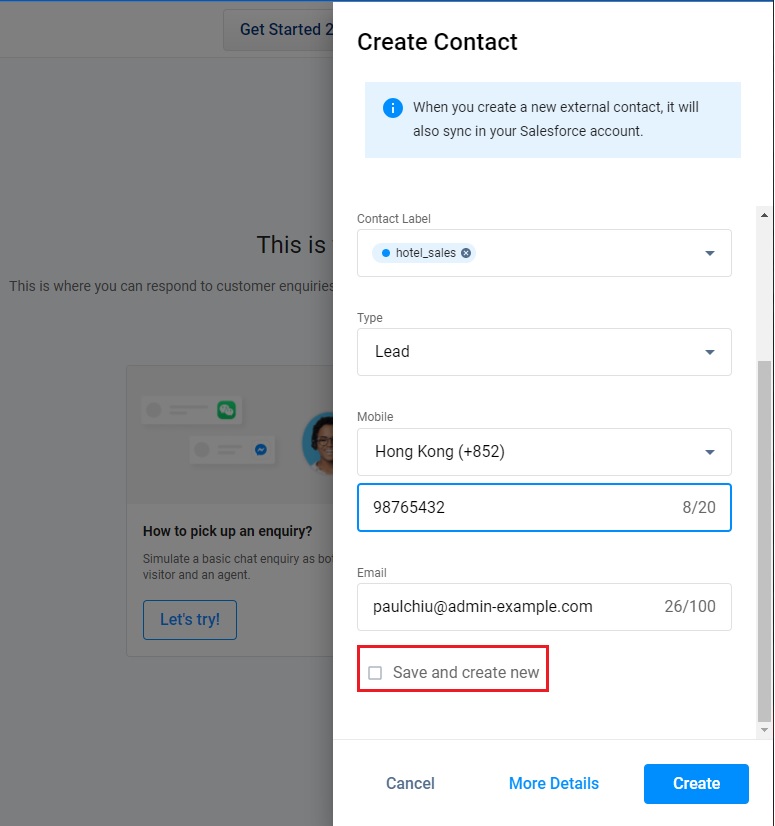
- To view and fill out additional contact details, click on More Details.
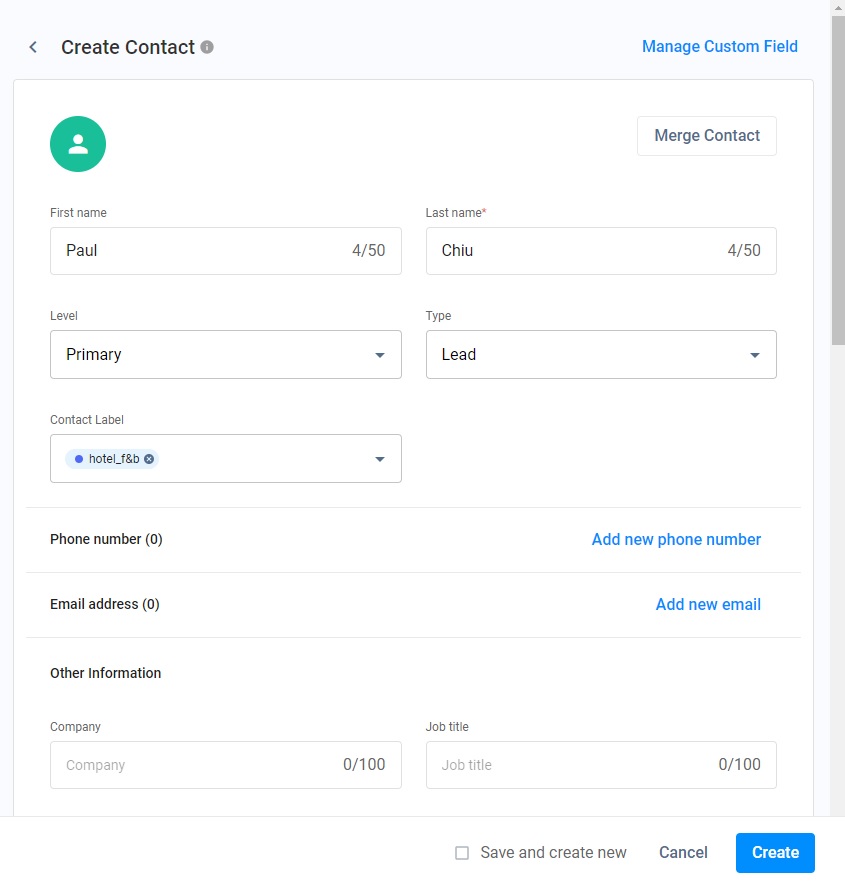
The window will display the following:
-
Personal Information
- First Name
- Last Name
- Type
- Level
- Company
- Job Title
- Department
- Birth Date (in MM/DD/YYYY format)
- Language (select from the dropdown list)
- English
- Japanese
- Simplified Chinese
- Traditional Chinese
- Group
-
Phone number
- Mobile
- Work
- Home
- Other
-
Email address
- Work
- Personal
- Others
-
Mailing Address
- Zip Code
- Street
- City
- State
- Country
-
Social Messaging
- Messenger
- LINE
- WOZTELL (WhatsApp Cloud)
- WOZTELL (Facebook)
- WOZTELL (Instagram)
-
Fill out the custom fields if required.
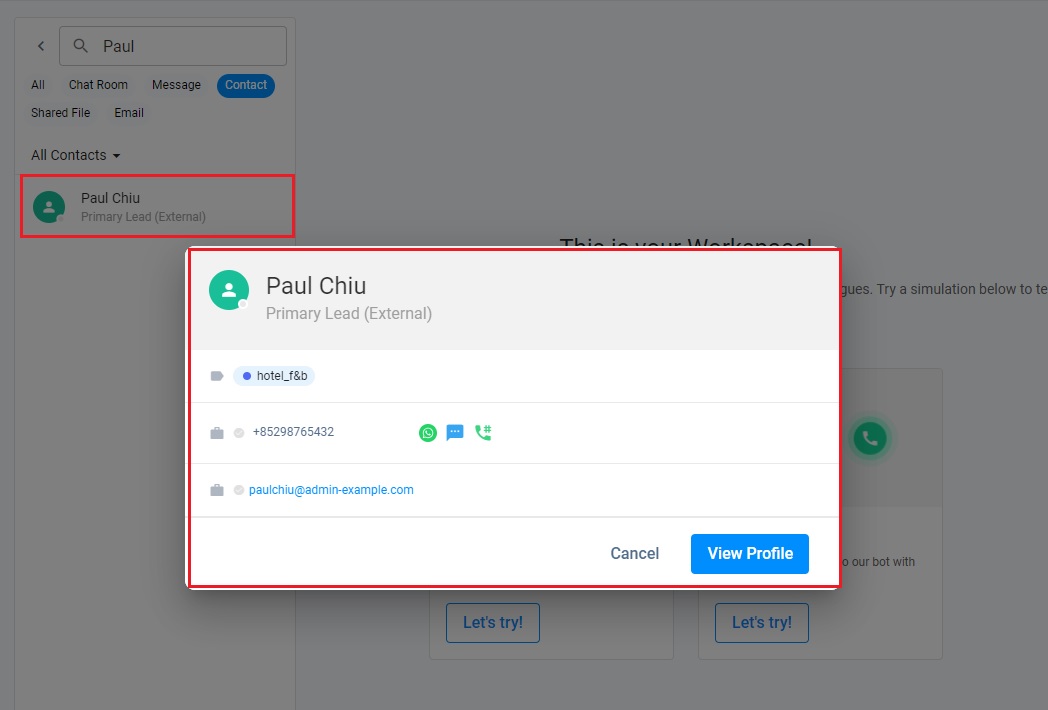
- Click on Create. The newly created external contact has been added to your External Contacts List.
Adding Notes to Contact
Adding notes to contact is a simple way to inform your group about something important.
You can add, view/edit notes to your contacts anytime.
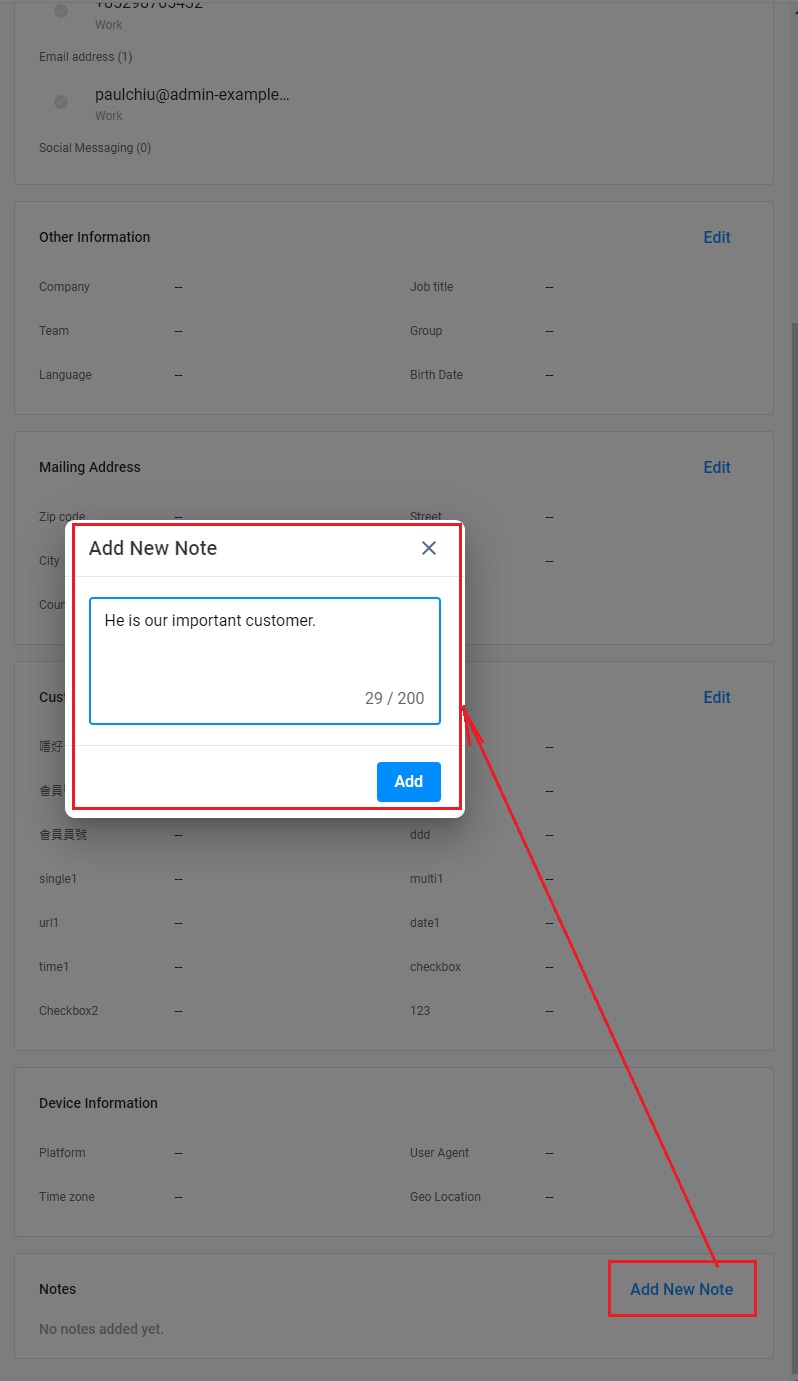
To add a note to contact:
- Find the name of a contact and open its Profile.
- Click the Add New Note button located after the personal information of the contact; the Add New Note pop-up window will display
- Add your note.
- Click Add to save the note
Adding a note to a contact
More about External Contacts
Manage your External Contacts with the following features:
Please refer to our External Contacts Management section of this Guide.
- Chatroom
- Serving Chat Enquiries
- Sending and Receiving Chats
- Canned Responses
- Chat Translation
- AI Enquiry Summary
- AI Enquiry Summary Custom Format Best Practices
- Add Staff to an Enquiry Room
- Monitor Enquiry and Take Action
- Private Message
- Get your Azure OpenAI Account
- Integrate your Azure OpenAI Account with CINNOX
- Labelling an Enquiry
- Sharing Files
- Space (Group Chat)
- Customer Public Space (Private Chat)
- Manage Tag Directory
- Creating a Tag
- Managing Social Channels
- Connecting (FB) Messenger
- Connecting Wechat
- Connecting Whatsapp
- 360dialog (WhatsApp BSP)
- Restart the Enquiry Conversation (360dialog WhatsApp)
- Connecting Line
- Connecting Woztell
- Get a Woztell Account and Create Channels
- Connecting Email
- Connecting Gmail/Google Workspace Email
- Connecting Outlook/Microsoft 360 Email
- Email Enquiry Handling
- Connecting Third-Party Channel
- Channel Source
- Email Engagement
- Pin/Unpin Messages & Hide/Unhide Chat Rooms
- Sending SMS
- SMS Inbox
- SMS and Call Known Limitations
- Campaigns
- Creating SMS Standard Campaign
- Create SMS Dynamic Campaign
- Campaign Templates
- SMS Templates
- WhatsApp Engagement
- Creating WhatsApp Campaign
- Whatsapp Templates
- CINNOX Markdown Guide
- Managing Destinations
- Managing Service Group
- Adding Chatbot
- CINNOX Q&A Bot
- Chatbot Data Source
- Chatbot Custom Prompts Best Practices
- General Integration for Chatbot
- IVR (Interactive Voice Response)
- Alternative, Percentage, Time and Sticky Routing Rules
- Queue Settings
- CINNOX Distribution Method (ACD)
- Advanced Enquiry Routing Flow
- Enquiries in CINNOX
- Enquiry Centre
- Transferring Enquiry
- Transferring Chat
- Follow Up on Missed Enquiries
- Closing an Enquiry
- Monitoring
- Enquiries Monitoring (aka Enquiry Overview)
- Queue Monitoring
- Contacts
- Managing External Contacts
- Labelling an External Contact
- Custom Field for External Contacts
- Merging Contacts
- Integrating Salesforce
- Salesforce Contacts in Dashboard
- Engagement in CINNOX
- Developer Guide
- Prerequisites
- Installing the Web Widget
- Configure the Widget UI Language
- Passing data to agent via Weblink and Widget
- Tag Conditional Trigger
- Installing Internet Information Services (Microsoft IIS)
- Installing Apache Server
- Installing Nginx Server
- Wordpress
- Wix
- Drupal
- Joomla
- Squarespace
- BigCommerce
- Shopify
- Weebly (eCommerce by Square)
- Webflow
- HubSpot CMS Hub
- Jimdo
- Leadpages
- SHOPLINE
- Thinkific
- APPs & API
- Zapier
- CINNOX Chrome Extension
- My Sites
- Configure CINNOX Web Widget
- Customising Your Widget
- Managing Widget's Smart Greeting
- Managing Visitor Forms
- Managing Staff
- Managing Roles and Permissions
- Managing Teams
- Managing Call Recording an Transcript
- Managing Labels
- Keyword Masking
- Managing Contact & Enquiry Settings
- Managing Call Prompts
- Managing Storage
- My Plan
- Cancelling CINNOX Account
- Workflows
- Getting Started with the App
- App Sign In and Sign Out
- Navigating the App
- Enquiry Monitoring (aka Enquiry Overview)
- Chat Room
- Private Message
- Serving Chat Enquiries
- Serving Call Enquiries
- Monitor Chat Enquiry & Take Action
- Add Staff to an Enquiry Room
- Closing Enquiries
- Labelling an Enquiry
- Labelling External Contacts
- Sending and Receiving Chats
- Sharing Files
- Making Calls
- Answering Calls
- Sending SMS
- WhatsApp Engagement
- Email Engagement
- Instant Conference Call
- Scheduling Conference Call
- 1-to-1 to Conference
- Ongoing Conference Call
- Video Calling
- Recording and Transcript
- Following Up on Missed Enquiries
- Transferring Enquiry
- Transferring Call
- Transferring Chat
- Space (Group Chat)
- Restart the Enquiry Conversation (360dialog WhatsApp)
- Pin/Unpin Messages & Hide/Unhide Chat Rooms
- Contacts
- Merging Contacts
- Salesforce Contacts in CINNOX App
- Sync Device Contacts
- Setting Up Your Availability Status
- Unread Panel
- Mention Preference
- Conference Preference
- My Account - Staff Profile
- Changing Password
- Passcode and Biometrics
- Two-Factor Authentication
- Third-Party Authentication (Staff App Login)
- Service Numbers
- Personal Numbers
- Call Forwarding
- Managing Devices
- Simulation and Help Centre
- Sending Feedback
- Reports API
- Get Enquiry Details
- Get Enquiry Chat Details
- Get Call Details
- Get Conference Details
- Get Call Log Details
- Get Recording File Details
- Get Transcription File
- Get SMS Details
- Get Enquiry Overview Matrix
- Get Channel Type list
- Get Channel Type details
- Create/Edit/Delete Enquiry Event Subscription
- Create/Edit/Delete Recording File Event Subscription
- Create/Edit/Delete Conference Call Event Subscription
- Get Sent Campaigns Summary
- Get Sent Campaign Details
- Management API
- Create/Edit/Delete External Contact Event Subscription
- Get External Contact List
- Get External Contact Activity
- Create External Contact
- Update External Contact
- Create/Edit/Delete Contact Event Subscription
- Create/Edit/Delete Staff Contact Event Subscription
- Get Staff Contact List
- Get Supported Language List
- Get Supported Location List
- Create Destination-Service Group
- Update Destination-Service Group
- Get Destination List
- Delete Destination-Service Group
- Create Tag
- Get Tag List
- Update Tag
- Delete Tag
- Get Label List
- Delete Label
- Label an Enquiry
- Unlabel an Enquiry
- Create/Edit/Delete Label Event Subscription