Canned Responses
Ready to revolutionise the way you communicate?
Boost your response times and eliminate repetitive typing with CINNOX's Canned Response tool! With predefined answers for frequently asked questions, you can effortlessly provide quick and accurate replies to your visitors, customers, and colleagues. Whether it's a personal canned response or a public one, CINNOX's tool allows you to easily manage and update your responses anytime. Experience the convenience and efficiency of Canned Responses - your ultimate solution for seamless and engaging chat interactions.
CINNOX lets you add and store your responses through the Canned Responses tool and use them effortlessly in chat replies.
Your response times reduce, and you no longer repetitively type the same chat by adding predefined answers or messages for frequently asked questions of your visitors, customers and colleagues. Use and manage your canned responses and keep them up to date anytime.
Types of Canned Responses
Personal Canned Response: All staff can add, view, update and delete their responses. It's for individual use only." The staff can download their canned response as well.
Public Canned Response: Admin and custom role staff (with permission) - can view, add, delete and download public responses. As for the usage, all staff can use the added public canned responses to their chat replies.
🚧
Permission to Public Canned Responses
As an admin, to grant permission for staff to view and manage Public Canned Responses, please navigate to Managing Roles and Permissions and edit the custom role to add Public Canned Response Management and assign it to staff.
Manage Canned Responses
Add Personal Canned Responses
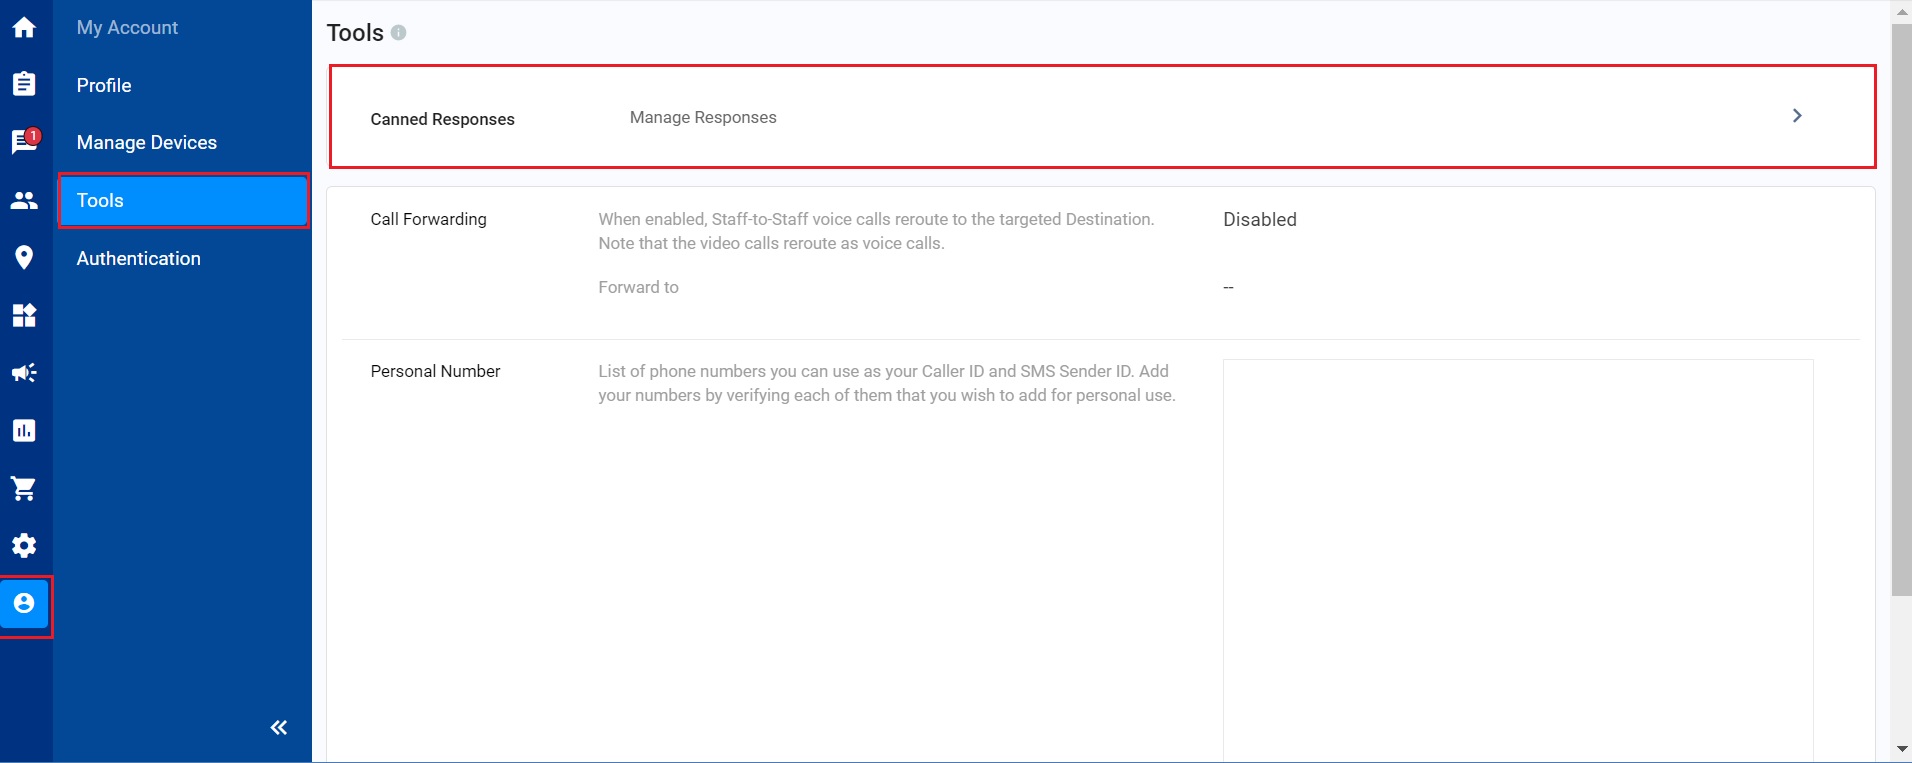
- Sign in to your web Dashboard and navigate to My Account > Tools & Settings or navigate to Administration > Tools & Settings > Canned Responses, then click Personal Tab
📘
Notice that if you have access to the Public Canned Response, the Public tab will appear.
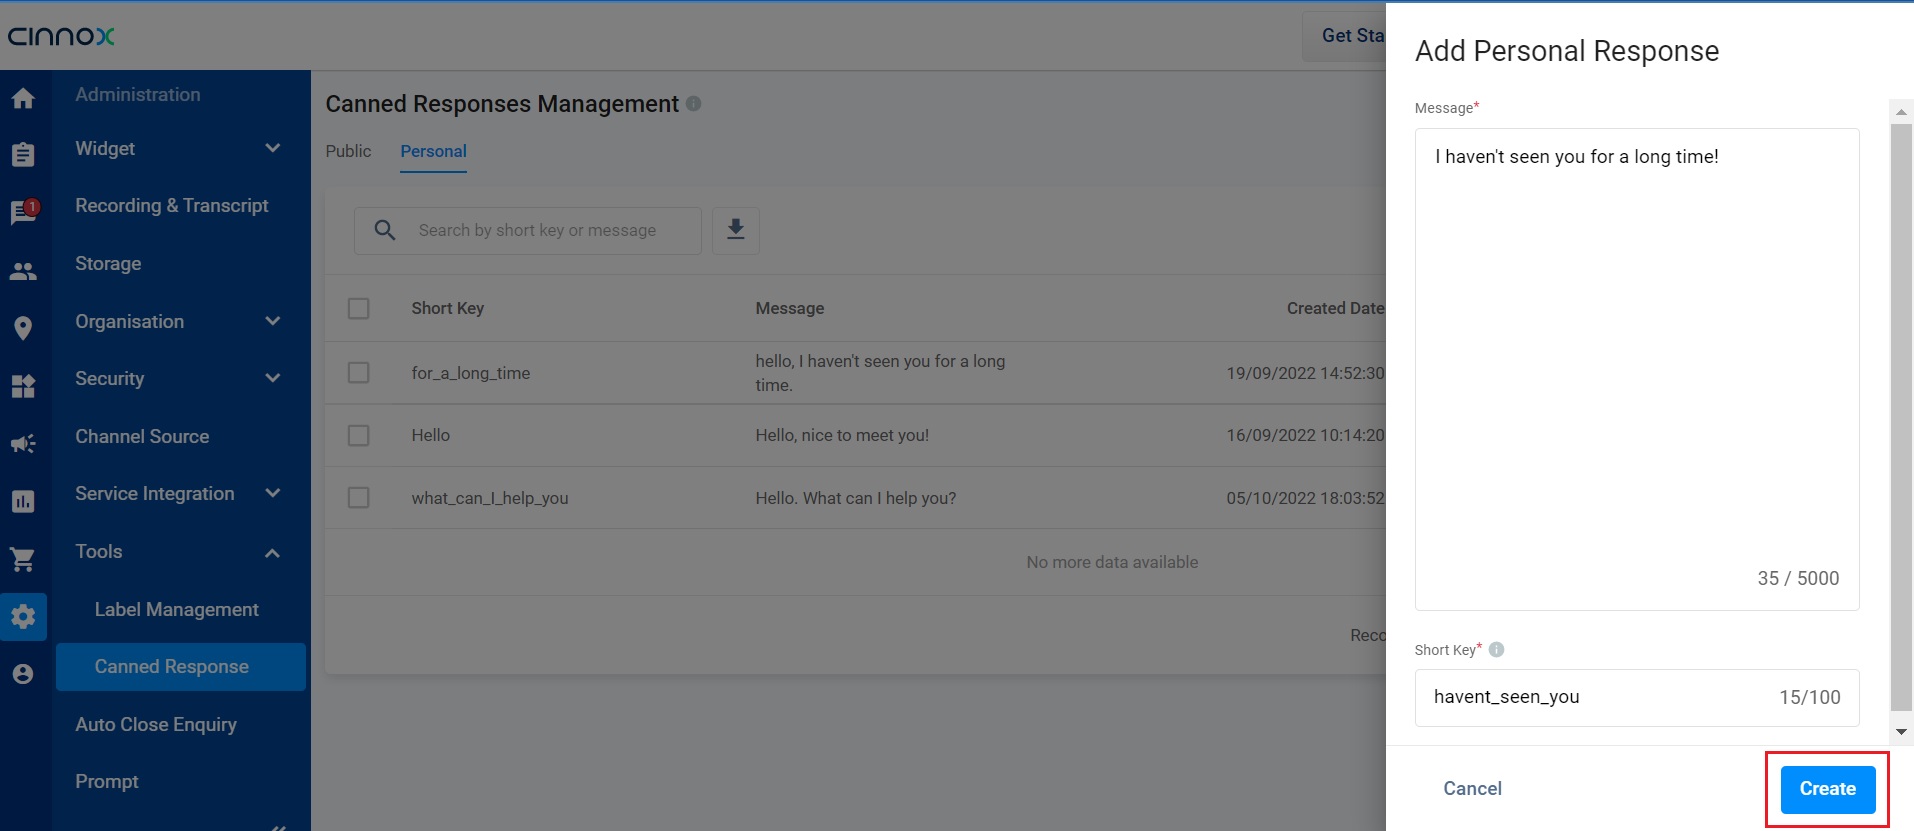
- Click Add Personal Response. A sliding window will show from the right.
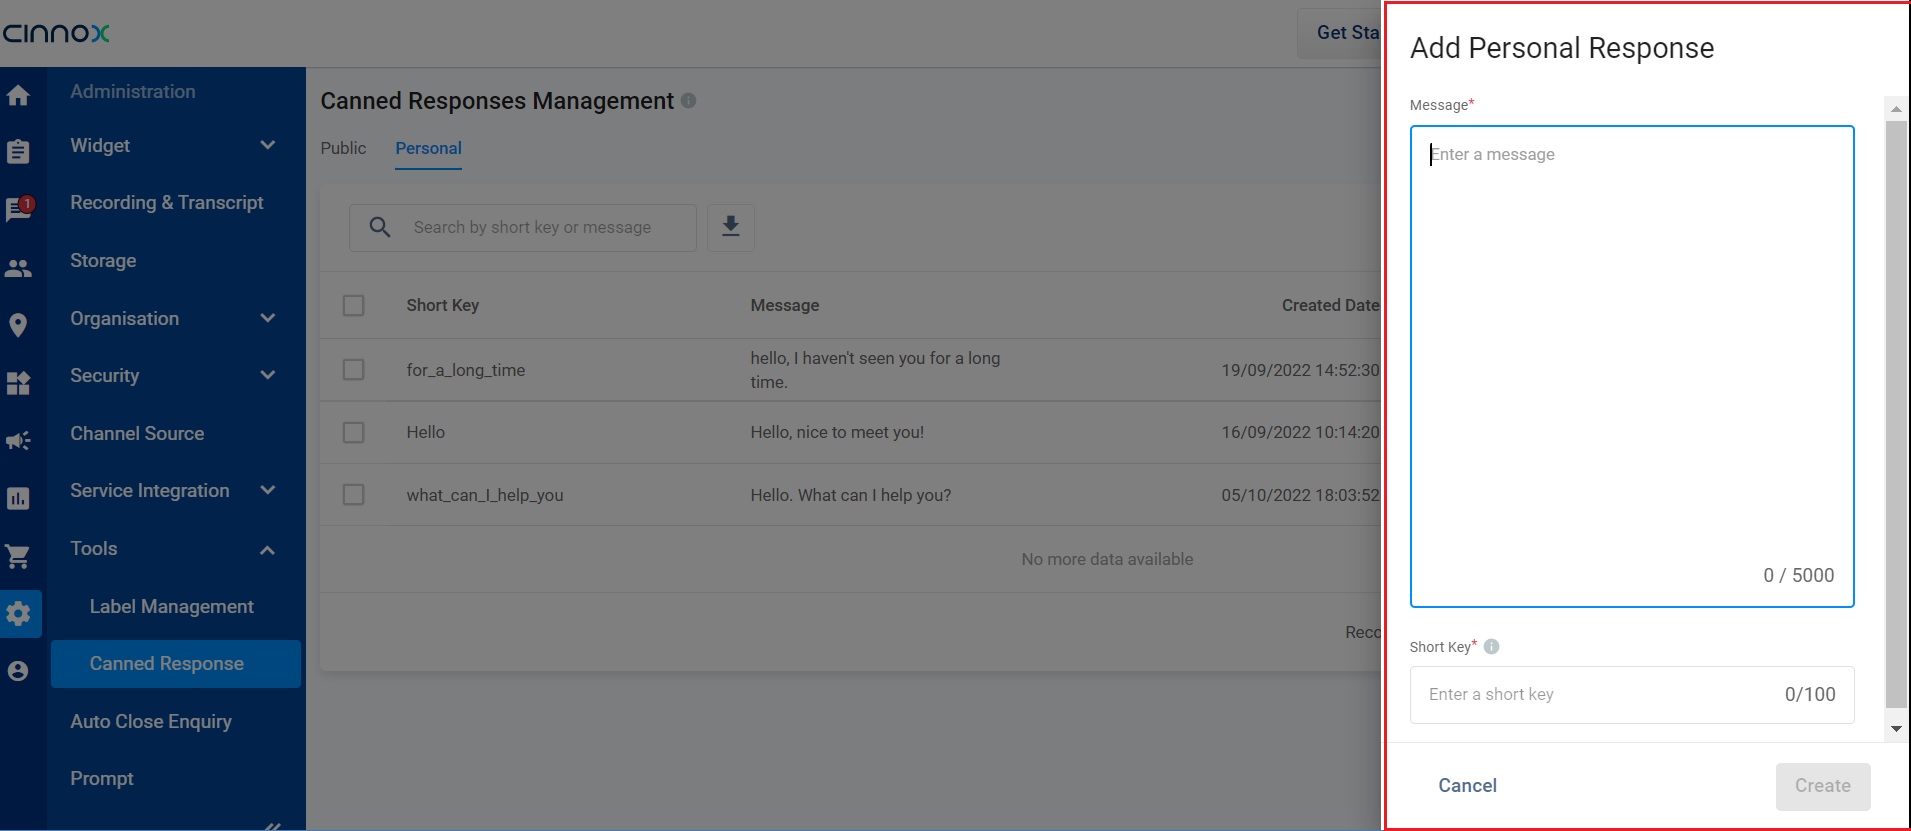
- Enter a message for the response you commonly send or reply to your visitors, customers and colleagues. A maximum of 5000 characters can be used for the response message.
- Enter a short key that is related and easy to remember for your predefined response. The system will check the short key as it should be unique and not duplicated with public and others' canned responses. A maximum of 100 characters can be used for the Short Key.
- Click Create.
Below are the possible errors to may appear. Otherwise, the response will be saved successfully.
- This short key is already used in the public or others' canned responses. Please enter another one.
- Do not support "space" and special characters ". @ # /". Each staff member can add and store 100 personal responses in total.
Add Public Canned Responses
- Sign in to your web Dashboard (as admin and non-admin with permission to Public Canned Responses) and navigate to My Account > Tools & Settings, then click Canned Responses or navigate to Administration > Tools & Settings > Canned Responses, then click Public Tab**.
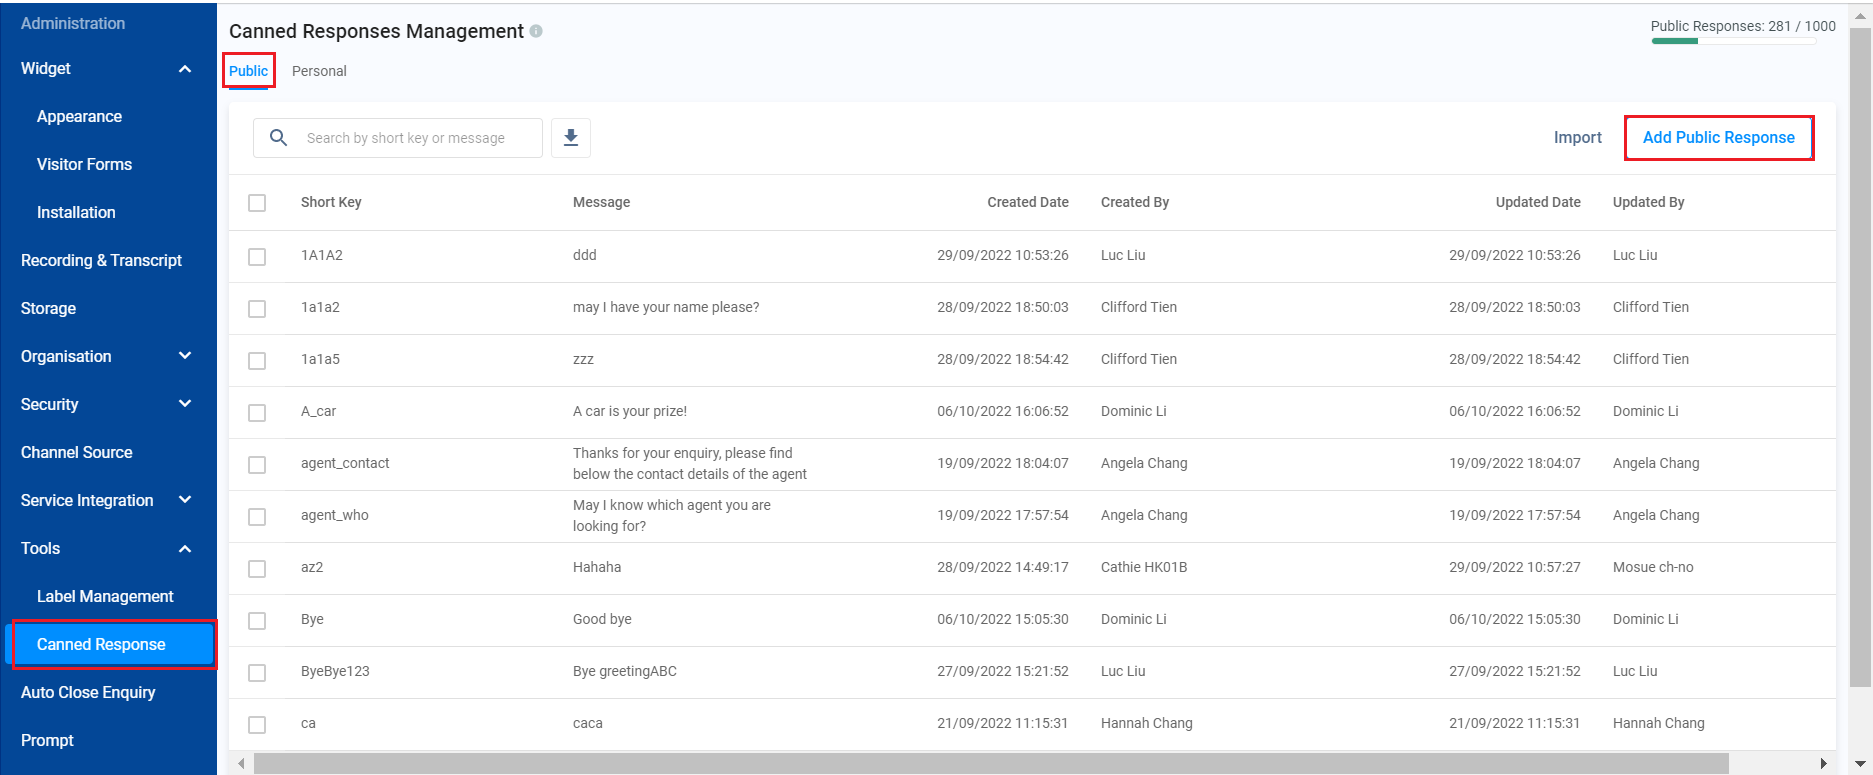
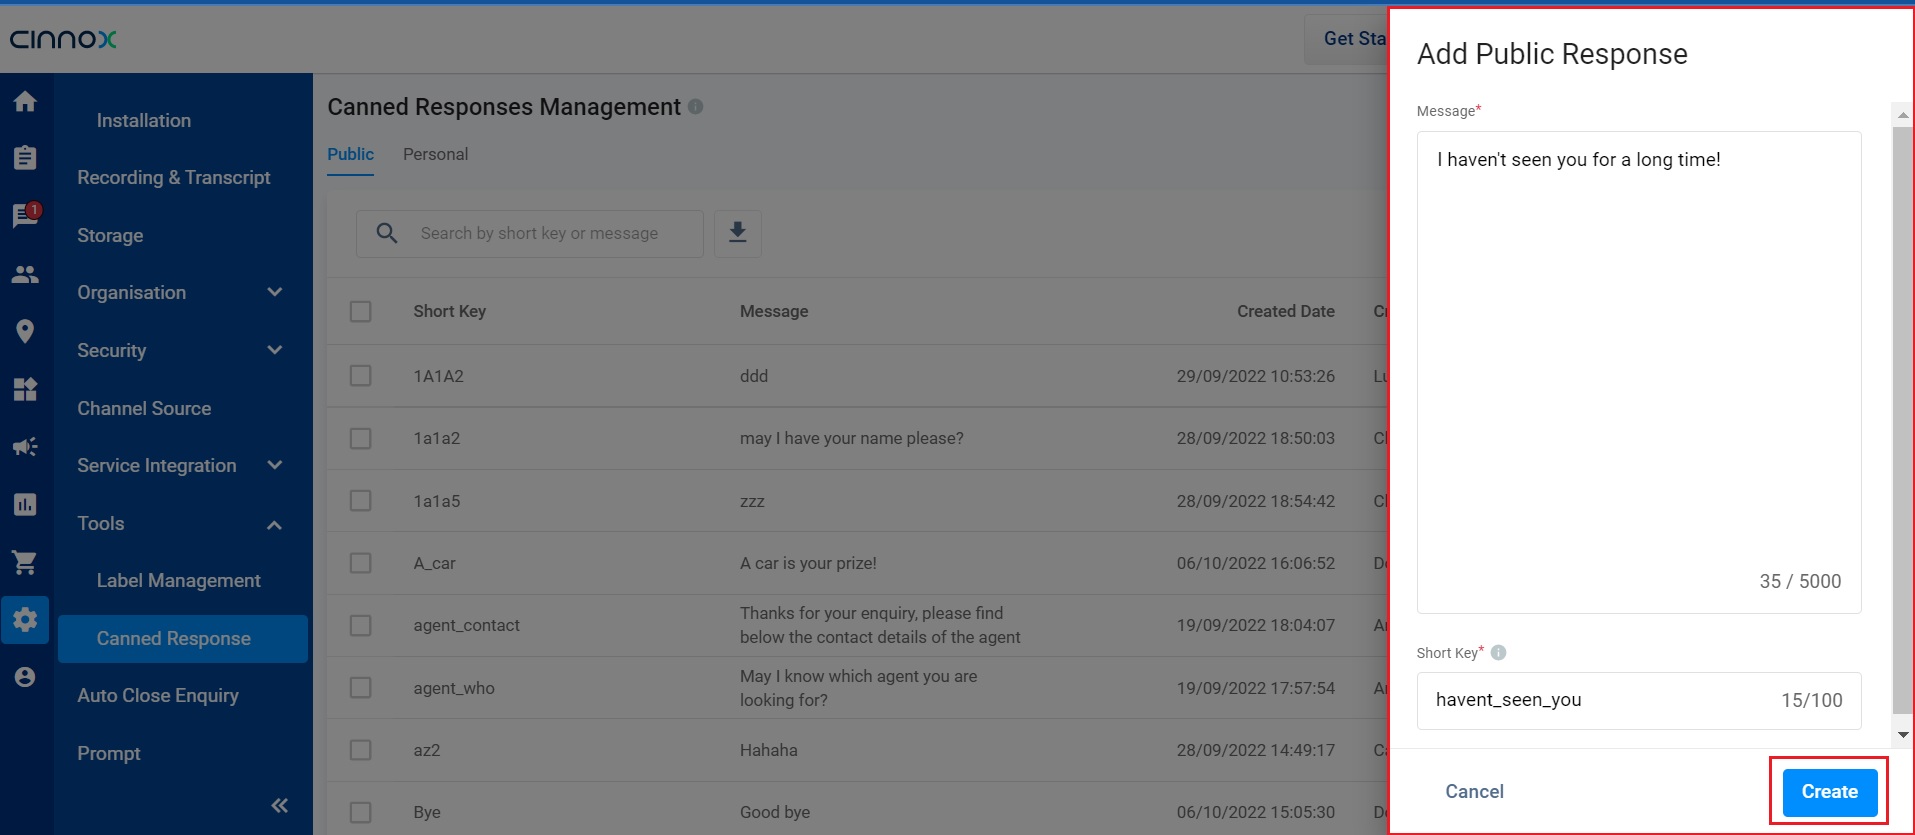
- Click Add Public Response. A sliding window will show from the right.
- Enter a message for the response you commonly send or reply to your visitors, customers and colleagues. A maximum of 5000 characters can be used for the response message.
- Enter a short key that is related and easy to remember for your predefined response. The system will check the short key as it should be unique and not duplicated with public and others' canned responses. A maximum of 100 characters can be used for the Short Key.
- Click Create.
Below are the possible errors to may appear. Otherwise, the response will be saved successfully.
- This short key is already used in the public or others' canned responses. Please enter another one. Do not support "space" and special characters ". @ # /".
📘
The short key automatically populates related canned response messages in the chat room. It should be unique and not duplicated with public and others' canned responses.
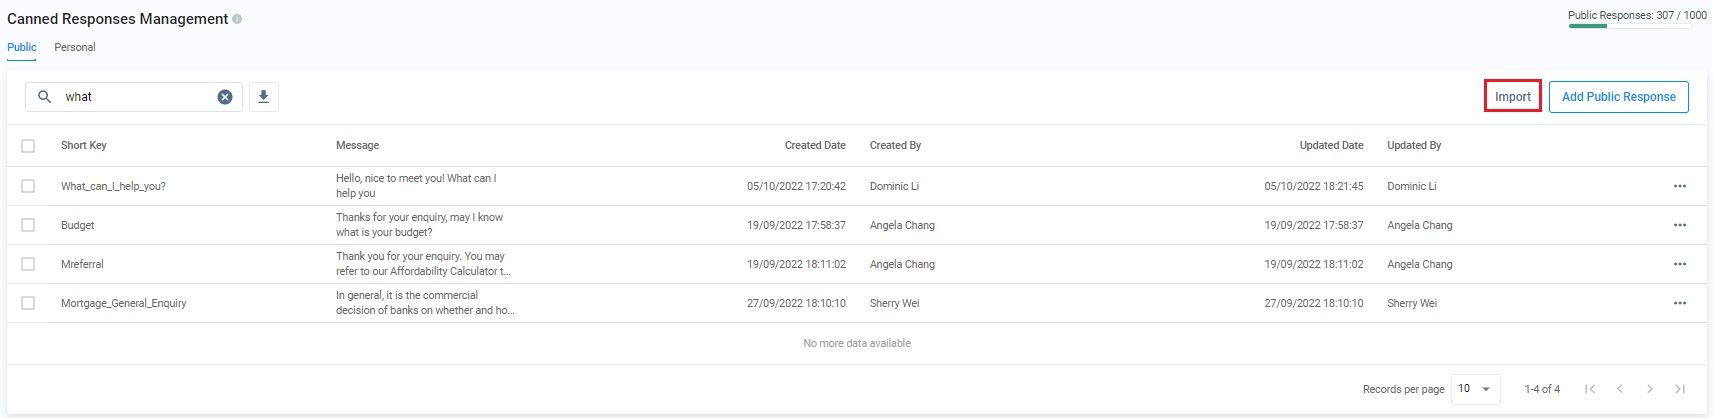
Import Personal or Public Canned Responses
- Select the Public or the Personal tab on the Canned Responses Management page.
- Click on Import.
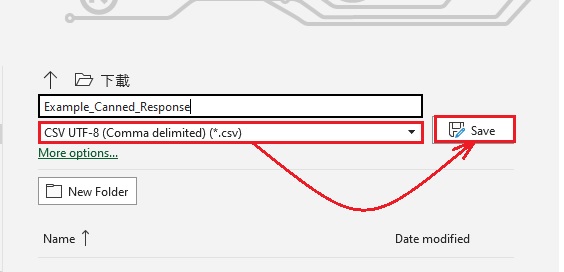
- On the Import Canned Responses pop-up window, click on CSV file or XLSX file on the sentence Download the sample CSV file or XLSX file. This template is downloaded to your local device.
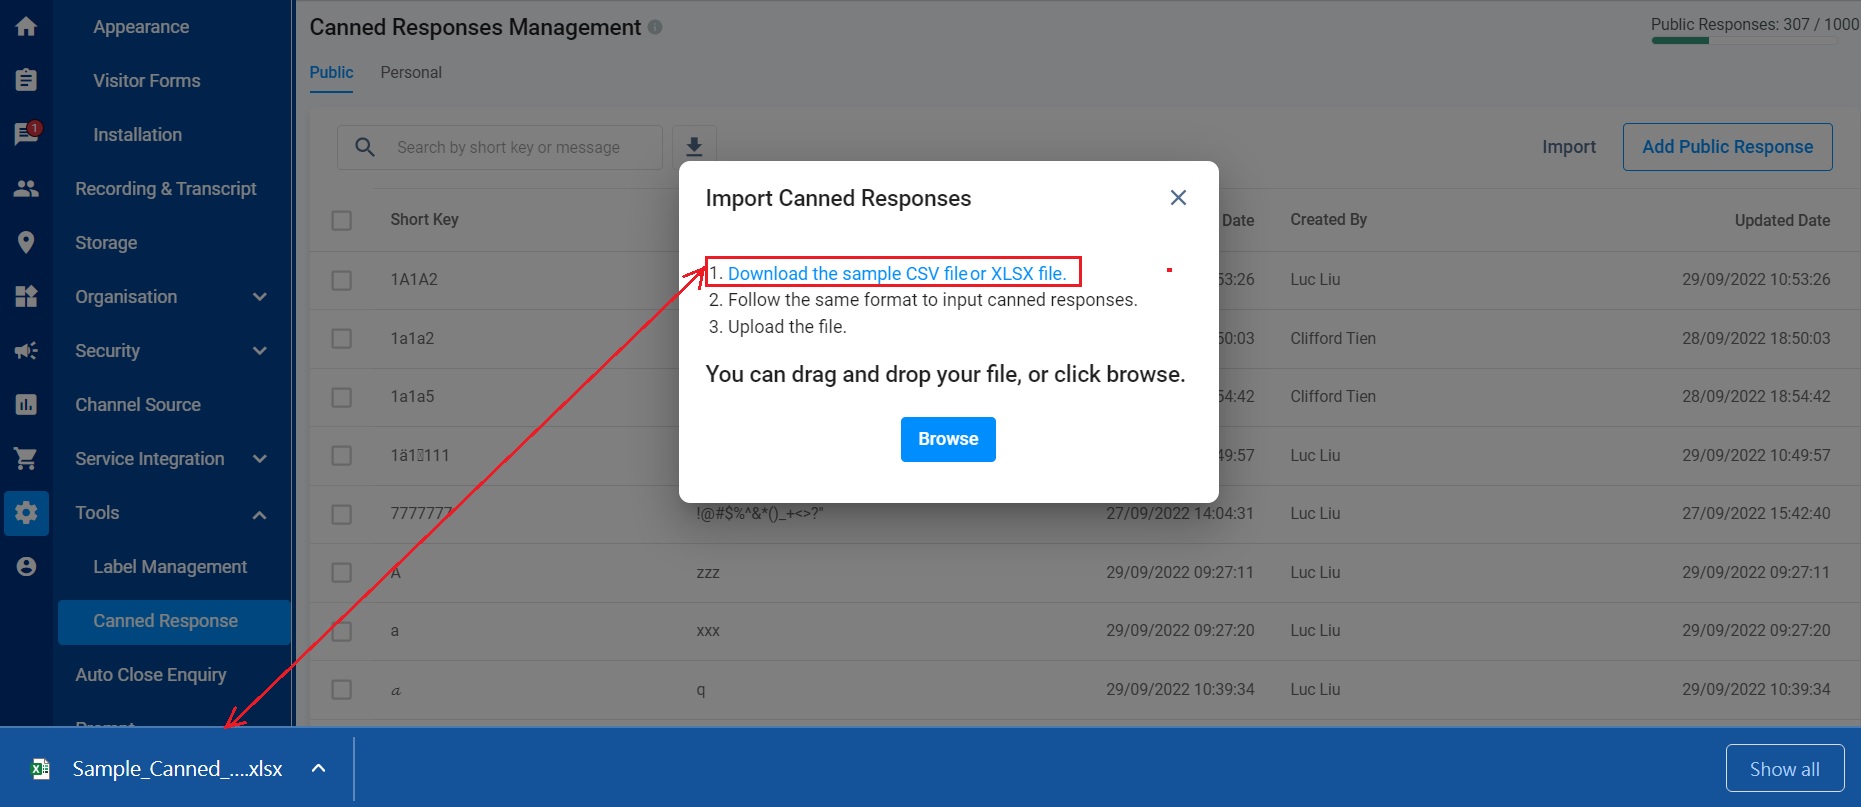
Click on Download the sample CSV file or XLSX file
- Open the spreadsheet template, which should contain two columns, and remove the first sample record.
- Add the short keys and messages to their respective columns for your canned responses.
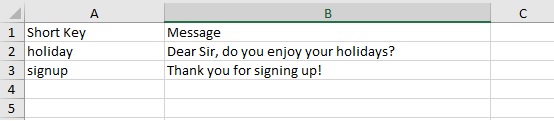
Enter the short keys and messages.
📘
- If you use a CSV text editor to edit the canned responses, the content must be wrapped with the double quotation marks "" (See Example 1). If the original content has already been wrapped with double quotation marks, make sure the double quotation marks must be used to wrap this content (See Example 2).
- Example 1: "Hello, how can I help you today."
- Example 2: "The room ""Gold"" is available."
- Double quotation marks are not required for editing content in an excel file.
- You can add as many records as possible to the spreadsheet if the file size does not exceed 5MB.
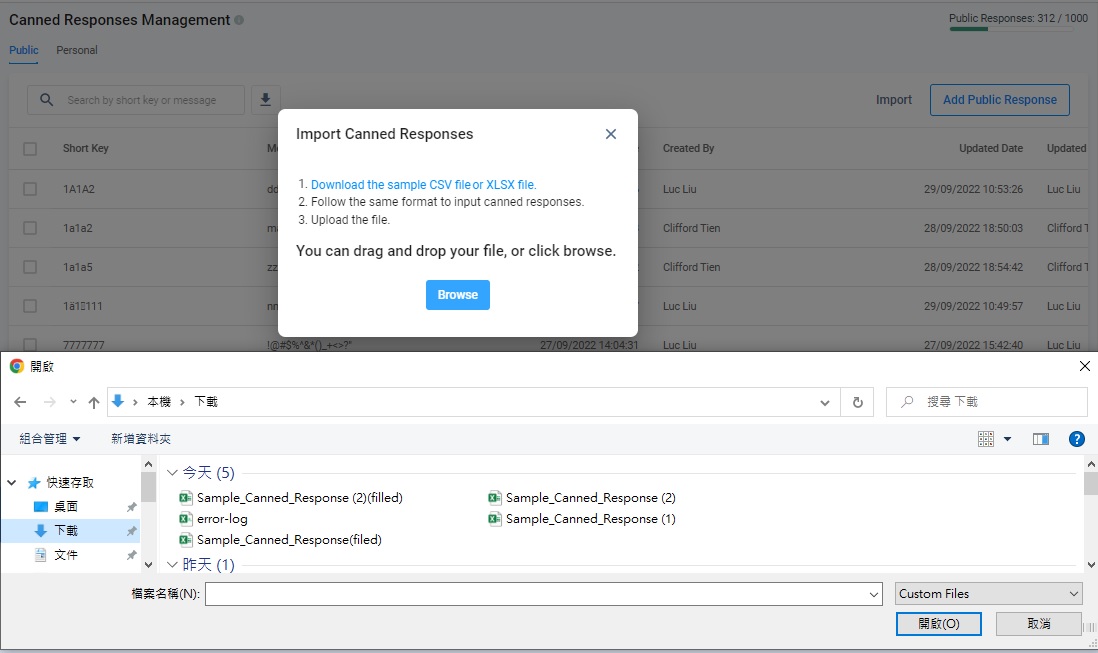
- Once all columns are ready, please save the file and upload it to CINNOX by dragging and dropping it into the designated box in the pop-up. You may also upload the file by clicking on Browse and selecting it from its location.
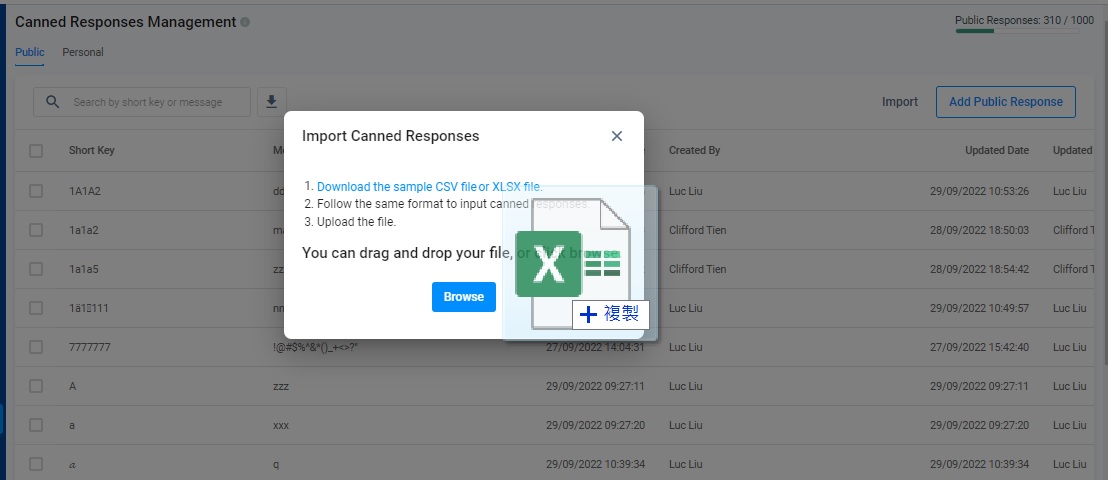
- You can also click on Browse from the pop-up window, then locate and select the file from your folder.
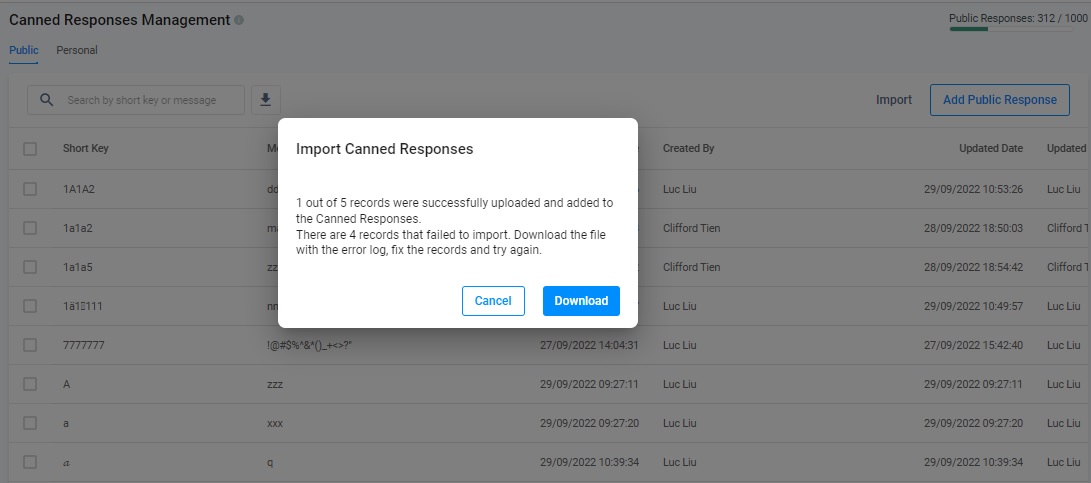
- The pop-up message will display the number of records that were successfully imported and the number of records that failed to import.
🚧
If only 10 remaining slots are available for the Canned Responses to add, and you imported 20 responses, then only the first 10 would be added to the Canned Responses. The remaining 10 will be considered invalid, and the import requests fail to these records.
How to handle failed records during the import of multiple canned responses:
| For example: |
|---|
| 1 of 5 records was successfully uploaded and added to the Canned Responses. 4 records failed to import. Download the file with the error log, fix the records and try again. |
- On the pop-up window, click on Download to download the file error-log.xlsx.
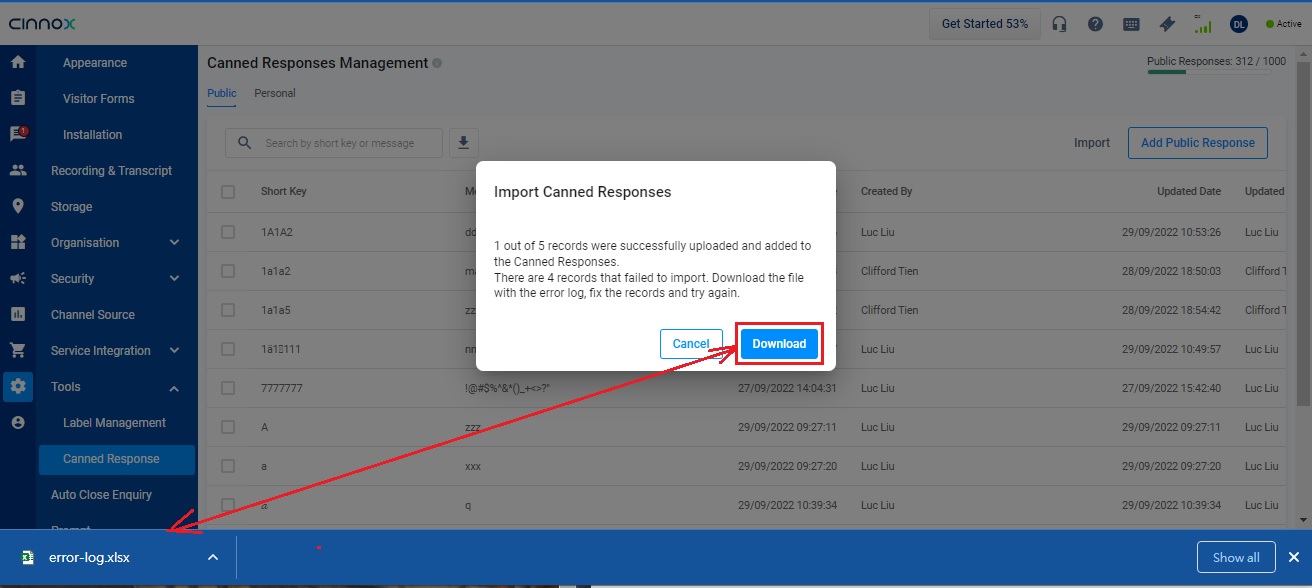
- Click on Cancel to close the pop-up window.
- Open error-log.xlsx and check the error details in column C. Each record will show an er or log.
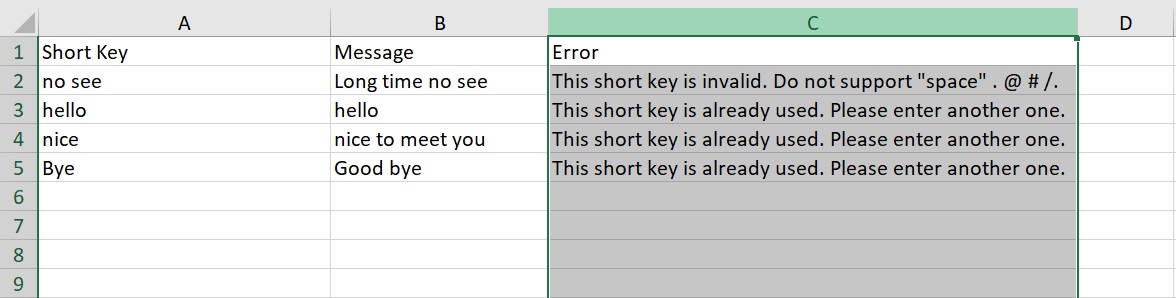
- Correct the details for each record directly on ErrorDetail.csv and save the changes made.
- Back on the Import pop-up window, upload the updated ErrorDetail.csv file by dragging and dropping the file into the window. You can also click on Browse from the pop-up window, then locate and select the file from your folder for the file upload.
- A message will display the number of records successfully imported and those that failed to import.
📘
- Each staff can add and store 100 personal responses in total.
- Admins and non-admins with permission to the Public Canned Responses can add and store 1000 per service.
How to handle the case of the splitting text in the CSV file:
Using a comma (,) to split the text is the function of the CSV file. When importing the CSV file with a comma between texts, the text will be split into the next column in the file after the file upload.
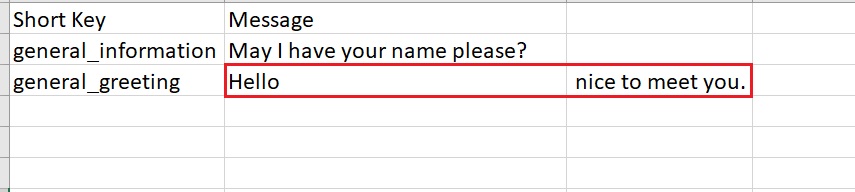
Splitting text in the CSV file
For example, when you enter Hello, nice to meet you. into the column Message, the file is shown below:

After the file upload, the text is shown below:
As the text Hello, nice to meet you. contains a comma in the Message, after the filled CSV file is uploaded, the text is split into two columns, Hello in the column Message and nice to meet you. in the other column.
How to avoid splitting text
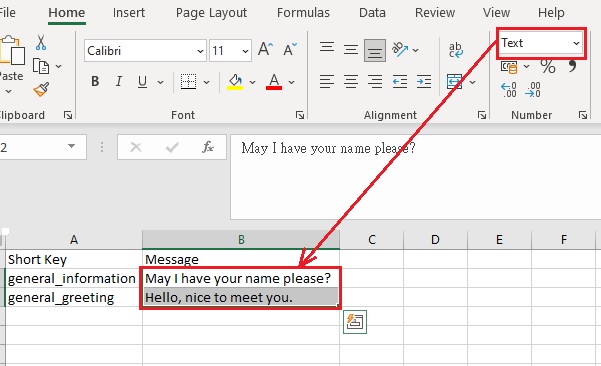
- Fill in the text in the text format.
- Using a text editor
- Put the text with a comma in the double quote (""), like "Hello, nice to meet you." and save it as a CSV file when you upload the file.
- Using Excel or style sheet editors
- Fill in the text in the text format.
- Save the sheet as a CSV file and upload it to the CINNOX.
The double quote should be added automatically to the file.

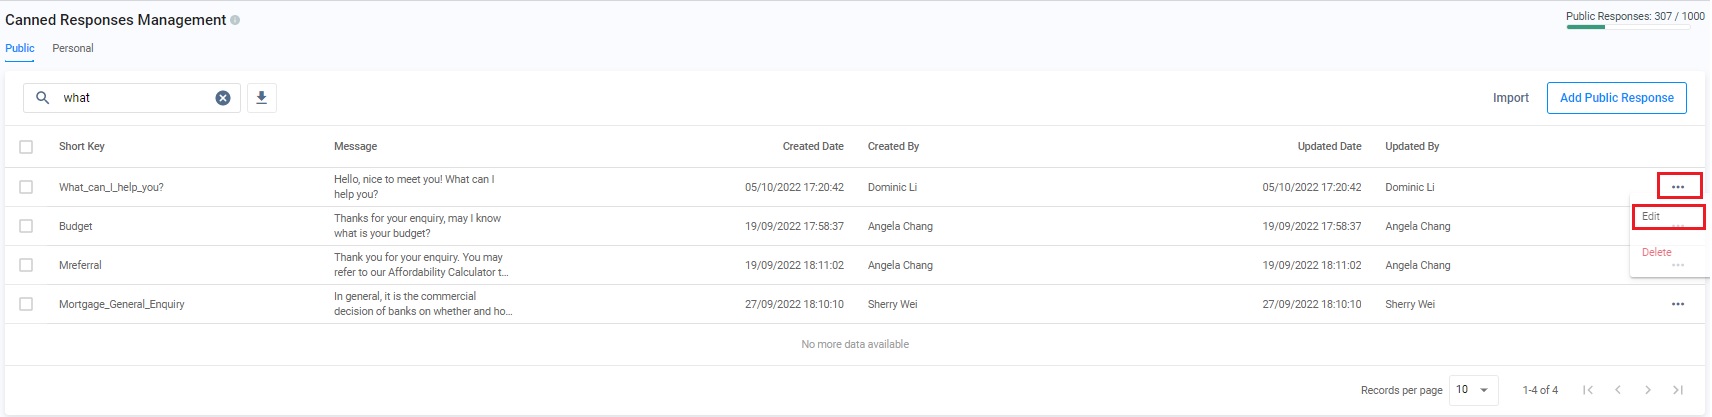
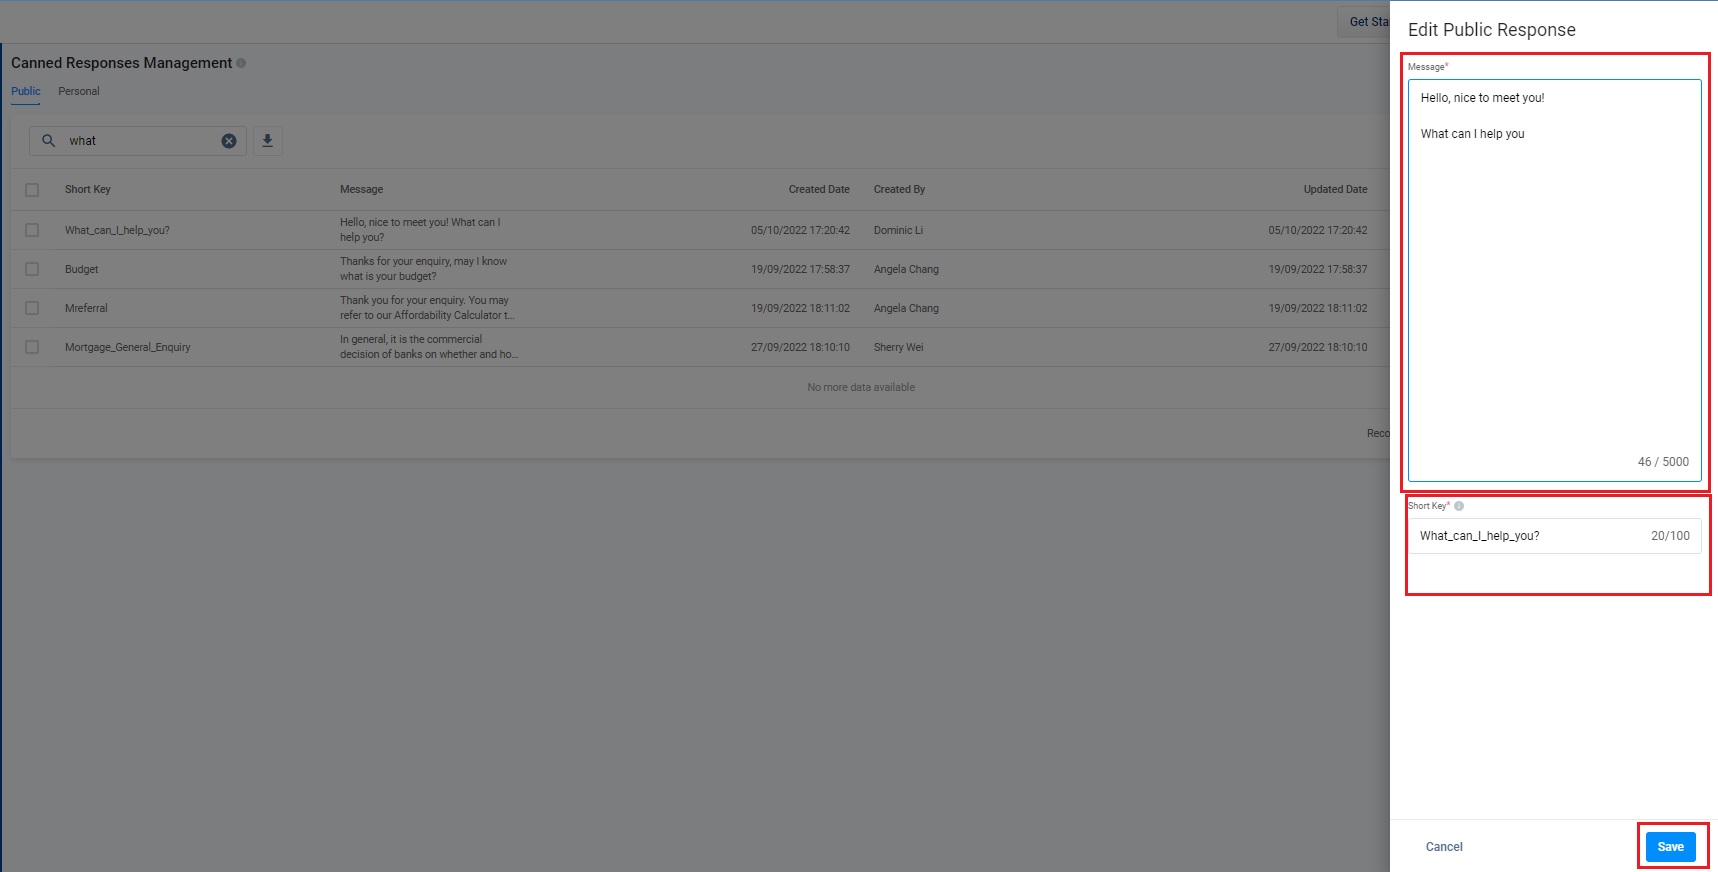
Edit Personal or Public Canned Responses
- Select the Public or the Personal tab on the Canned Responses Management page.
- Click on More (...) and select Edit.
- Edit the response message and the Short Key according to your needs.
- Click on Save.
- The toast message indicates A canned response was updated.
- The edited canned message is displayed on the Canned Responses Management page.
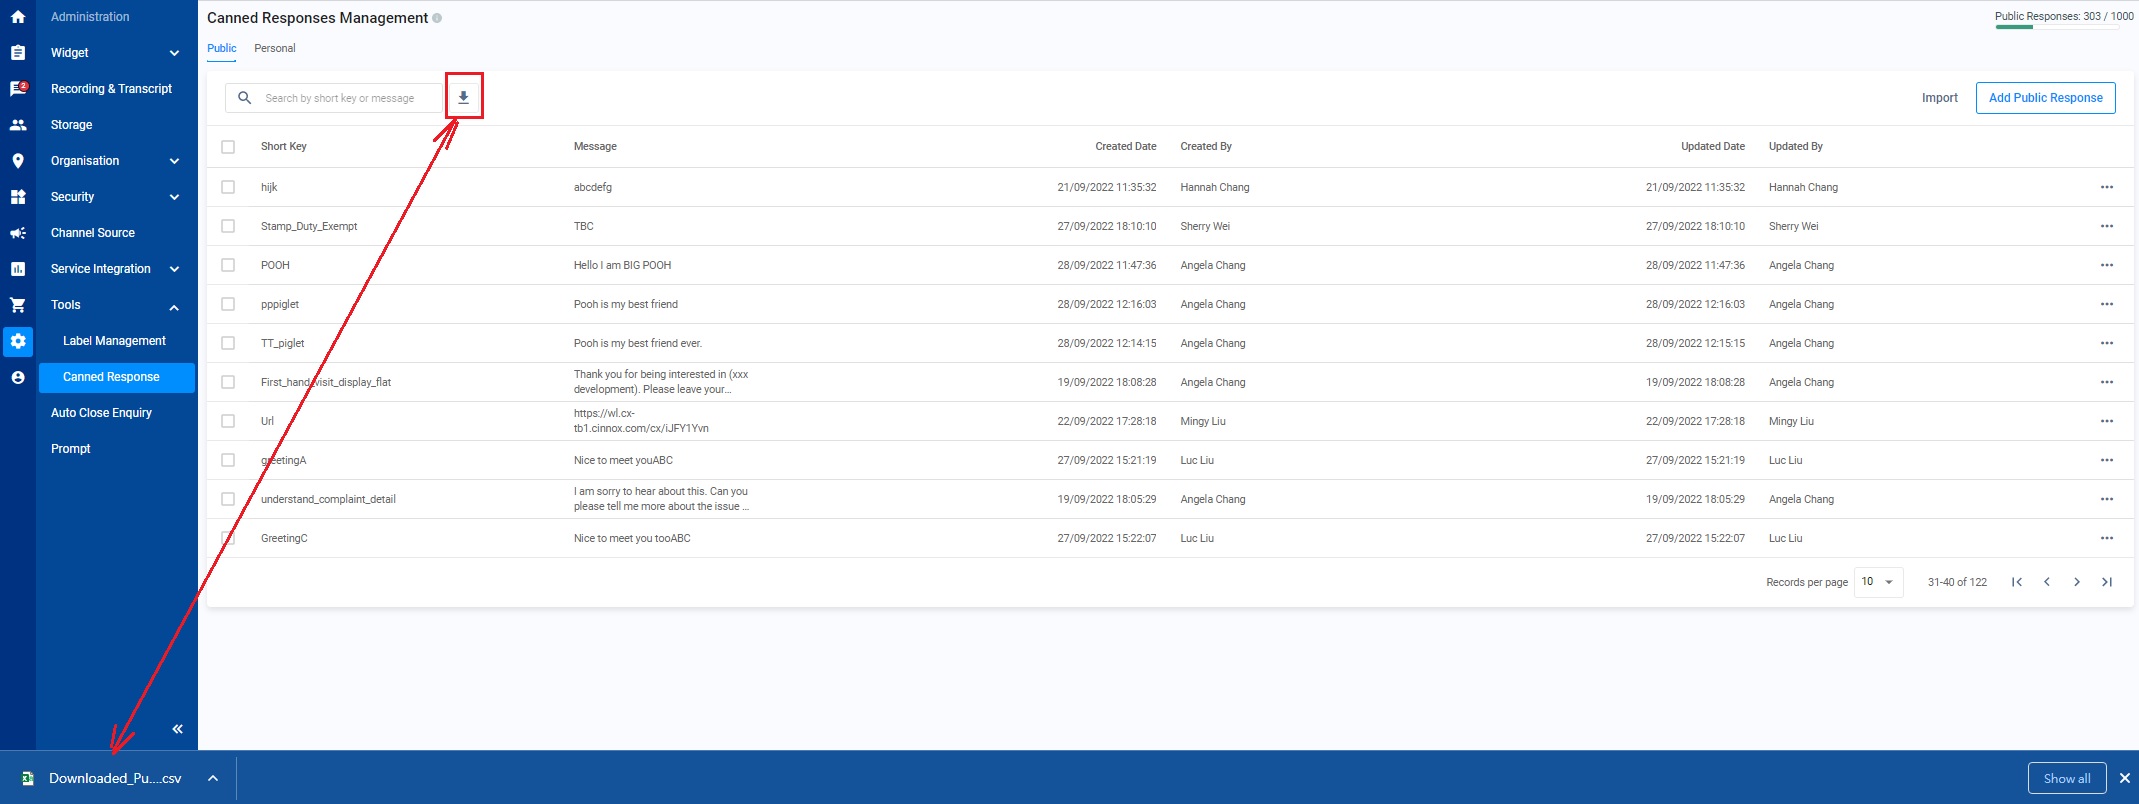
Download Personal or Public Canned Responses
- On the Canned Responses Management page, select either the Public or the Personal tab.
- Click on the Download icon.
- The Excel file containing all canned responses is downloaded to your local device.
Delete Canned Responses
Delete one-by-one
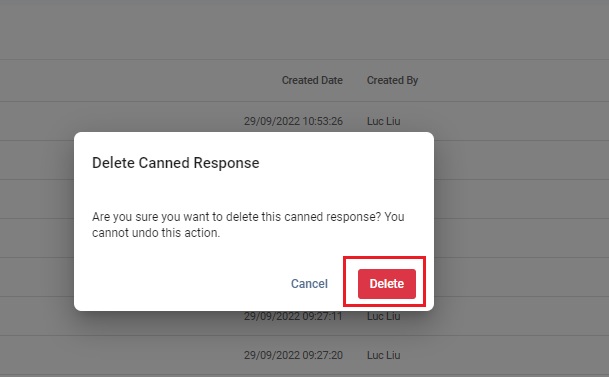
To delete one at a time canned response:
- On the Canned Responses Management page, select the Public or the Personal tab, click on More (...) and select Delete.

- Click the Delete button to confirm that you must delete the canned response.
- The toast message indicates that Canned responses deleted.
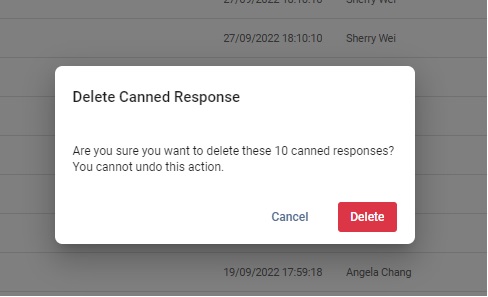
Delete bulk responses
- Select the Public or the Personal tab on the Canned Responses Management page, and tick the box beside the Short Key.
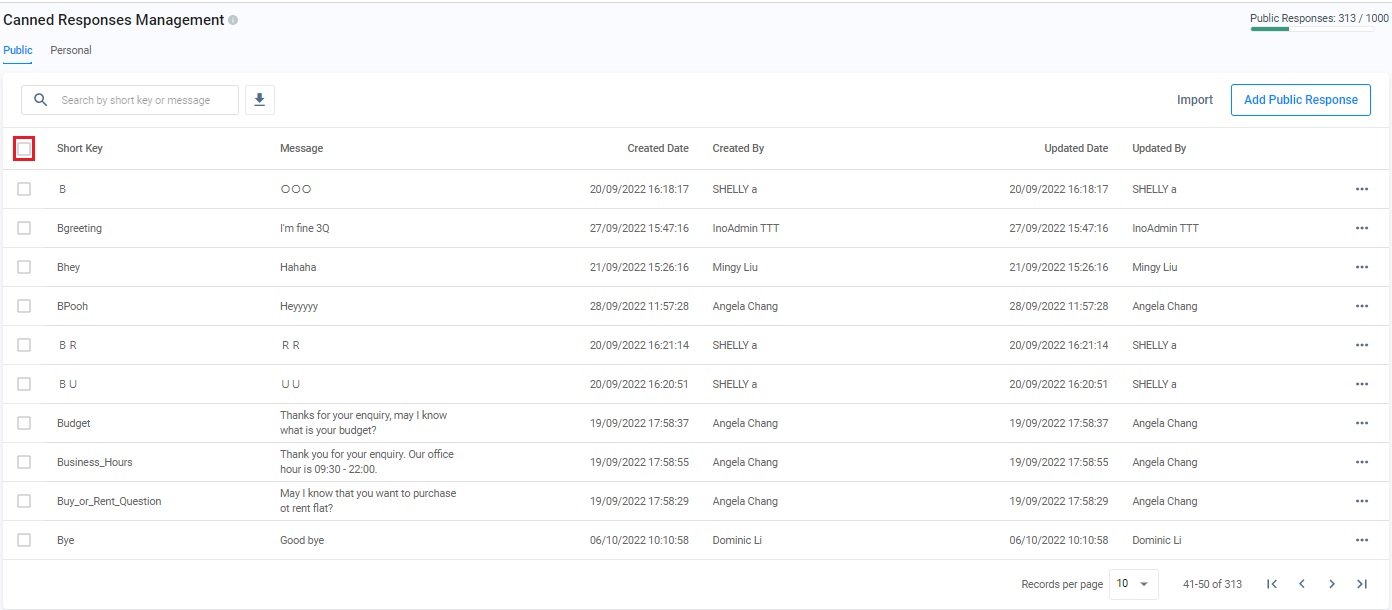
- Thus, all the canned responses on the list are selected. Click on the Delete button on the right-hand side of the table.

- Click on the Delete button on the pop-up window.
- The toast message indicates that Canned responses deleted.
How to use Canned Responses in the Chat Room
Pull out the added and stored predefined answers in the Canned Responses for your replies to your visitors, customers and colleagues' chats and emails.
To use the canned responses in the chat room:
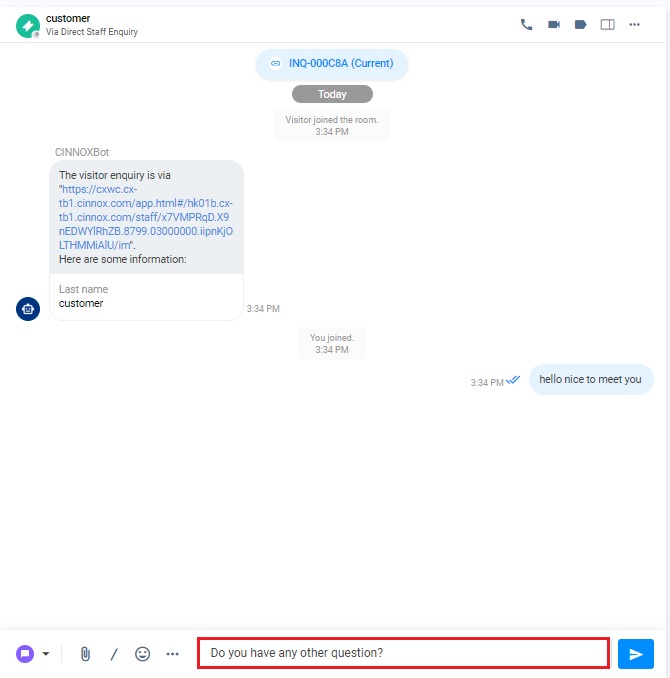
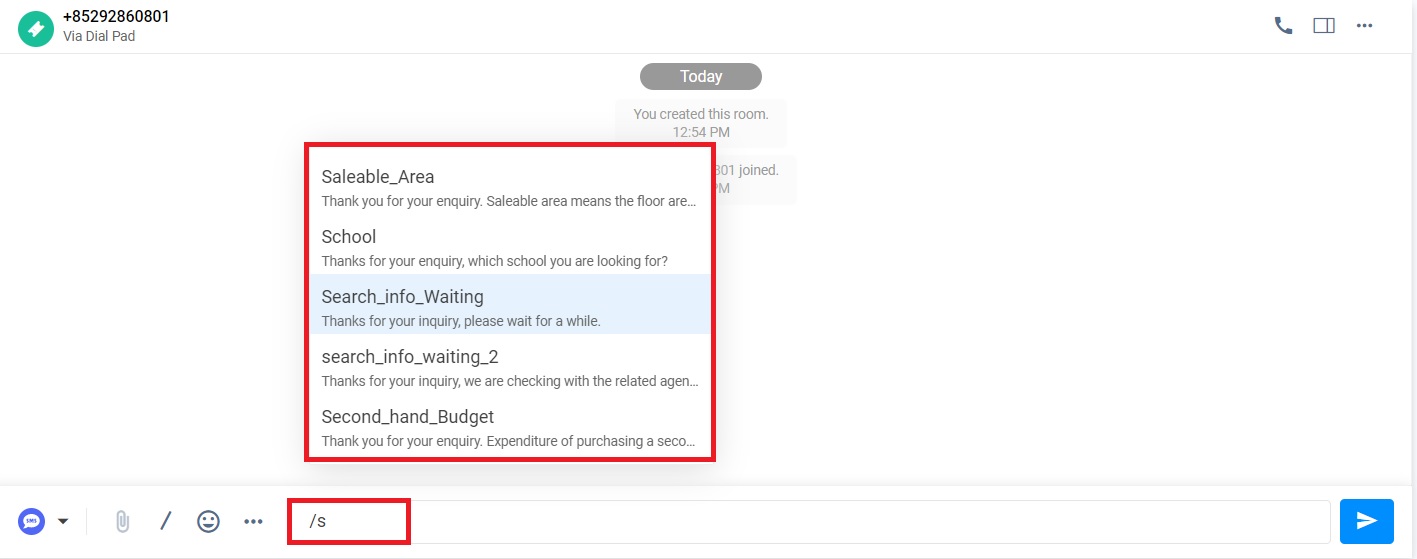
- In the chat room, select the slash (/) icon on the text input bar.

- Enter the Short Key or the Message into the search box and select the desired canned responses.
- Click on Confirm.
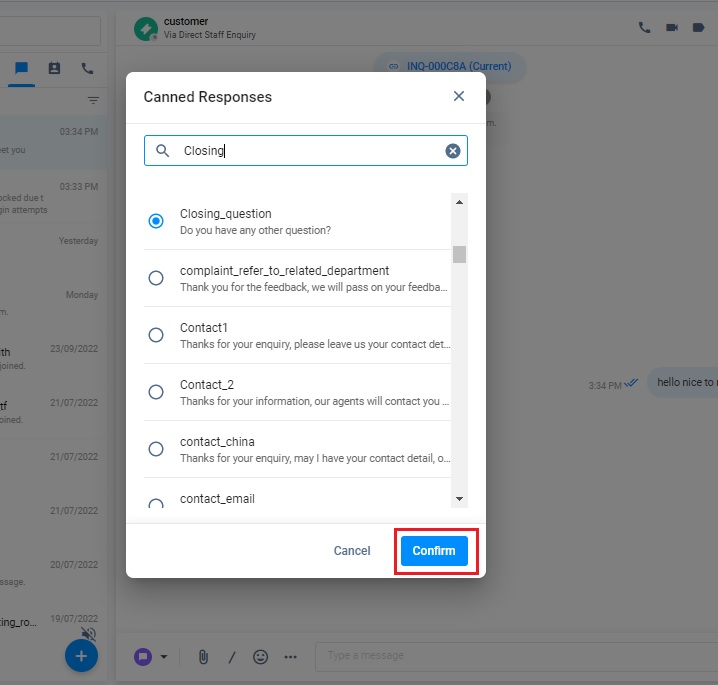
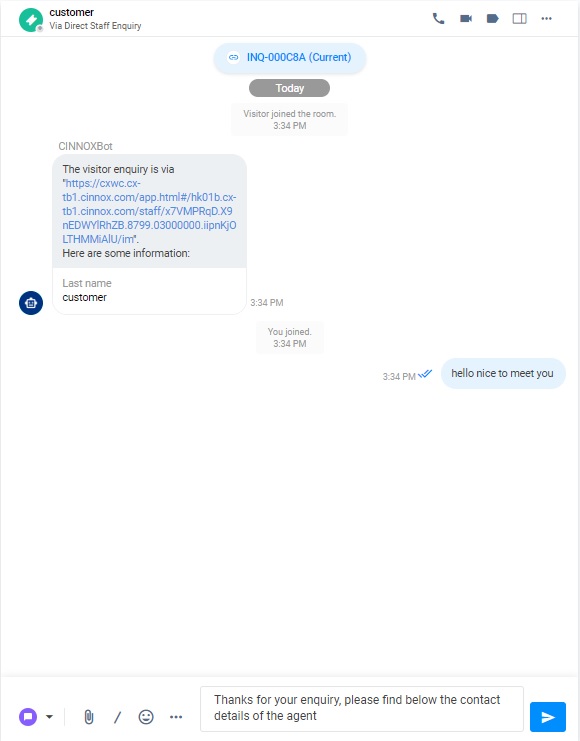
- The selected canned response is placed in the text input bar. Send it by clicking the Sendicon or pressing Enter* on your keyboard.
Or
- In the chat room, type the slash (/) symbol as a shortcut key to the text input bar and select 1 of the top 5 public canned responses listed alphabetically as your reply message.
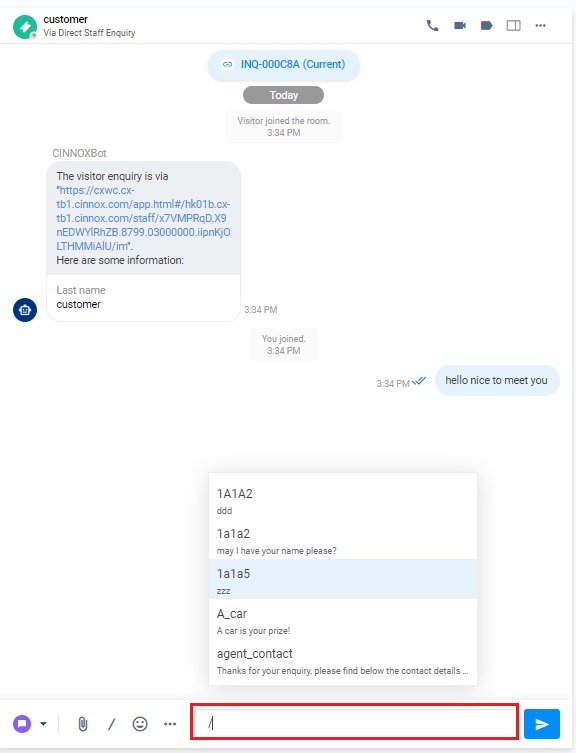
- You can also type the keyword after the slash (/) symbol for the keyword search of the canned responses.
- The selected canned response is put on the text input bar. You can send the canned response as the reply message by clicking the Send icon.
To use the canned responses in the email:
- After you pick up the email enquiry, click the Reply button.
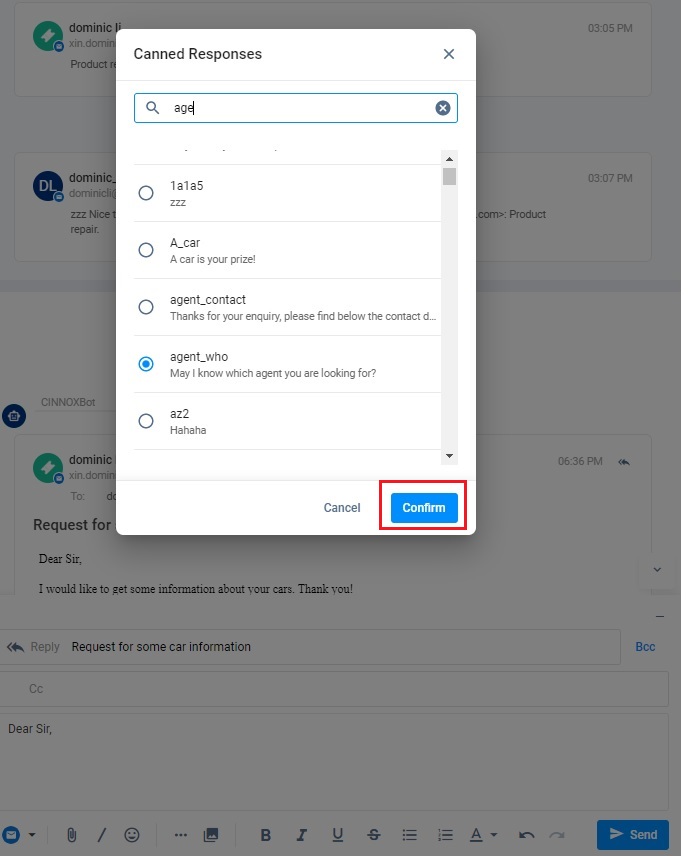
- Select the slash (/) on the text input bar.
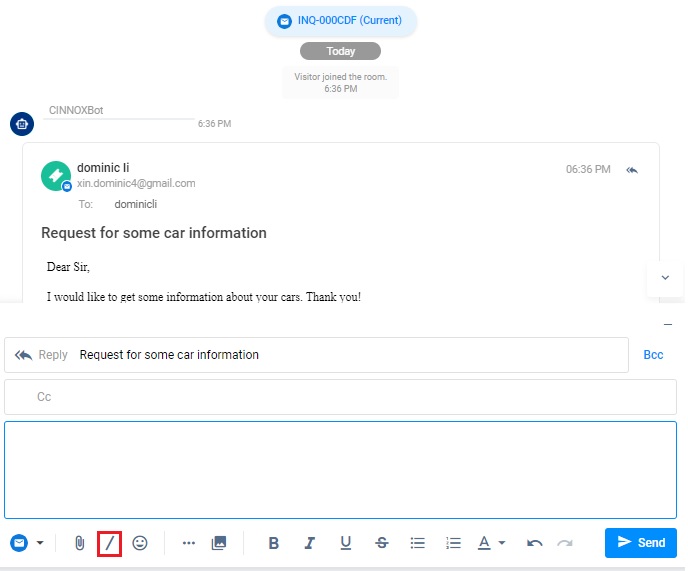
- Enter the Short Key or the Message into the search box on the "pop-up window and select the required canned responses.
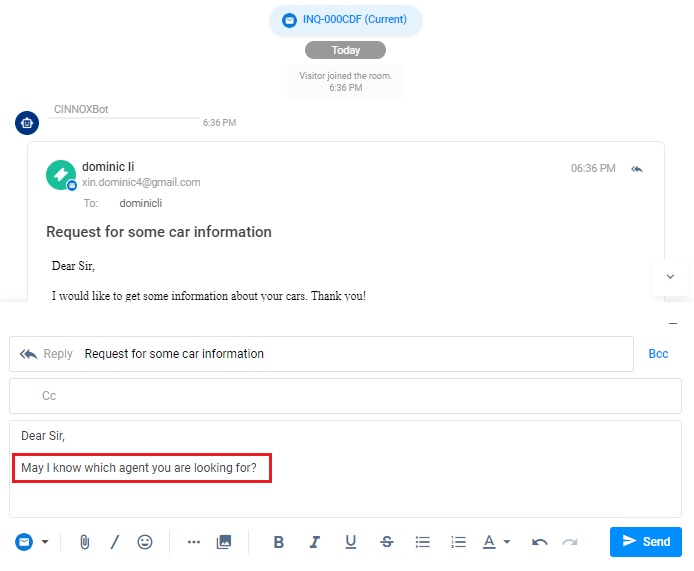
- Click on Confirm.
- The selected canned response is put in the email. Send it by clicking the * end icon or pressingEnter** on your keyboard.
📘
The hyperlink in the canned responses becomes text after you paste it to the chat room or as an email message. To paste the hyperlink, please click on More(...) on the text input bar and select insert link.
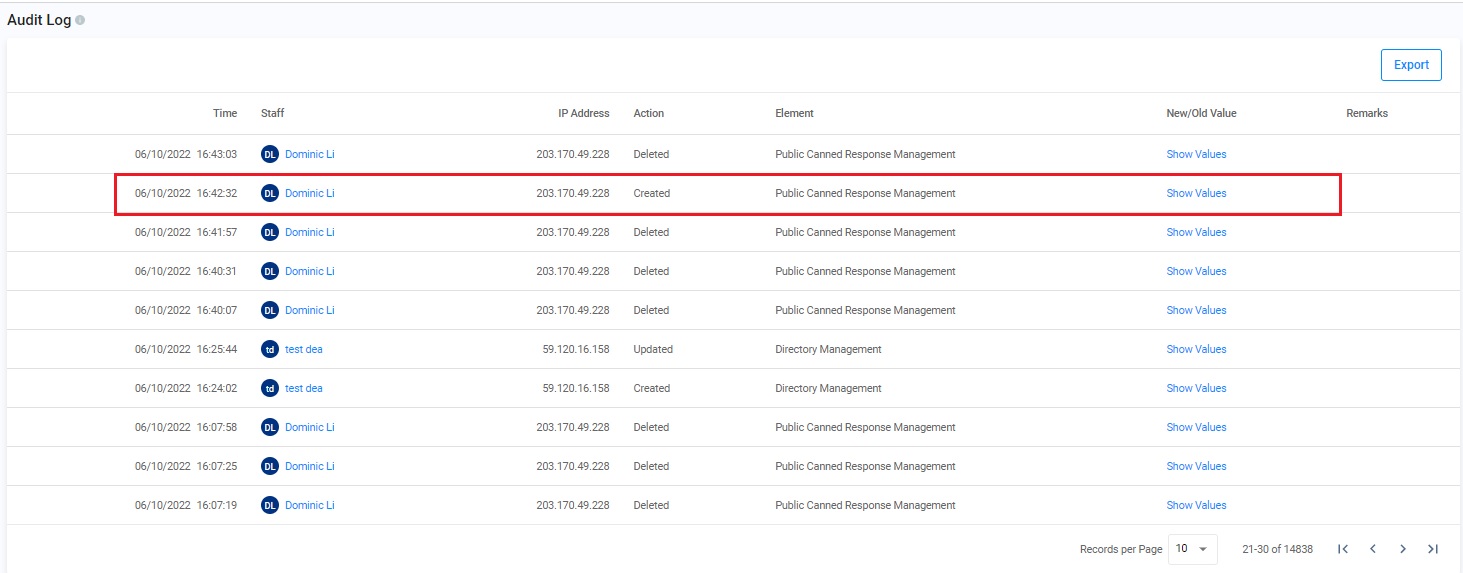
Audit Log for Canned Responses
The audit Log tracks and records the changes in the Public Canned Responses, such as adding, editing and deleting Public Responses.
To view the Audit Log, navigate to Dashboard>Administration>Security>Audit Log.
For more details, refer to the Audit Log section of this Guide.