Virtual Numbers
Looking for a Virtual Number Service?
From getting toll-free and local virtual numbers to enabling you to receive calls and make calls from all over the globe, we have got you covered with our competitive prices and high-quality service. CINNOX offers virtual numbers that enable you to manage calls from any device, anywhere in the world.
Virtual numbers are phone numbers without directly associated telephone lines to let customers from across the globe call you at lower costs. To understand more about Virtual Numbers, please refer to our Virtual Numbers for Business Global Reach.
-
Toll-Free Phone Numbers are used for customer service, hotlines for customers to support them. Typically, toll-free numbers can only receive calls when the number is dialled and recieve through the CINNOX platform, mobile devices, or SIP connection.
-
Local Phone Numbers(DID) are used for customer service and customer engagement for businesses to reach their customers. Local phones can receive and make calls, and can also send and receive SMS, good for SMS A2P (OTP, Notification, Marketing, and Campaign) apart from calling features.
Manage Virtual Number in CINNOX
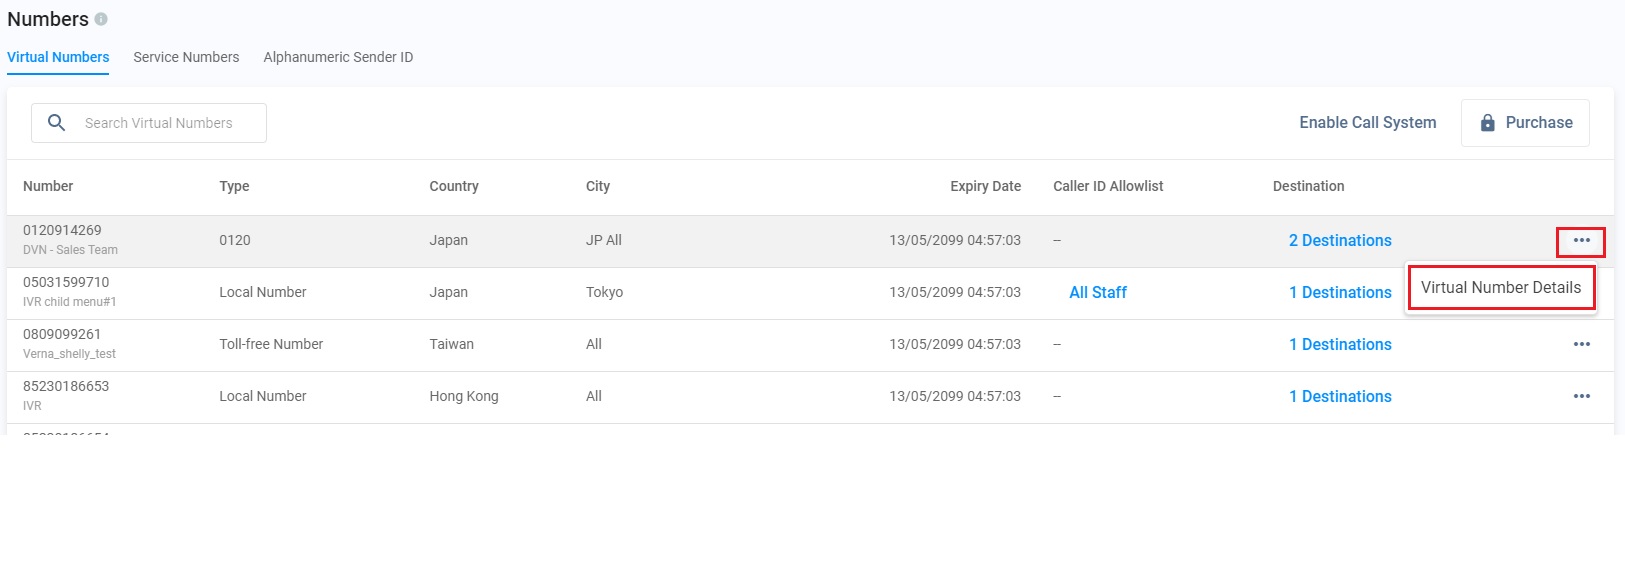
How to view details of a Virtual Number (Toll-Free / Local (DID) Numbers):
- Sign in to your CINNOX Dashboard.
- Navigate to Administration > Channels > Numbers
- On the Virtual Numbers tab, click More (...) > and select Virtual Number Details.
- Click More (...), and select Virtual Number Details on the Virtual Numbers tab.
❗️
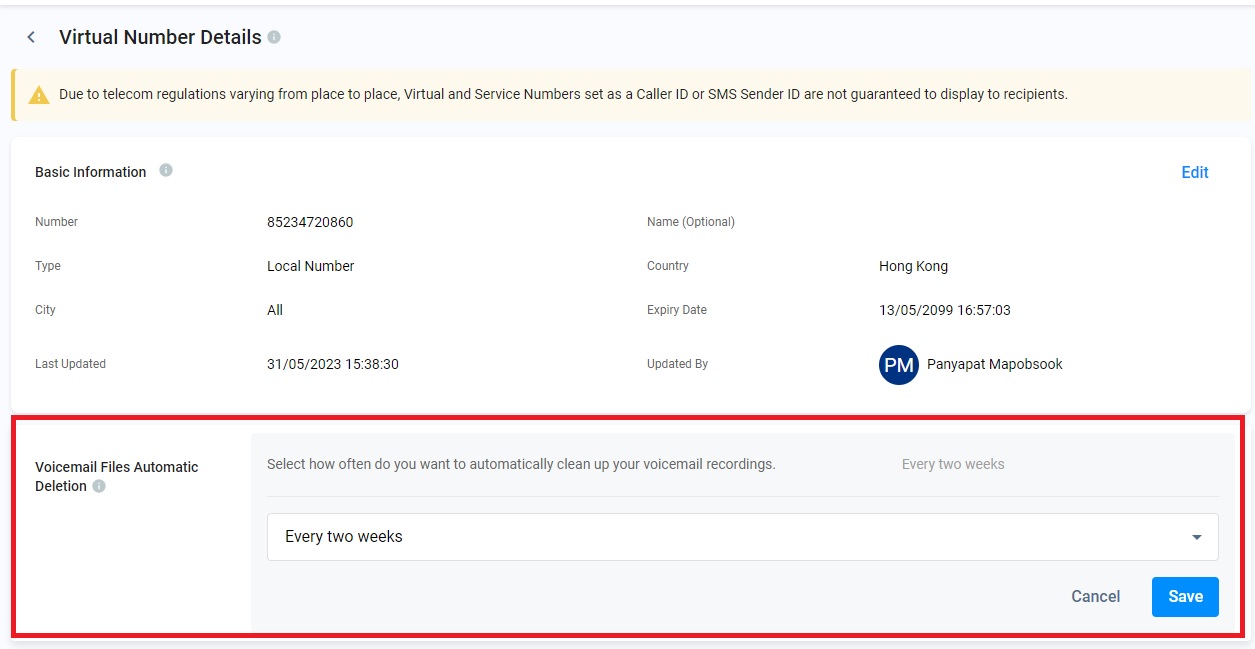
Due to telecom regulations varying from place to place, Virtual and Service Numbers set as a Caller ID or SMS Sender ID are not guaranteed to display to recipients.
Basic Information
The Basic Information section contains the following details:
- Number: the assigned phone number that your visitors need to dial to reach you
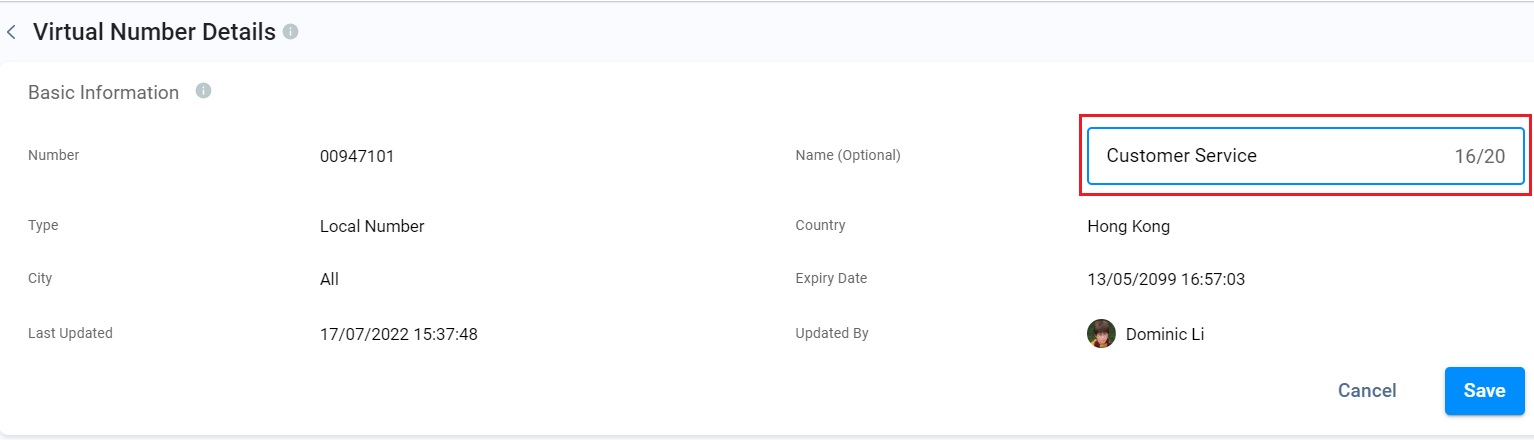
- Name (Optional): The nickname or descriptor of the virtual number
- Type: the type of virtual number, i.e., whether it is toll-free or local
- Country: the country/region location of the virtual number
- City: The city location of the virtual number
- Expiry Date: The date will deactivate your virtual number
- Last Updated: The date and time the details or settings of the virtual number were last updated
- Updated By: the name of the staff member who last updated the details or settings of the virtual number

To edit a Virtual Number's basic information:
- Click on the Edit button. You can only edit the details in the Name (Optional) field.
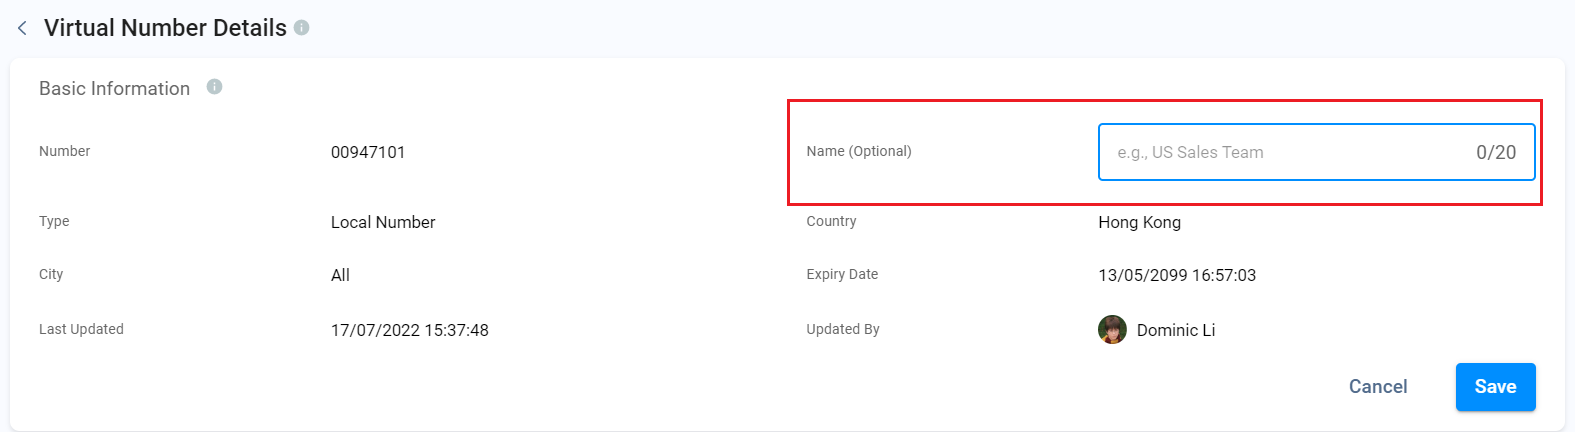
- Click on Save after you've made the necessary changes.
Voicemail Files Automatic Deletion
The Voicemail Files Automatic Deletion section lets you select how often you must delete your voicemail recordings automatically.
Please check our Voicemail detailed Guide for more information.
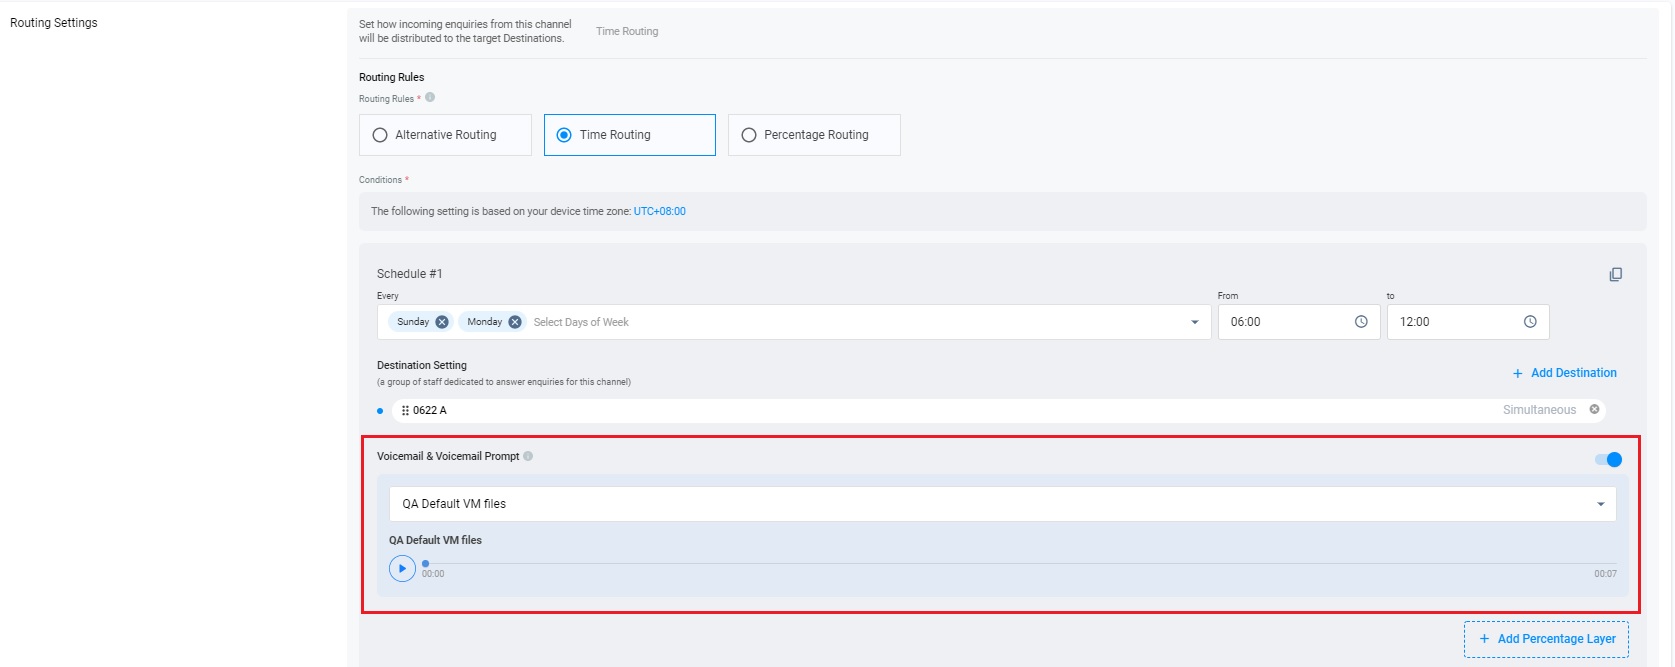
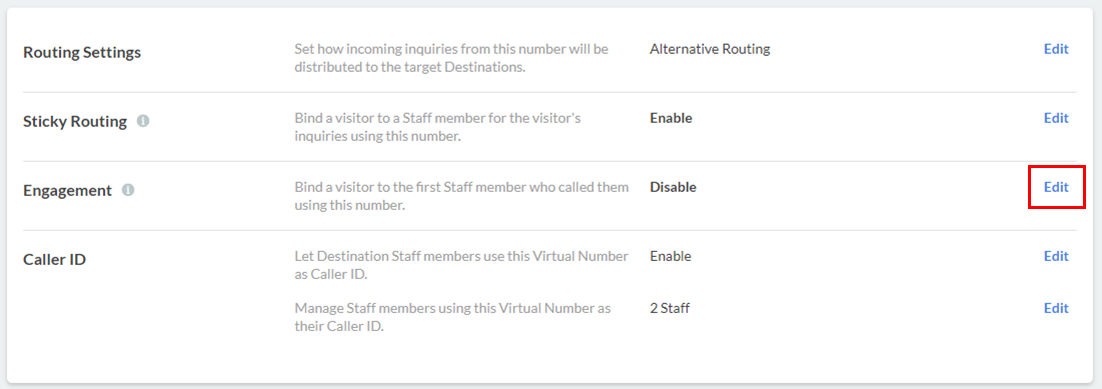
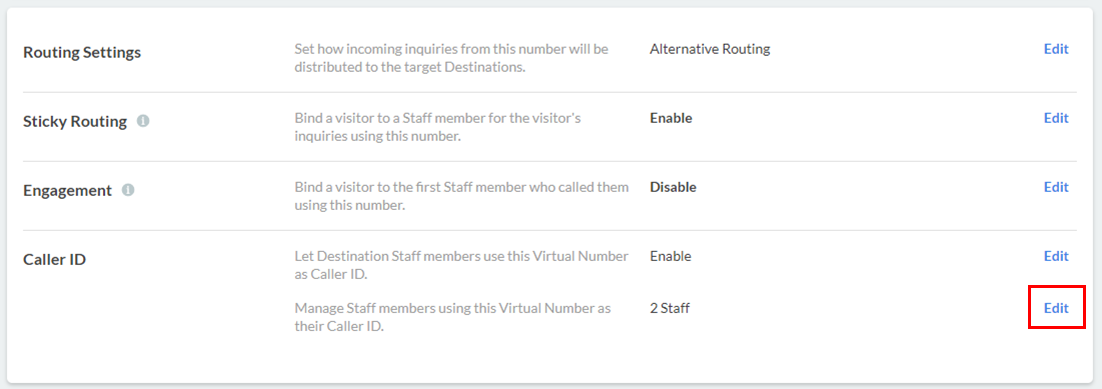
Routing Settings
The Routing Settings section indicates how enquiries will be directed or distributed to the Destinations identified to handle the said enquiries. These rules apply if multiple Destinations are associated with a virtual number. They help your staff members provide customer support 24/7 effectively or according to your hours of operation.
For more information, please check our Guide's Alternative, Percentage, Time and Sticky Routing.
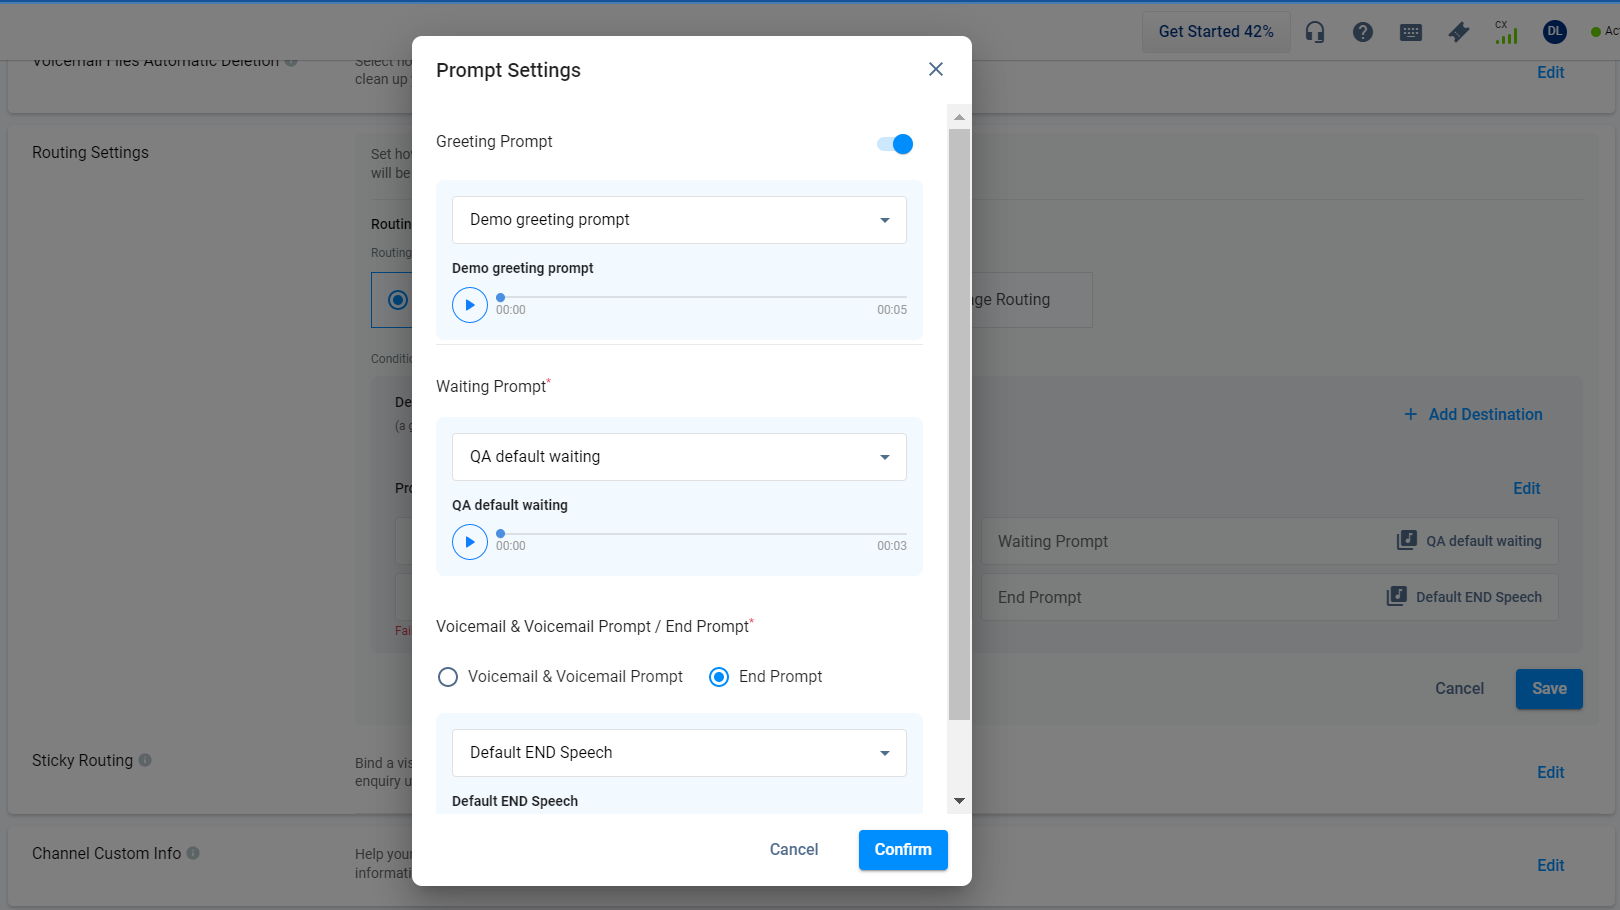
Using Prompts
Prompts are audio files played at various points within the call process. You can add prompts in the Routing Setting when the Advanced Call System is enabled.
Case 1: When the Advanced Call System is enabled
- Click on Edit for Prompt Setting.
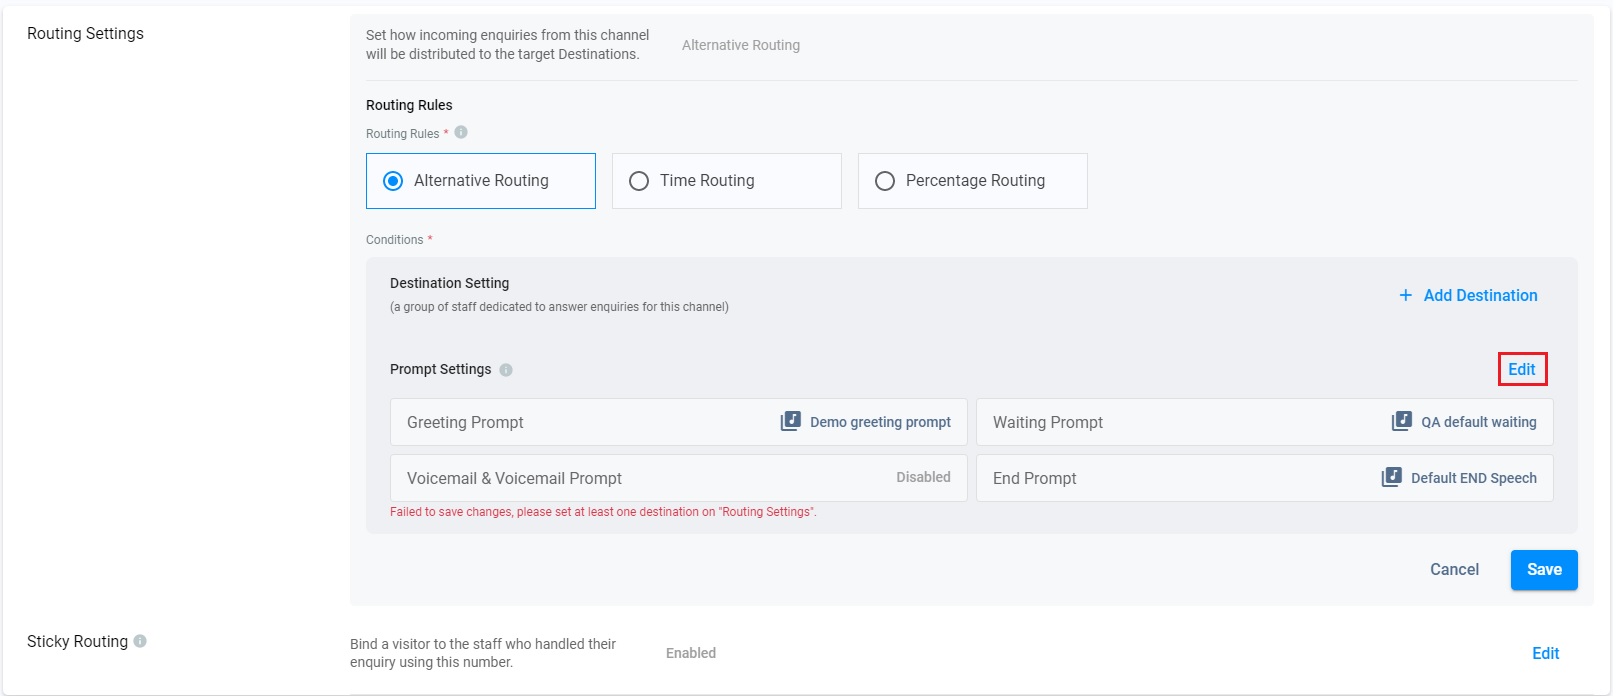
- Toggle on Greeting Prompt and Choose Voicemail & Voicemail Prompt / End Prompt as required.
- Click on the dropdown list to choose the required prompt or Add a new prompt to upload a new prompt if required.
- Click on Confirm.
📘
The audio files of Greeting Prompt, Waiting Prompt, Voicemail & Voicemail Prompt and End Prompt available to select in Prompt Settings were added on the Prompt page. Refer to Prompt for more details.
- Click on Save when all settings are completed.
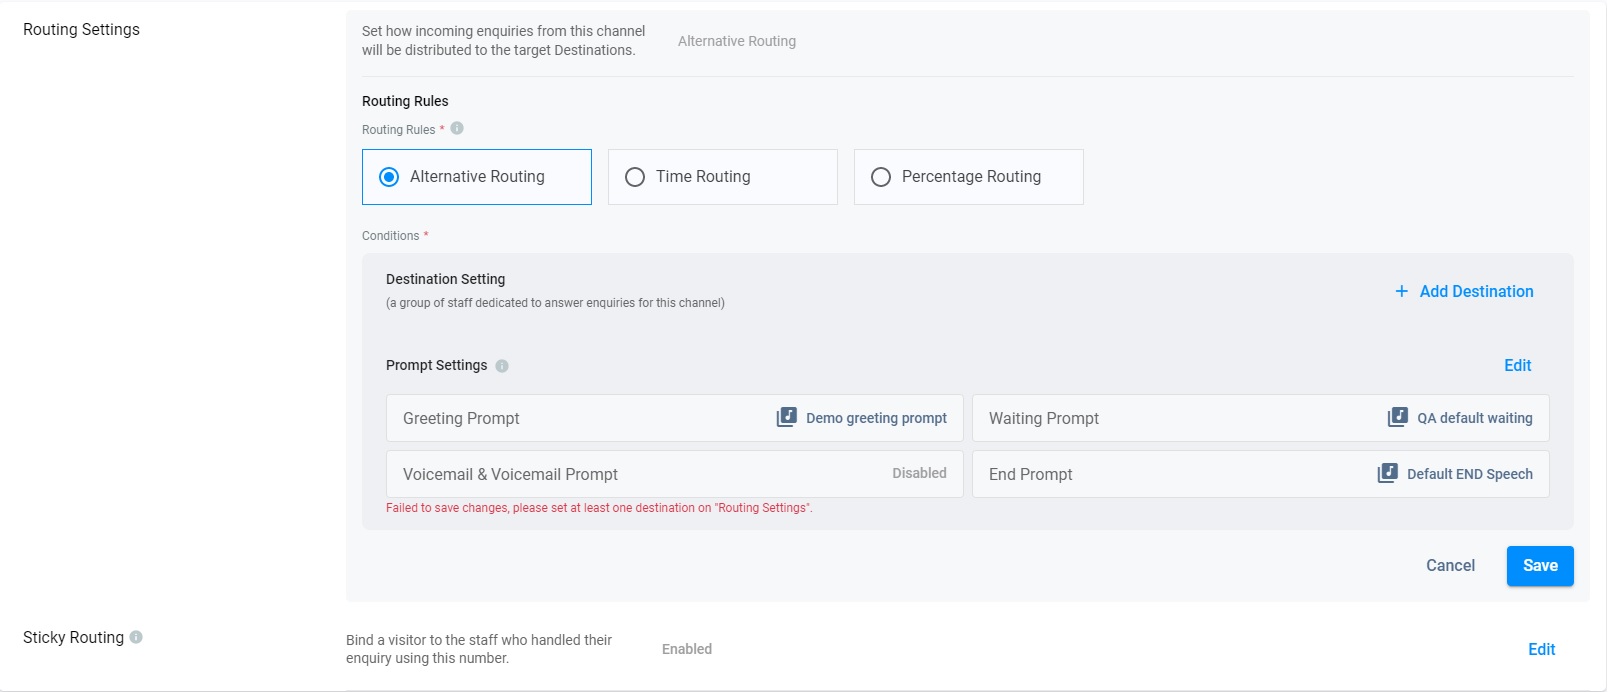
Case 2: When the Advanced Call System is disabled
The voicemail feature in the Routing Setting section lets your visitors leave a voice message in cases where your agents are unavailable to attend to their enquiry. It is disabled by default.
To enable voicemail on any of your toll-free or local numbers, refer to this Guide's Voicemail section.
📘
- When the Advanced Call System is disabled, only Voicemail & Voicemail Prompt are still available and inherits the settings done before the Advanced Call System was disabled.
Engagement (Local Numbers)
📘
Engagement Routing and Binding
When using Virtual: Local Numbers with Engagement Mode enabled, Engagement Routing and Binding ensure that call-backs from visitors are directed to the staff who initially engaged them.
For instance:
Staff A contacts Visitor A using the Virtual Local Number +851 1234 5678 with Engagement Mode enabled. If Visitor A returns the call to that number, it gets routed directly to Staff A, establishing a binding connection. Other staff cannot engage Visitor A through the same local number during this binding.
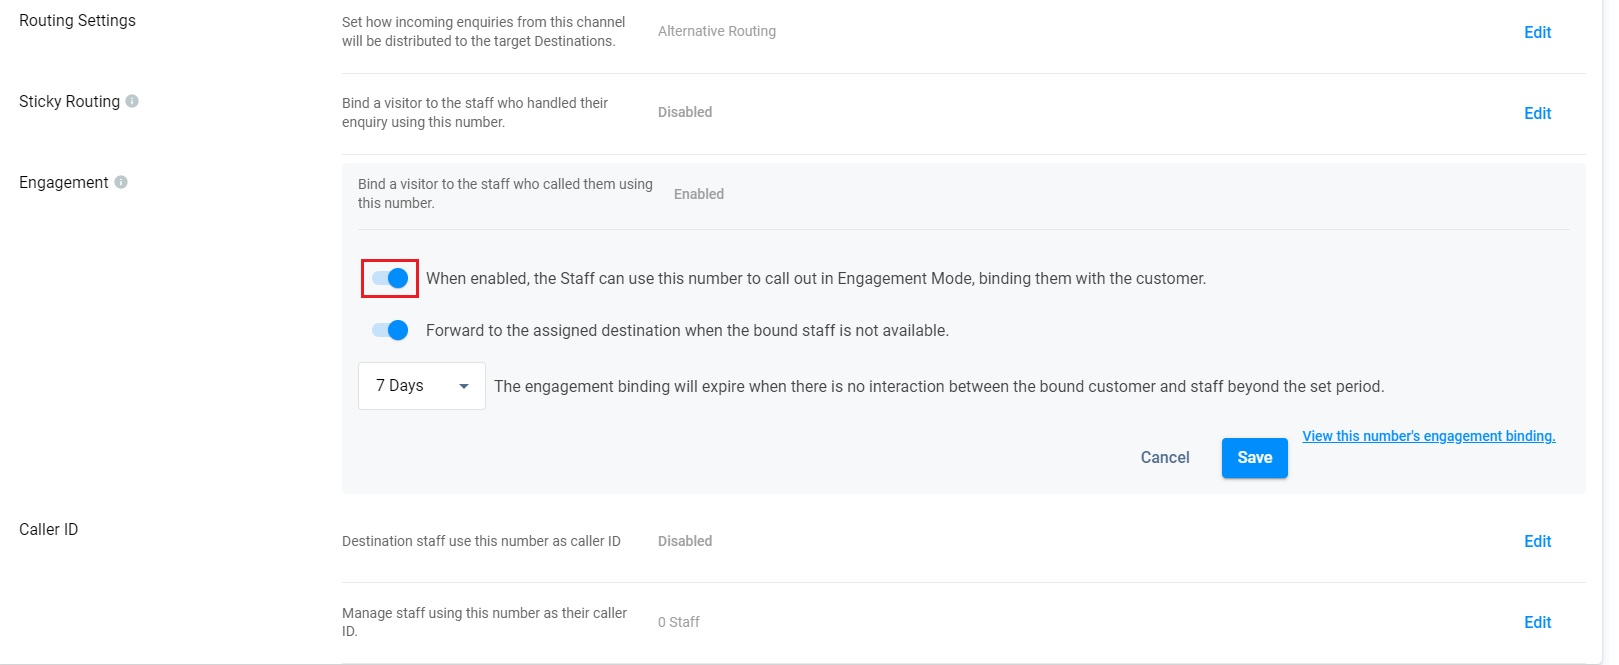
Enabling Engagement Mode
To enable Engagement Mode:
- On the Virtual Number Details page, click on Edit in the Engagement section.
- Toggle the button ON. A set of additional options will then appear.
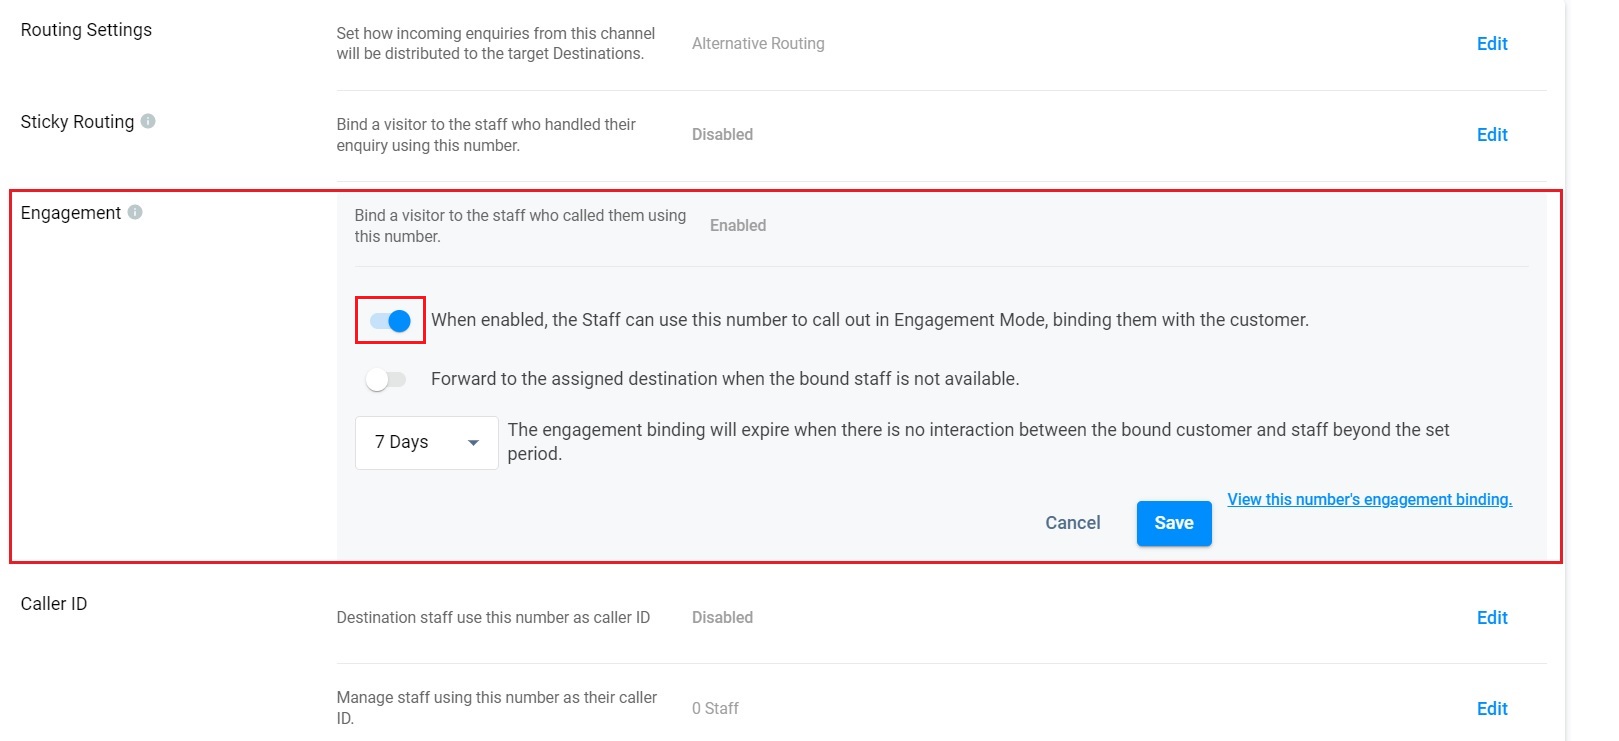
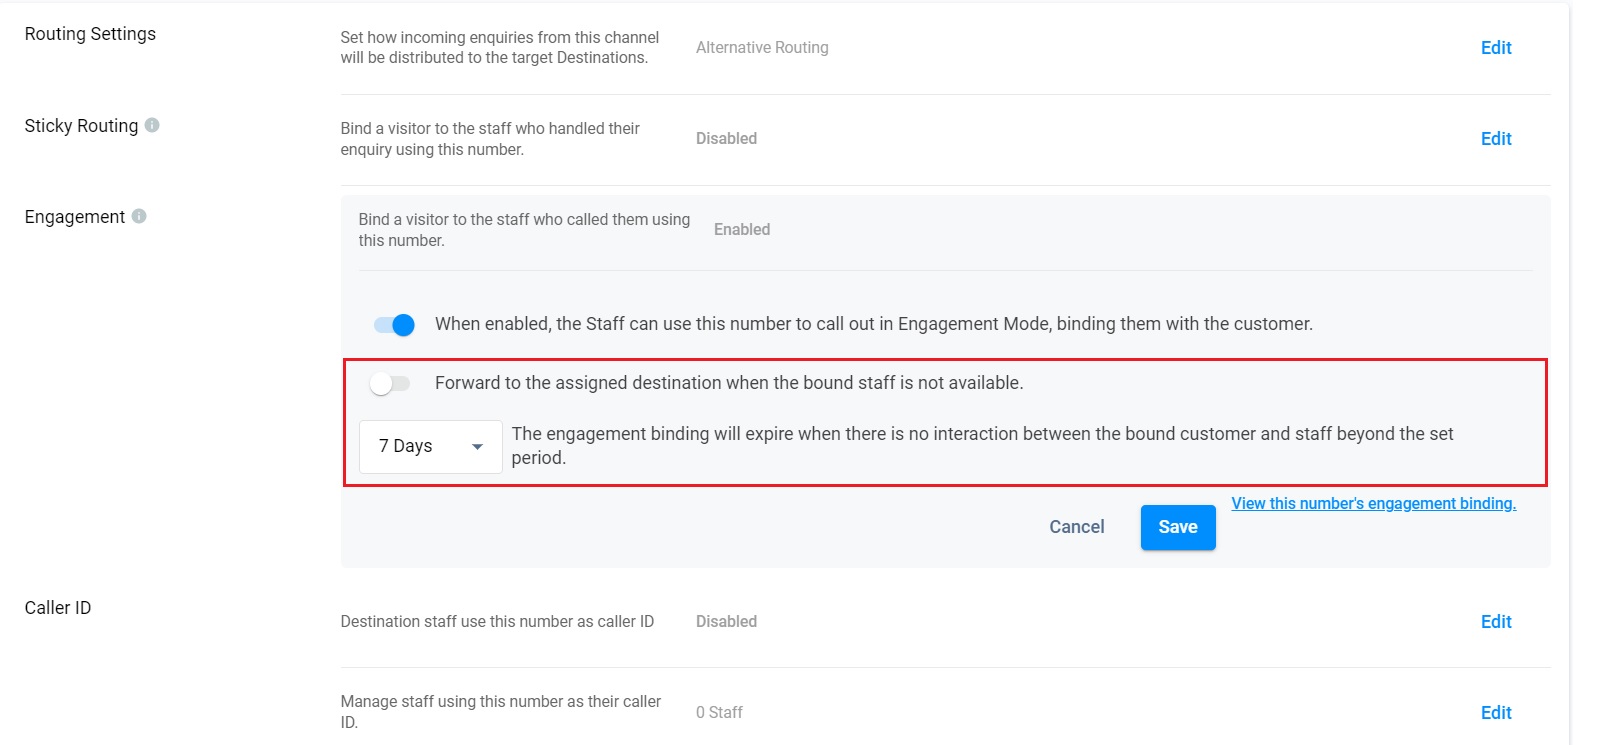
- You may turn the second toggle button ON to forward the enquiry to a Destination when no staff members can pick up the call.
- On the dropdown box that will appear, select the number of days for the Engagement binding period between the visitor and the staff member through this number. If there are no interactions between the two after the set number of days, the binding will be removed.
- Click on Save. A pop-up message will appear, asking you to confirm the action.
- Click on Confirm.
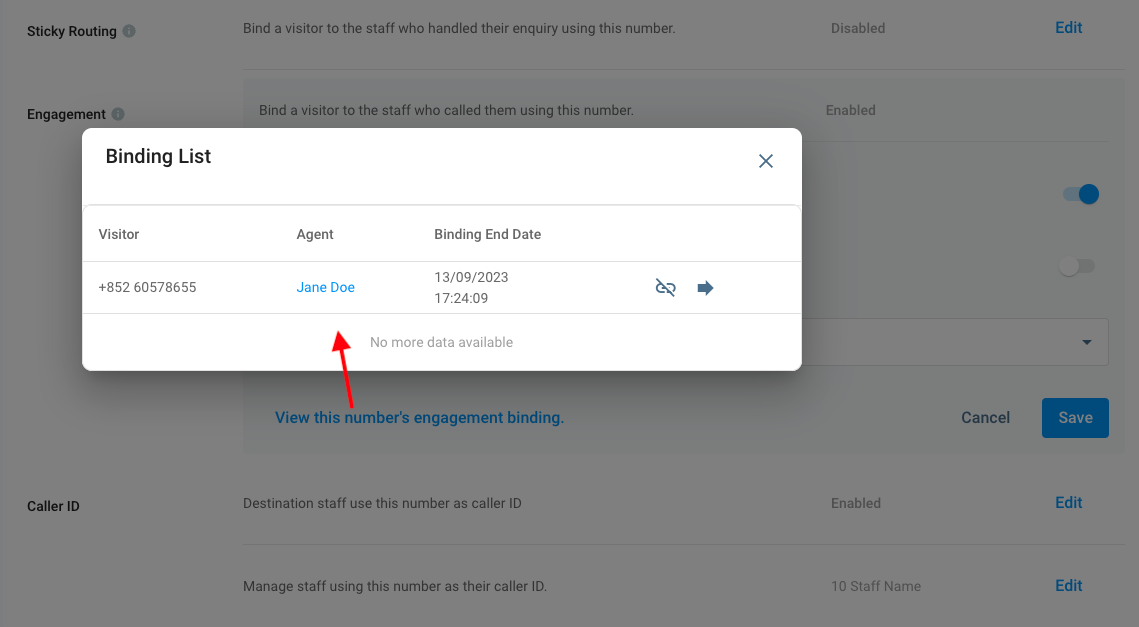
Binding List
- Click the View this number's engagement binding to display the binding list information of visitor and staff having the binding and the end date.
- If there are no interactions between the two after the set number of days, the binding will be removed.
Disabling Engagement Mode
To disable Engagement Mode:
- On the Virtual Number Details page, click on Edit in the Engagement section.
- Toggle the first button OFF.
❗️
Important
The CINNOX Call System transforms how you handle enquiry calls with Advanced Routing Rules and Prompts. These include greetings, waiting messages, and voicemail options for callers while they wait to connect with an agent, ensuring efficient and seamless call management.
You can personalise the experience with your own custom greetings and messages, allowing you to showcase your brand in every interaction. This adds a personal touch, enhancing the caller's connection with your business, which can lead to higher satisfaction and stronger loyalty.
CINNOX offers flexibility with various Automatic Call Distribution (ACD) methods—such as Fixed Order, Simultaneous, Round Robin, and Most Idle—giving you full control over how your calls are queued and routed, ensuring no call goes unanswered.
Please note that the duration of the call starts when the caller hears the first prompt. In your Call Report > Call Details, it will be labelled as "Call System" under the "Receiver Name" column.
Caller ID (Local (DID) Numbers)
❗️
Due to telecom regulations varying from place to place, Virtual and Service Numbers set as a Caller ID or SMS Sender ID are not guaranteed to display to recipients.
The Caller ID section lists the staff members who use the Local Virtual Number as the Caller ID when making outbound calls to visitors or customers.
You may allow staff members identified as Destination endpoints for a virtual number to use the number as their Caller ID automatically. Alternatively, add or remove other staff members to the Caller ID allowlist.
Enabling Caller ID for Destination Staff Members
To enable Caller ID for staff members identified as Destination endpoints for the virtual number:
- On the Virtual Number Details page, on the Caller ID section, click on the first Edit beside the following option: Destination staff members use this Virtual Number as Caller ID
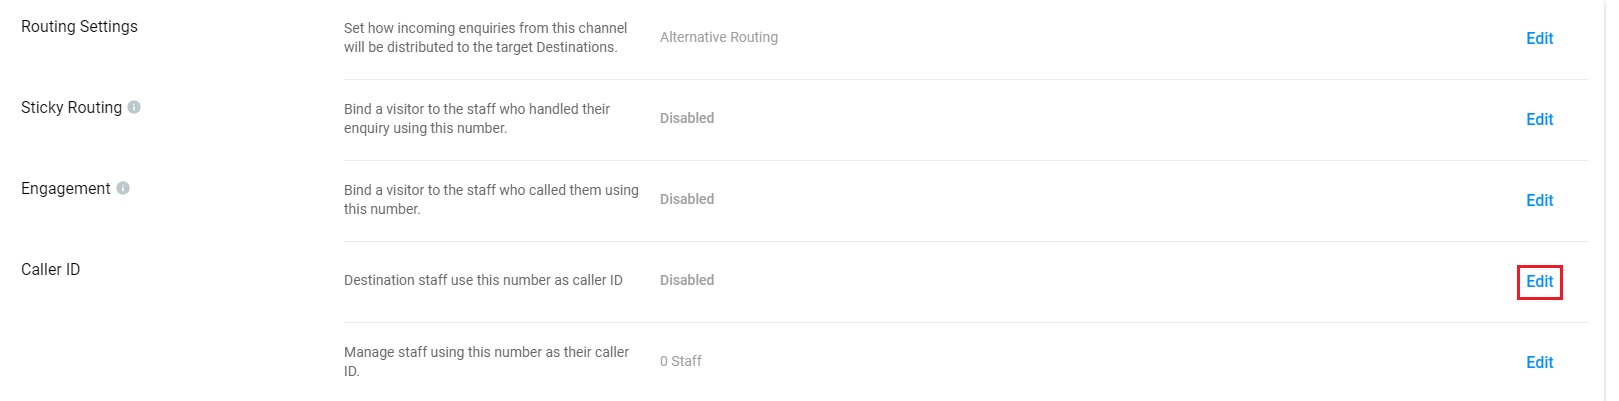
- Toggle the button ON.

- Click on Save. A pop-up message will appear, asking you to confirm the action.
- Click on Confirm.
Disabling Caller ID for Destination Staff Members
To disable Caller ID:
- On the Virtual Number Details page, on the Caller ID section, click on the first Edit beside the following option: Destination staff members use this Virtual Number as Caller ID.
- Toggle the button OFF.

Toggle off to disable Caller ID
- Click on Save. A pop-up message will appear, asking you to confirm the action.
- Click on Confirm.
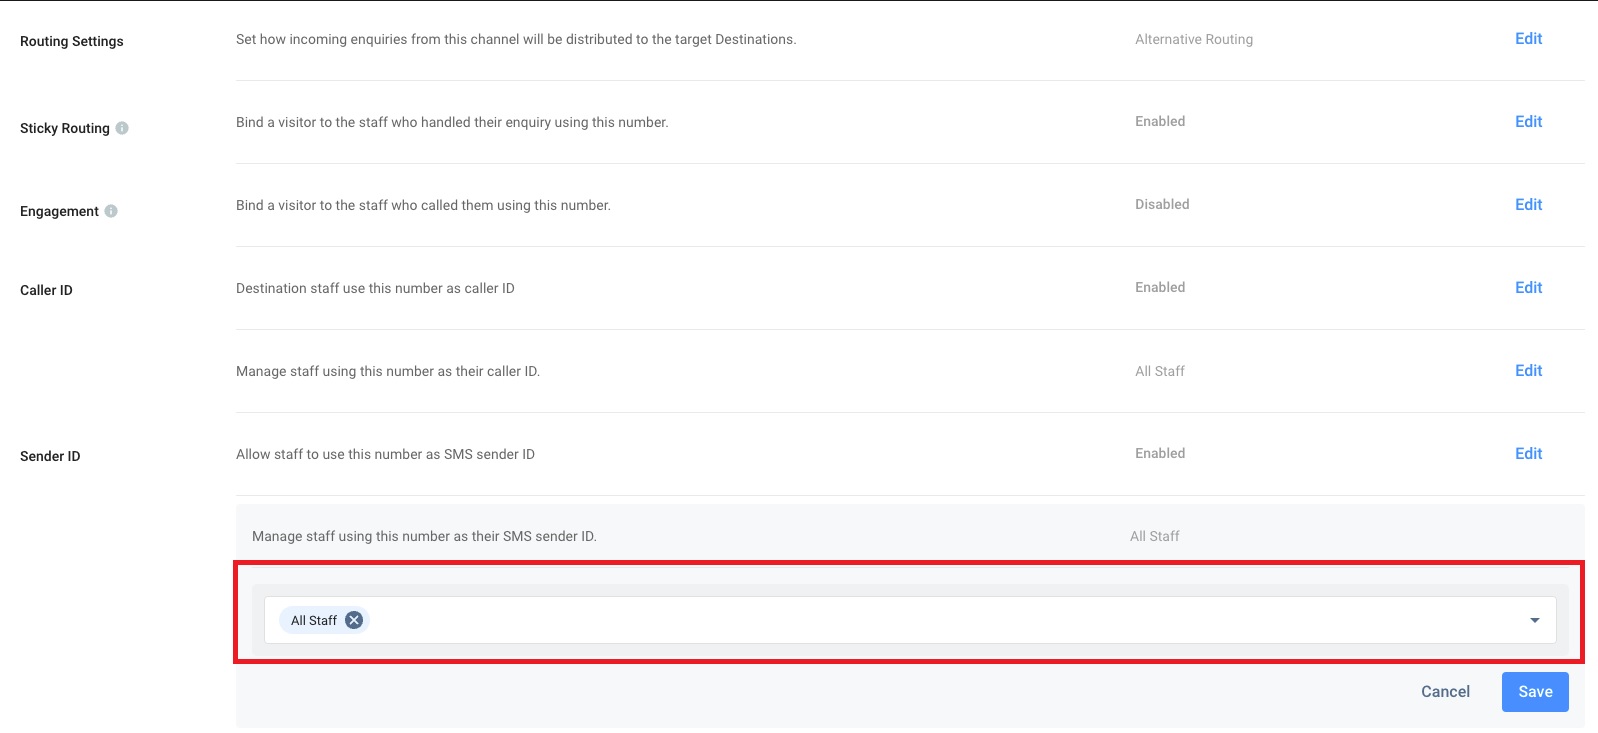
Adding and Removing Staff Members in the Caller ID Allowlist
You may edit the virtual number's Caller ID list to add or remove staff members:
- On the Virtual Number Details page, on the Caller ID section, click on the second Edit beside the following option: Manage staff members using this Virtual Number as their Caller ID.
- To add staff members, select their names from the dropdown list that will appear.
- Select All staff from the dropdown list if you wish to add all staff members.
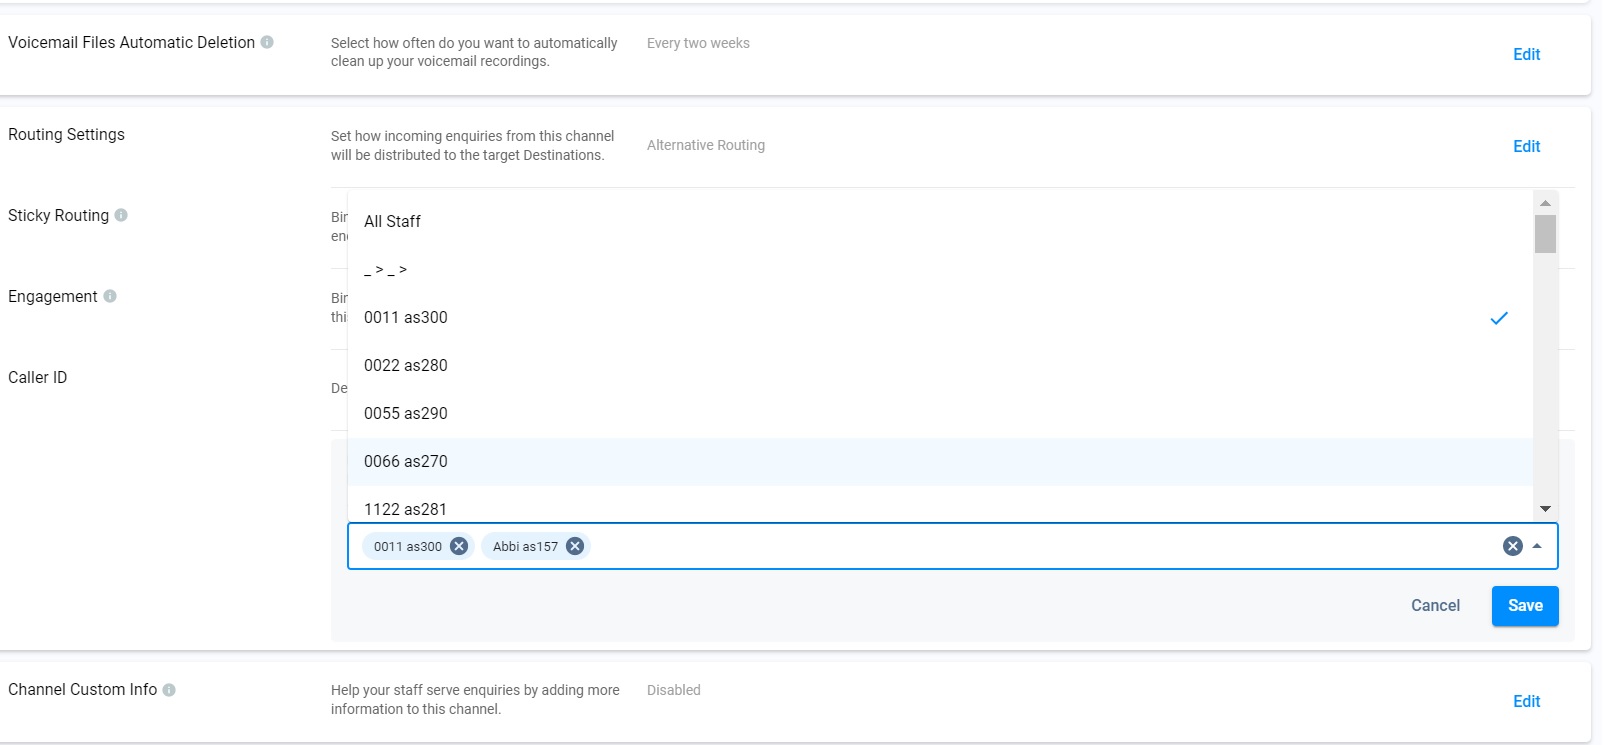
- To remove staff members, click the (X) button beside their names.
- Click on Save. A pop-up message will appear, asking you to confirm the action.
- Click on Confirm.
Sender ID
It allows staff members to adopt this number as the SMS sender ID.
- Toggle the button ON to enable the Sender ID. After it is enabled, the staff associated with the number's destination can use this number as their sender ID.
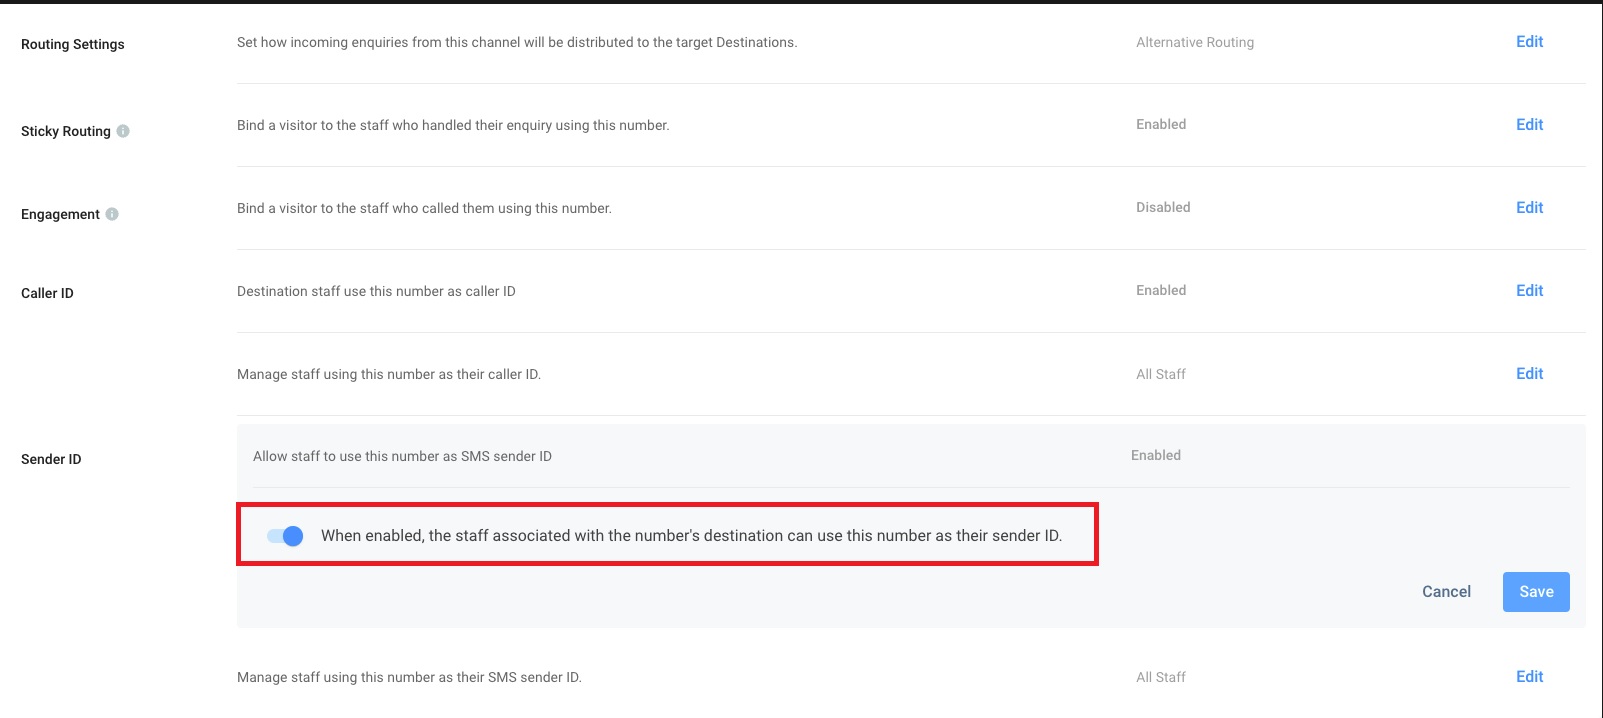
- You can select the staff from the drop-down list or enter the staff name directly. The staff is allowed to use this number as the SMS sender ID.
- Click on Save.
Channel Custom Info
Channel Custom Info allows you to add your channel details that your staff would see in the call screen and chat room whenever they are serving an enquiry. The custom info can be about the standard procedure or operation details of handling the enquiry.
- Click on the edit button.
- Toggle ON to enable the Channel Custom Info.
- A blank space adds the required basic information about the channel.
- Click the Save button, and the customised info appears on the Channel Custom Info.
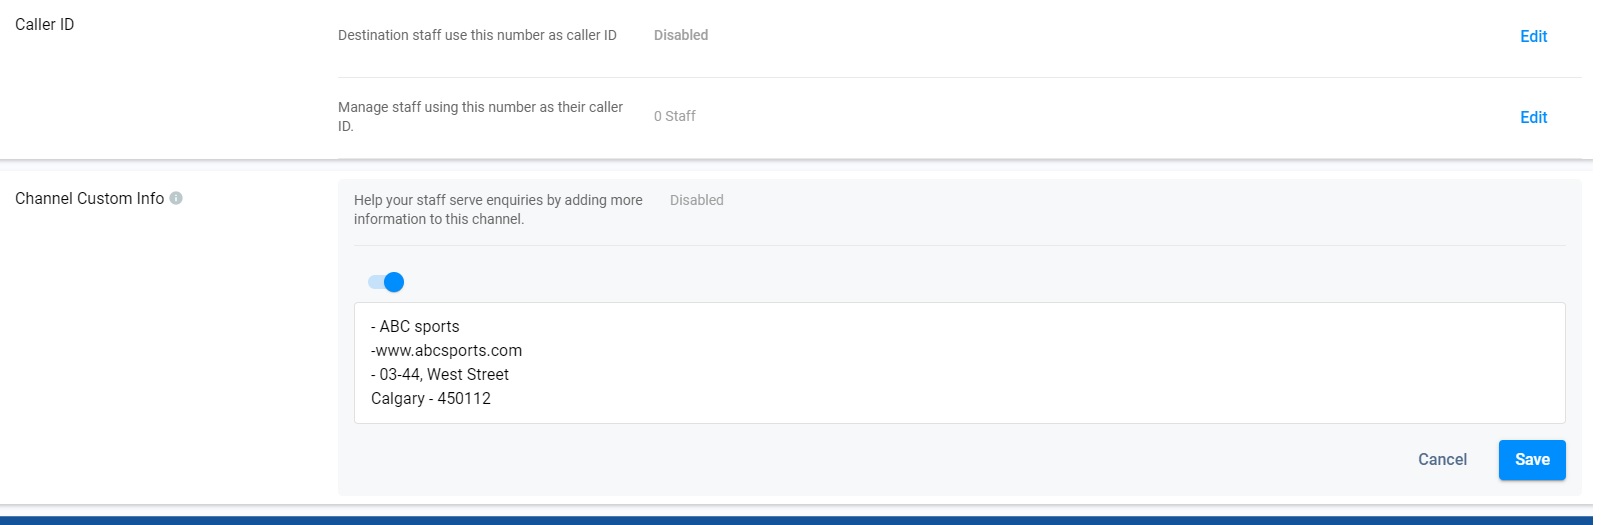
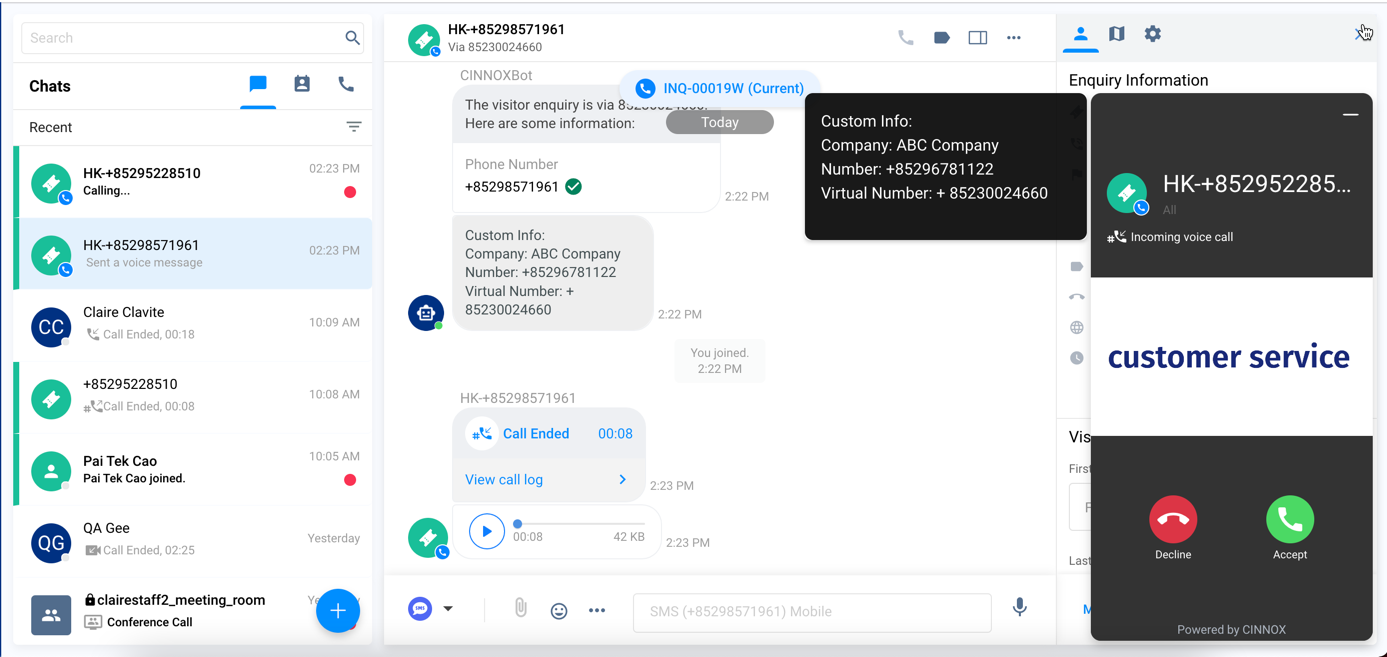
The custom info is displayed on the staff side at the call screen's left window and in the chat room for the call enquiry.
📘
Important Notes
- Channel Custom Info can be customised per Number.
- Channel Custom Info is only available for inbound service.
- In addition to Directory weblink, Channel Custom Info does not apply to other agent weblink and campaign weblink.
- The system is limited to 10,000 characters; if exceeded, the chatbot message will not be sent.
- Channel Custom Info will still be displayed as chatbot messages in the room of missed enquiry.