Managing Staff
Staff with an admin role in CINNOX can create role-based accounts for your staff members. Assign teams and roles according to their respective job responsibilities in your organisation.
Creating Staff Account
To manually create a new Staff account:
- Go to Administration > Organisation > Staff, then click Create Account at the top of the page.
- On the Create Account page that will appear, fill out the necessary details.
- All fields marked with * are mandatory.
- Other fields are optional.
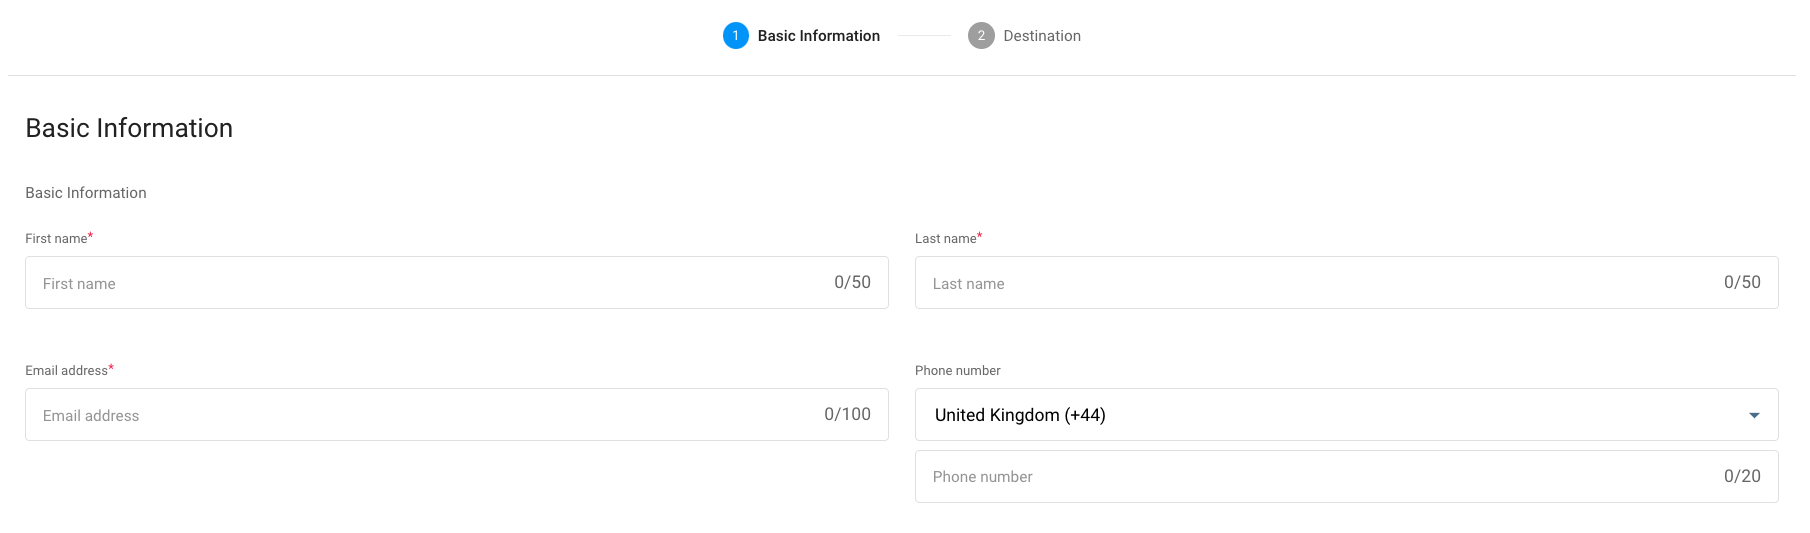
Basic Information
Personal Information
- Enter the following details for the Staff member with whom you are creating the Account:
- First name
- Last name
- Email address (must be unique)
- Phone number
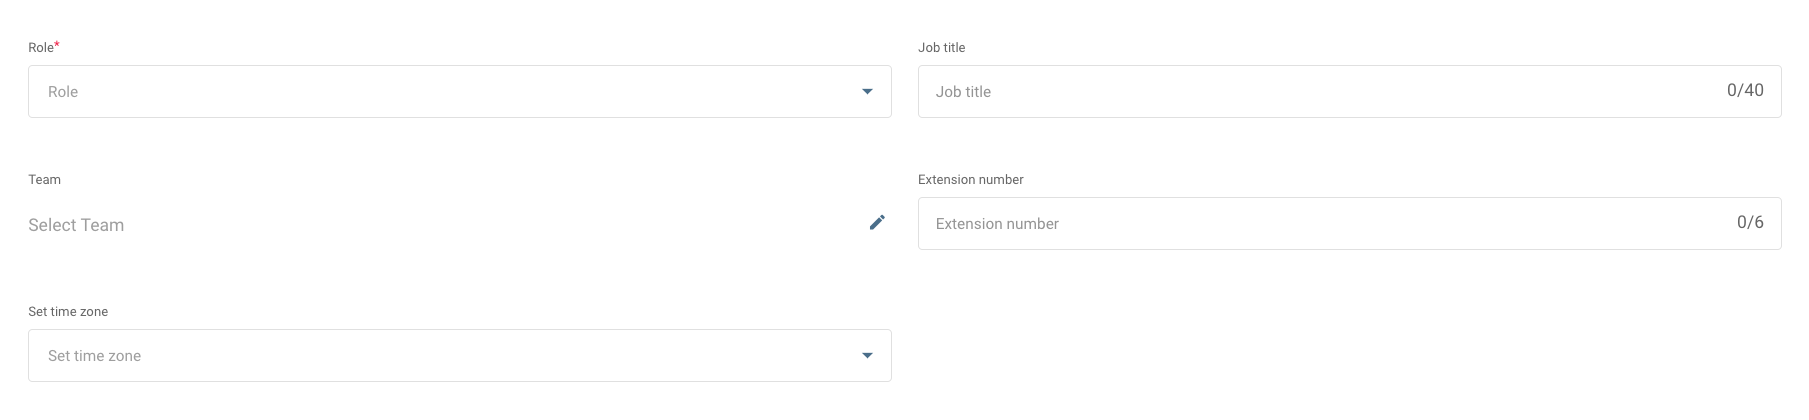
Staff Information
-
Select the Staff member's role.
-
Type in the Staff member's job title.
-
Select the Staff member's time zone.
-
Type in the Staff member's unique extension number.
- The system automatically assigns the Staff member one if no extension number is given.
-
Note that the Data Access Level will be automatically filled out once a role has been selected. For more information, refer to this Guide's Managing Roles and Permissions section.
-
If no Team is selected, the system automatically assigns the Staff member to the top-level team, usually the company name.
Staff Display Name
- Upload the Staff member's profile picture.
- Type in the Staff member's name as you want it to appear to your visitors.
Other Details
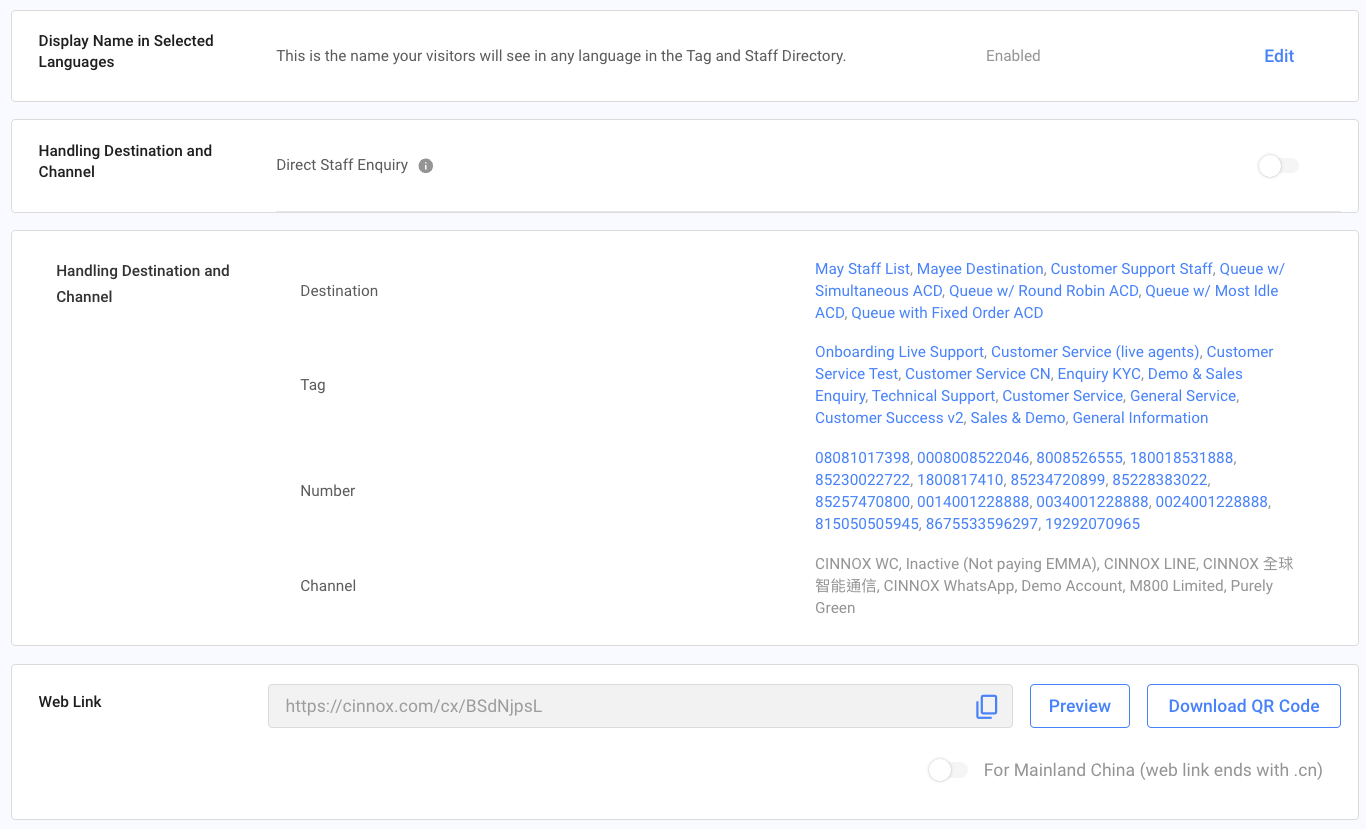
- To add different display names for the staff member in preferred languages, toggle the ON button for the Display Name in Selected Languages.
- For the Routing Settings, toggle the ON button for the Handling Destination and Channel if you want the staff member to appear in Widget's Staff Directory.
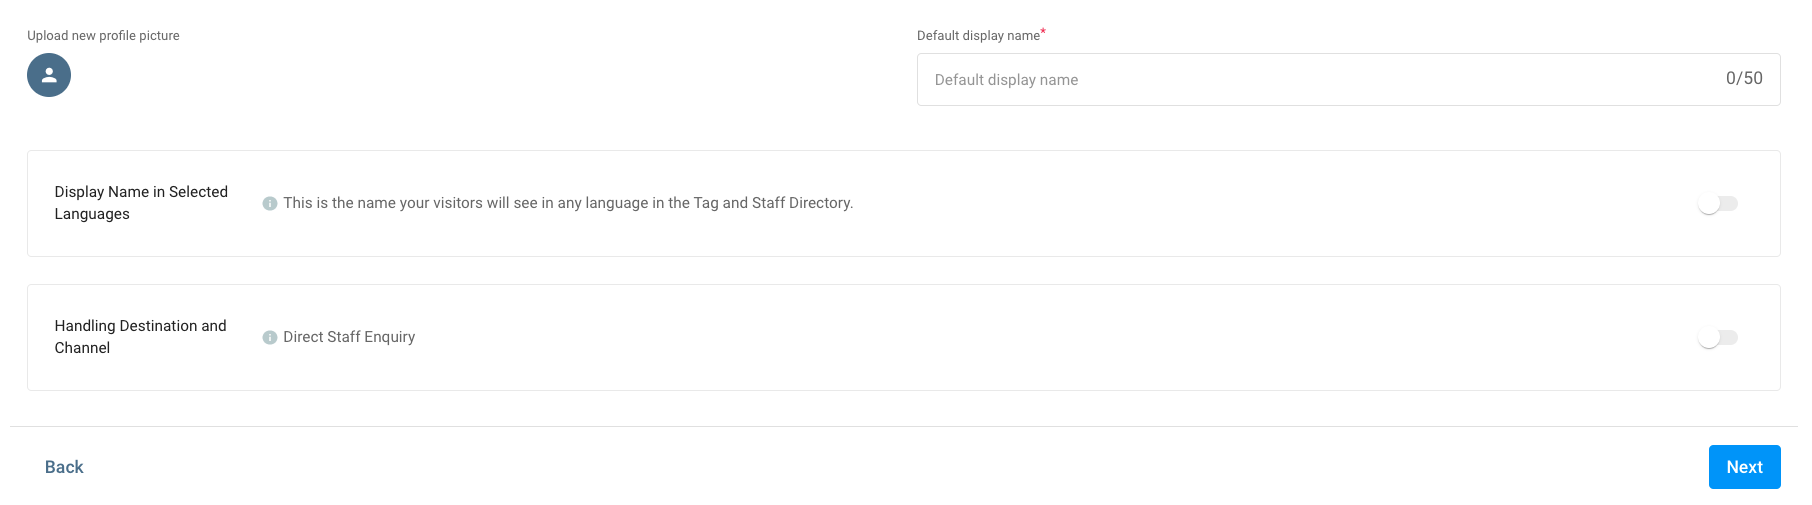
- After entering all the required information, click on Next.
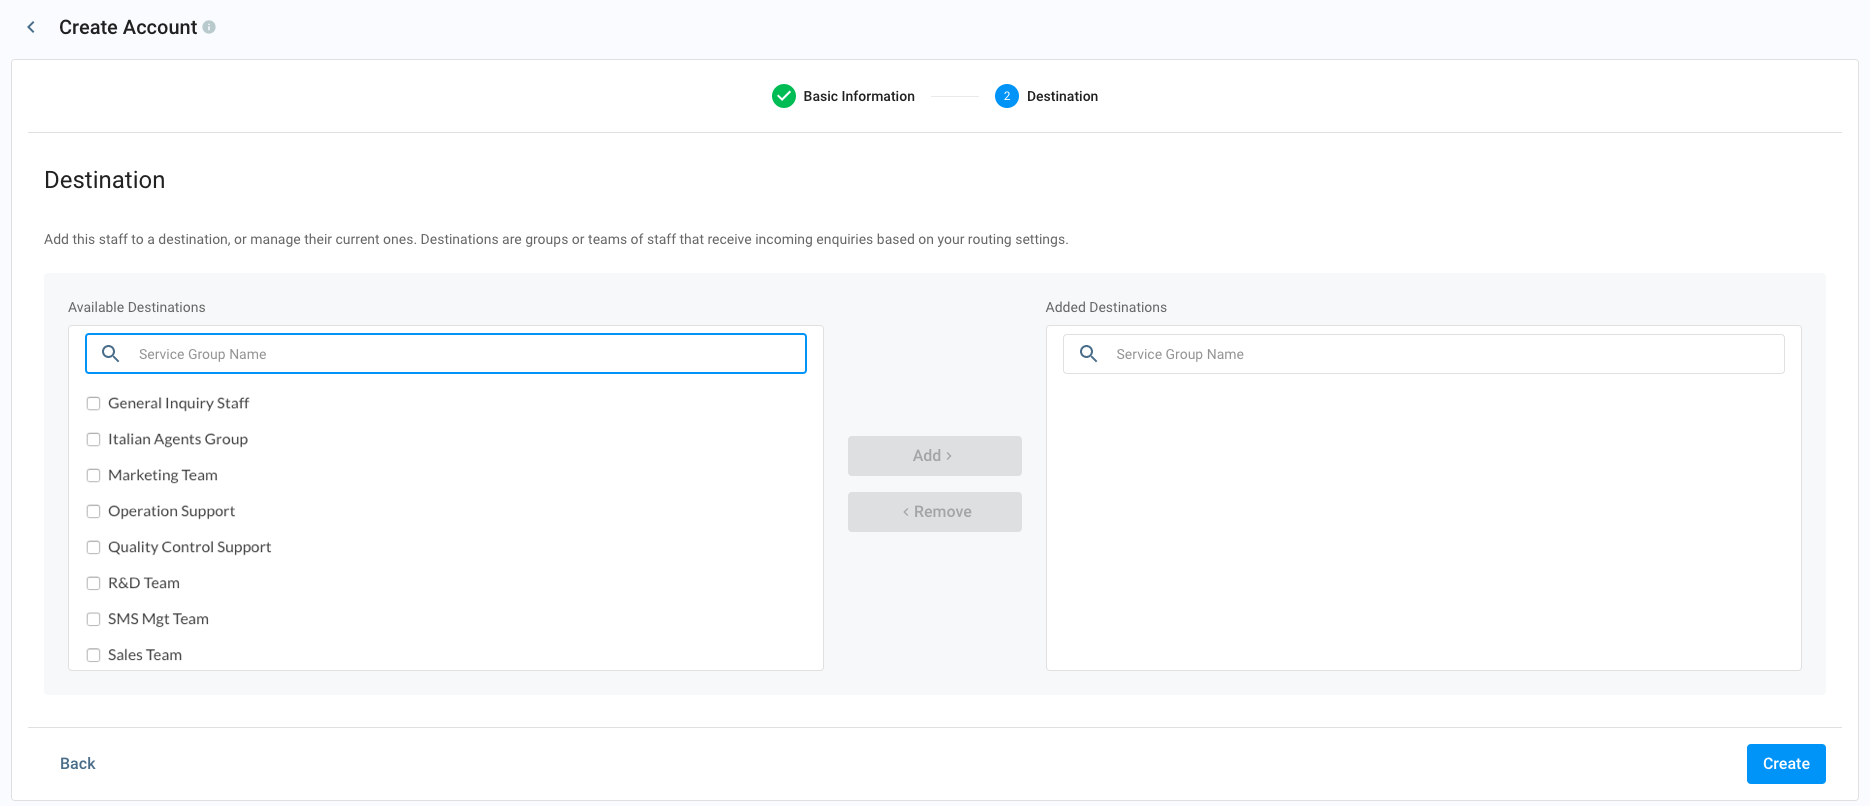
- On the next page, on the left pane, select the Service Groups you want the Staff member to be associated with, then click Add >.
- Click on Create. The newly created Staff account will then be listed on the Staff page.
Importing Staff Accounts
To import new Staff accounts in bulk:
- Go to Administration > Organisation > Staff, then click on Import at the top of the screen.

- On the Import pop-up window that will appear, download and open the CSV template file.

- On the CSV template file, remove the first record sample.
- Add Staff accounts according to the following guidelines:
- Fill out the following mandatory fields: first name, last name, email address, role, and default display name.
- When entering phone numbers: start with a (+), followed by the country code, area code, and the actual phone number (e.g., +85212345678).
- In the role value, select the default roles in CINNOX or the custom roles created in your service from the available options. Refer to this Guide's Managing Roles and Permissions section for more information.
- You can leave the timezone value blank.
- The extension number must be unique and have three to six digits (e.g., 1111). When left blank, CINNOX will automatically generate the extension number value.
- Routing settings are disabled by default; enter True to enable.
- Save the updated CSV file.
- Back on the Import pop-up window, drag and drop the saved CSV file in the pop-up window. You may also click Browse from the pop-up window, then locate and select the CSV file from your folder.
- A pop-up message showing numbers of both successful and failed records will appear.
Handling Failed Records :
| For example: |
|---|
| 3 record(s) out of 5 record(s) successfully uploaded and added to your Staff Account list. 2 record(s) failed with the following error details. Please download the error records, fix them, and upload them again. |
- On the pop-up window, click Download to download the file ErrorDetail.csv.
- Click on Cancel to close the pop-up window.
- Open ErrorDetail.csv and check the error details in column AA. Each record will show an error log.
- Correct the details for each record directly on the ErrorDetail.csv file, then save the changes.
- Back on the Import pop-up window, upload the updated ErrorDetail.csv file by dragging and dropping it in the pop-up window. You can also click Browse from the pop-up window, then locate and select the CSV file from your folder.
- A pop-up message showing numbers of both successful and failed records will appear.
How to handle the case of the splitting text in the CSV file
Using a comma (,) to split the text is the function of the CSV file. When importing the CSV file with the comma between texts, the text will be split into the next column in the file after the file upload.
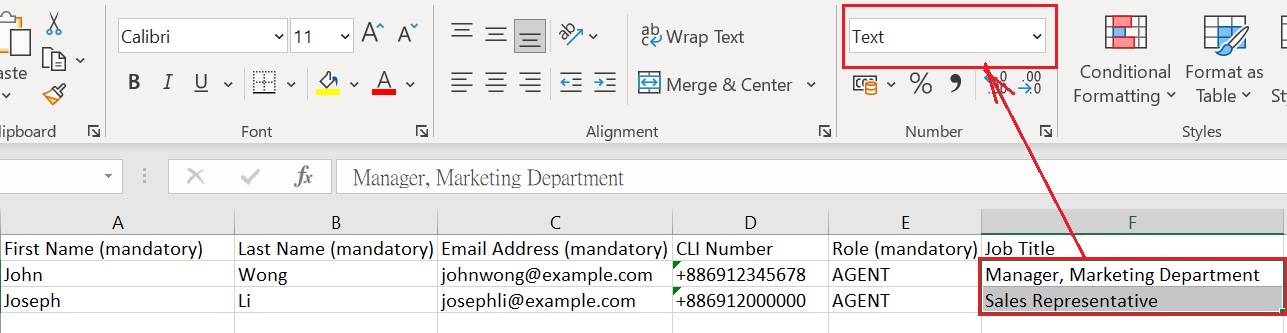
Splitting text in the CSV file
For example, when you enter Manager, Marketing Department into the column Job Title, the file is shown below:

After the file upload, the text is shown below:

As the text Manager, Marketing Department is added in the column Job Title after the filled CSV file is uploaded, the texts are split into two columns, Manager in the column Job Title and Marketing Department in the column Timezone respectively.
How to avoid splitting text
Using a text editor
- Put the text with a comma in the double quote (""), like "Manager, Marketing Department" and save it as a CSV file when you upload the file.
Using Excel or style sheet editors
- Fill in the text in the text format.
- Save the sheet as a CSV file and upload it to the CINNOX.

- The double quote should be added automatically to the file.

Activating Staff Account
See this Guide's Activating Staff Account section for detailed instructions about activating a staff account.
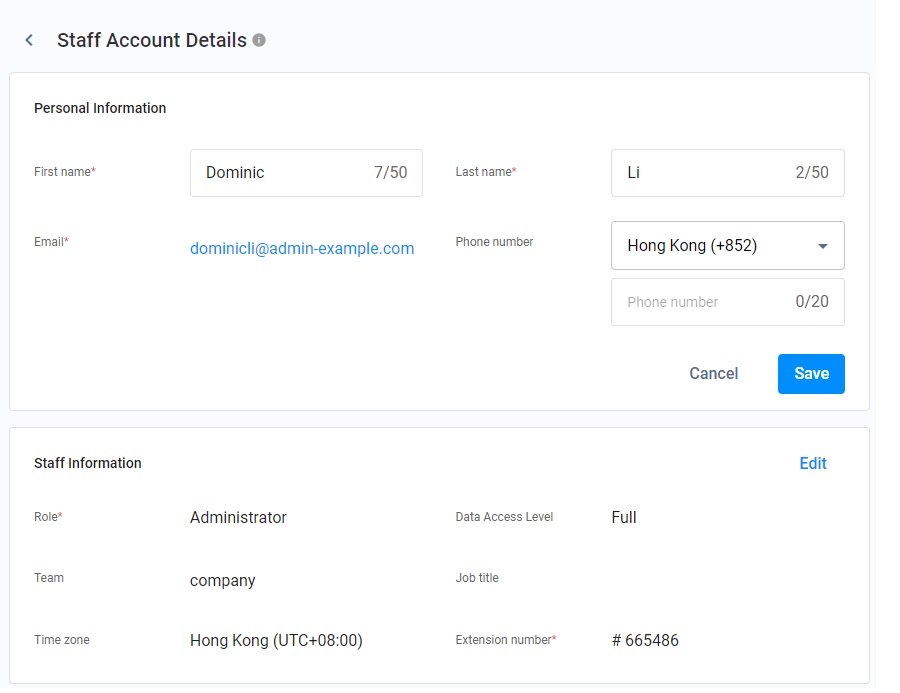
Viewing and Editing Staff Account
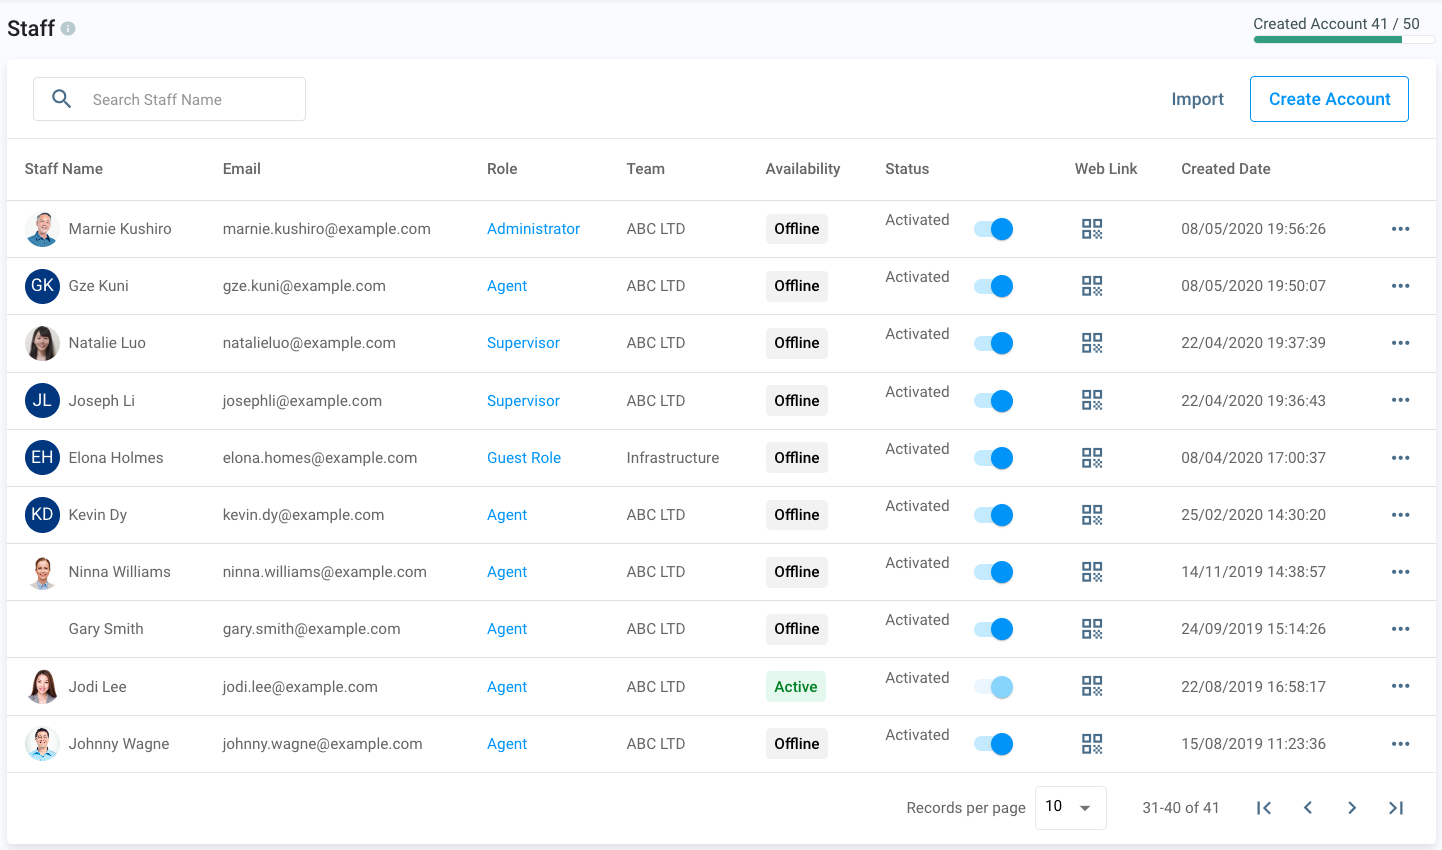
To view and edit a staff account:
- Go to Administration > Organisation > Staff, then scroll down through or search the Staff account you wish to view or edit.
- Click on the vertical ellipsis icon ( ) on the right-hand side of the Staff account, then click on Staff Account Details.
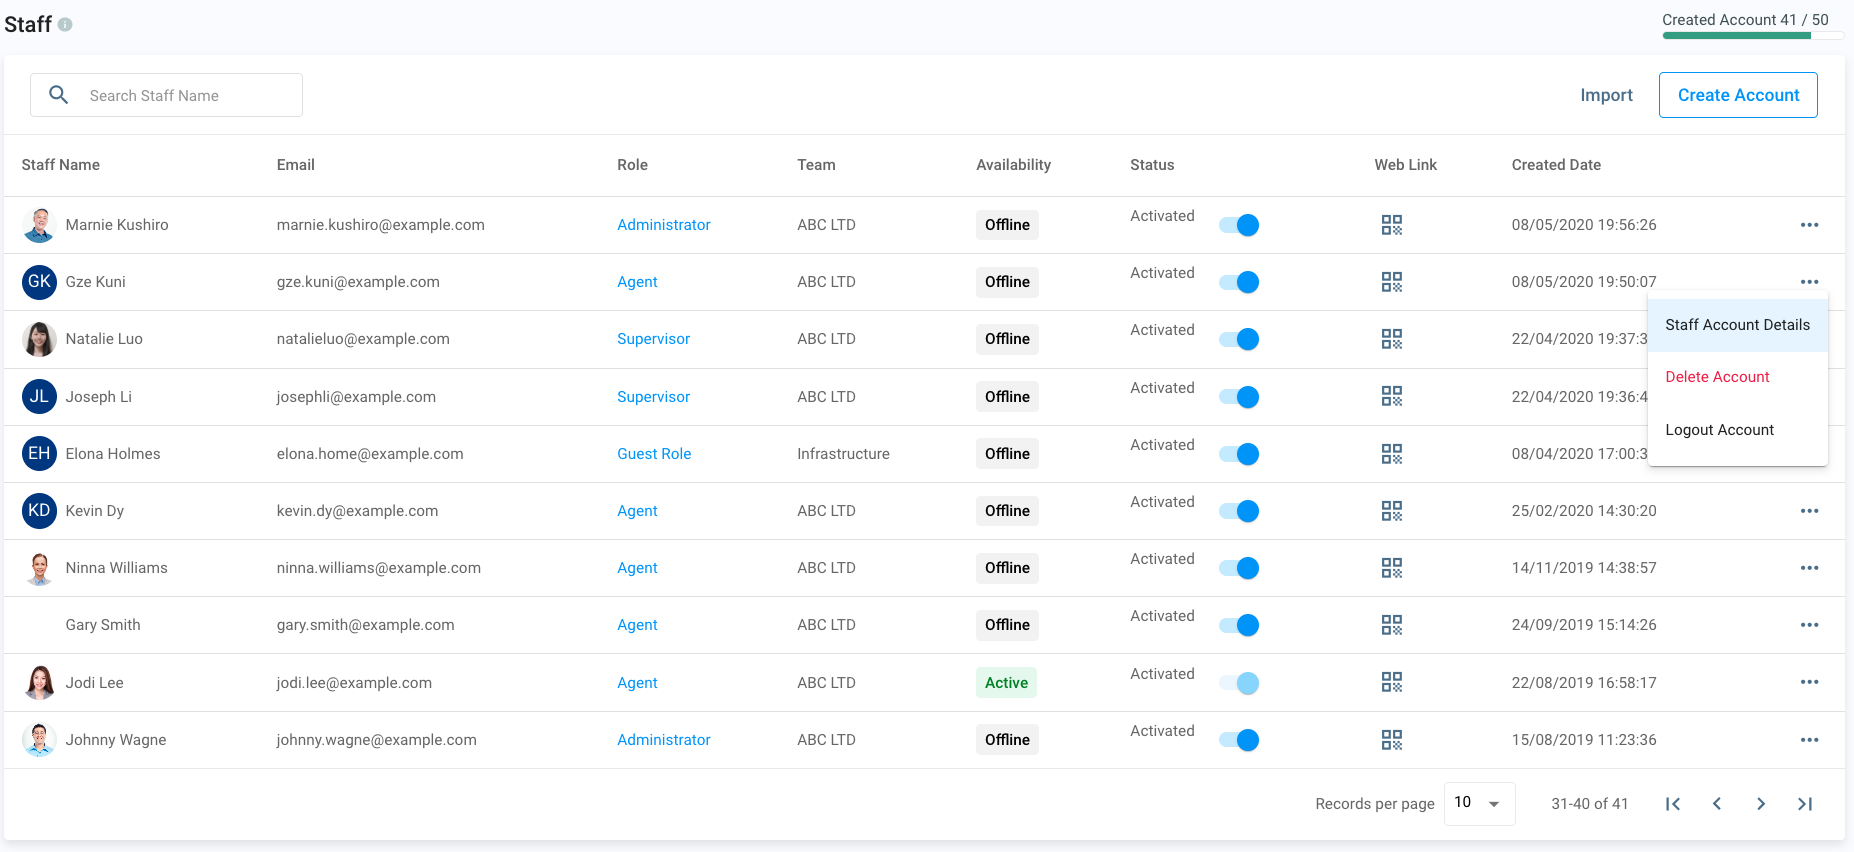
- On the Staff Account Details page, click Edit for the information you need to edit.
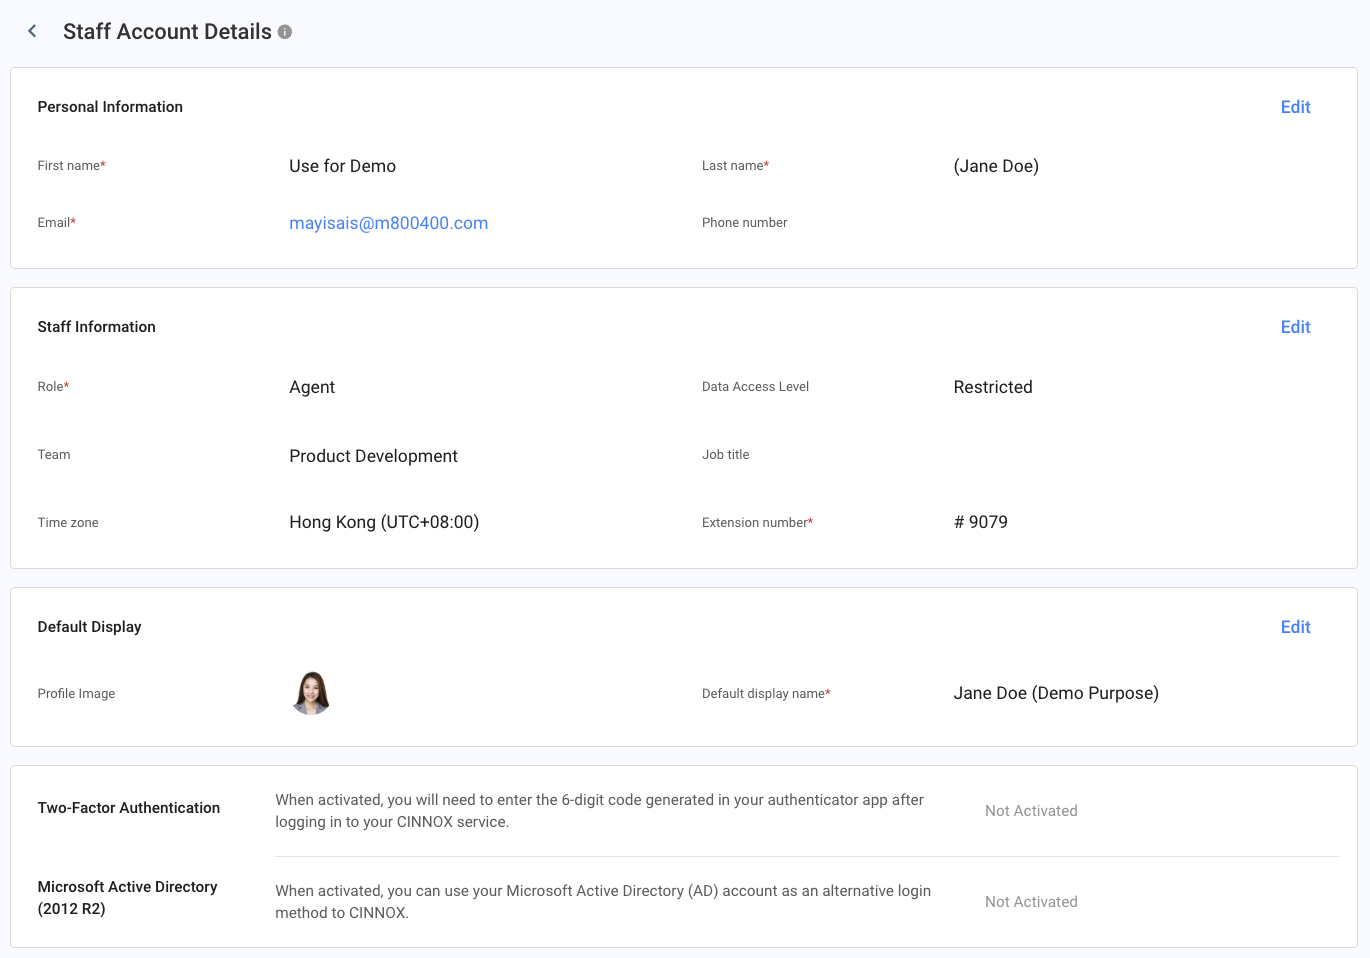
- Make the necessary changes, then click on Save.
Staff QR Code and Weblink
CINNOX automatically generates a unique QR code and Weblink whenever a new Staff account is created. Staff members can use these as alternative methods for customers to connect with them and the business.
Staff members can download the QR Code in PNG and SVG formats or copy the Weblink URL. They can then share these with their customers through various channels.
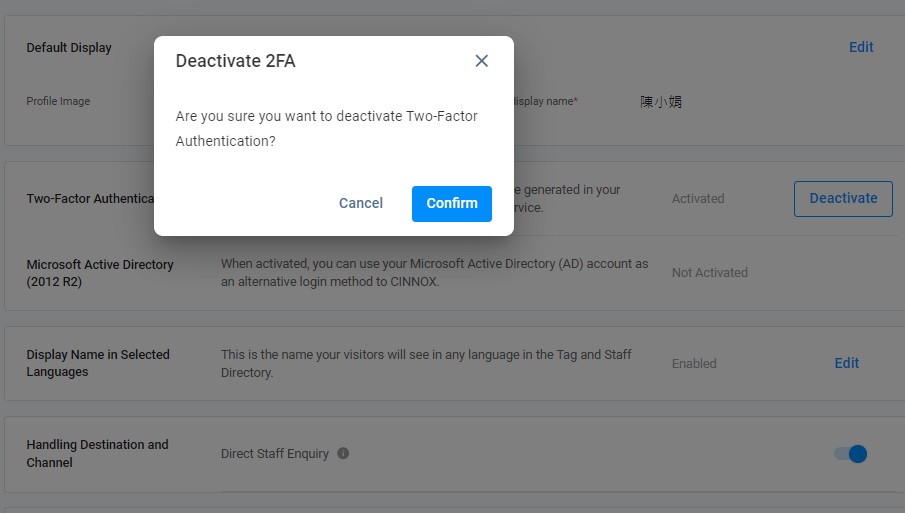
Deactivating Staff Two-Factor Authentication
If a Staff account has two-factor authentication (2FA) enabled, you may remotely deactivate it should a need arises (e.g. if the Staff member forgot their 2FA codes).
For more information about 2FA, refer to this Guide's Staff Two-Factor Authentication section.
To deactivate a Staff account 2FA:
- Go to Administration > Organisation > Staff from the navigation menu, then scroll down through or search the Staff account you wish to deactivate the 2FA.
- Click on the vertical ellipsis icon ( ) on the right-hand side of the Staff account, then click on Staff Account Details.
- On the Staff Account Details page, scroll down to Staff Two-Factor Authentication and check if its status is Active.
- Click on Deactivate. A pop-up message will appear, asking you to confirm the action.

- Click on Confirm.
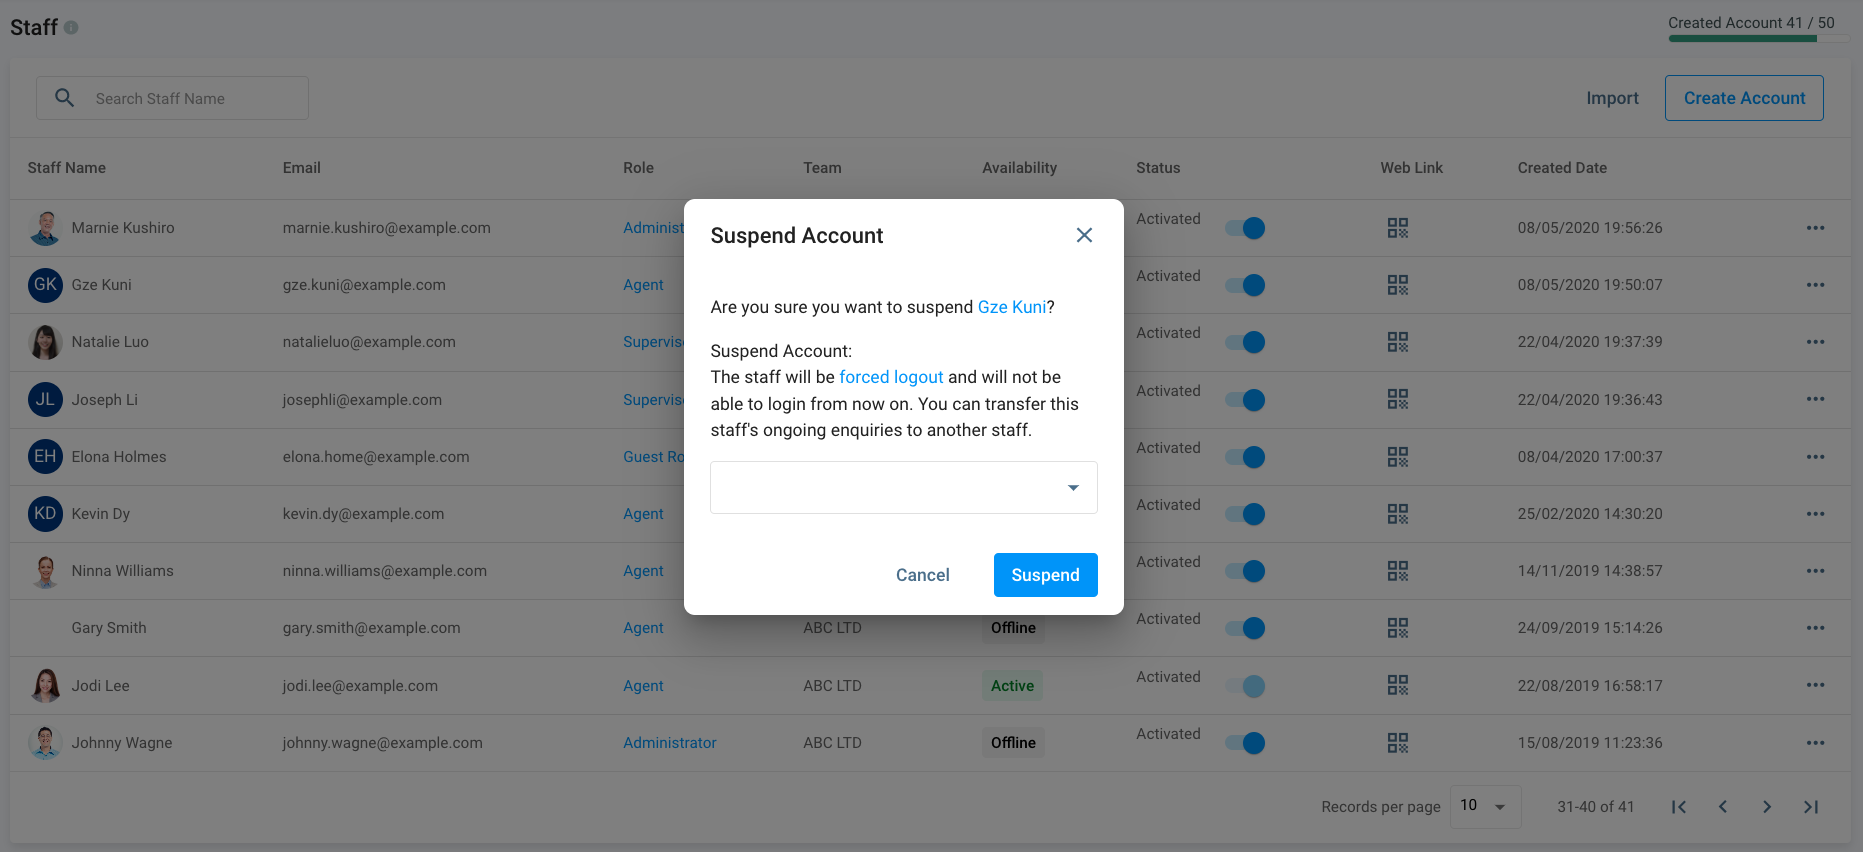
Suspending Staff Account
To suspend a Staff account:
- Go to Administration > Organisation > Staff from the navigation menu, then scroll down through or search the Staff account you wish to suspend.
- Toggle the status Activated button to OFF to suspend the Account. A pop-up message will appear, asking you to confirm the action.
- If you want to transfer the staff member's ongoing enquiries to another staff, click on the drop-down box and select the name of the new staff member you wish to handle the transferred enquiries.
- Click on Suspend.
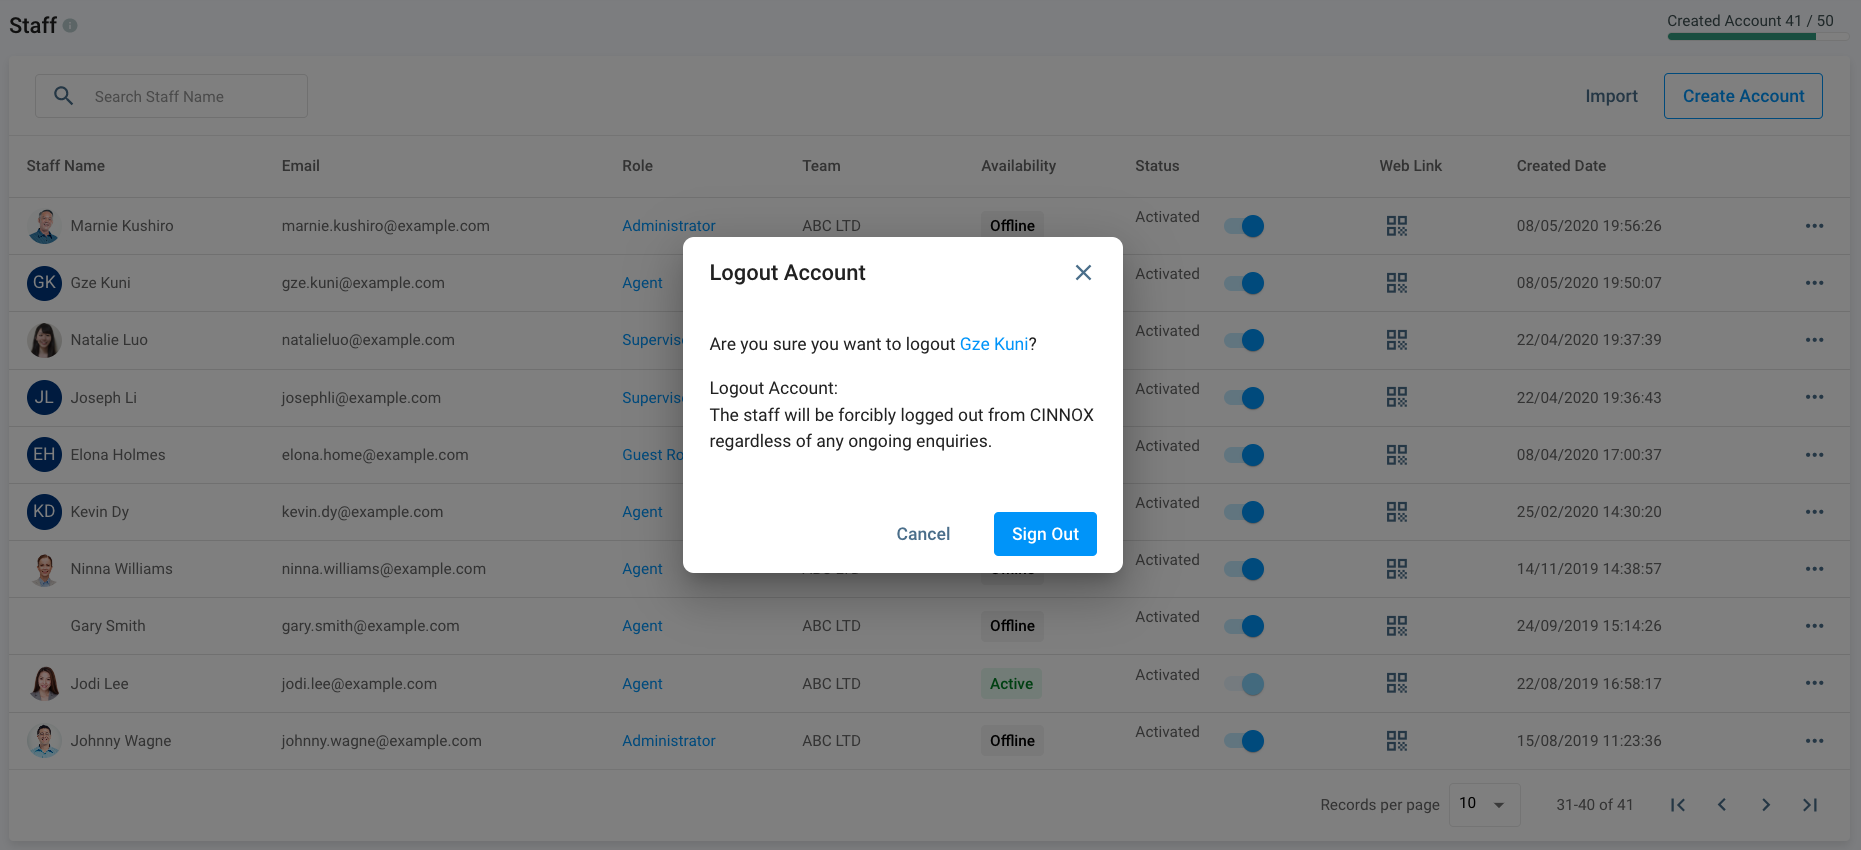
Logging Out Staff Account
To log out of a Staff account:
- From the navigation menu, go to Administration > Organisation > Staff, then scroll down through or search the Staff account you wish to log out of.
- Click on the vertical ellipsis icon ( ) on the right-hand side of the Staff account, then click on Logout Account. A pop-up message will appear, asking you to confirm the action.
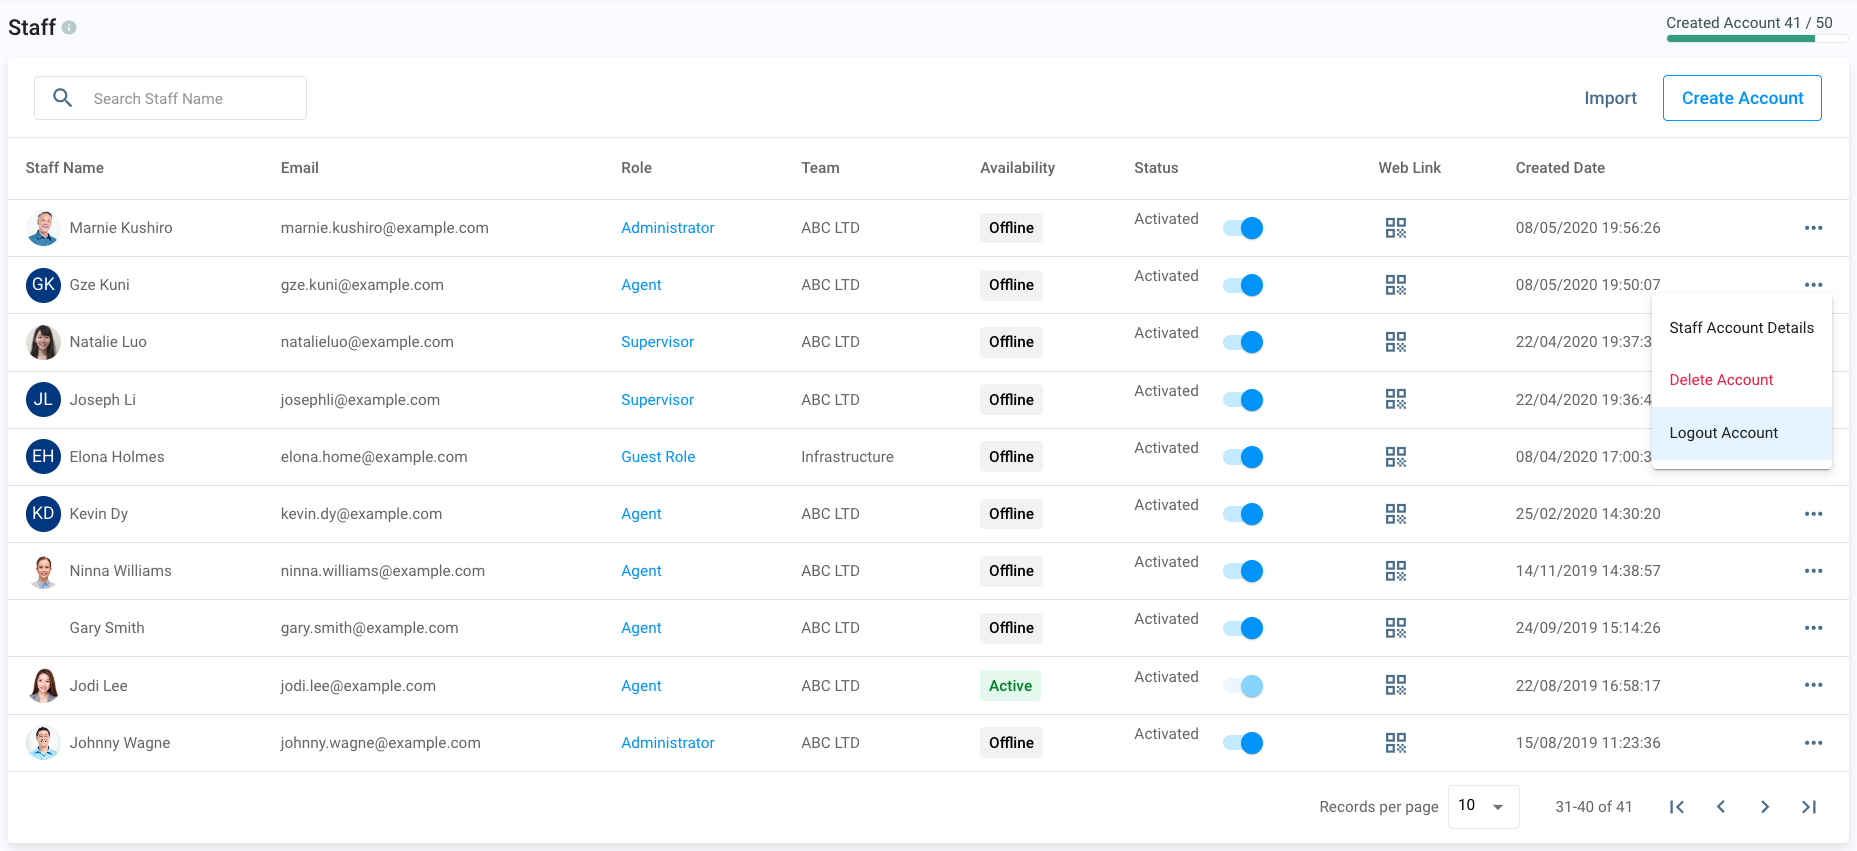
- Click on Logout.
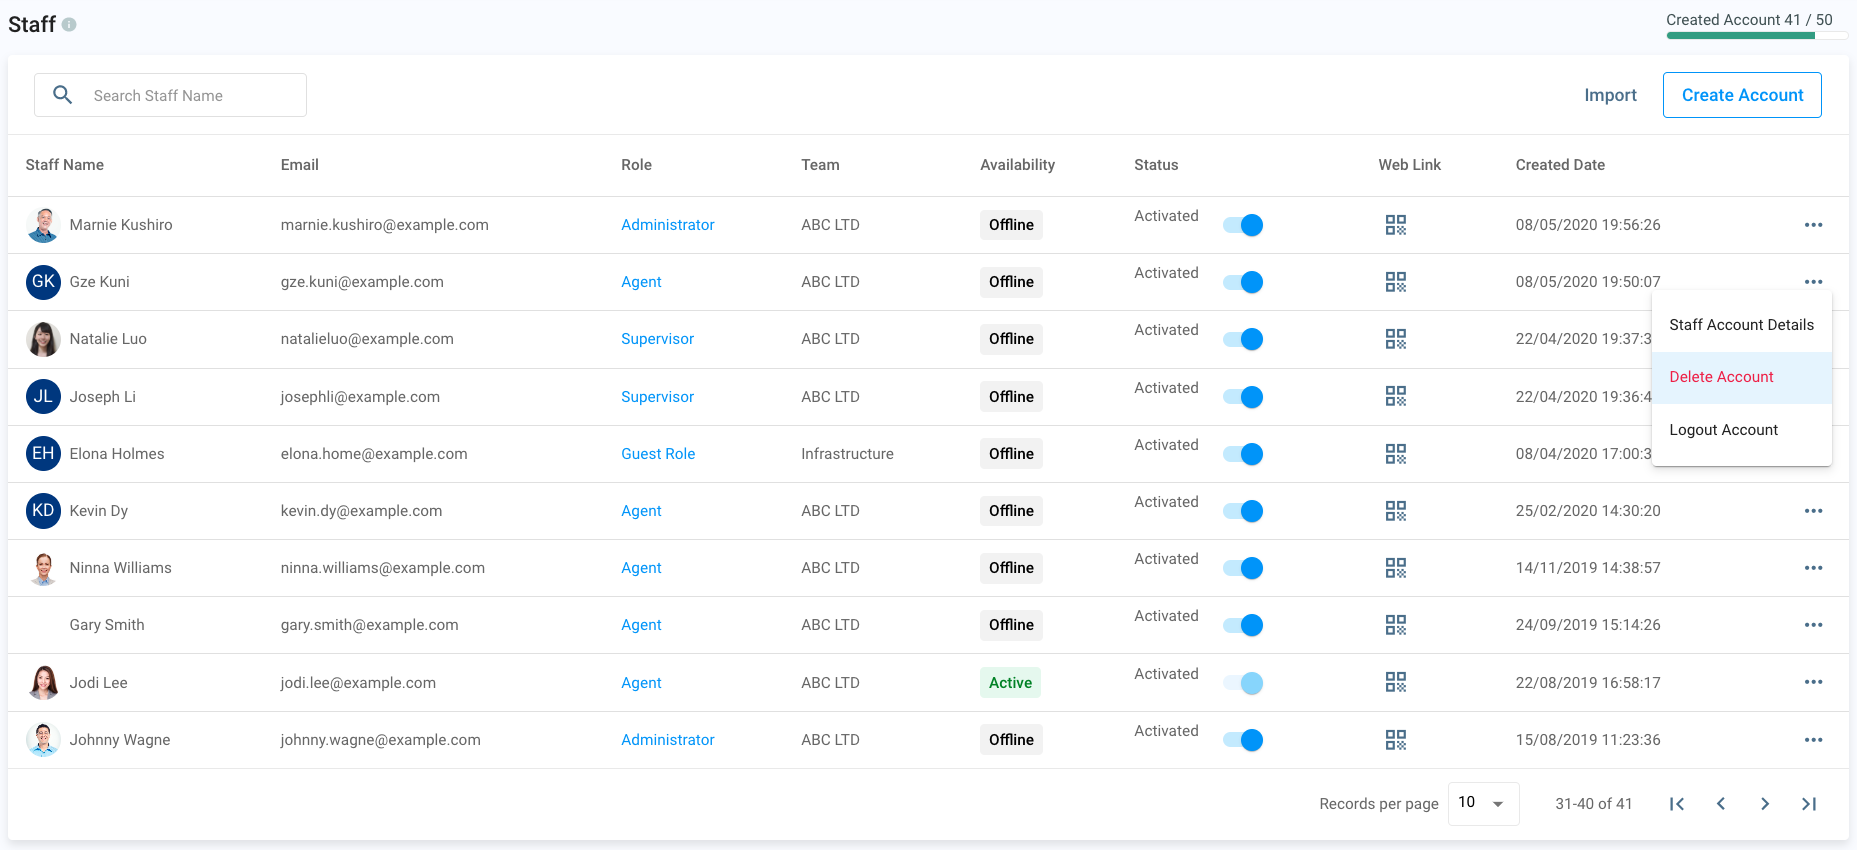
Deleting Staff Account
To delete a Staff account:
- Go to Administration > Organisation > Staff from the navigation menu, then scroll down through or search for the Staff account you wish to delete.
- Click on the vertical ellipsis icon ( ) on the Staff account's right-hand side, then click on Delete Account. A pop-up message will appear, asking you to confirm the action.
- If you want to transfer the staff member's ongoing enquiries to another staff, click on the drop-down box and select the name of the new staff member you wish to handle the transferred enquiries.
- Click on Delete.
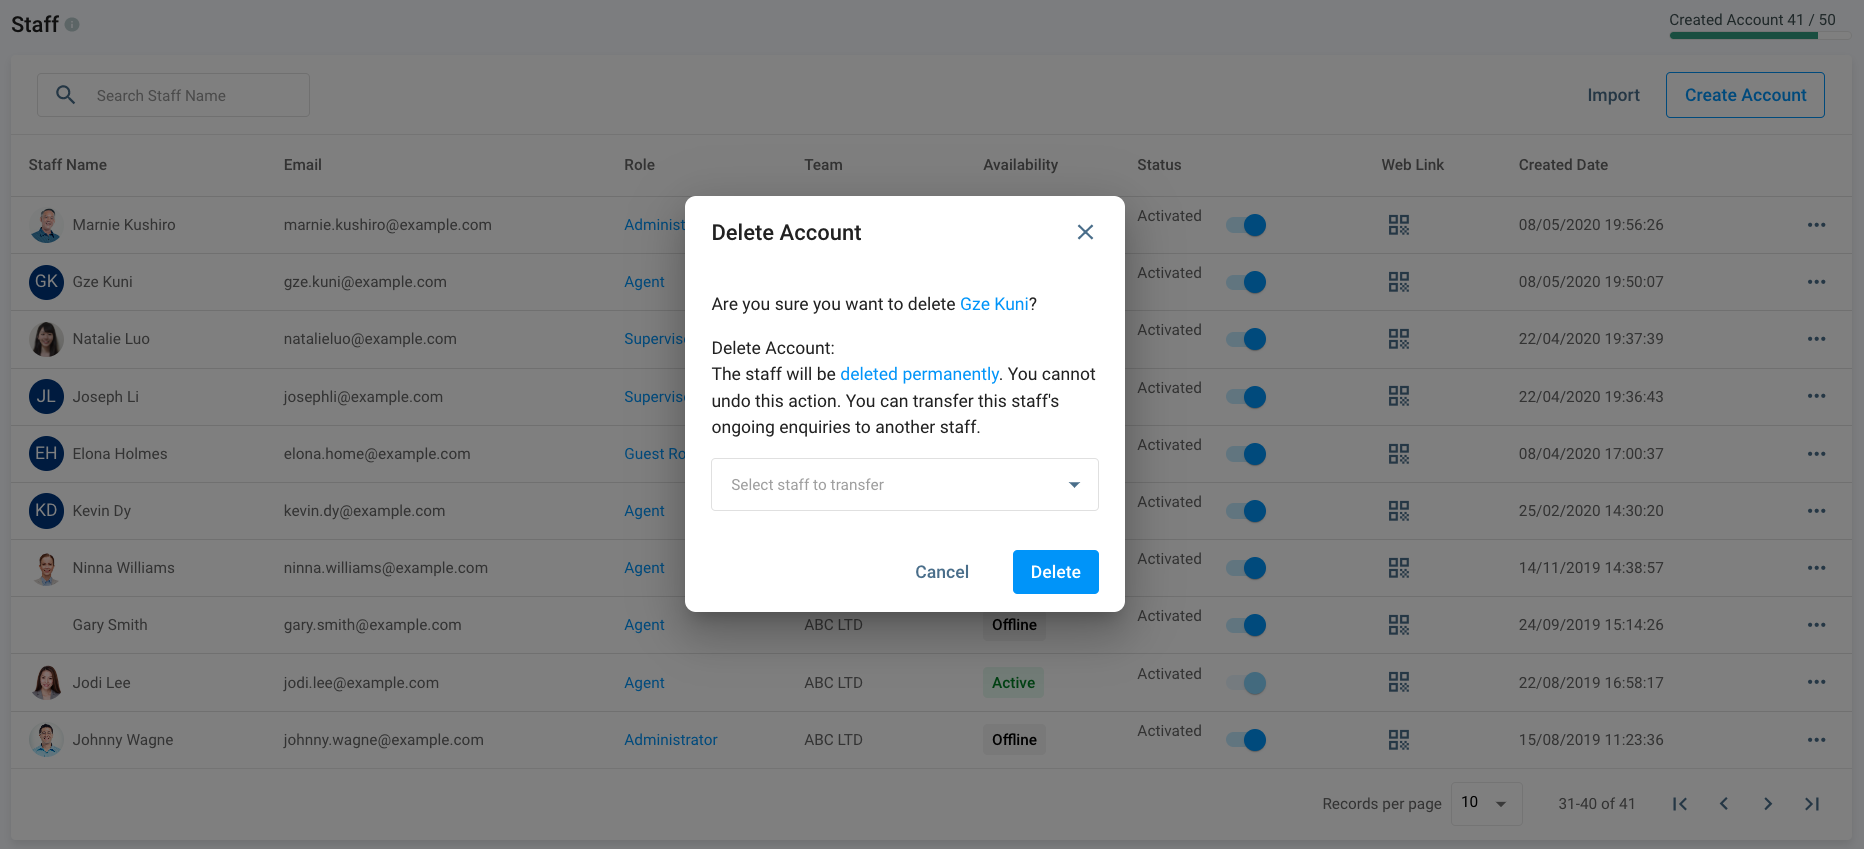
The deleted Staff will be removed from the Staff list when successfully done.