
Smart Calling
Smart Calling is CINNOX's auto-dialer feature that lets you run a call tree or create an outbound call campaign to your target customers by automatically dialing phone numbers immediately after each call.
With Smart Calling, you don't have to worry about memorising a long list of phone numbers, so you can focus instead on creating outstanding conversations with them.
There are two ways to use smart calling for your call campaign:
- Supervised Dialler - Calls numbers one by one and shows agents the customer details. Agents choose when to start auto‑dialling, so they stay in control.
- Agentless Dialler - Calls many numbers at the same time to save time. When someone finishes listening to the message prompt, the call is passed to an agent or sent to the chosen destination automatically.
Make the most of Smart Calling to improve how you reach customers. This user manual explains how to use the feature effectively to run call campaigns more smoothly and achieve better results.
Note: When making cold calls, always consider the situation and make sure you follow all applicable laws and regulations in your region.
Creating Call Campaign
Supervised Dialler
To create a new supervised campaign:
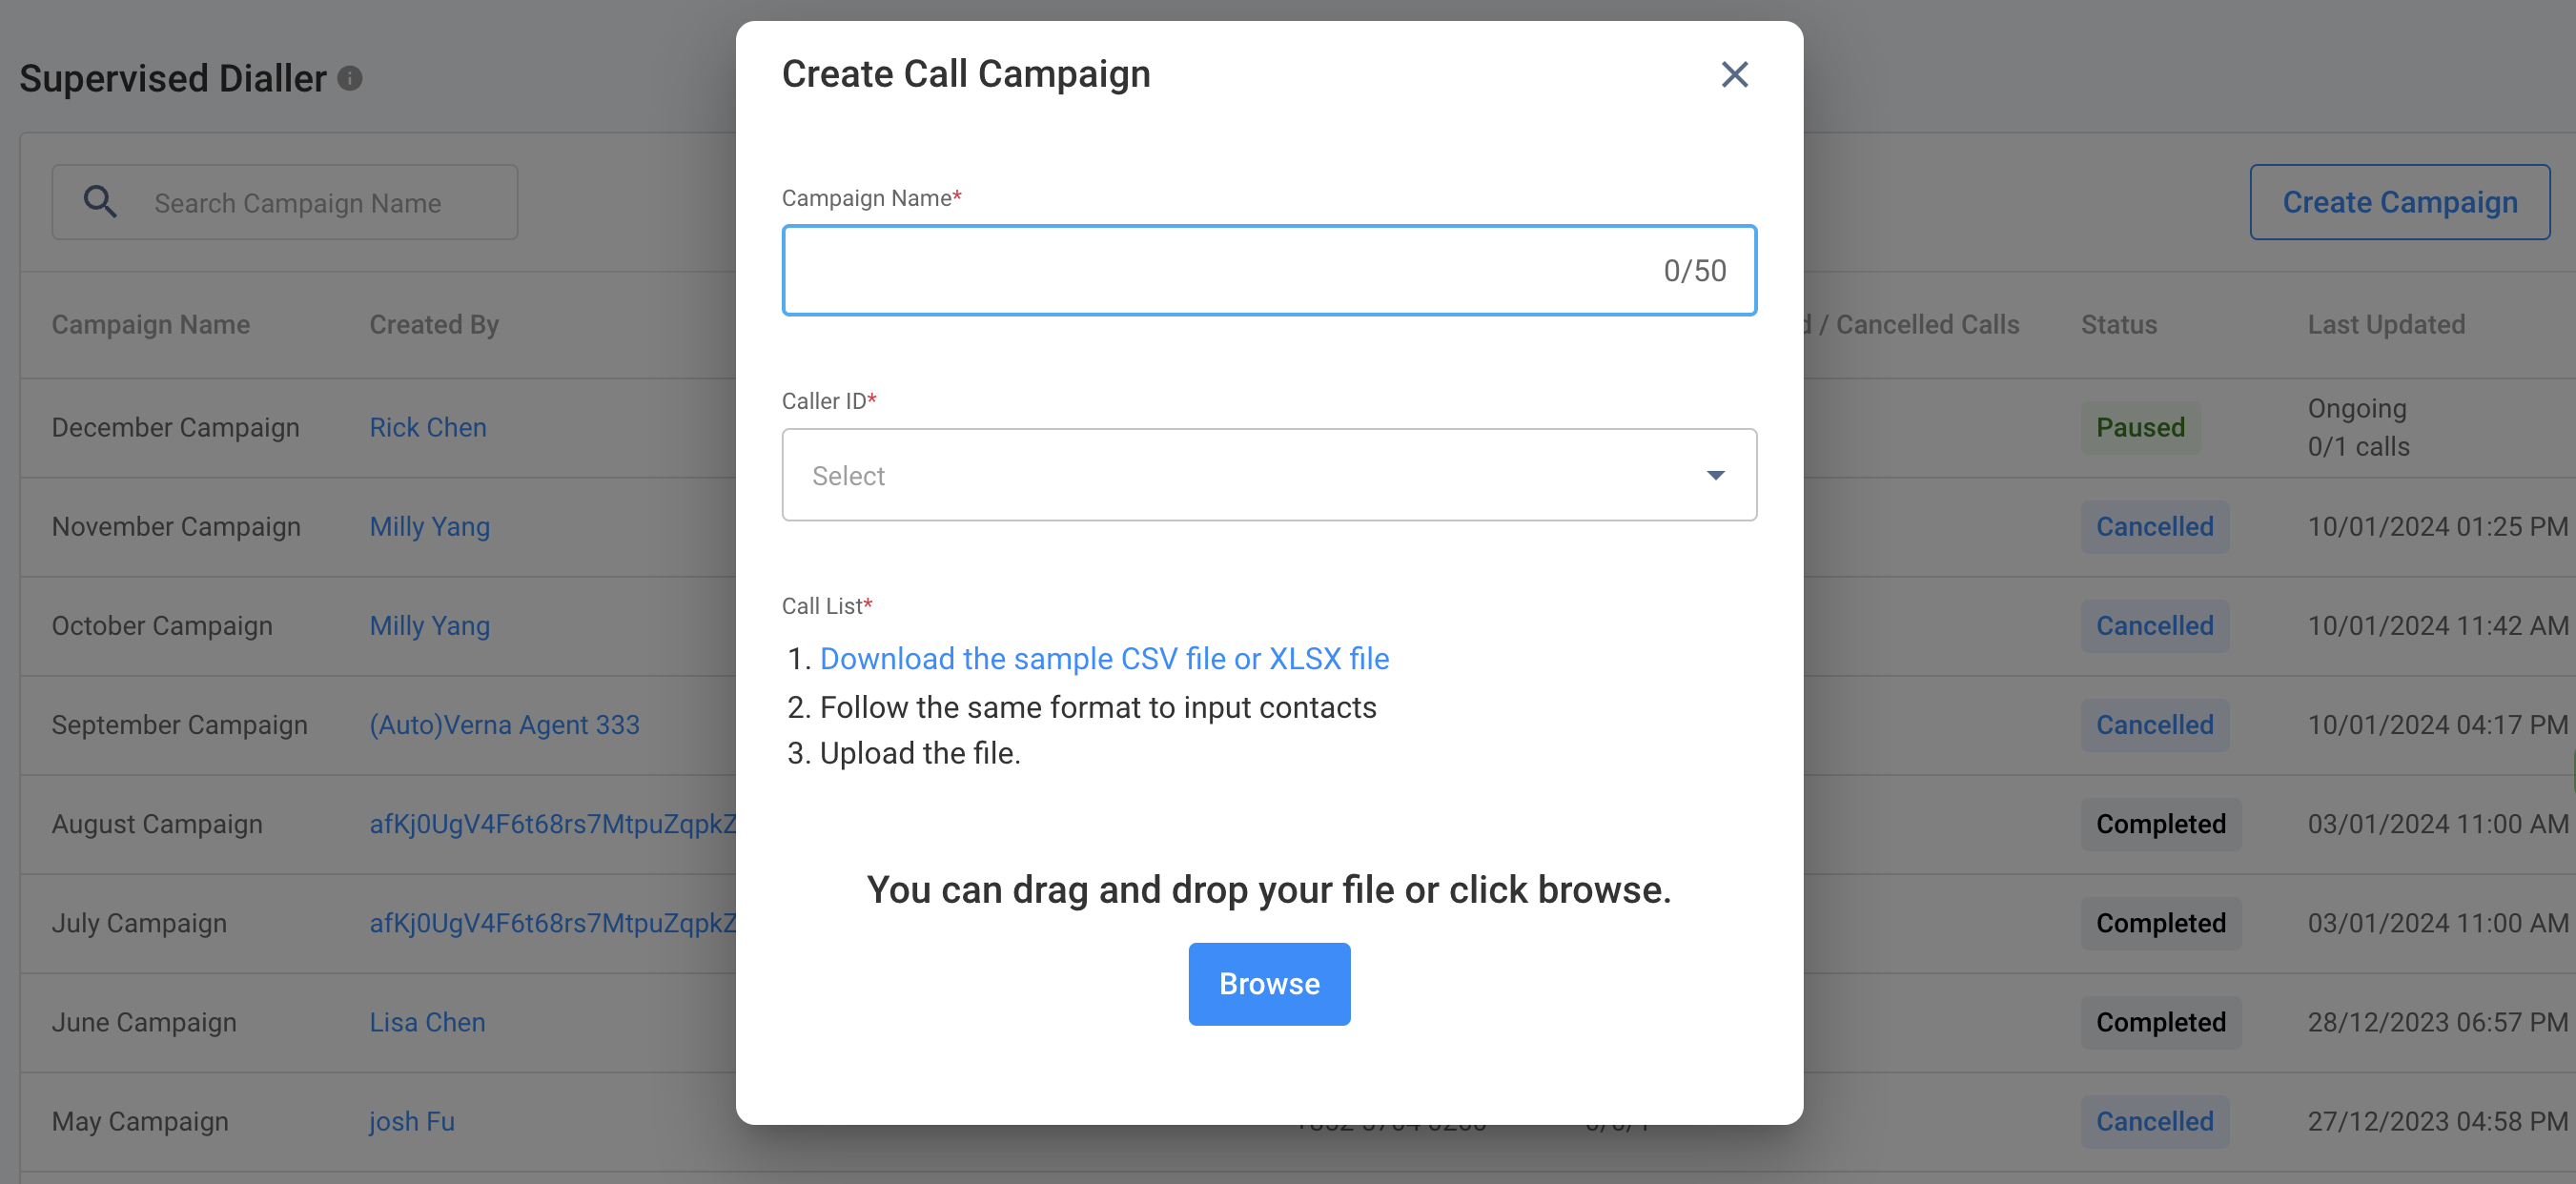
- Go to Campaigns > Smart Calling > Supervised Dialler from the navigation menu, then click the Create Campaign button in the top-right corner.
- On the pop-up window that will appear, input the Campaign Name.
- Under Caller ID, select the number in the drop-down to use as your outbound caller ID from the drop-down box. Please note that the caller ID to use must be enabled for "Engagement" and "Caller ID" in your Virtual Number Settings, and your staff account is listed.
- Click on the download the sample CSV or XLSX file to download a template.
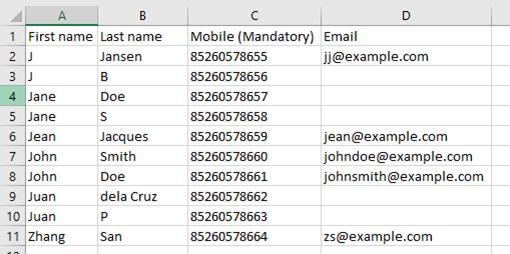
- Open the template file, which should contain four columns, then remove the sample first record.
- In the respective columns, type the first name, last name, mobile number, and email address of the customers you wish to call.
- Note that the Mobile column is mandatory, and the phone number should follow the following format: country code + area code + phone number.
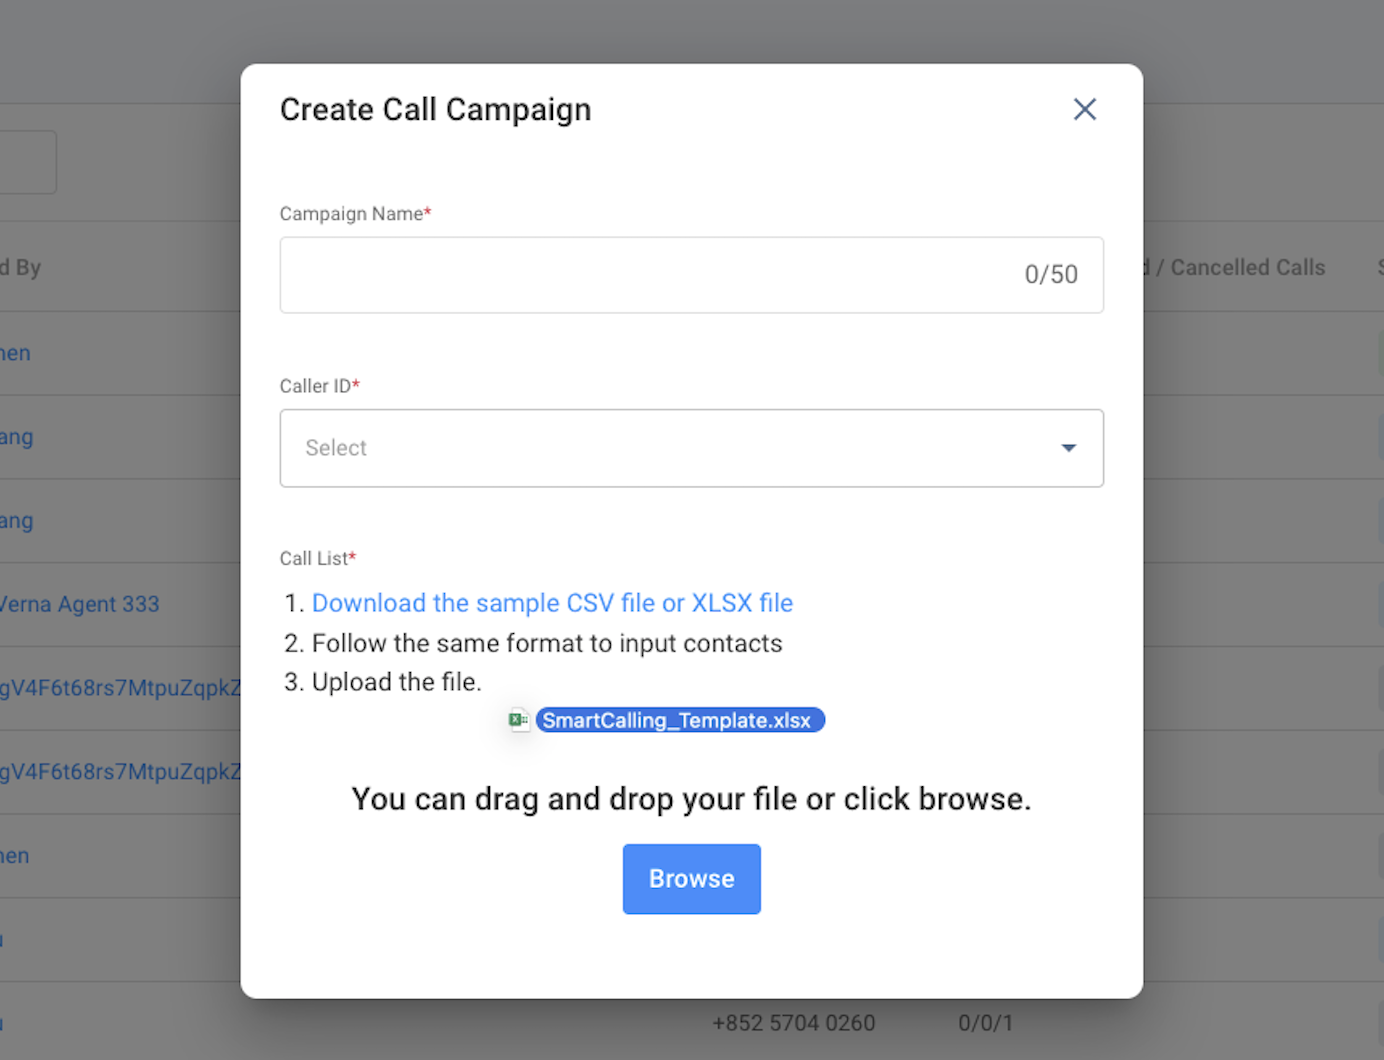
- Once all columns are ready, save the file and upload it to the dashboard by dragging and dropping it into the designated box in the pop-up window. CINNOX will then validate the uploaded file and create an error log if there are invalid records.
- You may also upload the file by clicking on Browse and selecting it from its location.
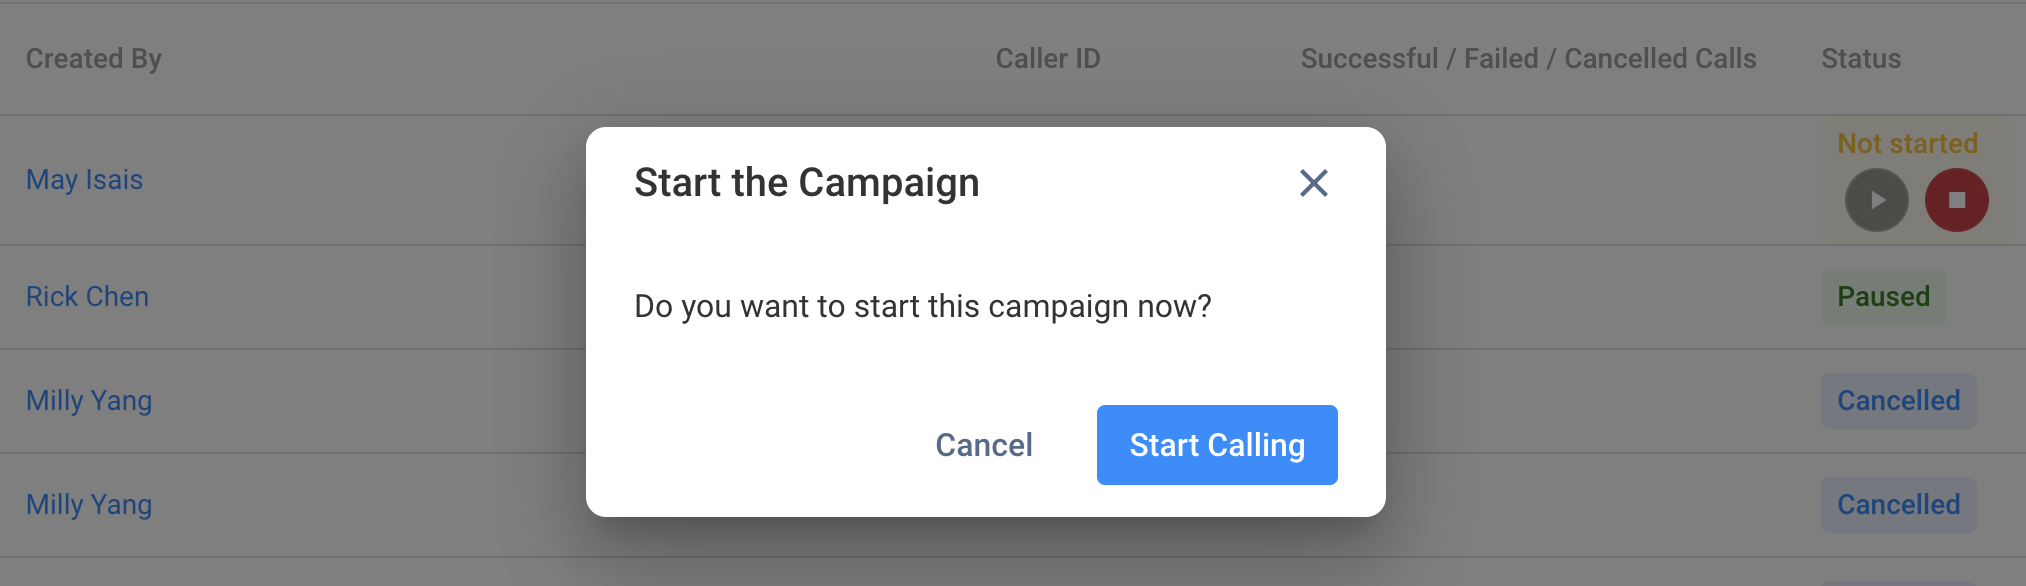
- Click on Create. A pop-up message will appear, asking if you will start the campaign immediately.
- Click on Start Calling if you'll start calling right away. CINNOX will then open the call screen on your Dashboard and start dialling the numbers, and the status will appear in the Smart Calling list as Ongoing.
- Click on Cancel if you want to start the campaign later. Its status will appear in the Smart Calling list as Scheduled.
Agentless Dialler
To create a new agentless campaign:
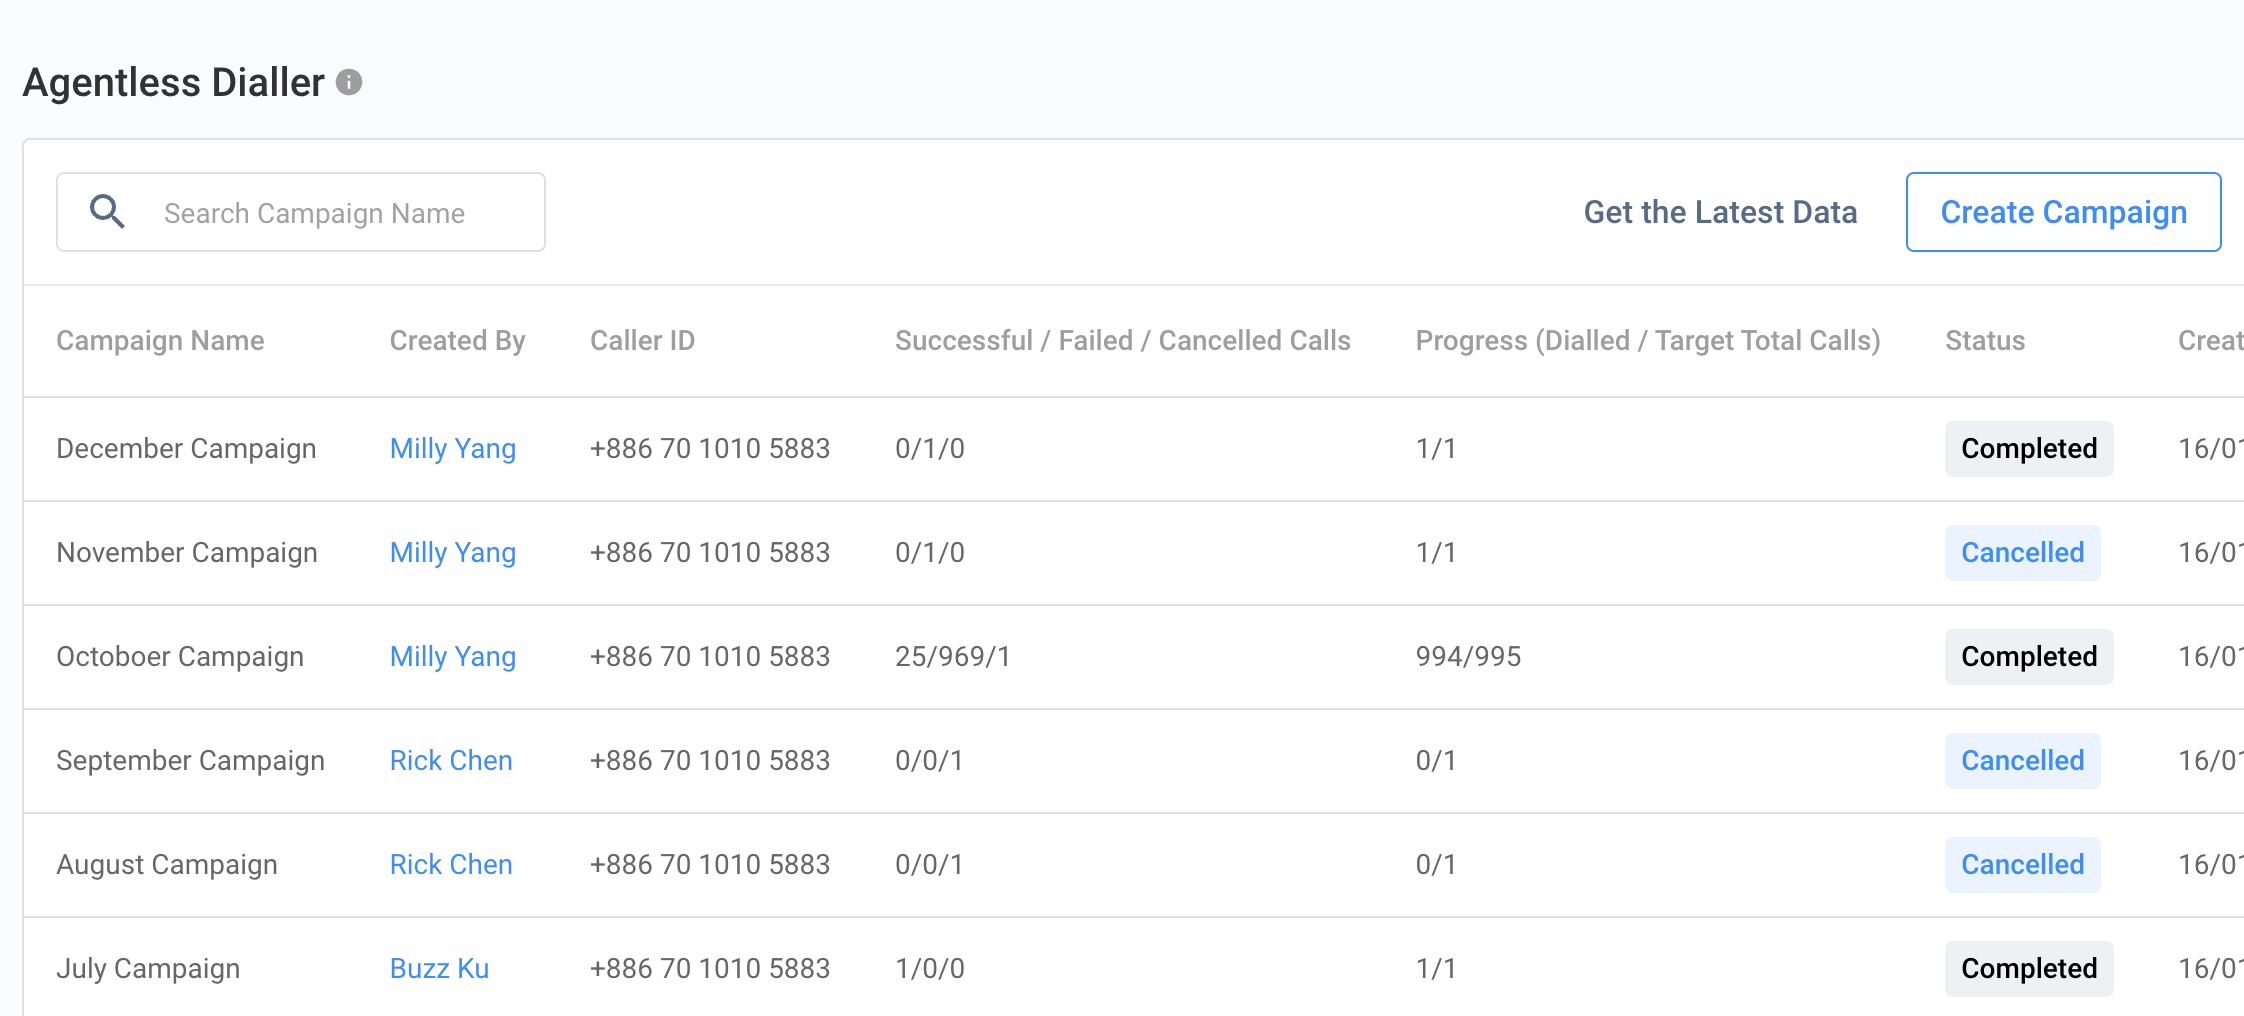
- From the navigation menu, go to Campaigns > Smart Calling > Agentless Dialler, then click Create Campaign in the top right corner.
-
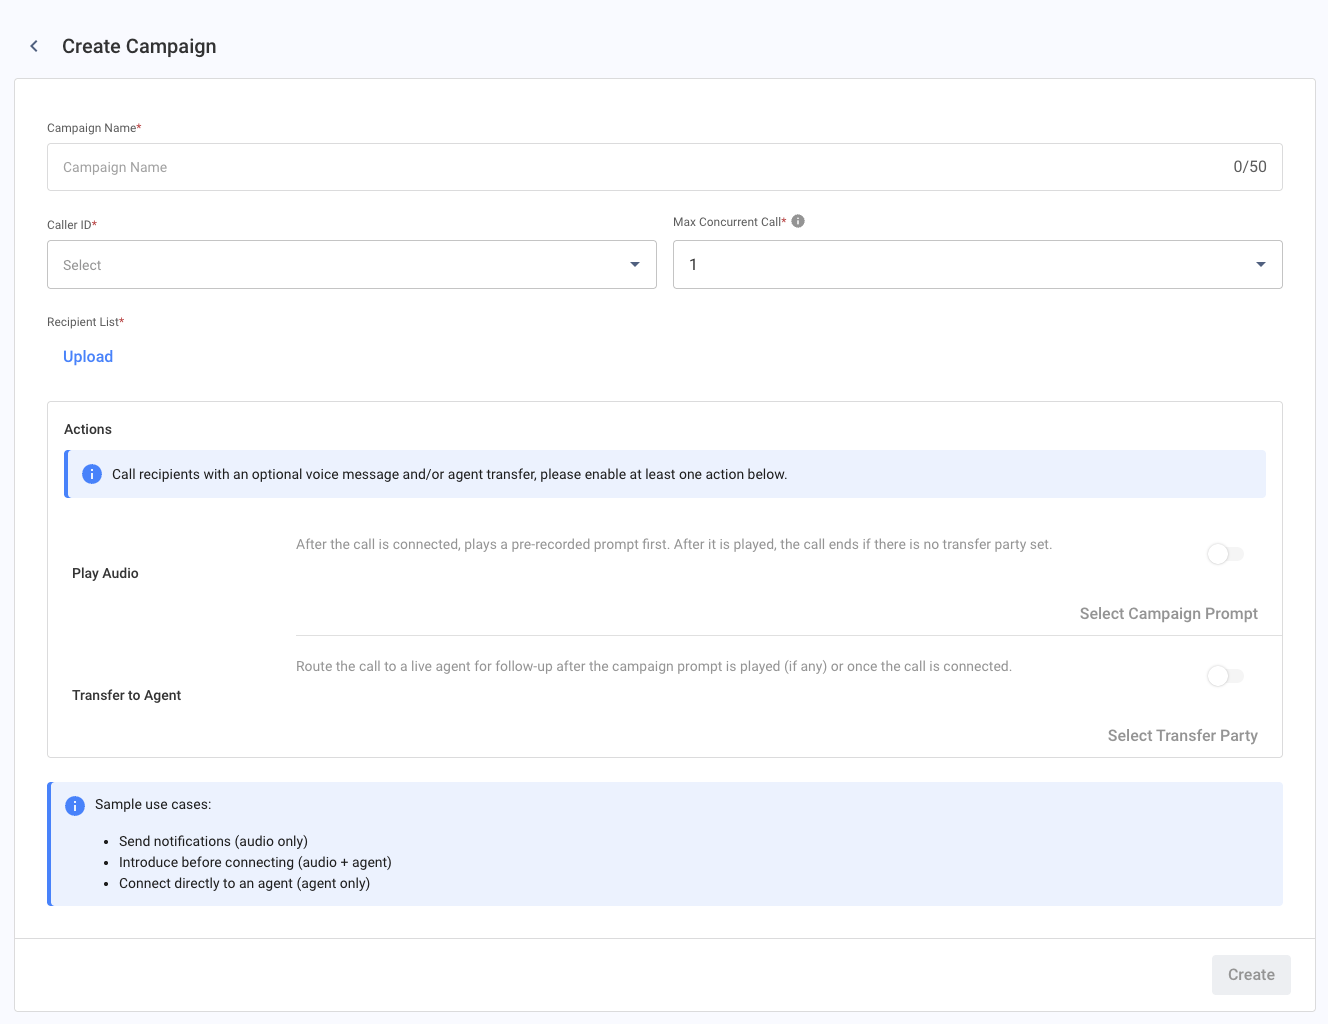
On the next page, enter a Campaign Name.
-
Select a Caller ID from the dropdown list
- The number must be enabled for Engagement and Caller ID in Virtual Number Settings.
- Your staff account must be assigned to the number selected.
-
Set the Max Concurrent Calls (1–100).
-
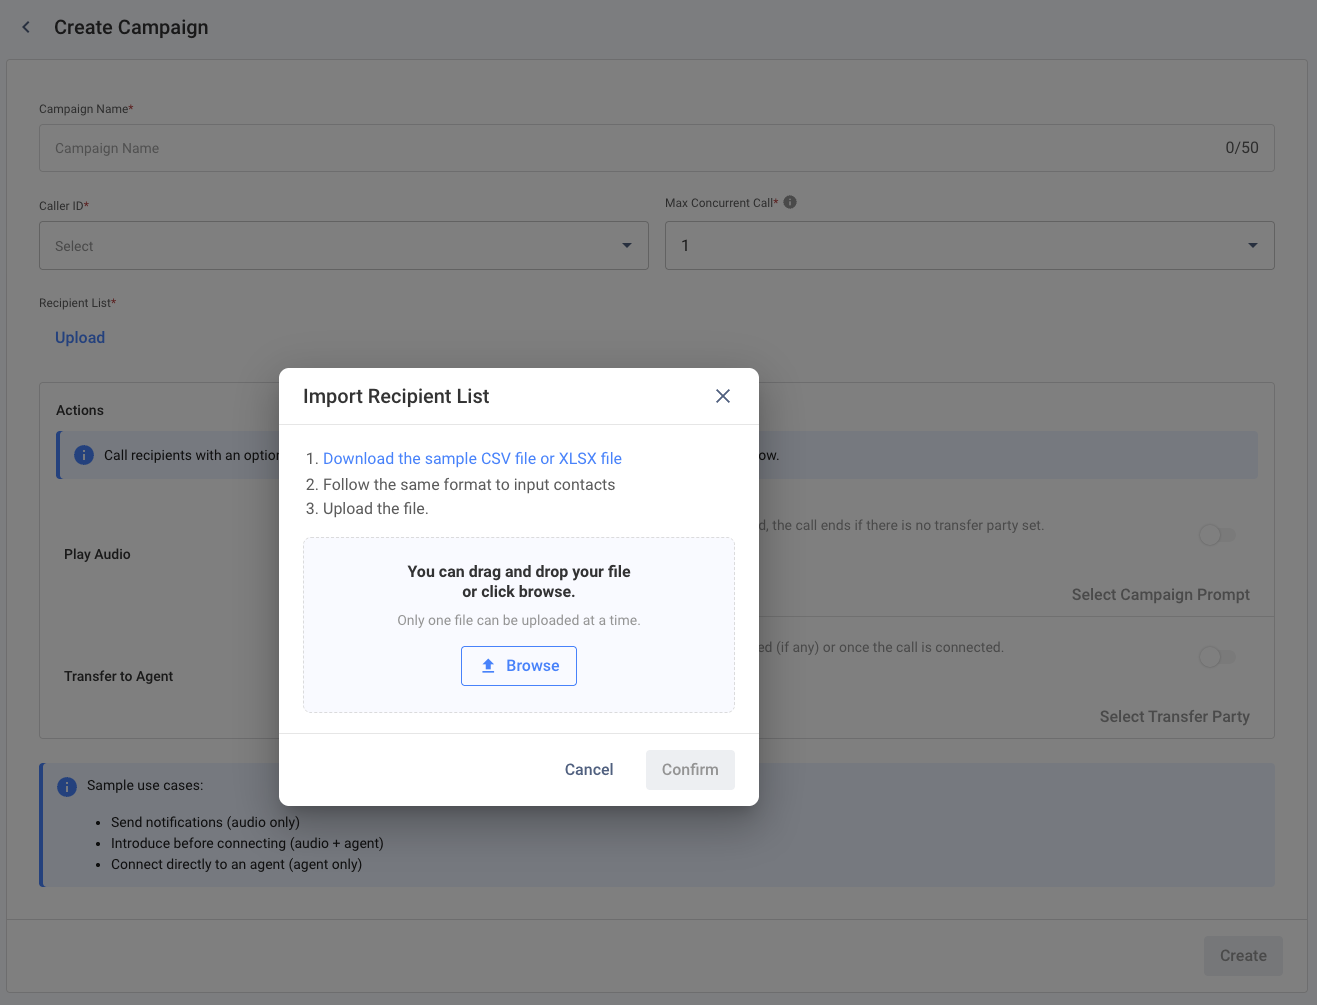
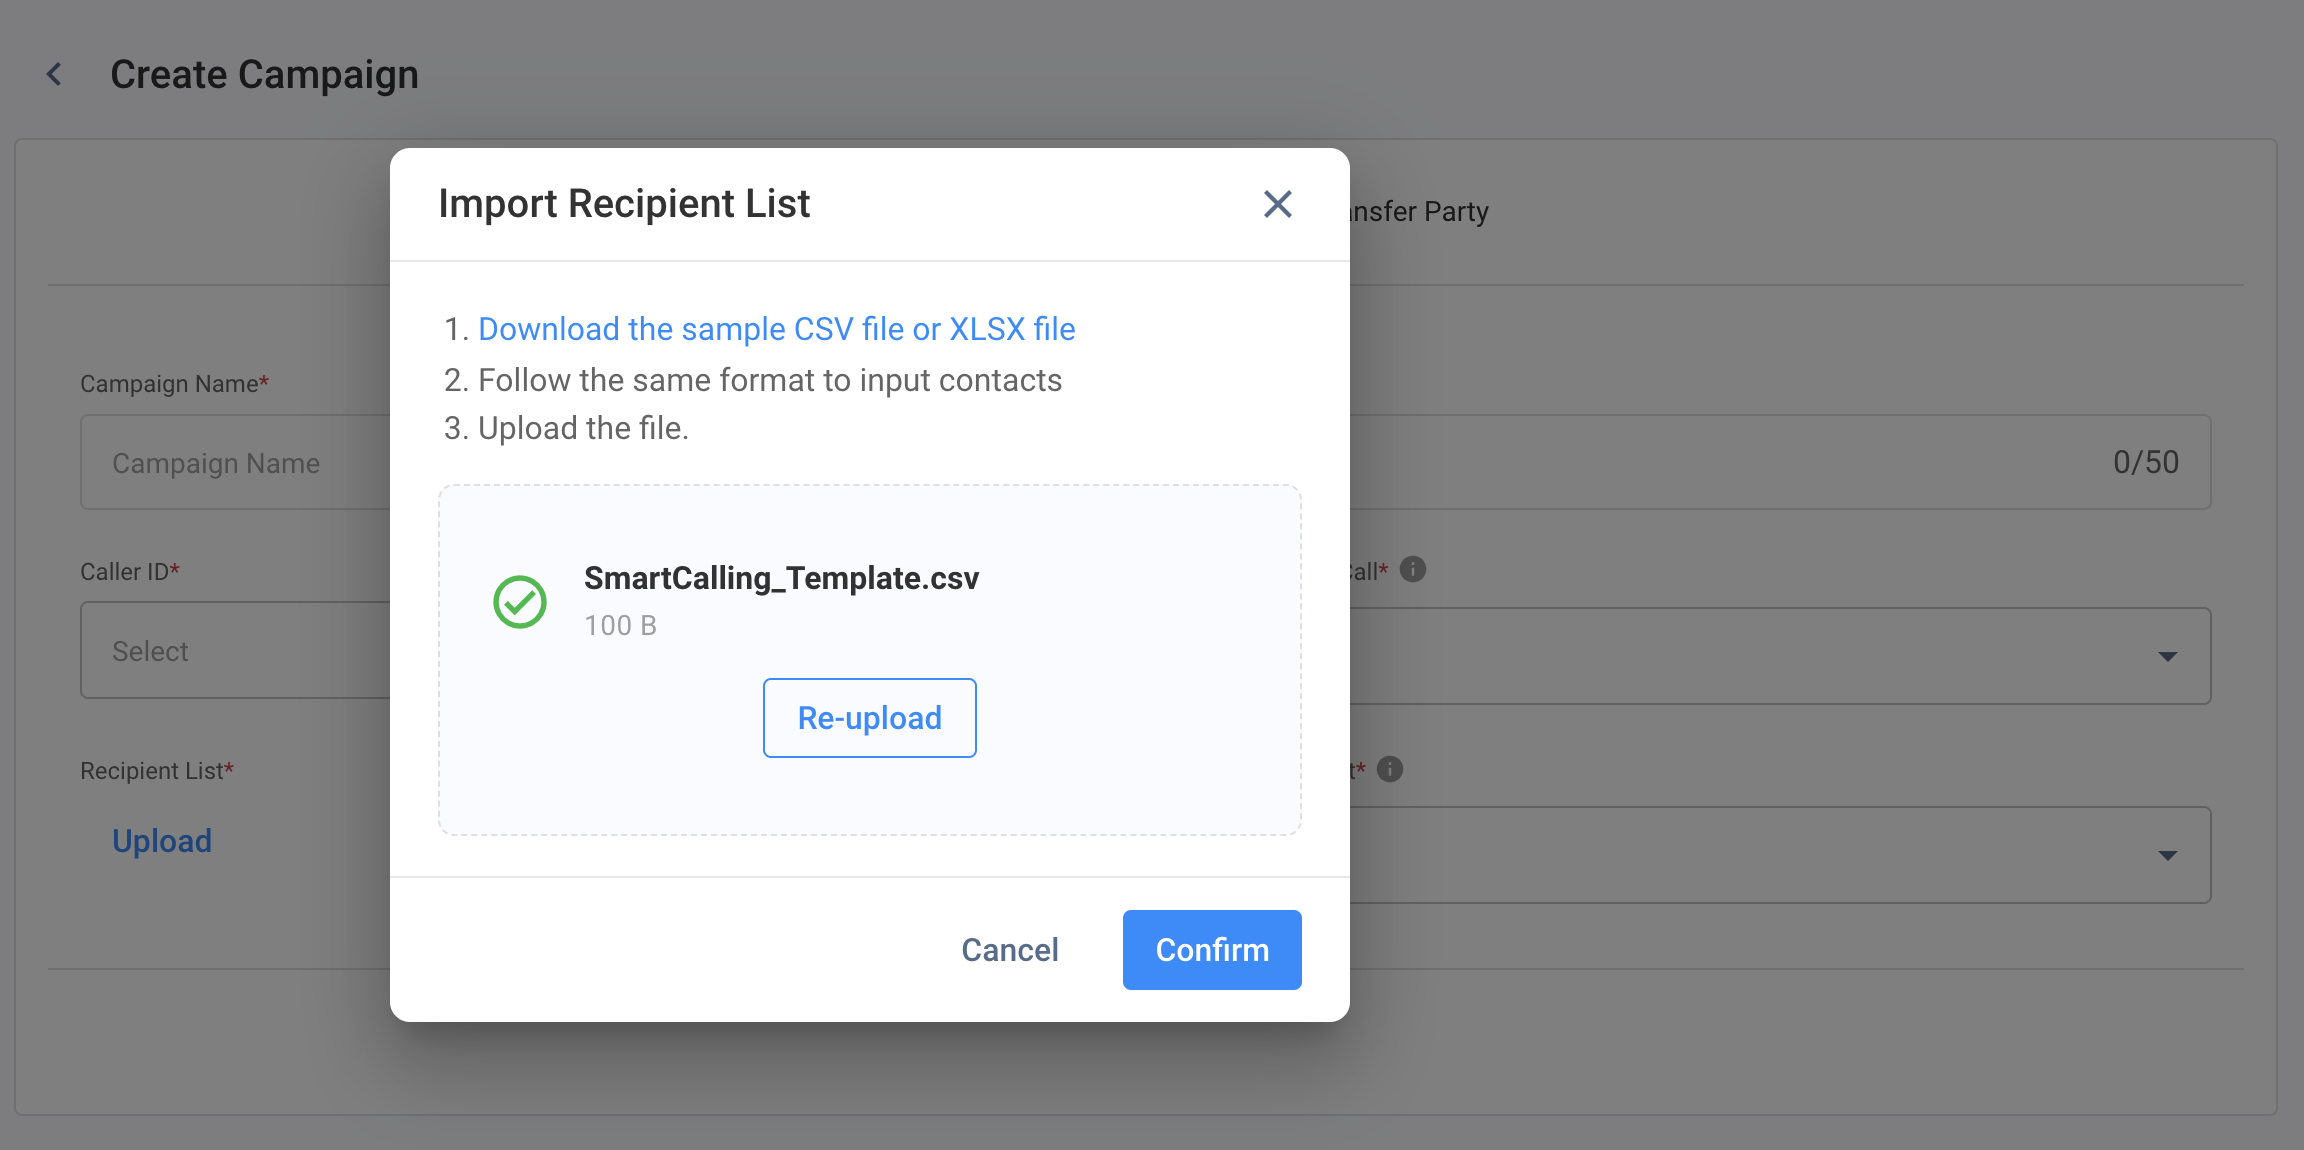
Under the Recipient List, click Upload to upload your recipient list.
-
This begins by downloading the CSV or XLSX template with a sample record for reference.
-
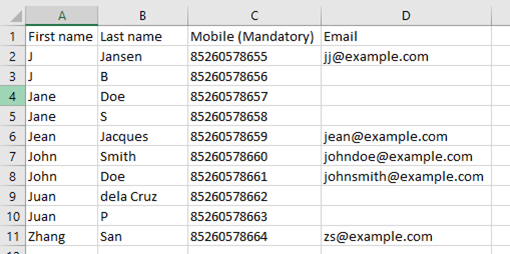
Open the template file, which should contain four columns, then remove the sample first record.
-
In the respective columns, type the first name, last name, mobile number, and email address of the customers you wish to call.
-
Note that the Mobile column is mandatory, and the phone number should follow the following format: country code + area code + phone number.
-
Once all columns are ready, save the file and upload it via the Dashboard by dragging and dropping it into the designated area in the pop-up window. CINNOX will validate the file and generate an error log if any invalid records are found.
-
You may also upload the file by clicking on Browse and selecting it from its location.
The next step is to set the Play Audio and Transfer to Agent.
Settings Requirement:
To create an Agentless Dialler campaign, you must enable at least one of the following:
- ✅ Play Audio or
- ✅ Transfer to Agent
- ❌ You cannot proceed if both options are turned off.
Case A: With Play Audio
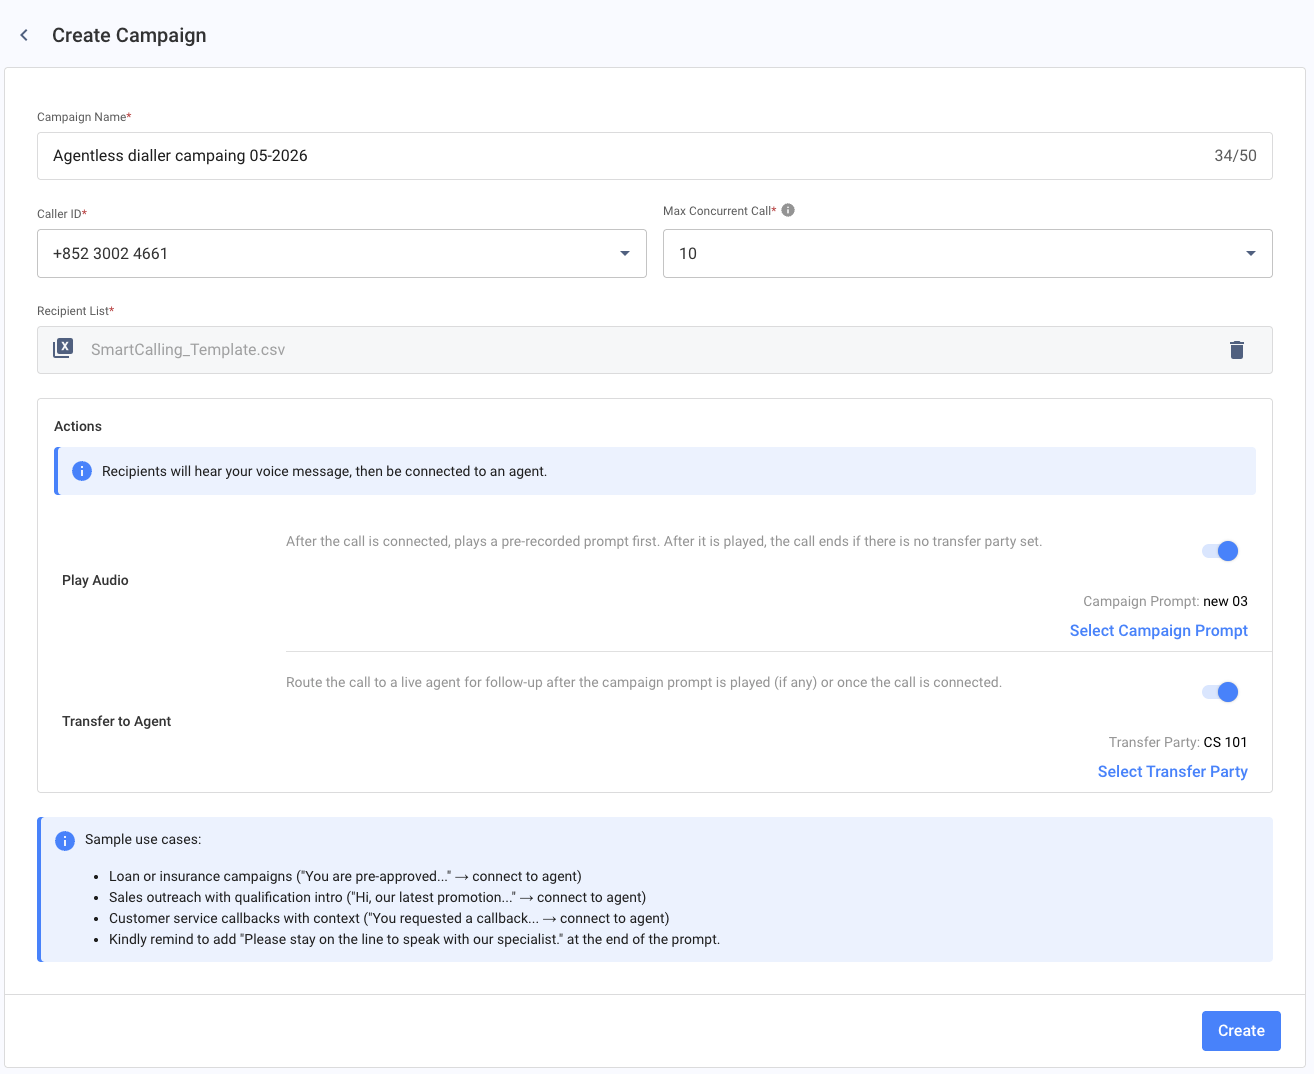
- If your campaign has the audio to play when the recipient answers the call, toggle the button on.
- Click Select Campaign Prompt to select from the call prompt list or (+) Add New Prompt
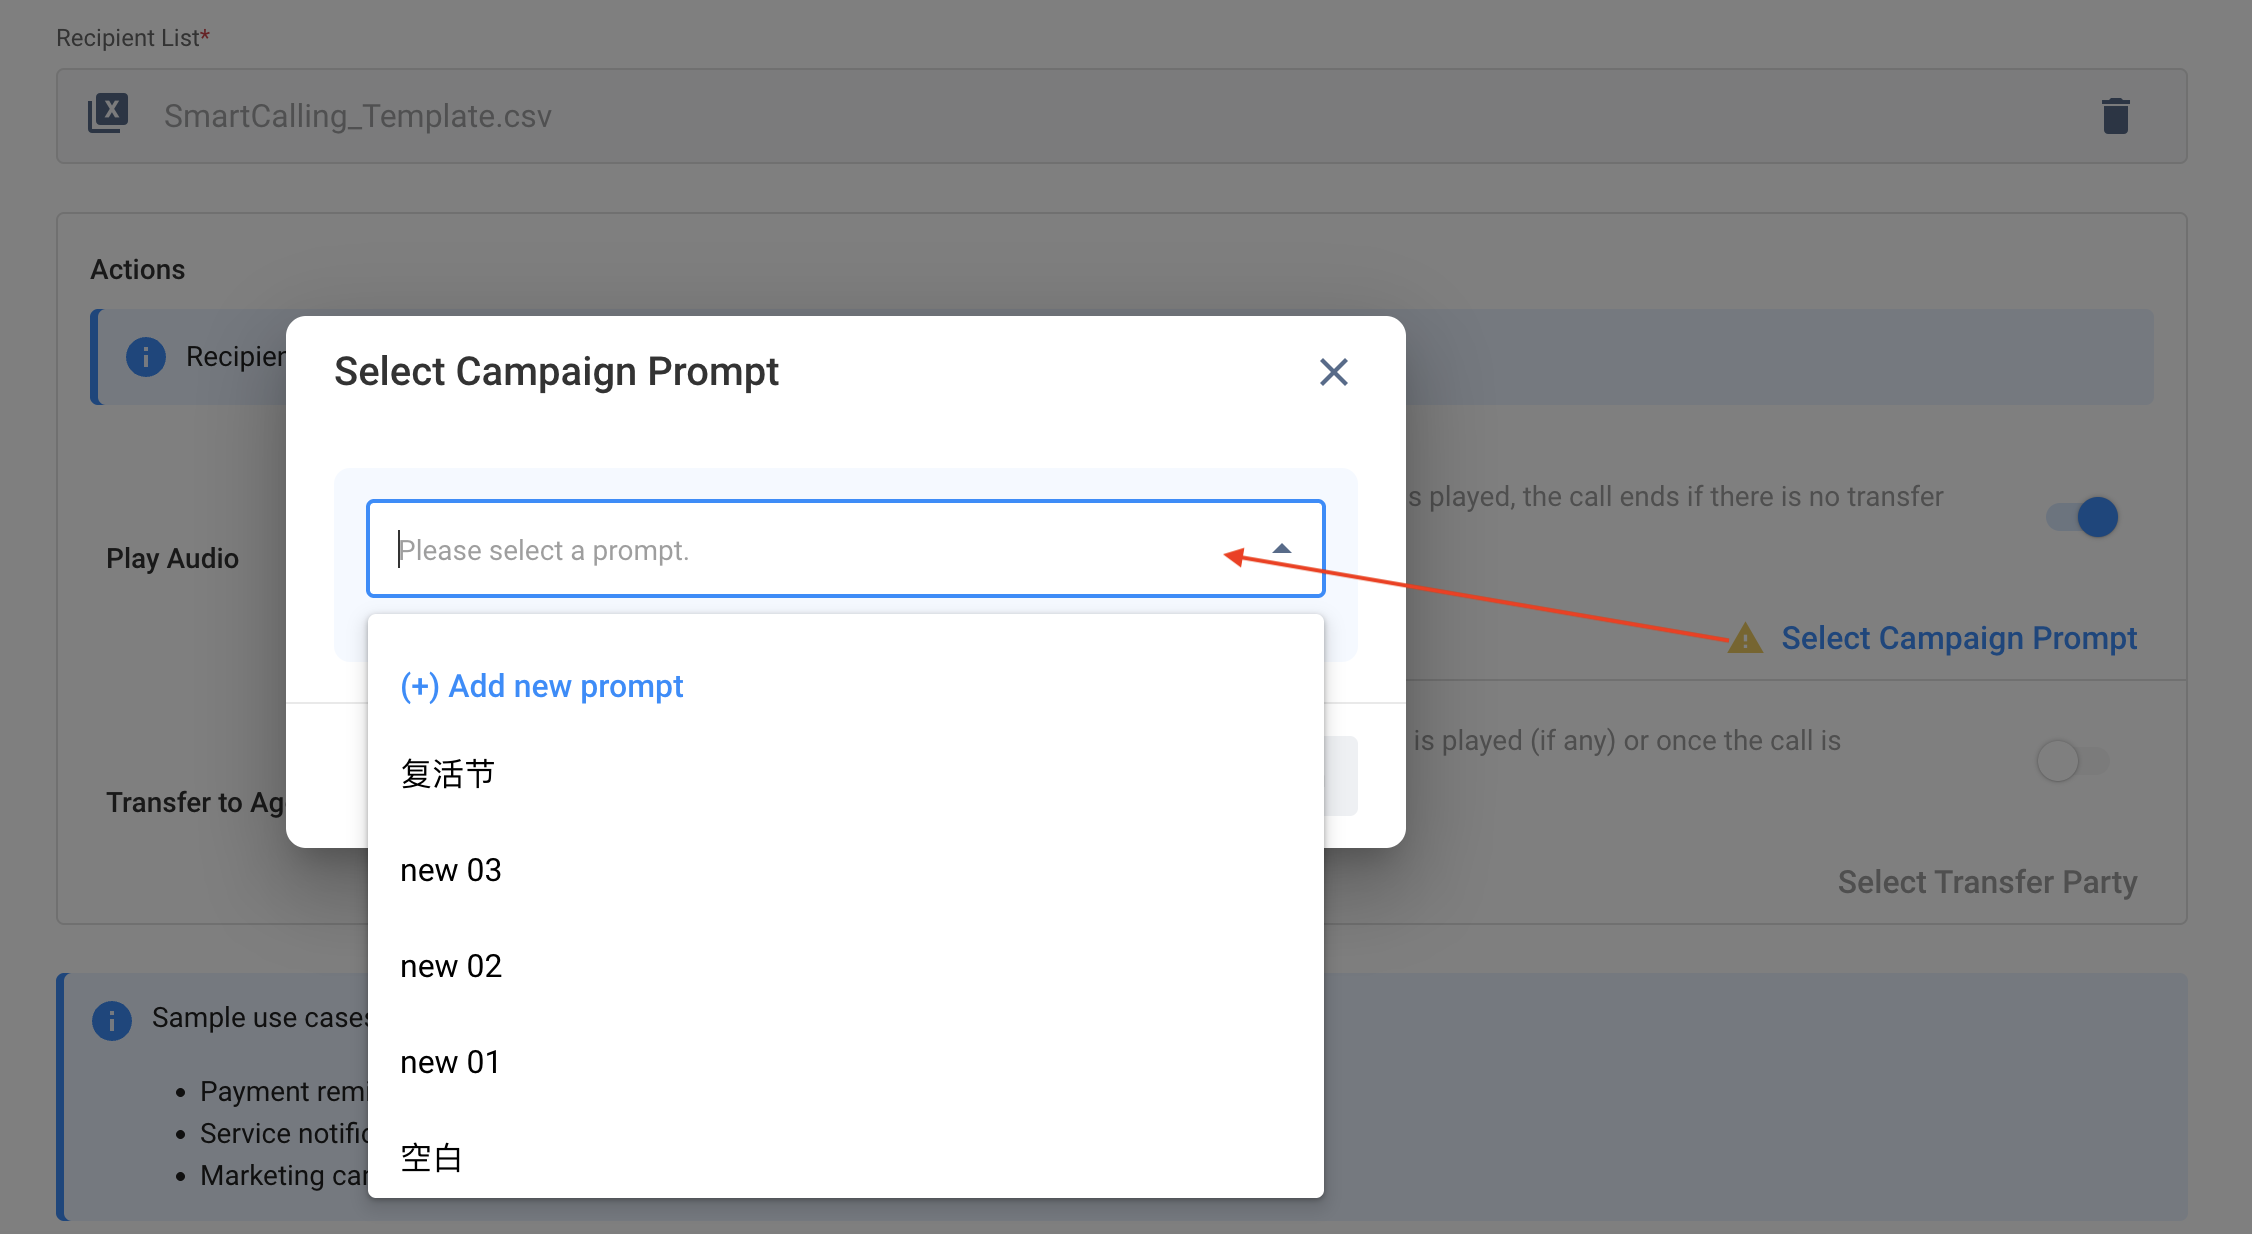
- Refer to our Managing Call Prompts to add new ones.
- Once a prompt to play as audio is selected, click Confirm.
Case B: With Transfer to Agent
- If your campaign is to route the call to a live agent for follow-up after the campaign prompt is played or the recipient has answered and the call is connected, toggle the button on.
- Click Select Transfer Party to select Service Group to transfer the call with.
Sample use cases when to transfer the call to an agent:
- Loan or insurance campaigns ("You are pre-approved..." → connect to agent)
- Sales outreach with qualification intro ("Hi, our latest promotion..." → connect to agent)
- Customer service callbacks with context ("You requested a callback... → connect to agent)
- Kindly remind to add "Please stay on the line to speak with our specialist." at the end of the prompt.
- Once all are set, from naming the campaign down to either playing an audio prompt or transferring to an agent, or both, click Create.
-
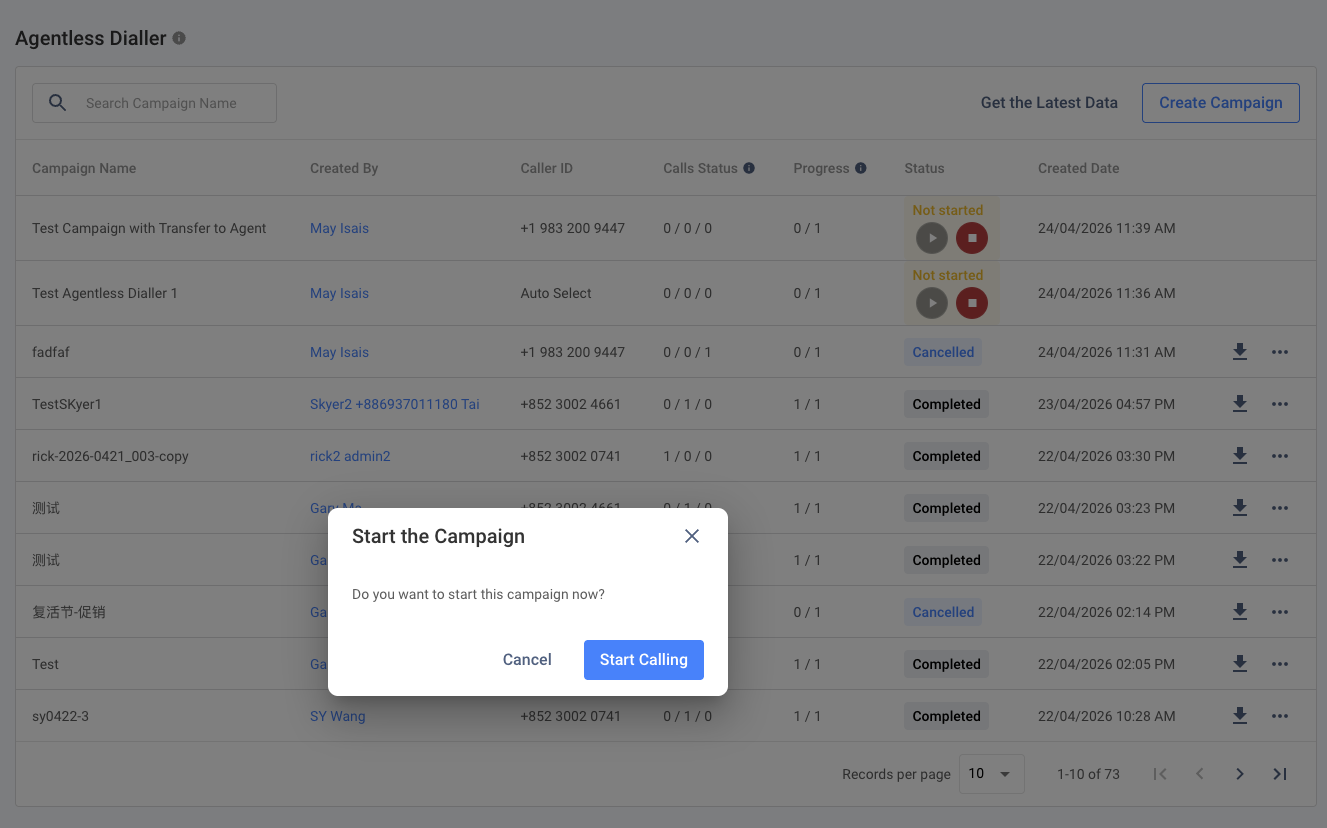
A pop-up message will appear, asking if you will start the campaign immediately.
- Click on Start Calling if you'll start calling right away. CINNOX will then open the call screen on your Dashboard and start dialling the numbers, and the status will appear in the Smart Calling list as Ongoing.
- Click on Cancel if you want to start the campaign later. Its status will appear in the Smart Calling list as Scheduled.
- Please note that only 1 campaign can be run at a time.
Handling Invalid Records for the Recipient List
For a case where there are invalid records detected in the uploaded file:
- On the pop-up window that will appear, click on Download to download a copy of the error log named error.csv or error.xlsx.
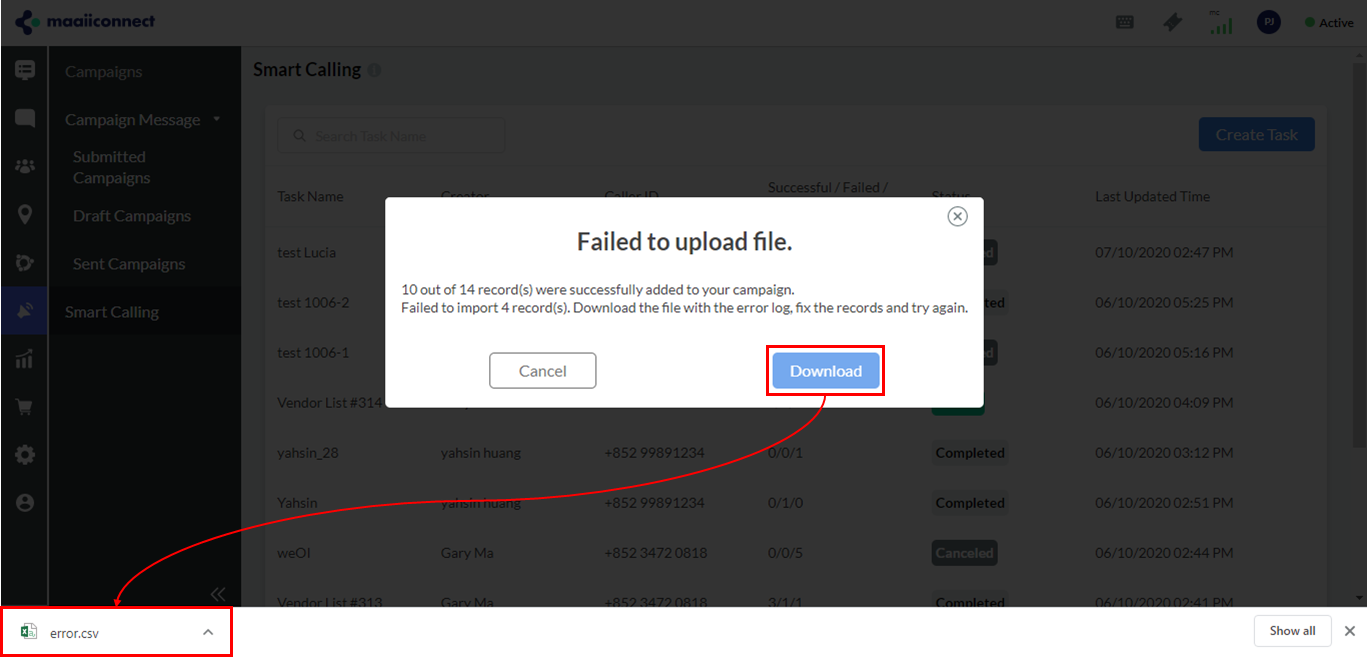
- Click on Cancel to close the pop-up window.
- Open the error log and check the error details in the last column. Each record will show error details.
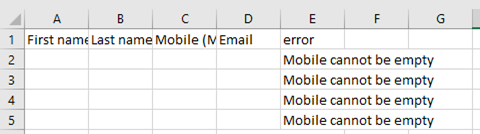
- Return to your spreadsheet template, locate the records with errors, and correct the details.
- Back on the CINNOX Dashboard, upload the updated spreadsheet template by dragging and dropping it into the pop-up window. The system will validate the uploaded file again, and an error log will be created if invalid records are still found.
- You may also upload the file by clicking on Browse and selecting it from its location.
- If you have accidentally closed the pop-up window, click the Create Campaign button in the top-right corner of the page again.
How to handle the case of splitting text in the CSV file
Using a comma (,) to split the text is the function of the CSV file. When importing a CSV file with a comma separating text, the text will be split into the next column in the file after the file is uploaded.
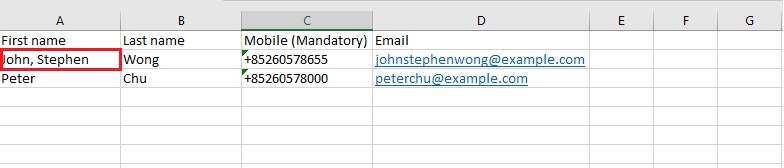
After the file upload, the text is shown below:

As the text John, Stephen contains a comma in the column First name after the filled CSV file is uploaded, the text is split into two columns, John in the column First name and Stephen in the column Last name.
How to avoid splitting text
Using a text editor
- Put the text with a comma in the double quote (""), like "John, Stephen", and save it as a CSV file when you upload the file.
Using Excel or style sheet editors
- Fill in the text in the text format.
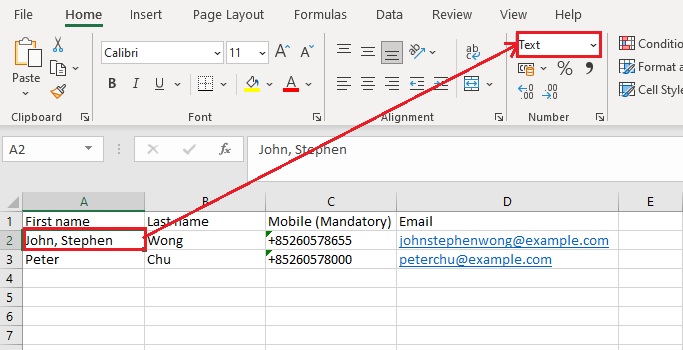
- Save the sheet as a CSV file and upload it to the CINNOX.
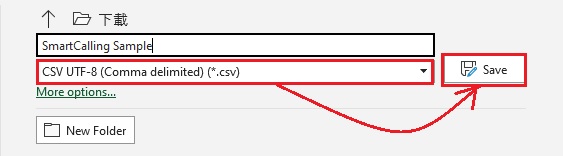
- The double quote should be added automatically to the file.

Viewing Campaign Status
To view all call campaigns:
- From the navigation menu, go to Campaigns > Smart Calling.
The Smart Calling page displays the following details:
- Campaign Name
- Created By
- Caller ID
- Successful / Failed / Cancelled Calls
- Progress (Dialled / Target Total Calls) (For Agentless Dialler only)
- Status
- Last Updated (For Supervised Dialler only)
- Created Date (For Agentless Dialler only)
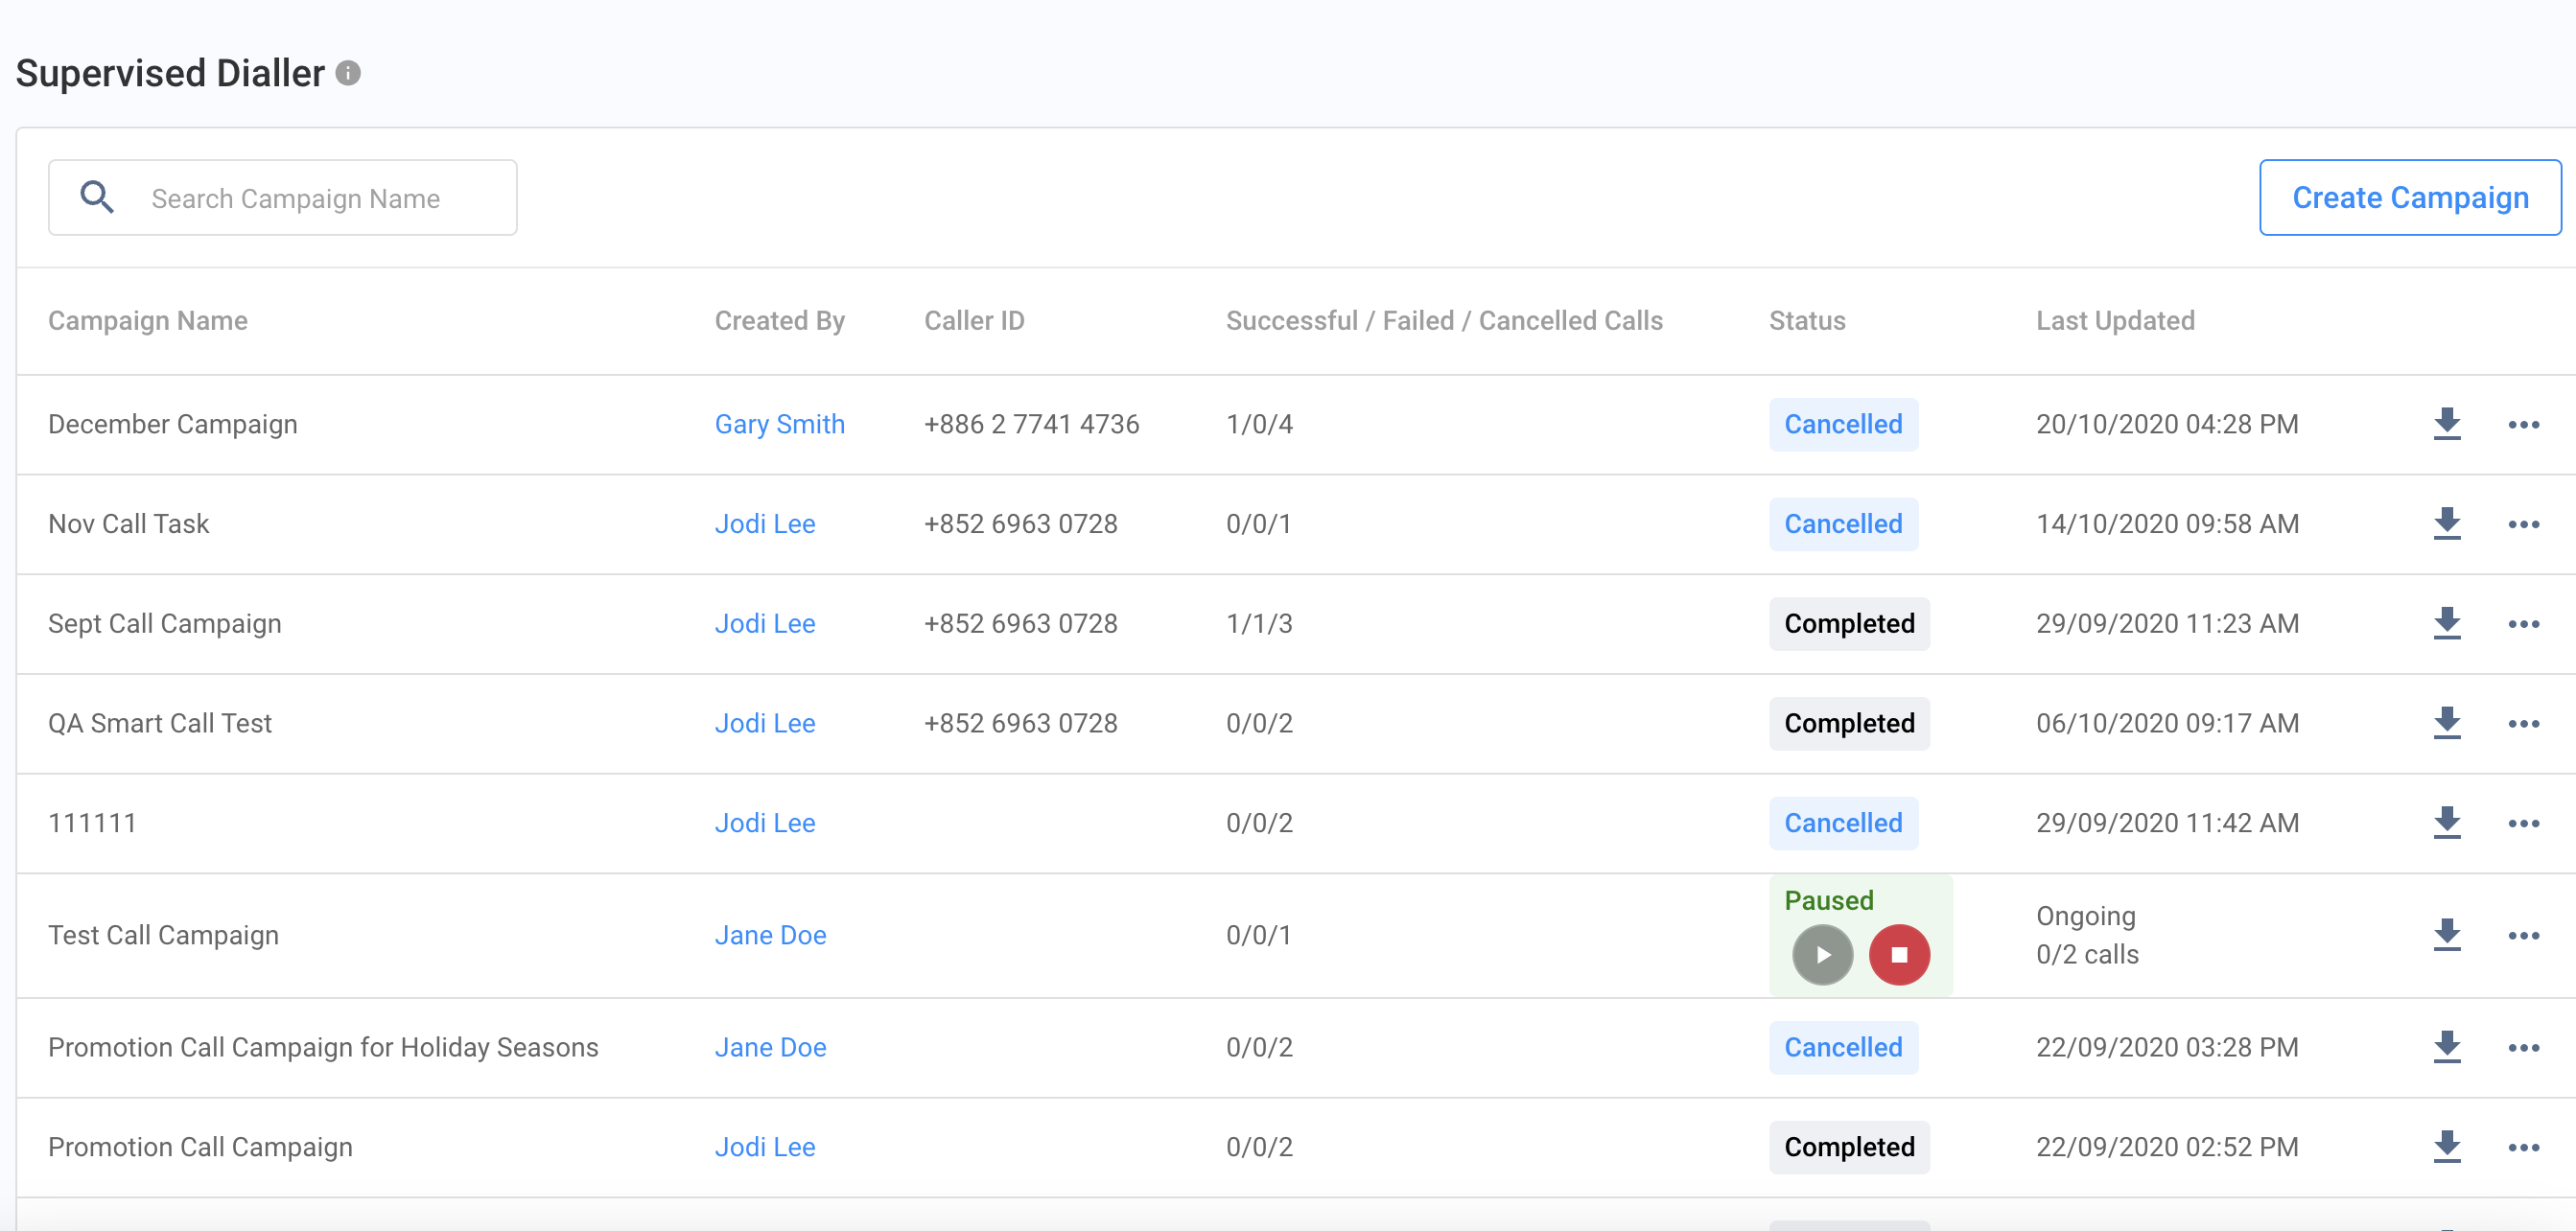
A call campaign may have any of the statuses below. Note that a status refers to the dialling campaign and is not dependent on the number of successful or failed calls.
| Campaign Status | Description |
|---|---|
| Not started | The campaign has not started yet. |
| Ongoing | The campaign has started dialling the numbers on the recipient list. |
| Paused | The campaign has been started but has been paused temporarily. If a staff member resumes a Paused campaign, its status will change back to Ongoing. |
| Cancelled | The campaign was stopped permanently, and we will no longer proceed to dial the remaining numbers on the recipient list. |
| Completed | The call campaign was finished by dialling all numbers on the list. |
Pausing and Resuming Call Campaign
To pause a call campaign:
- Go to Campaigns > Smart Calling from the navigation menu, then Supervised Dialler or Agentless Dialler.
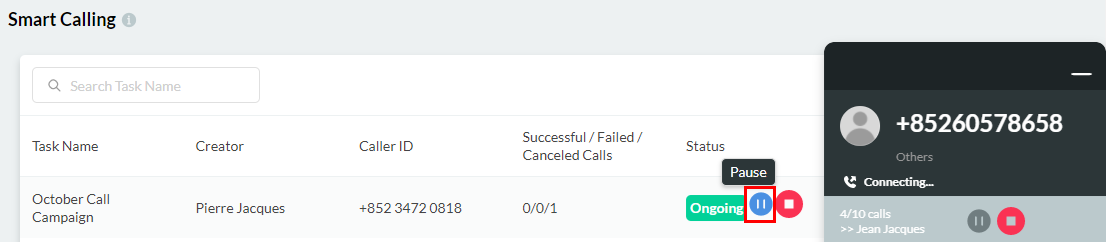
- Please find the campaign you wish to pause on the Smart Calling page, then click the Pause ( ) button next to its status. A pop-up message will appear, asking you to confirm the action.
- Click on Confirm. The campaign's status will then appear in the Smart Calling list as Paused.
To resume a call campaign:
- Go to Campaigns > Smart Calling from the navigation menu, then Supervised Dialler or Agentless Dialler.
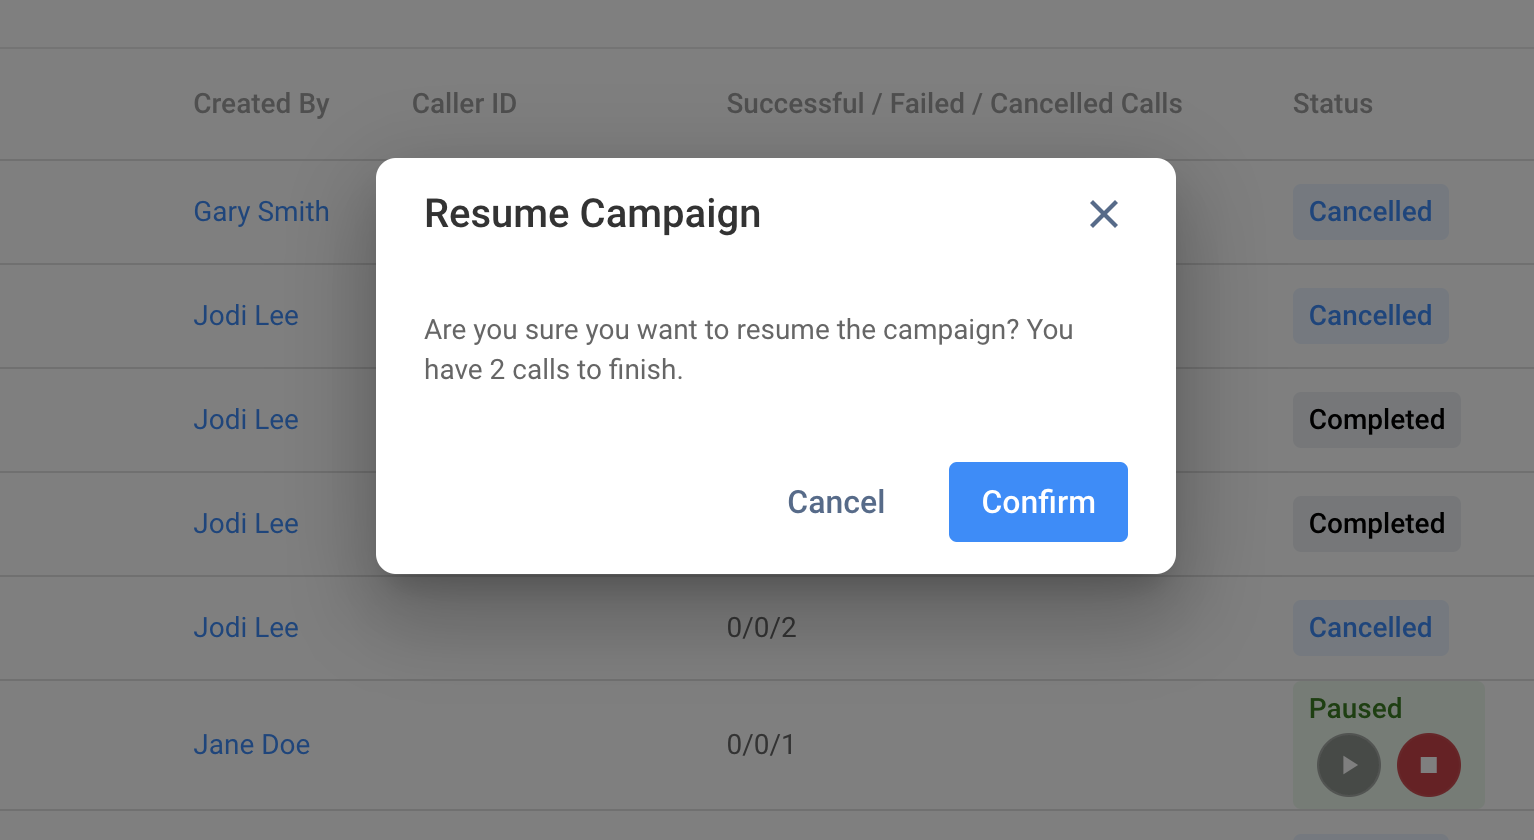
- Please find the campaign you wish to continue on the Smart Calling page, then click the Play ( ) button next to its status. A pop-up message will appear, asking you to confirm the action.
- Click on Confirm. The campaign's status will then appear in the Smart Calling list as Ongoing.
📘
In addition to the call campaign owner, the admin also has the authority to pause, resume, and terminate the call campaign.
Terminating Call Campaign
To stop or cancel a call campaign:
- From the navigation menu, go to Campaigns > Smart Calling > Supervised Dialler or Agentless Dialler.
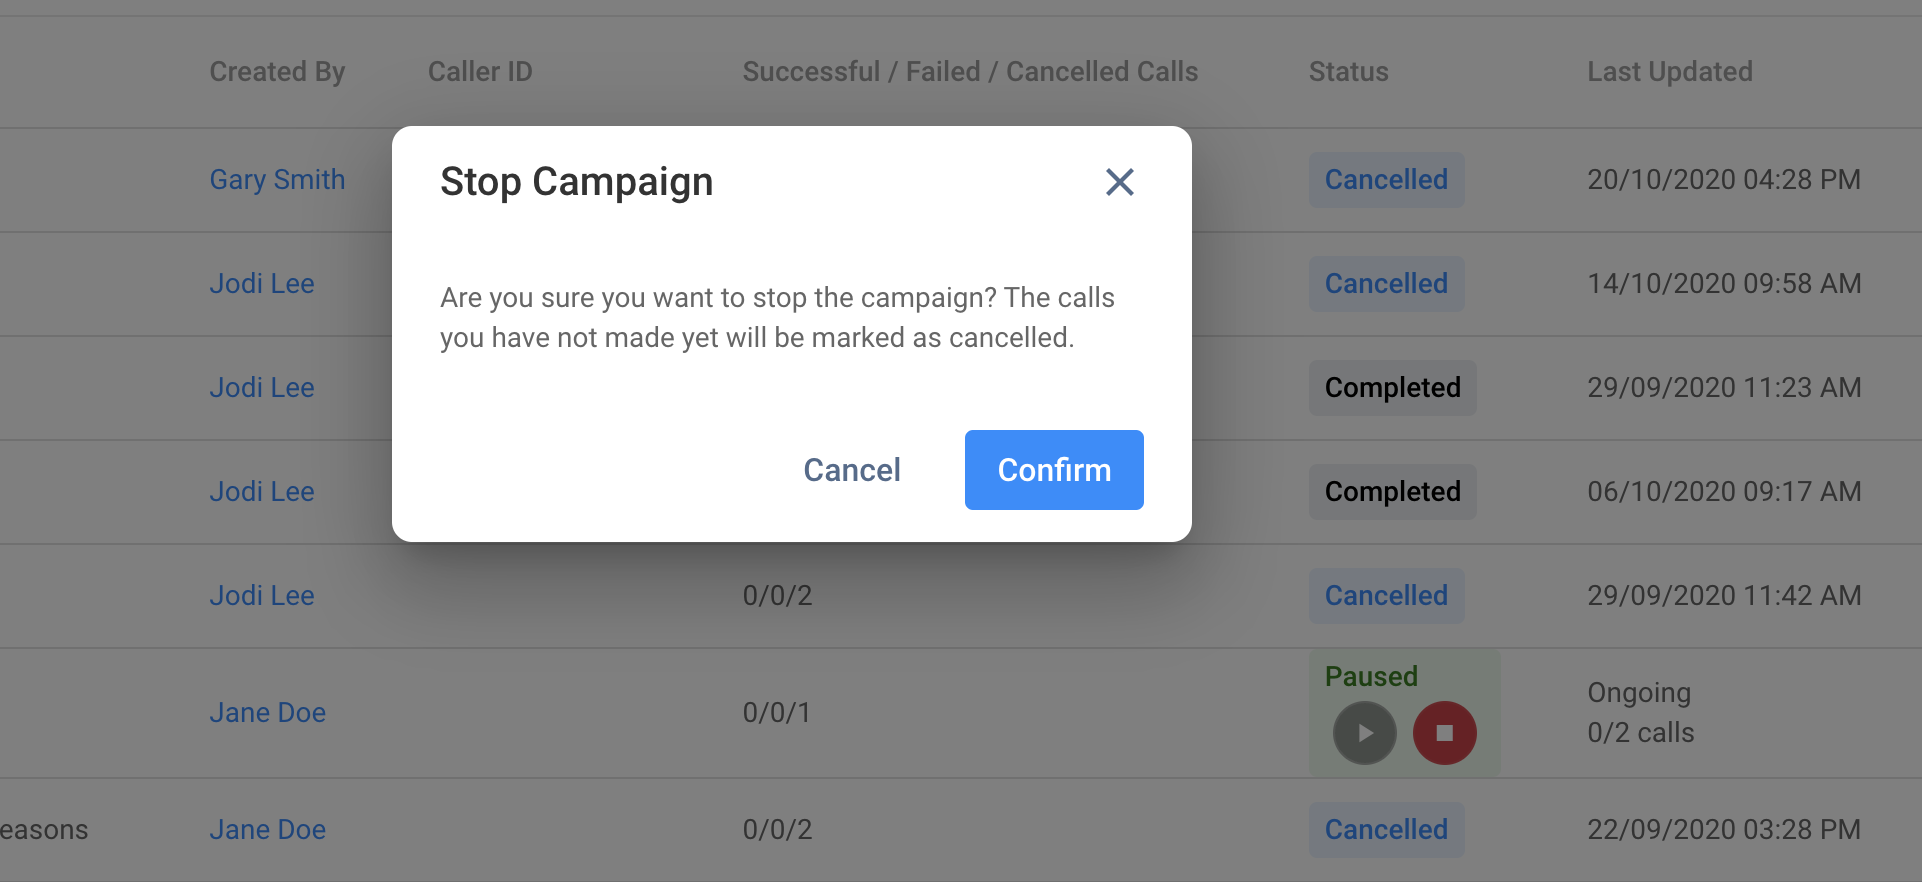
- Please find the campaign you wish to stop on the Smart Calling page, then click the Stop ( ) button next to its status. A pop-up message will appear, asking you to confirm the action.
- Click on Confirm. The campaign's status will then appear in the Smart Calling list as Cancelled.
Viewing and Downloading Call Reports
You can get more information about each successful, failed, or cancelled call you made by viewing the Call Detail Report or downloading a spreadsheet of the call records.
To view the Call Detail Report:
- From the navigation menu, go to Campaigns > Smart Calling > Supervised Dialler or Agentless Dialler.
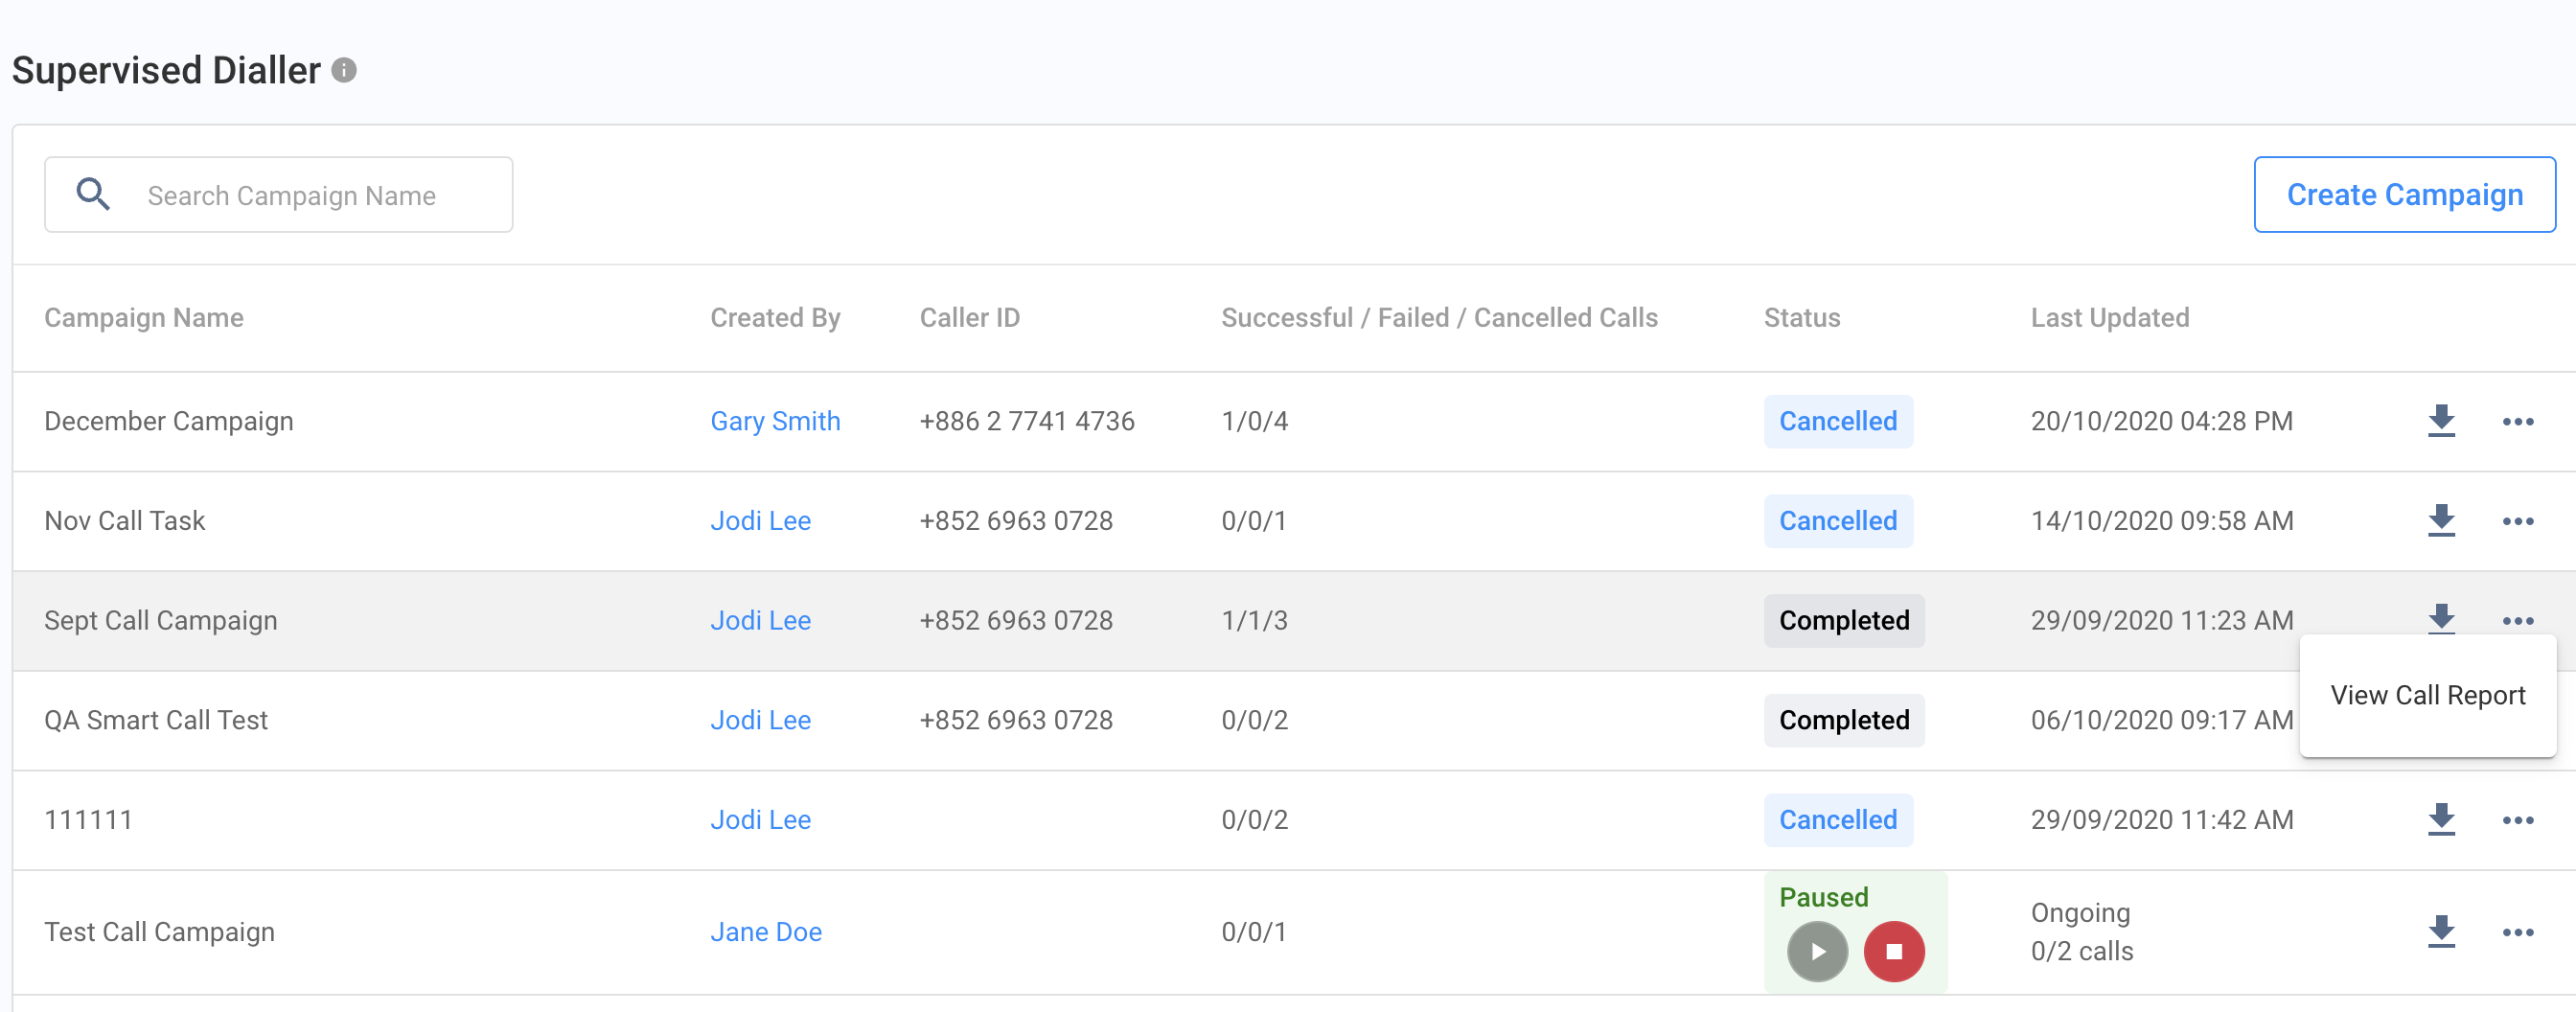
- On the Smart Calling page, find the campaign for which you wish to view the call details, then click the vertical ellipsis icon ( ) on the right.
- Click on View Call Report. This will redirect you to the Call Detail Report page.
To download a call record:
- From the navigation menu, go to Campaigns > Smart Calling > Supervised Dialler or Agentless Dialler.
- On the Smart Calling page, find the campaign for which you wish to view the call details, then click the Download icon vertically on the right.
- Click on any of the following options:
- Download All Calls
- Download Successful Calls
- Download Failed Calls
- Download Cancelled Calls
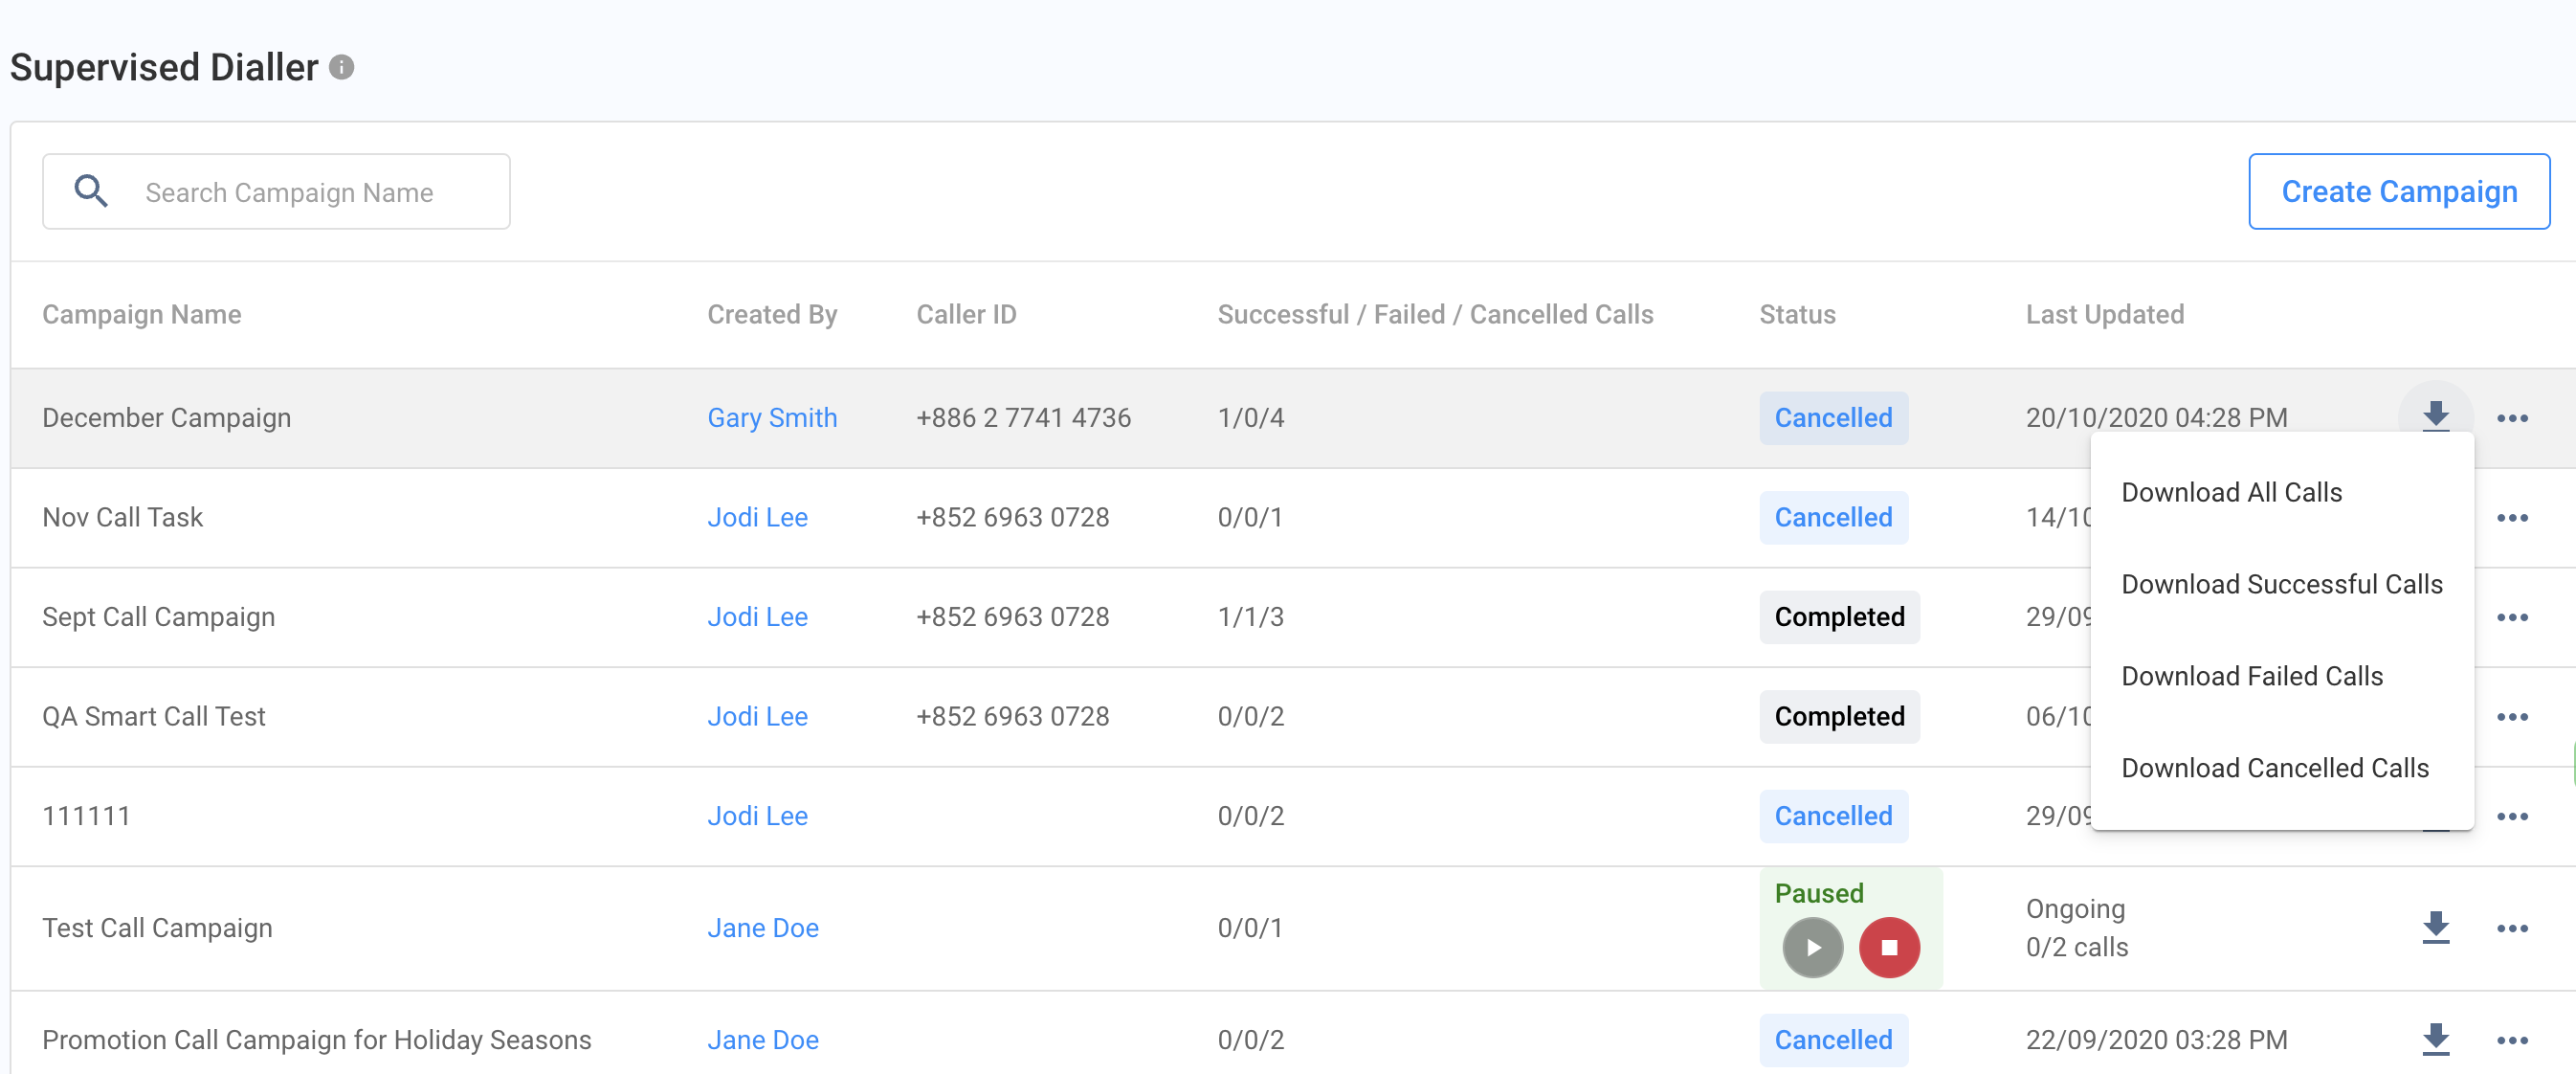
CINNOX will then download the selected call records and save them in your default Downloads folder as a CSV file.