Merging Contacts
Merge Contacts
The same visitor can reach your customer support, create enquiries from different channels, and serve them by the other staff agents assigned to channels, resulting in duplicate contacts.
CINNOX offers the Merge Contacts tool to help you identify identical profiles with verified phone number among your External Contact List. You can manually find contact to merge with the visitor profile if you find them as one profile.
You can also select a field from each record if one has information and another does not. The Merge Contact tool allows you to resolve duplicate contacts and have up-to-date information in your Contact list.
Below are some scenarios we can look at the Merge Contacts.
Scenario 1: Identical Verified Phone Number
When the pre-chat form is enabled with phone number verification and contact auto-save enabled or the visitor call via Virtual Number.
A visitor with a verified phone number and the phone number owned by a contact, merging the visitor information with the contact, will appear in the enquiry chatroom's room panel as a suggestion.
The name saved in the contact will appear in the enquiry room instead of the visitor's name in the Pre-Chat Form.
We identified contact with the same verified phone number as this visitor. Do you want to merge them? displays with the Merge button.
To proceed with the merging:
- Tap the Avatar or the Name appearing on the screen's top to view the Chatroom Information.
- Tap Contact Profile, and the personal information of the visitor appear
- Tap Merge and select the fields you want to keep from each contact just if one has information that the other does not.
- Tap Merge again to confirm the merging. A toast message "Contact merged" will appear once you successfully merge the two contacts, and all activities, including closed and ongoing enquiries, can be viewed in just one room.
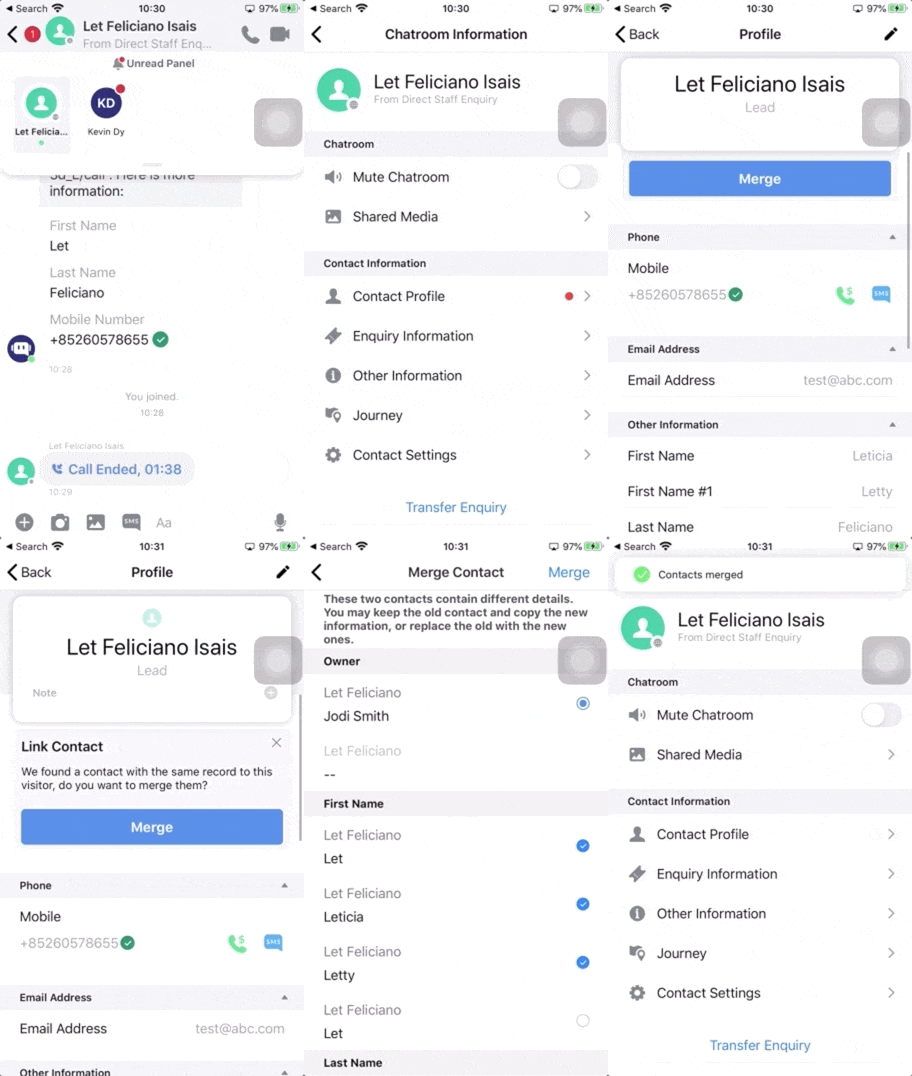
Visitor w/ identical verified phone number merge with another contact
Scenario 2: Non-Identical Verified Phone Number
When the pre-chat form is enabled with phone number verification and contact auto-save enabled or the visitor call via Virtual Number.
A visitor with a verified phone number in which no contact does not own the phone number:
You can still merge the visitor information to an existing contact, provided you know they are just one contact; otherwise, keep the new contact as it is.
To proceed with the merging:
- Tap the Avatar or the Name appearing on the screen's top to view the Chatroom Information.
- Tap Customer Information, and the visitor's personal information appears.
- Tap Merge to Contact and search for the Contact you want to merge.
- Select the fields you want to keep from each Contact if one has information that the other does not.
- Tap Merge again to confirm the merging. A toast message "Contact merged" will appear once you successfully merge the two contacts, and all activities, including closed and ongoing enquiries, can be viewed in just one room.
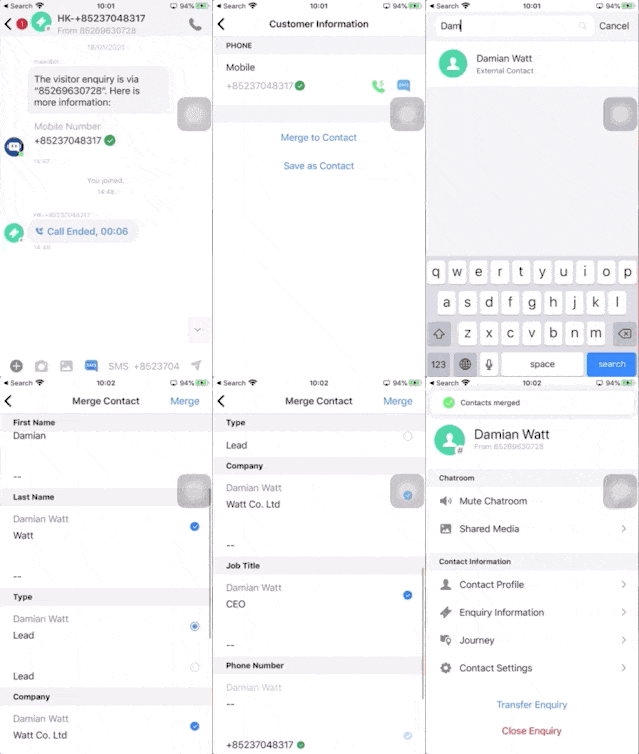
Visitor w/ non-identical verified phone number merge with another contact
Scenario 3: Non-Verified Phone Number
When the pre-chat form is enabled without phone number verification and contact auto-save enabled/disabled.
A visitor with unverified can still merge the visitor profile to an existing contact, but ensure you know that they are just one contact profile; otherwise, save the visitor profile as a new contact.
To proceed with the merging:
- Tap the Avatar or the Name appearing on the screen's top to view the Chatroom Information.
- Tap Contact Profile, and the personal information of the visitor appear
- Tap Merge to Contact and search for the Contact you want to merge.
- Select the fields you want to keep from each Contact if one has information that the other does not.
- Tap Merge again to confirm the merging. A toast message "Contact merged" will appear once you successfully merge the two contacts, and all activities, including closed and ongoing enquiries, can be viewed in just one room.
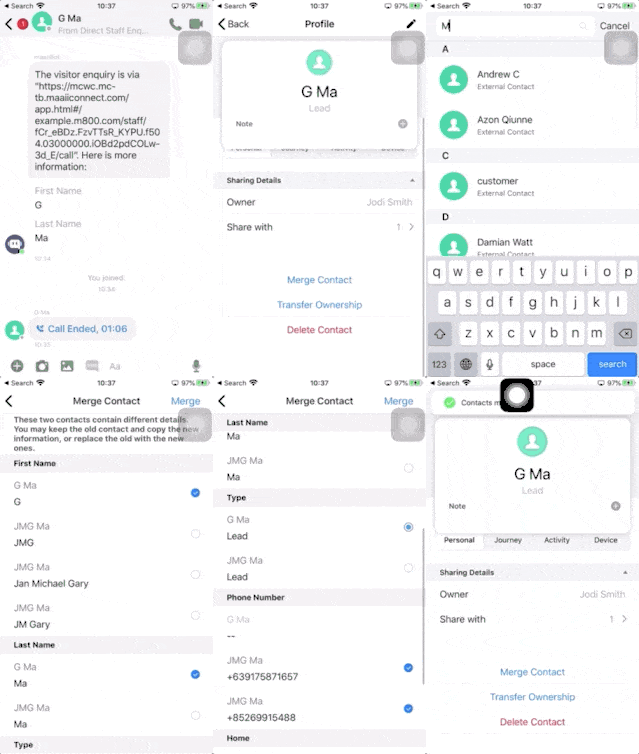
Visitor w/ unverified phone number merge with another contact
Scenario 4: No Visitor Personal Information
When the pre-chat form is disabled.
A visitor without personal information can still merge the visitor information to an existing contact, but ensure you know they are just one contact profile; otherwise, save the visitor information as a new contact.
To proceed with the merging:
- Tap the Avatar or the Name appearing on the screen's top to view the Chatroom Information.
- Tap Save as Contact, and the new contact form will appear
- Fill in the visitor information gathered during the enquiry handling.
- Tap Merge to Contact and search for the Contact you want to merge.
- Select the fields you want to keep from each Contact if one has information that the other does not.
- Tap Merge again to confirm the merging. A toast message "Contact merged" will appear once you successfully merge the two contacts, and all activities, including closed and ongoing enquiries, can be viewed in just one room.
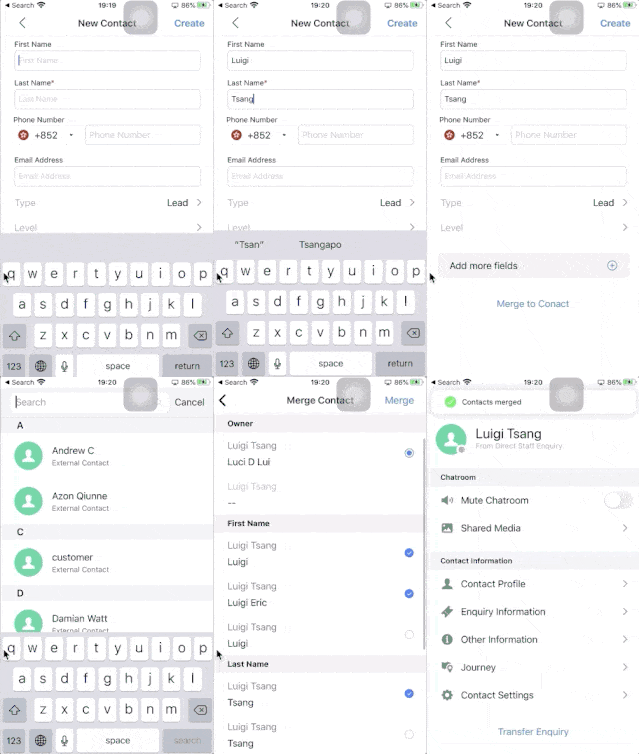
Entered visitor information merged with another contact
All activities and enquiry rooms will be merged and viewed in just one for merge contacts.
Merged Rooms View for Merged Contacts
For contacts with multiple (closed and ongoing) enquiries when merged with another contact, their enquiries are combined and viewed in one chatroom.
You can:
- View all previous enquiries, chat history & ongoing enquiries of the same Contact inside the chat room when handling an enquiry.
- Filter the chatroom containing multiple enquiries of the same Contact so that each whole enquiry conversation is viewed separately.
- View all shared media sent by the same Contact in previous separate enquiries in the chat room in one location.
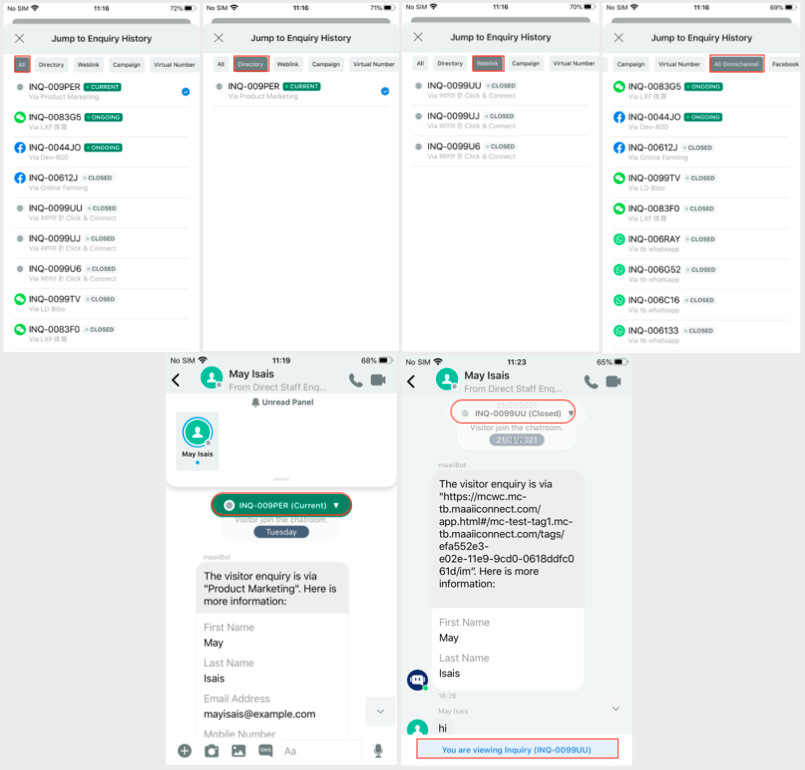
Merged Rooms View for Merged Contacts
🚧
You can only reply to the enquiry handled by you with a status Current, which means it is the room's active enquiry. Others (ongoing, followed-up and closed) are just for reference and are still available in the Recent list.
Save Visitor Profile as New Contact
For a new visitor with or without personal information, you can fill in additional information gathered during the enquiry handle and save them as new Contact.
- Fill in the visitor information gathered during the enquiry handling.
- Tap the Save button, and a toast message will appear that the Contact is updated.
- Tap the Avatar or the Name appearing on the screen's top to view the Chatroom Information.
- Tap Save as Contact, and the new contact form will appear
- Fill in the visitor information gathered during the enquiry handling.
- Tap Merge to Contact and search for the Contact you want to merge.
- Select the fields you want to keep from each Contact if one has information that the other does not.
- Tap Merge again to confirm the merging. A toast message "Contact merged" will appear once you successfully merge the two contacts, and all activities, including closed and ongoing enquiries, can be viewed in just one room.
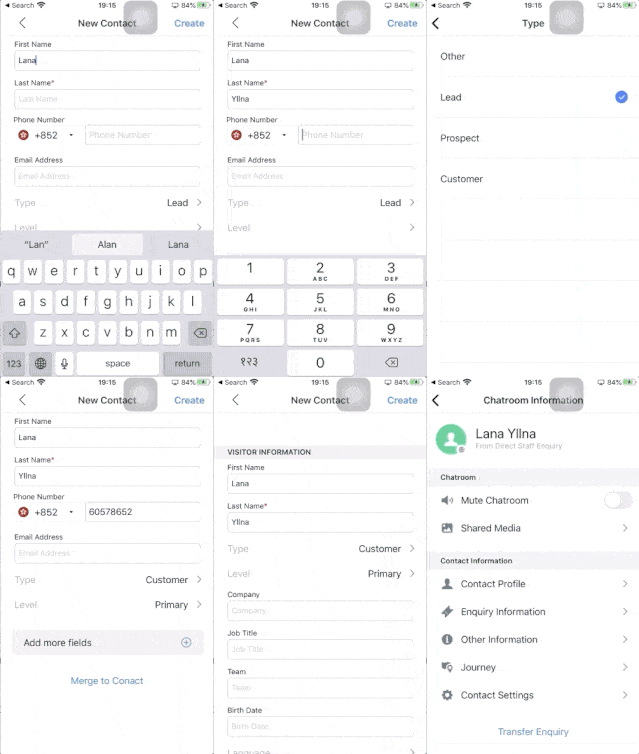
Save Visitor Profile as New Contact
- Chatroom
- Serving Chat Enquiries
- Sending and Receiving Chats
- Canned Responses
- Chat Translation
- AI Enquiry Summary
- AI Enquiry Summary Custom Format Best Practices
- Add Staff to an Enquiry Room
- Monitor Enquiry and Take Action
- Private Message
- Get your Azure OpenAI Account
- Integrate your Azure OpenAI Account with CINNOX
- Labelling an Enquiry
- Sharing Files
- Space (Group Chat)
- Customer Public Space (Private Chat)
- Manage Tag Directory
- Creating a Tag
- Managing Social Channels
- Connecting (FB) Messenger
- Connecting Wechat
- Connecting Whatsapp
- 360dialog (WhatsApp BSP)
- Restart the Enquiry Conversation (360dialog WhatsApp)
- Connecting Line
- Connecting Woztell
- Get a Woztell Account and Create Channels
- Connecting Email
- Connecting Gmail/Google Workspace Email
- Connecting Outlook/Microsoft 360 Email
- Email Enquiry Handling
- Connecting Third-Party Channel
- Channel Source
- Email Engagement
- Pin/Unpin Messages & Hide/Unhide Chat Rooms
- Sending SMS
- SMS Inbox
- SMS and Call Known Limitations
- Campaigns
- Creating SMS Standard Campaign
- Create SMS Dynamic Campaign
- Campaign Templates
- SMS Templates
- WhatsApp Engagement
- Creating WhatsApp Campaign
- Whatsapp Templates
- CINNOX Markdown Guide
- Managing Destinations
- Managing Service Group
- Adding Chatbot
- CINNOX Q&A Bot
- Chatbot Data Source
- Chatbot Custom Prompts Best Practices
- General Integration for Chatbot
- IVR (Interactive Voice Response)
- Alternative, Percentage, Time and Sticky Routing Rules
- Queue Settings
- CINNOX Distribution Method (ACD)
- Advanced Enquiry Routing Flow
- Enquiries in CINNOX
- Enquiry Centre
- Transferring Enquiry
- Transferring Chat
- Follow Up on Missed Enquiries
- Closing an Enquiry
- Monitoring
- Enquiries Monitoring (aka Enquiry Overview)
- Queue Monitoring
- Contacts
- Managing External Contacts
- Labelling an External Contact
- Custom Field for External Contacts
- Merging Contacts
- Integrating Salesforce
- Salesforce Contacts in Dashboard
- Engagement in CINNOX
- Developer Guide
- Prerequisites
- Installing the Web Widget
- Configure the Widget UI Language
- Passing data to agent via Weblink and Widget
- Tag Conditional Trigger
- Installing Internet Information Services (Microsoft IIS)
- Installing Apache Server
- Installing Nginx Server
- Wordpress
- Wix
- Drupal
- Joomla
- Squarespace
- BigCommerce
- Shopify
- Weebly (eCommerce by Square)
- Webflow
- HubSpot CMS Hub
- Jimdo
- Leadpages
- SHOPLINE
- Thinkific
- APPs & API
- Zapier
- CINNOX Chrome Extension
- My Sites
- Configure CINNOX Web Widget
- Customising Your Widget
- Managing Widget's Smart Greeting
- Managing Visitor Forms
- Managing Staff
- Managing Roles and Permissions
- Managing Teams
- Managing Call Recording an Transcript
- Managing Labels
- Keyword Masking
- Managing Contact & Enquiry Settings
- Managing Call Prompts
- Managing Storage
- My Plan
- Cancelling CINNOX Account
- Workflows
- Getting Started with the App
- App Sign In and Sign Out
- Navigating the App
- Enquiry Monitoring (aka Enquiry Overview)
- Chat Room
- Private Message
- Serving Chat Enquiries
- Serving Call Enquiries
- Monitor Chat Enquiry & Take Action
- Add Staff to an Enquiry Room
- Closing Enquiries
- Labelling an Enquiry
- Labelling External Contacts
- Sending and Receiving Chats
- Sharing Files
- Making Calls
- Answering Calls
- Sending SMS
- WhatsApp Engagement
- Email Engagement
- Instant Conference Call
- Scheduling Conference Call
- 1-to-1 to Conference
- Ongoing Conference Call
- Video Calling
- Recording and Transcript
- Following Up on Missed Enquiries
- Transferring Enquiry
- Transferring Call
- Transferring Chat
- Space (Group Chat)
- Restart the Enquiry Conversation (360dialog WhatsApp)
- Pin/Unpin Messages & Hide/Unhide Chat Rooms
- Contacts
- Merging Contacts
- Salesforce Contacts in CINNOX App
- Sync Device Contacts
- Setting Up Your Availability Status
- Unread Panel
- Mention Preference
- Conference Preference
- My Account - Staff Profile
- Changing Password
- Passcode and Biometrics
- Two-Factor Authentication
- Third-Party Authentication (Staff App Login)
- Service Numbers
- Personal Numbers
- Call Forwarding
- Managing Devices
- Simulation and Help Centre
- Sending Feedback
- Reports API
- Get Enquiry Details
- Get Enquiry Chat Details
- Get Call Details
- Get Conference Details
- Get Call Log Details
- Get Recording File Details
- Get Transcription File
- Get SMS Details
- Get Enquiry Overview Matrix
- Get Channel Type list
- Get Channel Type details
- Create/Edit/Delete Enquiry Event Subscription
- Create/Edit/Delete Recording File Event Subscription
- Create/Edit/Delete Conference Call Event Subscription
- Get Sent Campaigns Summary
- Get Sent Campaign Details
- Management API
- Create/Edit/Delete External Contact Event Subscription
- Get External Contact List
- Get External Contact Activity
- Create External Contact
- Update External Contact
- Create/Edit/Delete Contact Event Subscription
- Create/Edit/Delete Staff Contact Event Subscription
- Get Staff Contact List
- Get Supported Language List
- Get Supported Location List
- Create Destination-Service Group
- Update Destination-Service Group
- Get Destination List
- Delete Destination-Service Group
- Create Tag
- Get Tag List
- Update Tag
- Delete Tag
- Get Label List
- Delete Label
- Label an Enquiry
- Unlabel an Enquiry
- Create/Edit/Delete Label Event Subscription