Connecting WOZTELL
Looking for an Omnichannel Customer Service Solution?
Our competitive plans and high-quality service enable you to effortlessly handle customer enquiries and engage with them from any device, anywhere in the world. We've covered you from WOZTELL, WeChat, Facebook Messenger, WeChat to other social media channels, live chat and calls, local and international calls, and emails. Simplify your customer service and enhance your reach with CINNOX.
Start for FREE Get a Demo
Connect your WOZTELL channel account to your CINNOX service. Your visitors' and customers' messages on the WOZTELL channel become social enquiries in your CINNOX service, which any of your staff can attend as one-on-one conversations.
This user manual page covers three main parts:
-
PART I: Get a WOZTELL channel Account and create WOZTELL Channels
-
PART II: Connect your WOZTELL channel to CINNOX, its configuration and customisation
If you already have the WOZTELL channel account, you are ready to start from PART II.
Notes
Implementing the WOZTELL chatbot is crucial to the enquiry handling process between the chatbot and CINNOX. To implement it, you must ensure that the pre-defined tree nodes are added to your WOZTELL chatbot and included in the Tree Settings of the WOZTELL channel you will connect to CINNOX.
Please follow the instruction in Switch between the WOZTELL chatbot and the live chat function in CINNOX to configure the tree nodes.
After configuring the pre-defined nodes added to Trees, you can continue to process PART II to connect your WOZTELL channel to CINNOX. You can not only switch between the WOZTELL chatbot and the live agent in CINNOX but also close the enquiry handled by the WOZTELL chatbot.
PART II: Connect your WOZTELL channel to CINNOX
From the CINNOX Dashboard, navigate to Administration > Channels > Social. On the Social page, click on Connect Social. A pop-up window displays a list of sources that you can connect to.
(woztell integration).jpg")
Connect Social page
Step 1: Connect the WOZTELL channel to CINNOX
- Click Connect on WOZTELL.
.jpg")
Create a WOZTELL channel to CINNOX
- Click on +Select your WOZTELL Channel to CINNOX.
(woztell integration).jpg")
Connect your WOZTELL Channel to CINNOX
-
On the Connect WOZTELL Channel to CINNOX page, click on the drop-down list to choose either WhatsApp Cloud, Facebook or Instagram as your platform.
-
Fill in the following information:
-
Account Access Token - log in to the WOZTELL channel and navigate to Settings. Click on Access Tokens. Copy the generated access token (Long Token (v1)) and paste the value on its respective field on the WOZTELL configuration page. Refer to Important Note about Account Access Token for selecting the scopes and permissions.
-
Channel ID - log in to the WOZTELL channel and navigate to Channels. Find the channel you want to connect to from the list and click the "..." button. Click on Copy Channel ID and paste it.
-
Environment ID - log in to the WOZTELL channel and navigate to Channels. Click on Edit next to the required channel you connect to CINNOX. Copy the ENV ID value on Environment Settings and paste it.
-
Advanced Access Token (required only for WhatsApp Cloud) - log in to the WOZTELL channel and navigate to Channels. Click on Platform and then the Advanced Access tab. Click on Generate in the Generate Access Token section. Copy the token value and paste it.
-
-
Click on Next.
.jpg")
Set up a new WOZTELL channel
Important
When you receive an error message in connecting the WOZTELL channel to CINNOX, please try to check the following items:
- The validity and correctness of Account Access Token value.
- The scopes of Account Access Token value.
- The validity and correctness of Channel ID and/or Environment ID.
- The WOZTELL channel might be duplicated.
- CINNOX supports the platforms in the WOZTELL channel.
- The “CX_CLOSED_ENQUIRY” node existed in your WOZTELL chatbot tree.
Step 2: Configure the CINNOX Channel and Routing Setting
Channel Name
- Add a name to your WOZTELL channel. The channel name can be filled in up to 40 characters. Click on Next.
(woztell integration).jpg")
Add a Channel Name
Routing Settings
- Select the Routing Rules as appropriate and add Destinations based on the operational support to your channel. Refer to the Alternative, Percentage, Time and Sticky Routing section of this Guide for more information.
(woztell integration).jpg")
Routing Settings
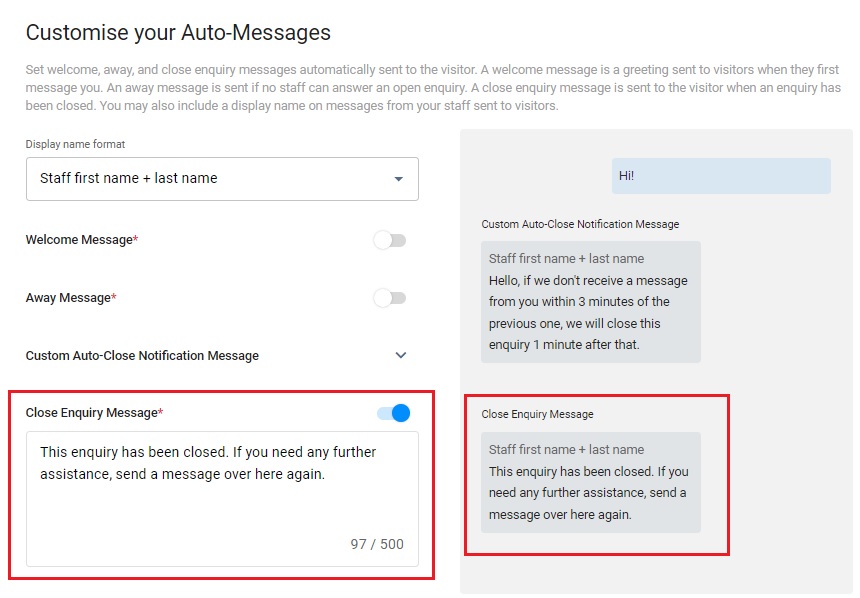
Step 3: CINNOX Auto-Message Settings
You can enable and configure the following Auto-Reply Messages:
- Welcome Message: Greetings are sent to customers when they first message you.
- Away Message: It is only sent if no staff can answer an enquiry.
- Custom Auto-Close Notification Message: It is sent when the chat room doesn't have a new message after 2 min(s), and the enquiry will be closed when the notification has been sent after 1 min(s).
- Close Enquiry Message: This will be sent to the visitors' chatrooms when the staff or the system closes the enquiries.
Reminder
- The limit of Welcome, Away, Custom Auto-Close Notification and Closed Enquiry Messages is 500 characters.
- Before configuring the Custom Auto-Close Notification Message function, you must enable the auto close feature for handled enquiries without new messages. For more information, please refer to the Managing Auto Close Enquiry page.
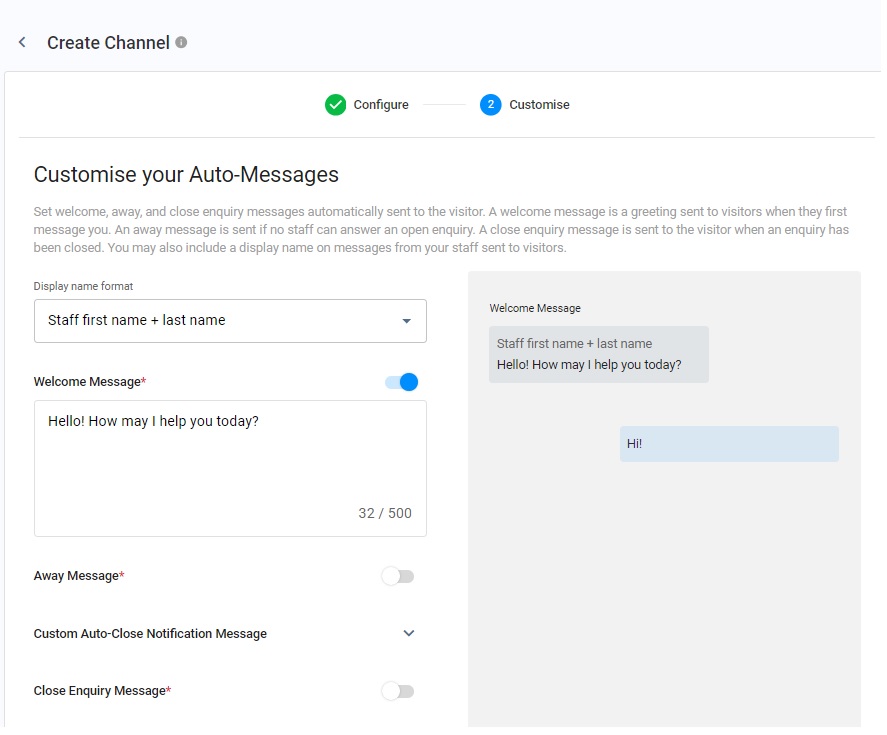
Display Name Format
You may include staff display names in your messages. Choose from the following options:
- No name to display
- Staff first name
- Staff first name + last name
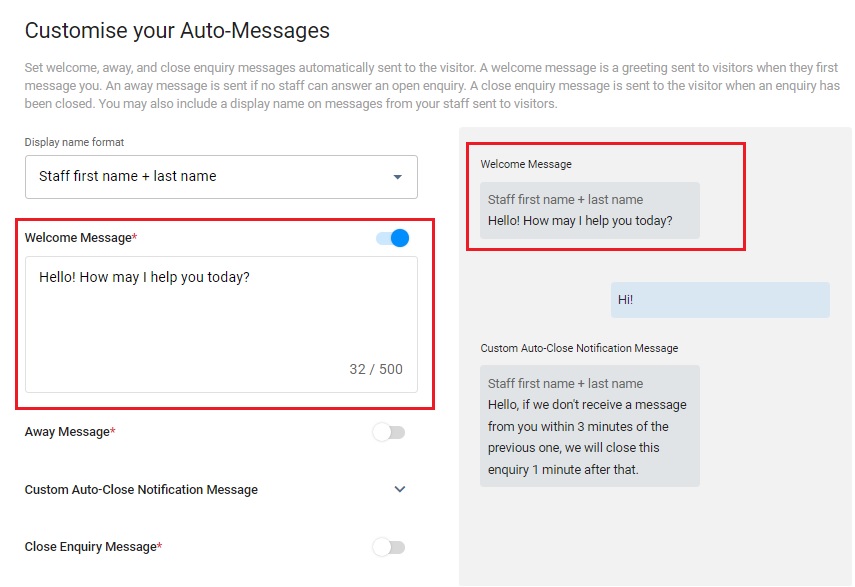
Welcome Message
- CINNOX provides a default welcome message.
- Toggle the switch on to enable it.
- After toggling on it, you can change the default message according to your needs.
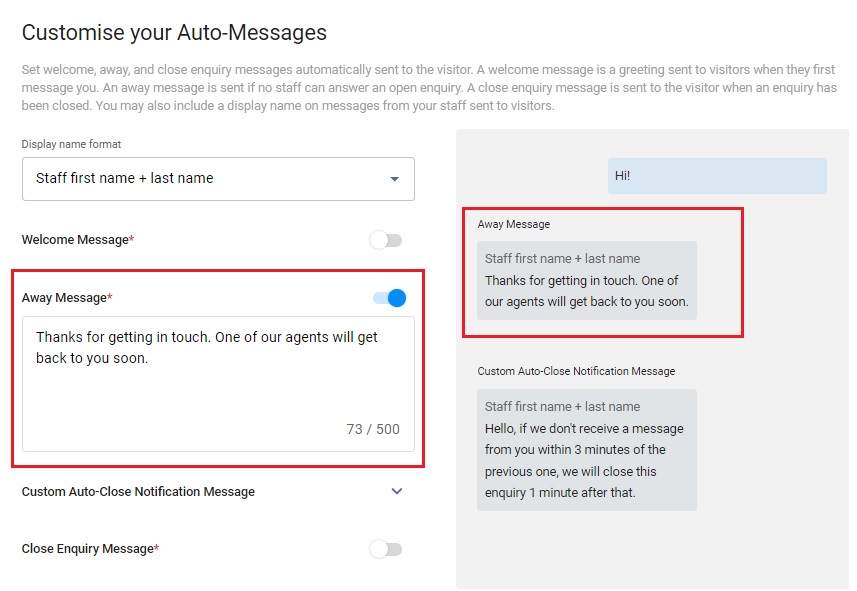
Away Message
- CINNOX provides a default away message.
- Toggle the switch on to enable it.
- After toggling on it, you can change the default message according to your needs.
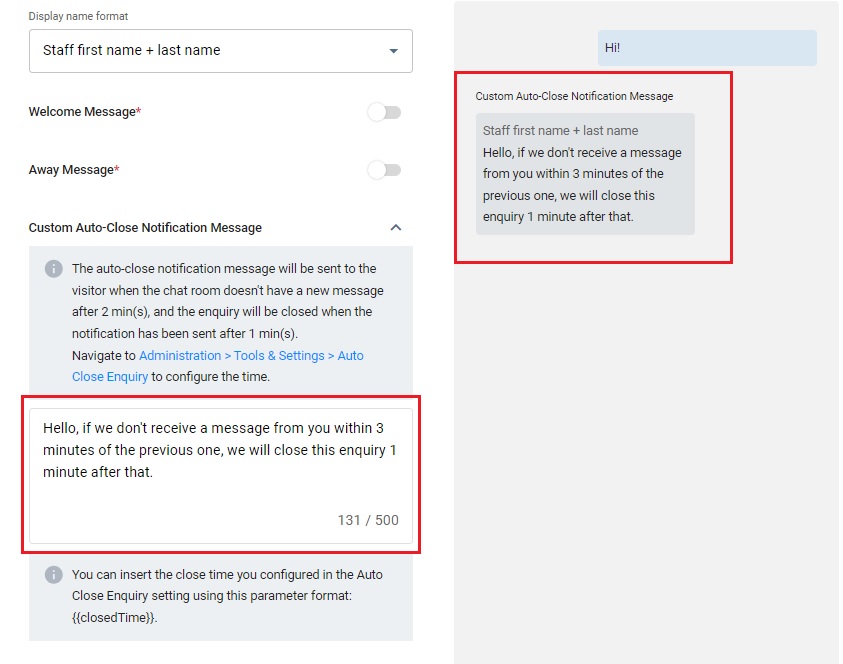
Custom Auto-Close Notification Message
- Click the downward arrow icon.
- Enter your Auto-Close Notification Message in the box.
- You can preview the message in the chat room on the right-hand side of the grey box.
Close Enquiry Message
- CINNOX provides a default close enquiry message.
- Toggle the switch on to enable it.
- After toggling on it, you can change the default message according to your needs.
Step 4: Enable CINNOX Channel Custom Info
Channel Custom Info allows you to add your channel details that your staff would see in the call screen and chat room whenever they are serving an enquiry. The custom info can be about the standard procedure or operation details of handling the enquiry.
- Toggle on the switch to enable the Channel Custom Info.
- A blank space adds the required basic information about the channel.
- Click the Next button to complete all configurations, and the customised info appears on the Channel Custom Info.
 (close enquiry message)(v380).jpg")
Channel Custom info
The custom info is displayed on the staff side in the chat room section for the chat enquiry.
(woztell integration).jpg")
Custom Channel Info on the Enquiry Page
Important
- You can customise the Channel Custom Info per Channel - Directory/Tag, Number, Social and Third Party Channel.
- Channel Custom Info is available for call and chat enquiries.
- The Channel Custom Info does not support Direct Staff Enquiry and Enquiry from the Campaign Web Link.
- The Channel Custom Info you can add is 10,000 chars per channel. Please ensure it is not more than the limit to work correctly.
- The Channel Custom Info will still be displayed as a chatbot message in the enquiry room if an enquiry is missed.
When your connection is successful, you can see this message. Click on Done.
(woztell integration).jpg")
WOZTELL connection is successful
- Created channels listed on the Social page.
 (woztell integration).jpg")
Social Main Page
PART III: Managing WOZTELL channels in CINNOX
To edit, suspend, or delete your WOZTELL channels in CINNOX, refer to the Managing Social Channels section of this Guide.
If you updated the WOZTELL chatbot tree and webhook, please log in to your Dashboard and navigate to the Administration page >Channel Source. Click on your required channel and click Webhook & Tree Settings to sync your updated WOZTELL chatbot tree and webhook settings with CINNOX.
.jpg")
Source Detail page
CINNOX supports Plain Text, Quick Reply, and Carousel message types to respond to customer messages.
Switch between the WOZTELL chatbot and the live chat function in CINNOX
How to switch the WOZTELL chatbot to the live chat function in CINNOX
To switch the WOZTELL chatbot to the live chat function in CINNOX, we must add a node on the chatbot tree.
- Navigate to Bot Builder.
- Click on + Tree Node and + New Action in Pre-actions.
- Add the keyword CX_GET_STARTED as the command in the Advanced script. Click on Save.
- Click on Post-actions and + New Action to enable the Live Chat function in the Advanced script and for the visitors to trigger the function afterwards. Click on Save.
When the visitors switch the chatbot to the live agent function, for example, the chatbot function stops by clicking the "Find Live Agent" button. Then, the enquiry is routed to CINNOX and becomes an open enquiry for an agent to pick up.
(woztell integration).jpg")
Switch the WOZTELL chatbot to the live chat function
How to activate the WOZTELL chatbot after the live agent closed the enquiry in CINNOX
To switch the live chat function in CINNOX to the WOZTELL chatbot, we must add a node on the chatbot tree.
- Navigate to Bot Builders in WOZTELL.
- Select the existing Tree where you are required to add a node.
- Click on + Tree Node and enter the Node Name as CX_CLOSED_ENQUIRY in the Basic Information.
- Click on Post-actions and + New Action to disable the Live Chat function in the Advanced script. Click on Save.
When the live agent closes the enquiry in CINNOX, the visitor will be redirected to the node "CX_CLOSED_ENQUIRY", meaning that the live chat function is disabled and concurrently, the WOZTELL chatbot is activated.
(woztell integration).jpg")
Switch the live chat function to the WOZTELL chatbot
Make sure the node name of "CX_CLOSED_ENQUIRY" can only exist in one tree.
How to close the enquiry handled by the WOZTELL chatbot
To close the enquiry handled by the WOZTELL chatbot, we must add a node to the chatbot tree.
- Navigate to Bot Builders in WOZTELL.
- Select the existing Tree where you are required to add a node.
- Click on + Tree Node and + New Action in Pre-actions.
- Add the keyword CLOSE_ENQUIRY as the command in the Advanced script. Click on Save.
When the node "CLOSE_ENQUIRY" is triggered, for example, by sending a Customer Satisfaction Survey as a message to the visitor, the ongoing enquiry handled by the WOZTELL chatbot will be closed in CINNOX.
.jpg")
Close the enquiry handled by the WOZTELL chatbot
How to connect your chatbot tree to your channel
After configuring your WOZTELL chatbot with the required tree nodes mentioned above, you can connect the tree nodes to your channel.
- Navigate to Channels and Edit for the channel where you must add a new tree node in WOZTELL.
- Navigate to Tree Settings on the right-hand side of the navigation menu. Select a chatbot tree with the added nodes to connect to your channel. Click on Save.
.jpg")
Select the required Tree
WOZTELL Channel Known Limitation
- Rate limit:
- The rate limit of the chatbot API is 4 API requests/ per second. Delay may occur in CINNOX when the number of API requests exceeds the rate limit.
- The rate limit of Open API: 60 API requests/ per minute. In CINNOX, the visitor-uploaded file whose open API goes beyond the 60th request will be regarded as a broken file.
- Message type supported by CINNOX:
- Facebook & Instagram:
- Text
- WhatsApp:
- Text
- Image
- Audio
- Video
- Sticker
- File
- Reply button
- For file types & size limits supported by WOZTELL, please refer to the following documentation listed on the Facebook/ Instagram & WhatsApp official website or WOZTELL website:
- Error handling for the configuration between the WOZTELL channel and CINNOX:
- The connection between the WOZTELL channel and CINNOX is a prerequisite for deploying the chatbot.
- Log in to the WOZTELL account > Navigate to Member> Find the visitor name in the list > click Detail> Turn off Live Chat and Save > The visitor can converse with a chatbot.
Enquiry Status in Different Chatbot Configurations
.jpg")
Enquiry status for the configuration
Help and Support
If your CINNOX service account fails to receive the messages from your WOZTELL channels:
- Log in to your WOZTELL channel account and check the details of your Account Access Token, ENV ID and Channel ID, and please ensure all are the same as those in your CINNOX Channel Details.
- Send a test message to your connected channels and check whether your CINNOX service account receives it.
If your CINNOX service fails to receive any messages, contact our CINNOX Support Team at [email protected].
Updated 5 months ago