Interactive Voice Response (IVR)

Interactive Voice Response helps the agents handle incoming phone calls and the people calling customer service. When incoming callers navigate a phone menu, that call can be intelligently routed to the best agent for the job. Drops a caller's frustration by not requiring them to tread through multiple support while freeing live agents to handle specialised issues and tasks.

The CINNOX IVR manages your inbound calls by collecting information via the caller keypresses, such as the chosen language, function, support service type, and others, before automatically transferring the call to your designated support group and agents.

Using IVR for call enquiries saves time and money by cutting hold times, requiring less workforce, and delivering a better experience for the customer.

👍

IVR calls do not have any usage charges.
The call usage charges will be the same as the current on-net, off-net and IDD charging schemes.


CINNOX IVR Configuration includes TWO PARTS

  • Part I: Offline Configuration
  • Part II: Online Configuration (through the CINNOX Dashboard)


Part I: Offline Configuration

Below is the end-to-end flow to request the IVR system in your CINNOX service account.

  1. Reach out to your Account Manager. Your Account Manager will discuss the quote for the requested service and the necessary payment.
  2. You will need to fill in the form for the details of your IVR system. According to your customer support operation, this provides a personal touch to your IVR. Such as the Virtual Number, IVR Name, greeting prompt, keypress options, invalid and bye prompt and its navigations, and other details to complete the end-to-end of your IVR.
  3. Once the required information is provided, your Account Manager will file a job request to our CINNOX Operation Support Team to process the request.
  4. Your Account Manager will update you on the status of your request. And advise you to complete the configuration for the Routing Rule and Destination of the IVR Menu Routing Settings on your CINNOX Dashboard.


Terms and Descriptions

TermDescription
Virtual NumberA telephone number without a directly associated telephone line. CINNOX can provide toll-free or local virtual numbers for businesses so their customers can contact them at lower costs.

A CINNOX Virtual Number can be routed to an IVR system to enhance customer service.
Menu Routing NumbersThese are virtual dummy numbers used for routing rules and destinations of your menus.
IVR MenuAre used to present callers with a series of options to route them to the correct agent or department before the caller is connected with a live person
PromptIVR uses voice prompts to give callers instructions and directions for accessing information during the call.
Greeting PromptA welcome message prompt to the callers (e.g. "Hello and thank you for calling ABC Company, where customer service is our priority.”)
Keypress PromptAn instruction prompt for the customer to follow (e.g. "To speak with our Sales Representative, press 1. To reach our Billing Department, press 2. If you would like to speak with our Technical Support, press 3…")
Error PromptIf the visitor presses the wrong key or when the visitor does not press any key until timeout, the error prompt will be played.
Timeout PromptIf the visitor misses the time to press any key.
End PromptEnd greeting to be played before the end of the call.
Dual-Tone Multi-Frequency (DTMF)Are touch-tone telephone keypads used to gather the IVR Menu responses.


Part II: Online Configuration

Complete the configuration of your IVR System in your CINNOX Dashboard by selecting Routing Rule and adding Destination (Service Group) to your IVR Menus Routing Settings once your Account Manager confirms to proceed.

Configuring the IVR Menus Routing Settings

  • Log in to your CINNOX Dashboard using a Staff Admin account.
  • Go to Administration > Channels > Destinations > IVR tab. Your IVR menus should be listed on the page.
    Each IVR Menu consists of Keypress and Destination that bounds with Routing Numbers.
2768
  • Click the IVR Menu to view the IVR Detail for the child menu and its details.
2776
  • Add Destination to each Keypress with an enquiry of Routing Virtual Number.
  • On the Routing Settings, select the appropriate Routing Rule - (Percentage, Time or Alternative Routing)
  • Click on (+) Add Destination.
2250
  • On the pop-up window that will appear, select the Service Group you wish to add to the IVR Menu Routing, then click on Add.
2398
  • Back on the Routing Settings section, click on Save.
    A pop-up message will appear, asking you to confirm the action.

  • Click on Confirm.

2236

🚧

Continue configuring the Routing Settings of each Menu and Child Menu.

Ensure that each of them has the appropriate Routing Rule and Destination (Service Group) according to your IVR menu flow.


Viewing the Virtual Number Routing Settings

To view the Routing Settings of your Virtual Number with the IVR Menus:

  • Log in to your CINNOX Dashboard using a Staff Admin account.
  • Go to the Administration > Channels > Numbers > Virtual Number.
  • Find the Virtual Number you request to add an IVR Menu.
  • Click on the Virtual Number to open the Virtual Number Details page.
  • On the Routing Settings, you will notice an IVR menu (as a Service Group) in the Destination section.

This IVR Menu corresponds to Part I (Offline Configuration), equivalent to the details you provide in the IVR Form and Part (Online Configuration) for the Routing Settings.

2328

❗️

Test the IVR flow end-to-end, and you can change the Routing Settings of your IVR Menu Routing if necessary.

If you need some changes in your Virtual Number IVR configuration, please contact your Account Manager.


Customer Call Journey with IVR

When your customer calls a virtual number with an IVR system, the customer journey displays information on how your customer navigates to the IVR Menu.

  • For the Virtual Number Enquiry Room, click the Customer Profile on the left side or click the three-dot menu and select Detail Information to display the right-side panel of the Enquiry Chat Room.

  • Click the Journey icon to display the customer journey with the IVR Menu.
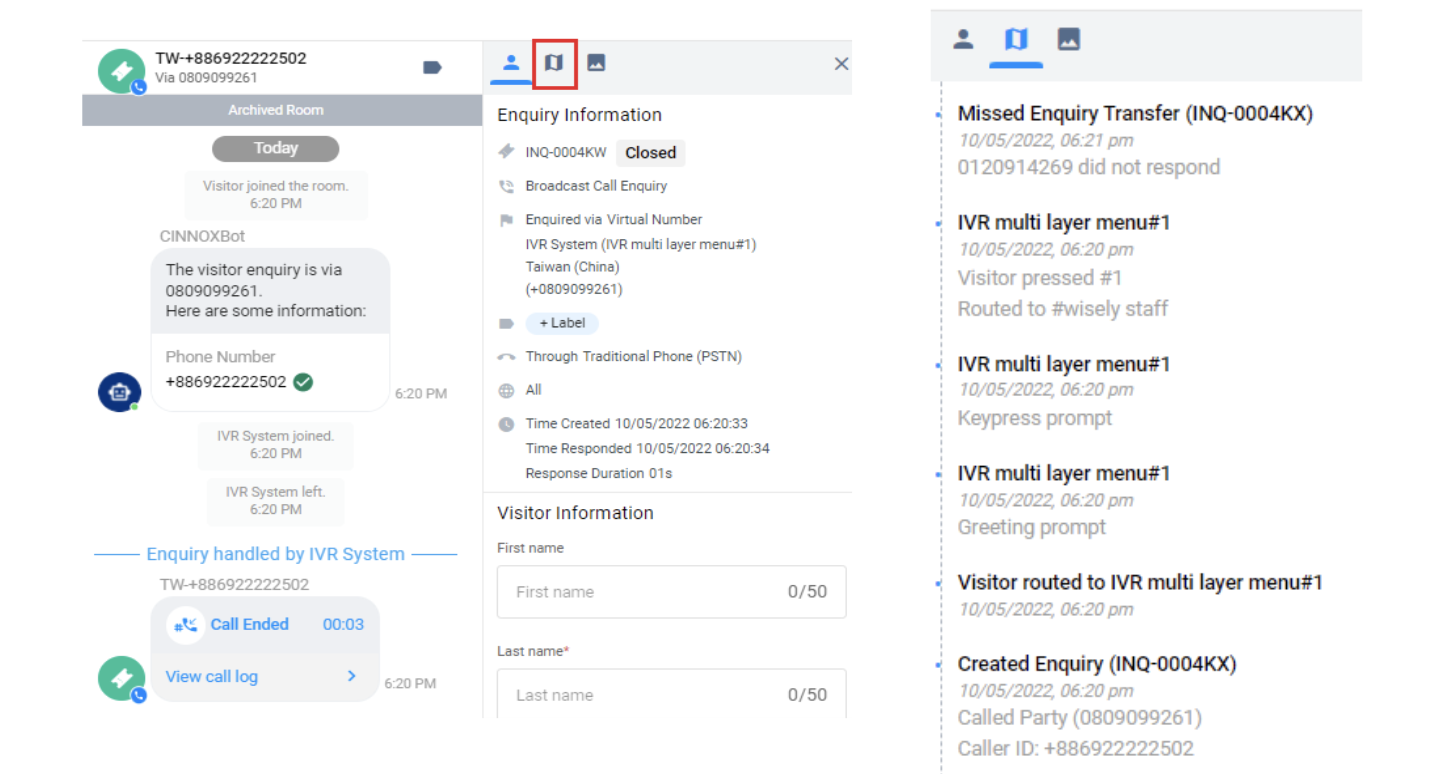
1432

Visitor Journey


Enquiry Detail Report with IVR

The Enquiry Detail Report is updated, including the IVR. Refer to this guide's Viewing the Enquiry Detail Report section.
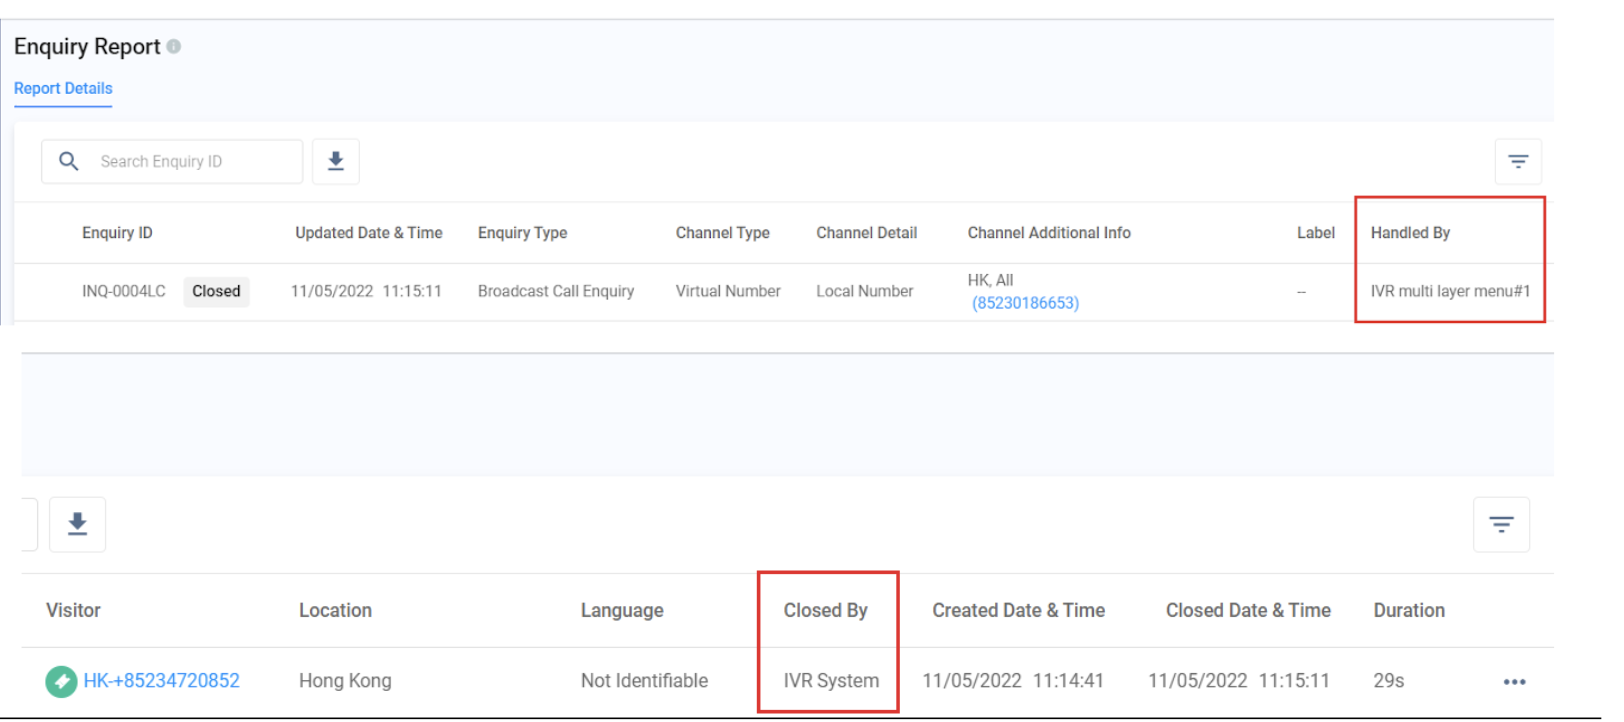
1624


Call Detail Report with IVR

The call enquiry report is updated, including the IVR. Refer to this guide's Viewing the Call Report section.
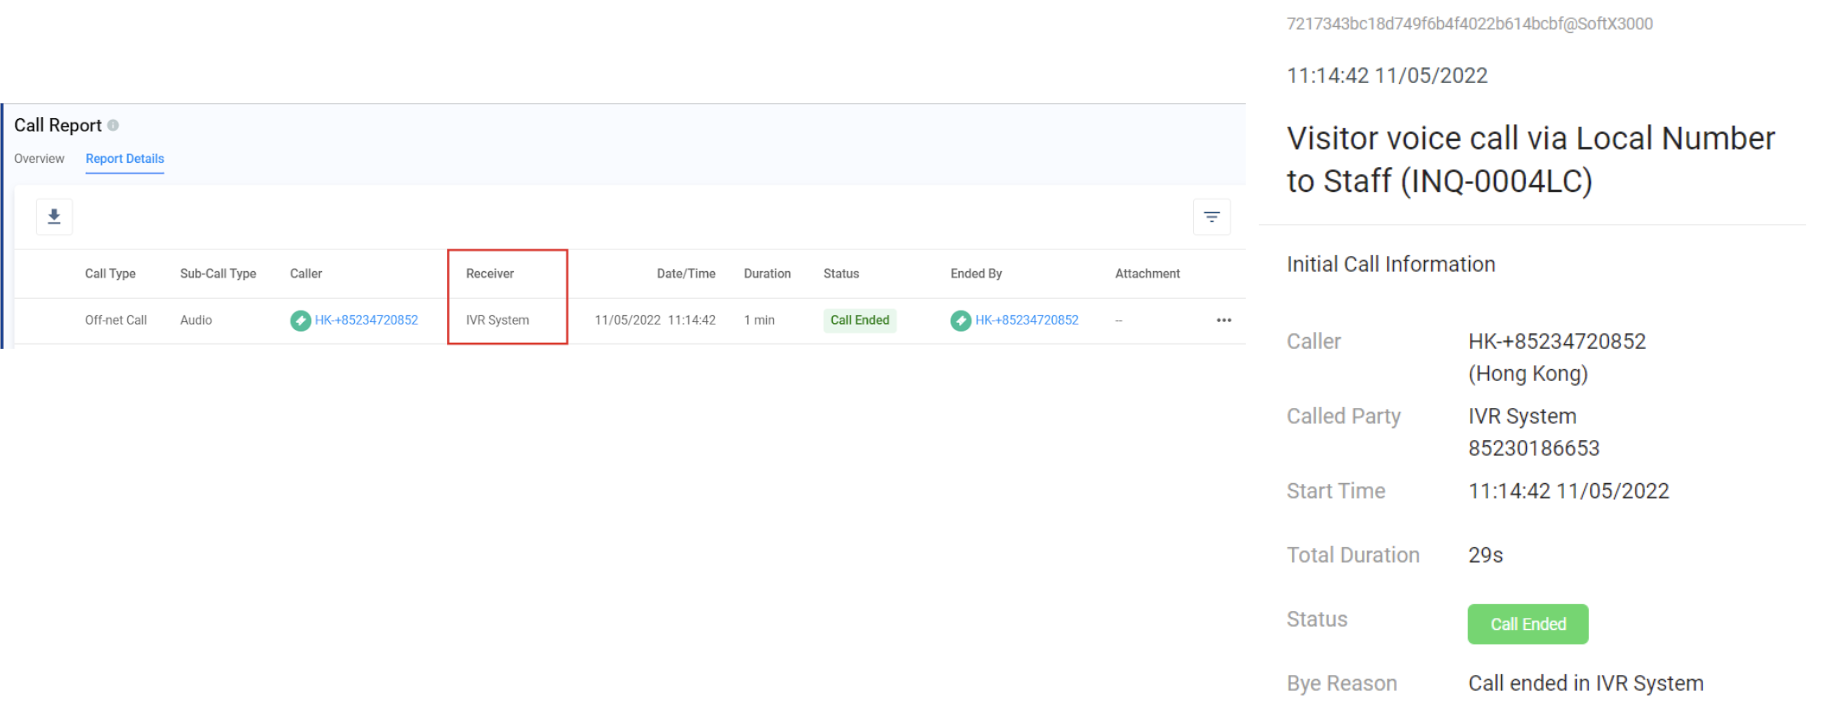
1826

Out of Scope

📘

The following are unavailable in the current IVR:

  • No integration to any 3rd party applications like CRM systems and others. It is by request.
  • No Database (DB) lookup
  • No text to speech (TTS)
  • No import and export of XML files
  • Not for transaction/payment processing services
  • No Outbound IVR Calls
  • Not a Visual IVR
  • Not a Speech Enabled IVR (aka Automated Speech Recognition (ASR))