
Managing Roles and Permissions
CINNOX lets Staff administrators assign different roles to Staff members. Depending on the roles or teams, the Staff members will have different data scopes, e.g., levels of access to data within your CINNOX service and different permissions when using the CINNOX features.
The staff administrator can use the staff default roles and data access levels to assign tasks to staff members or create custom roles.
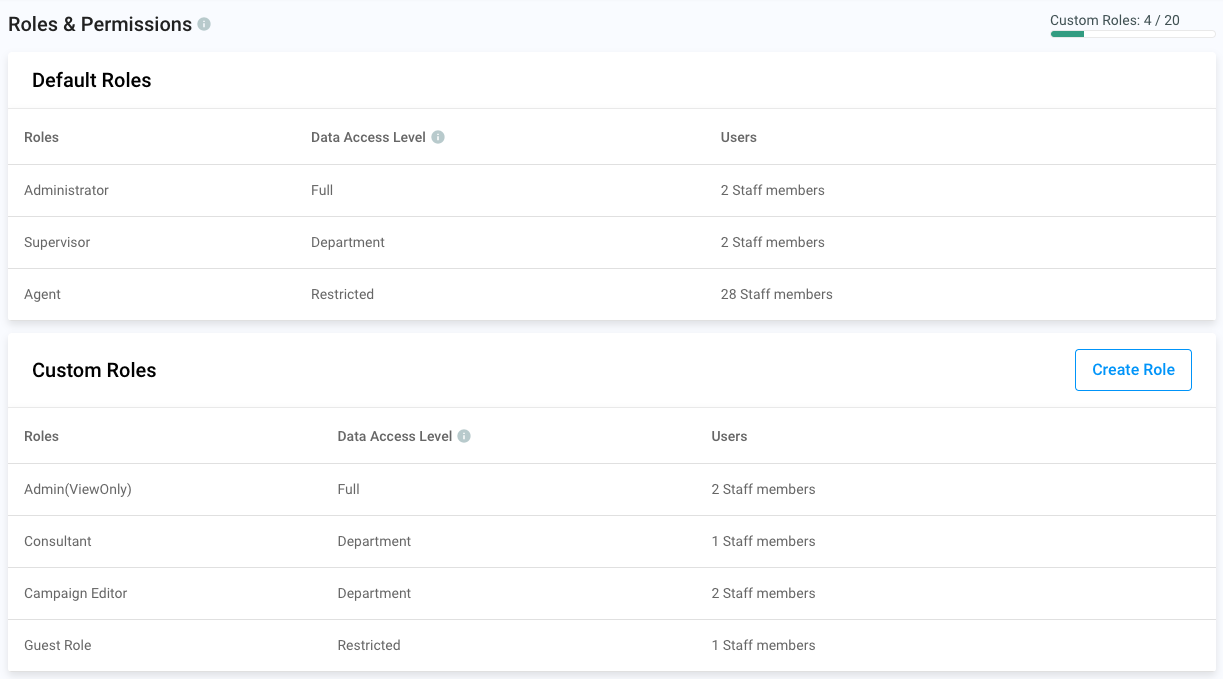
CINNOX Roles and Permissions
🚧
Please be aware that Managing Roles & Permissions are advanced settings in your CINNOX Service, and you understand their risks. Any changes you make may affect the activities of your staff members.
Data Access Level
CINNOX allocated the data access level for the Staff default roles accordingly.
It would be best if you assigned the Data Access Level when creating a Custom Role.
  <th>
    Data Access Level
  </th>
</tr> <td>
A staff member can access FULL and ALL account data for your service.
</td>
</tr>
<tr>
<td>
Department
</td>
<td>
Departments are distinct functional units within a company, each with its specific responsibilities and areas of focus.\
A Staff can access ALL data in the DEPARTMENT to which they belong.\
A department can be a Sales Unit, R\&D, Product Management, Product Development, Finance, Marketing and others.
</td>
</tr>
<tr>
<td>
Restricted
</td>
<td>
A Staff can only access their data.
</td>
</tr>| Role |
|---|
| Full |
Default Roles
The table below shows the Staff default roles and their corresponding data access level in the service.
| Role | Data Access Level |
|---|---|
| Administrator | Full |
| Supervisor | Department |
| Agent | Restricted |
📘
The Staff with the Leader and Manager roles have been changed to Supervisor.
Feature Permissions
The table below shows the permission and describes what action it will grant to the feature.
| Permission | Description |
|---|---|
| Enabled | A Staff can use the feature. It applies mainly to Calling & Messaging, Recording and Plan features. |
| View | A Staff can see or read contents displayed on their Dashboard or App. It applies mainly to Contacts, Campaigns, Reports and Storage. |
| Edit | Staff can modify or overwrite the contents displayed on their Dashboard or App. It applies mainly to Contacts, Campaigns, Channels and Service settings. |
| Download | A Staff can save an offline copy of the contents displayed on their Dashboard or App. It applies mainly to Campaigns and Reports. |
| Delete | A Staff can save an offline copy of the contents displayed on their Dashboard or App. It applies mainly to Campaigns and Reports. |
| Approve | A staff member can approve or reject the submitted task or an item another member made. It applies to sending Campaigns. |
Features and Permissions to the Staff Default Roles
The table below shows the CINNOX Features available to the Staff - Default Roles and the corresponding Permissions.
  <th>
    Administrator
  </th>

  <th>
    Supervisor
  </th>

  <th>
    Agent
  </th>

  <th>
    Remarks
  </th>
</tr> <td>
</td>
<td>
</td>
<td>
</td>
<td>
</td>
</tr>
<tr>
<td>
Make and transfer On-net Calls
</td>
<td>
Enabled
</td>
<td>
Enabled
</td>
<td>
Enabled
</td>
<td>
On-net calls within the CINNOX web or mobile app
</td>
</tr>
<tr>
<td>
Make and transfer Off-net Calls
</td>
<td>
Enabled
</td>
<td>
Enabled
</td>
<td>
Enabled
</td>
<td>
Off-net calls to a landline or mobile phone using CINNOX.
</td>
</tr>
<tr>
<td>
Make Conference Call
</td>
<td>
Enabled
</td>
<td>
Enabled
</td>
<td>
Enabled
</td>
<td>
</td>
</tr>
<tr>
<td>
Make Video calls and Screen Sharing
</td>
<td>
Enabled
</td>
<td>
Enabled
</td>
<td>
Enabled
</td>
<td>
It will also allow Staff to make and transfer On-net calls.
</td>
</tr>
<tr>
<td>
Send SMS
</td>
<td>
Enabled
</td>
<td>
Enabled
</td>
<td>
Enabled
</td>
<td>
</td>
</tr>
<tr>
<td>
Create Space (Group Chat)
</td>
<td>
Enabled
</td>
<td>
Enabled
</td>
<td>
Enabled
</td>
<td>
</td>
</tr>
<tr>
<td>
Forward Call
</td>
<td>
Enabled
</td>
<td>
Enabled
</td>
<td>
Enabled
</td>
<td>
</td>
</tr>
<tr>
<td>
Use Personal Number as Caller and Sender ID
</td>
<td>
Enabled
</td>
<td>
Enabled
</td>
<td>
Enabled
</td>
<td>
</td>
</tr>
<tr>
<td>
<b><p style="font-size:15px"><span style="color: black">Recording & Transcription</span> </p></b>
</td>
<td>
</td>
<td>
</td>
<td>
</td>
<td>
</td>
</tr>
<tr>
<td>
Record Call
</td>
<td>
Enabled
</td>
<td>
Enabled
</td>
<td>
Enabled
</td>
<td>
When the call recording preference is "Manual", Staff can press "Record" to record their call.
</td>
</tr>
<tr>
<td>
Access Recording File & Transcript File
</td>
<td>
View, Download
</td>
<td>
View, Download
</td>
<td>
View, Download
</td>
<td>
</td>
</tr>
<tr>
<td>
Manage Recording & Transcript
</td>
<td>
View, Edit
</td>
<td>
</td>
<td>
</td>
<td>
</td>
</tr>
<tr>
<td>
<b><p style="font-size:15px"><span style="color: black">Enquiry </span> </p></b>
</td>
<td>
</td>
<td>
</td>
<td>
</td>
<td>
</td>
</tr>
<tr>
<td>
Access Enquiry Overview
</td>
<td>
View
</td>
<td>
View
</td>
<td>
View
</td>
<td>
</td>
</tr>
<tr>
<td>
Join & Take Over Enquiry
</td>
<td>
Enabled
</td>
<td>
Enabled
</td>
<td>
</td>
<td>
It will also allow Staff to access the Enquiry Overview page.
</td>
</tr>
<tr>
<td>
<b><p style="font-size:15px"><span style="color: black">Channel </span> </p></b>
</td>
<td>
</td>
<td>
</td>
<td>
</td>
<td>
</td>
</tr>
<tr>
<td>
**Widget**
</td>
<td>
</td>
<td>
</td>
<td>
</td>
<td>
</td>
</tr>
<tr>
<td>
Manage Directory Channel
</td>
<td>
View, Edit, Delete
</td>
<td>
</td>
<td>
</td>
<td>
</td>
</tr>
<tr>
<td>
Manage Widget Installation
</td>
<td>
View, Edit
</td>
<td>
</td>
<td>
</td>
<td>
</td>
</tr>
<tr>
<td>
Customise Widget
</td>
<td>
View, Edit
</td>
<td>
</td>
<td>
</td>
<td>
</td>
</tr>
<tr>
<td>
Manage Visitor Form
</td>
<td>
View, Edit
</td>
<td>
</td>
<td>
</td>
<td>
</td>
</tr>
<tr>
<td>
**Number**
</td>
<td>
</td>
<td>
</td>
<td>
</td>
<td>
</td>
</tr>
<tr>
<td>
Manage Number
</td>
<td>
View, Edit, Delete
</td>
<td>
</td>
<td>
</td>
<td>
Manage Numbers include Virtual Numbers, Service Numbers and Alphanumeric Sender ID management.
</td>
</tr>
<tr>
<td>
Manage Prompt
</td>
<td>
View, Edit, Delete, Download
</td>
<td>
</td>
<td>
</td>
<td>
</td>
</tr>
<tr>
<td>
**Social**
</td>
<td>
</td>
<td>
</td>
<td>
</td>
<td>
</td>
</tr>
<tr>
<td>
Manage Social Channel
</td>
<td>
View, Edit, Delete
</td>
<td>
</td>
<td>
</td>
<td>
</td>
</tr>
<tr>
<td>
**Email**
</td>
<td>
</td>
<td>
</td>
<td>
</td>
<td>
</td>
</tr>
<tr>
<td>
Manage Email Channel
</td>
<td>
View, Edit, Delete
</td>
<td>
</td>
<td>
</td>
<td>
</td>
</tr>
<tr>
<td>
**Third Party Channel**
</td>
<td>
</td>
<td>
</td>
<td>
</td>
<td>
</td>
</tr>
<tr>
<td>
Manage Third Party Channel
</td>
<td>
View, Edit, Delete
</td>
<td>
</td>
<td>
</td>
<td>
</td>
</tr>
<tr>
<td>
**Destination**
</td>
<td>
</td>
<td>
</td>
<td>
</td>
<td>
</td>
</tr>
<tr>
<td>
Manage Destination
</td>
<td>
View, Edit, Delete
</td>
<td>
</td>
<td>
</td>
<td>
It will allow Staff to view the Destination page when any of the Channel's permission access is enabled.
</td>
</tr>
<tr>
<td>
<b><p style="font-size:15px"><span style="color: black">Contact </span> </p></b>
</td>
<td>
</td>
<td>
</td>
<td>
</td>
<td>
</td>
</tr>
<tr>
<td>
Manage External Contact
</td>
<td>
View, Edit, Delete, Download
</td>
<td>
View, Edit, Delete, Download
</td>
<td>
View, Edit, Delete
</td>
<td>
</td>
</tr>
<tr>
<td>
Manage External Contact Custom Field
</td>
<td>
View, Edit, Delete
</td>
<td>
</td>
<td>
</td>
<td>
</td>
</tr>
<tr>
<td>
<b><p style="font-size:15px"><span style="color: black">Campaign </span> </p></b>
</td>
<td>
</td>
<td>
</td>
<td>
</td>
<td>
</td>
</tr>
<tr>
<td>
Manage Smart Messaging (SMS Campaign)
</td>
<td>
View, Edit, Delete, Download, Approve
</td>
<td>
View, Edit, Delete, Download, Approve
</td>
<td>
View, Edit, Delete, Download
</td>
<td>
</td>
</tr>
<tr>
<td>
Create Smart Calling (Call Campaign)
</td>
<td>
Enabled
</td>
<td>
Enabled
</td>
<td>
Enabled
</td>
<td>
</td>
</tr>
<tr>
<td>
<b><p style="font-size:15px"><span style="color: black">Tools & Automation </span> </p></b>
</td>
<td>
</td>
<td>
</td>
<td>
</td>
<td>
</td>
</tr>
<tr>
<td>
Manage Workflow
</td>
<td>
View, Edit, Delete
</td>
<td>
</td>
<td>
</td>
<td>
</td>
</tr>
<tr>
<td>
Manage Label
</td>
<td>
View, Edit, Delete
</td>
<td>
View, Edit, Delete
</td>
<td>
Edit
</td>
<td>
</td>
</tr>
<tr>
<td>
Manage Auto Close Enquiry
</td>
<td>
View, Edit
</td>
<td>
View
</td>
<td>
</td>
<td>
</td>
</tr>
<tr>
<td>
Manage Public Canned Response
</td>
<td>
View, Edit, Delete, Download
</td>
<td>
</td>
<td>
</td>
<td>
</td>
</tr>
<tr>
<td>
Manage Data Source
</td>
<td>
View, Edit, Delete, Download
</td>
<td>
</td>
<td>
</td>
<td>
</td>
</tr>
<tr>
<td>
<b><p style="font-size:15px"><span style="color: black">Report </span> </p></b>
</td>
<td>
</td>
<td>
</td>
<td>
</td>
<td>
</td>
</tr>
<tr>
<td>
Access Dashboard
</td>
<td>
View
</td>
<td>
View
</td>
<td>
View
</td>
<td>
</td>
</tr>
<tr>
<td>
Access Enquiry Report
</td>
<td>
View, Download
</td>
<td>
View, Download
</td>
<td>
View
</td>
<td>
</td>
</tr>
<tr>
<td>
Access Call Report
</td>
<td>
View, Download
</td>
<td>
View, Download
</td>
<td>
View
</td>
<td>
</td>
</tr>
<tr>
<td>
Access Conference Report
</td>
<td>
View, Download
</td>
<td>
View, Download
</td>
<td>
View
</td>
<td>
</td>
</tr>
<tr>
<td>
Access Chat Report
</td>
<td>
View, Download
</td>
<td>
View, Download
</td>
<td>
View
</td>
<td>
</td>
</tr>
<tr>
<td>
Access SMS Report
</td>
<td>
View, Download
</td>
<td>
View, Download
</td>
<td>
View
</td>
<td>
</td>
</tr>
<tr>
<td>
Access Visitor Report
</td>
<td>
View, Download
</td>
<td>
View, Download
</td>
<td>
View
</td>
<td>
</td>
</tr>
<tr>
<td>
Access Staff Report
</td>
<td>
View, Download
</td>
<td>
View, Download
</td>
<td>
View
</td>
<td>
</td>
</tr>
<tr>
<td>
<b><p style="font-size:15px"><span style="color: black">Storage </span> </p></b>
</td>
<td>
</td>
<td>
</td>
<td>
</td>
<td>
</td>
</tr>
<tr>
<td>
Manage Storage
</td>
<td>
View, Delete
</td>
<td>
</td>
<td>
</td>
<td>
</td>
</tr>
<tr>
<td>
<b><p style="font-size:15px"><span style="color: black">Organisation </span> </p></b>
</td>
<td>
</td>
<td>
</td>
<td>
</td>
<td>
</td>
</tr>
<tr>
<td>
Manage Staff (Internal Contact)
</td>
<td>
View, Edit, Delete
</td>
<td>
View
</td>
<td>
</td>
<td>
</td>
</tr>
<tr>
<td>
Manage Team
</td>
<td>
View, Edit, Delete
</td>
<td>
</td>
<td>
</td>
<td>
</td>
</tr>
<tr>
<td>
<b><p style="font-size:15px"><span style="color: black">Security </span> </p></b>
</td>
<td>
</td>
<td>
</td>
<td>
</td>
<td>
</td>
</tr>
<tr>
<td>
Manage Login Authentication
</td>
<td>
View, Edit, Delete
</td>
<td>
</td>
<td>
</td>
<td>
</td>
</tr>
<tr>
<td>
Access Audit Log
</td>
<td>
View, Download
</td>
<td>
</td>
<td>
</td>
<td>
</td>
</tr>
<tr>
<td>
<b><p style="font-size:15px"><span style="color: black">Plan </span> </p></b>
</td>
<td>
</td>
<td>
</td>
<td>
</td>
<td>
</td>
</tr>
<tr>
<td>
Access Plan Monitoring, Company Profile, Marketplace, Invoice / Receipt and Rate Table
</td>
<td>
Enabled
</td>
<td>
Enabled
</td>
<td>
</td>
<td>
</td>
</tr>| Feature |
|---|
| Calling & Messaging |
👍
When creating a new Custom Role, you can manage what features and permissions you should assign to the new role accordingly.
Custom Roles
Creating a Custom Role
Staff administrators can create custom roles based on any default roles and data scope available in CINNOX to align with their organisation's requirements.
To create a new custom role:
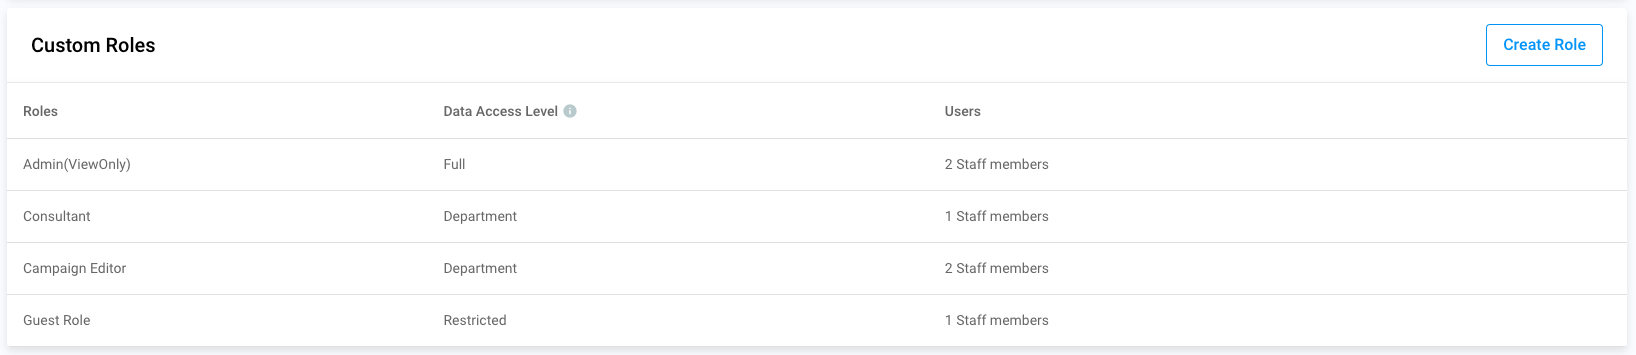
- Go to Administration > Organisation > Roles and Permissions.
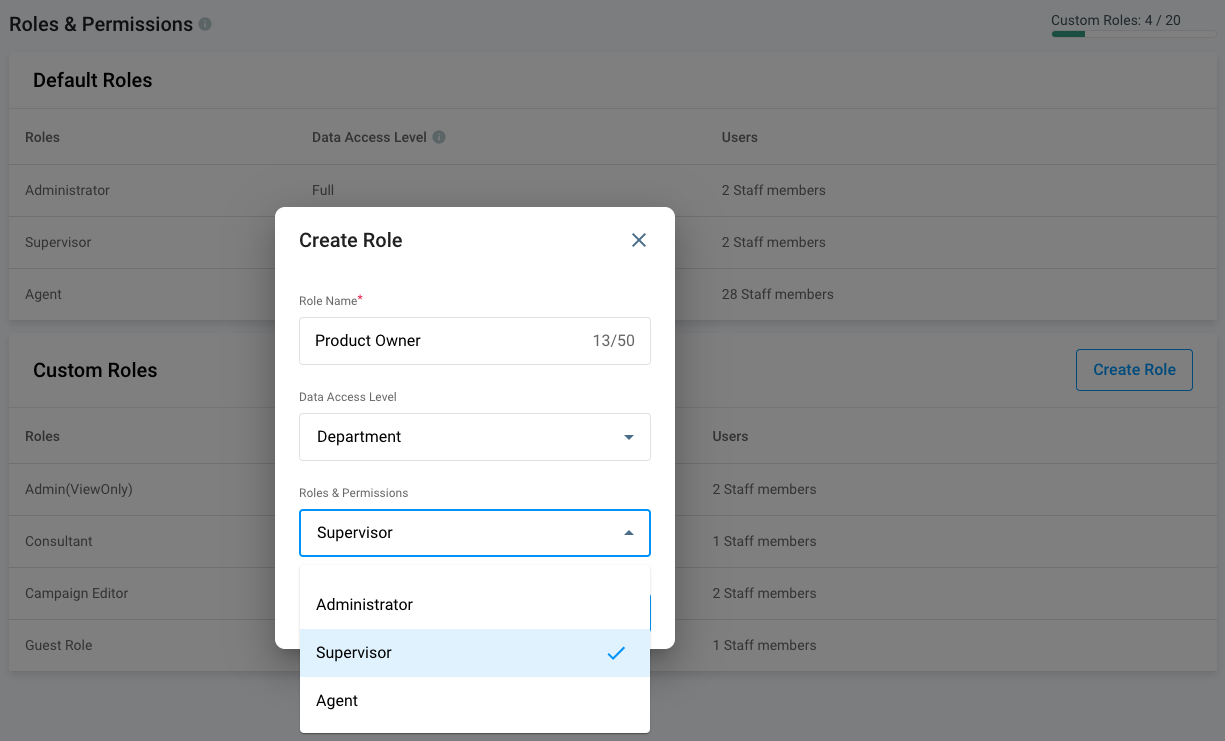
- Under Custom Roles, click the Create Role button at the right side of the page.
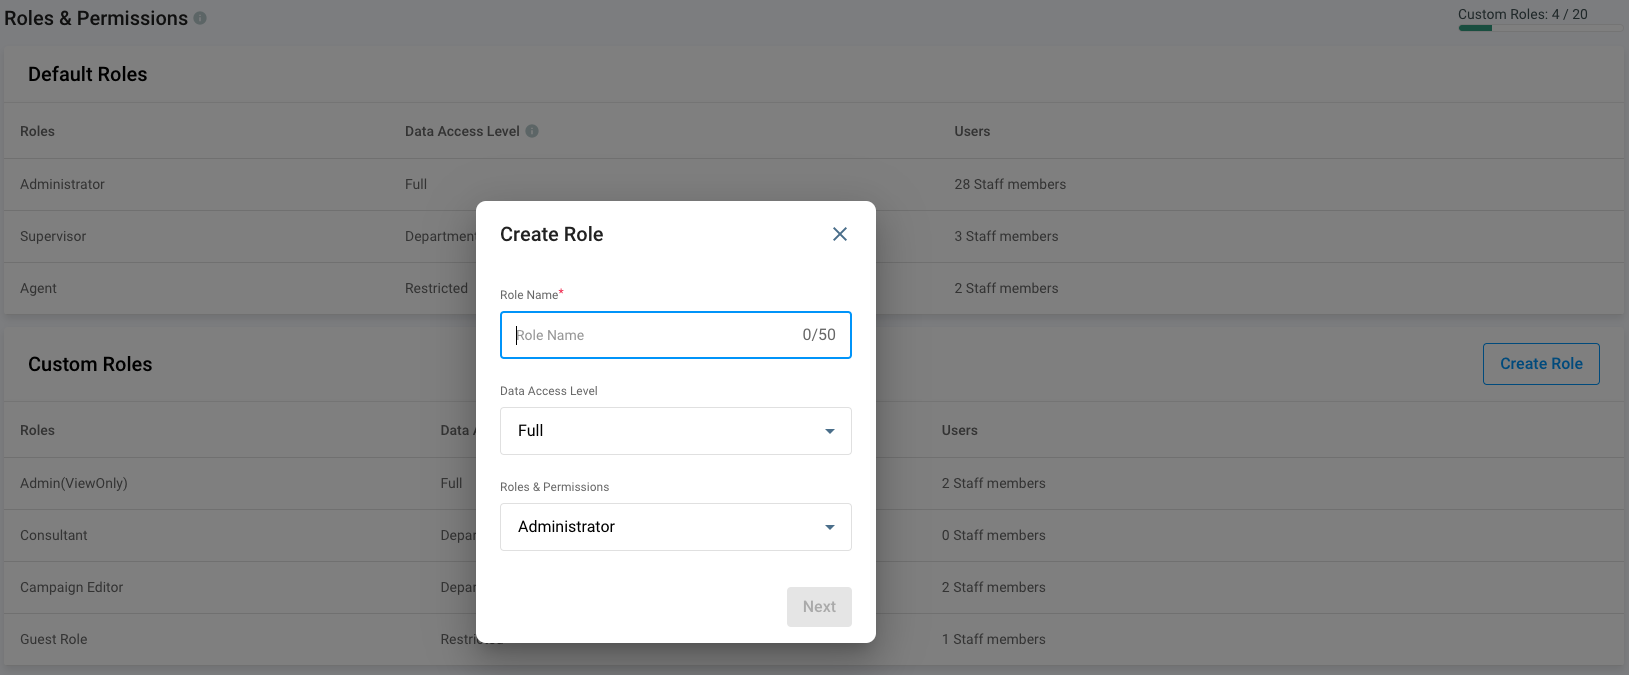
- Enter the Role Name you must create in the pop-up window.
- Select a data access level for the new custom role on the Data Scope dropdown box.
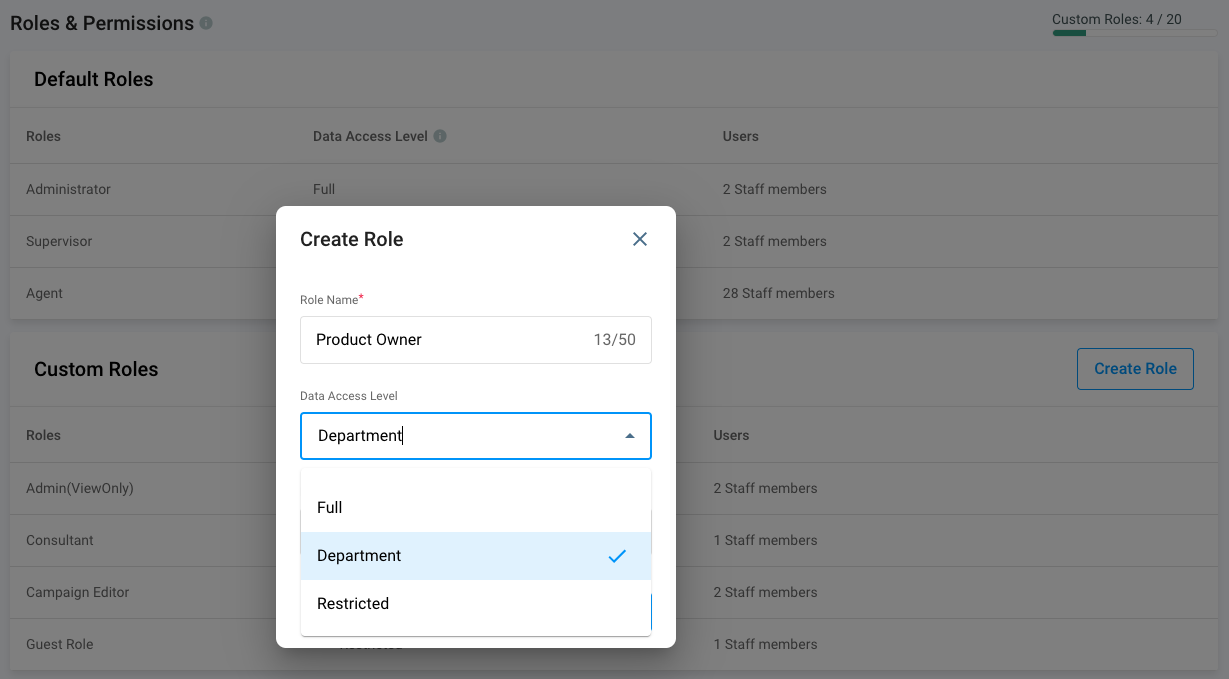
- Select a role close to the new custom role you must create as the base on the Roles & Permissions dropdown box.
- Click on Next.
-
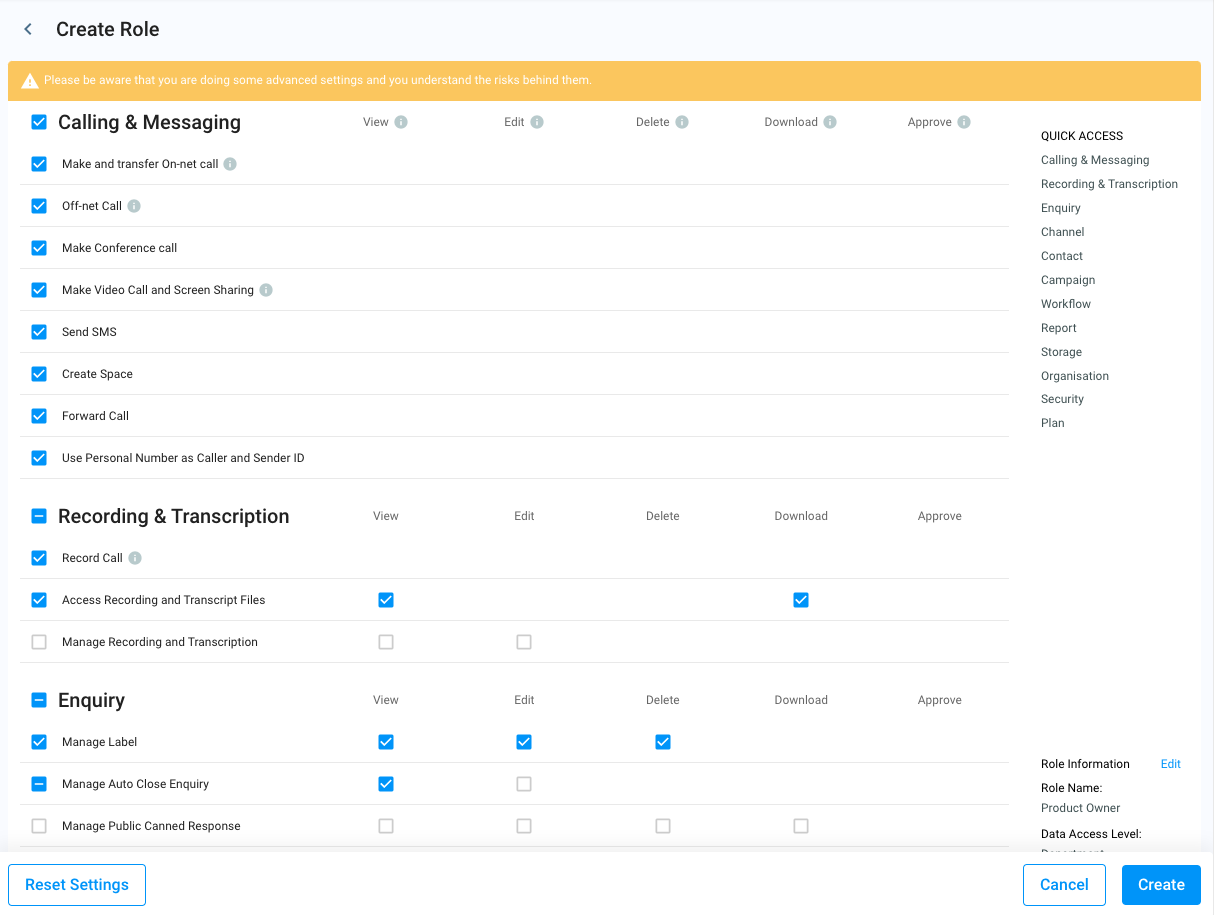
On the Create Role page, scroll down and tick or untick the checkboxes next to the features and permissions. You may use the Quick Access links on the right side of the page to jump to specific sections of the features list.
- If you wish to undo all your changes in the permissions settings, click on Reset Settings.
- If you want to edit the Role Name and Data Scope you previously entered, click on Edit under each of these details on the lower-right side of the screen.
-
Click on Create. CINNOX will automatically save this new role and redirect you to the role's details page, where you can edit its Feature Permissions and assign Staff members.
Viewing and Editing a Custom Role
To view and edit a Custom Role:
- Go to Administration > Organisation > Roles and Permissions.
- Under Custom Roles, find and click for a custom role you want to view.
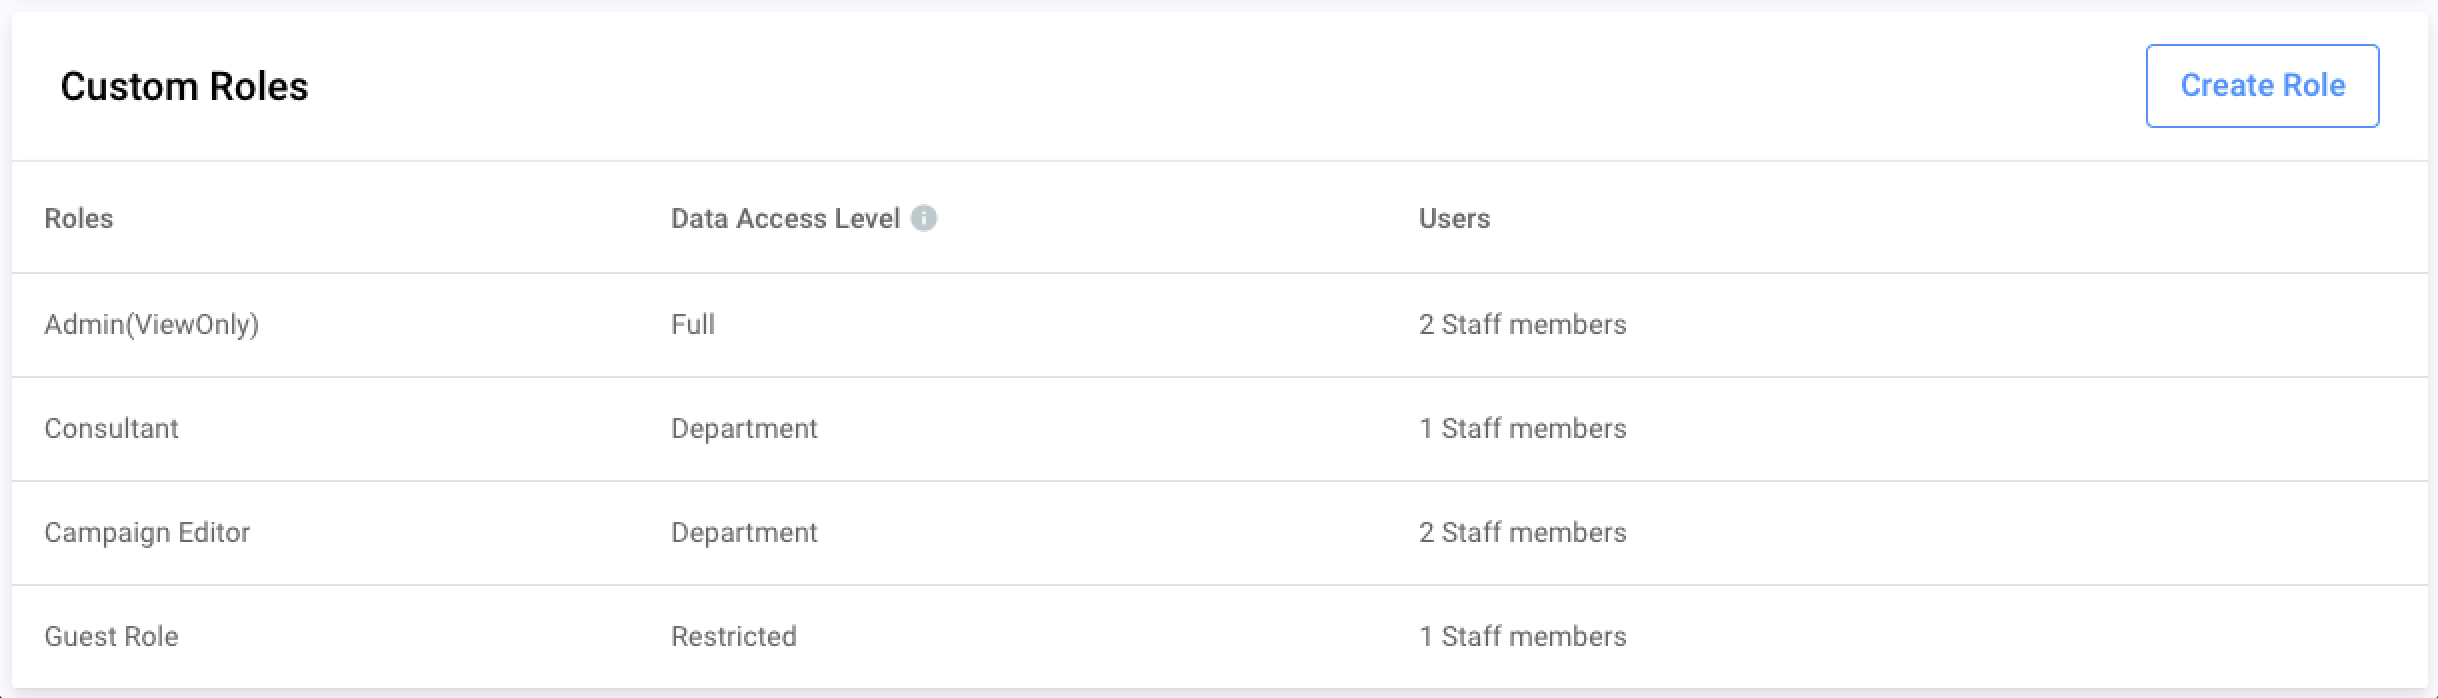
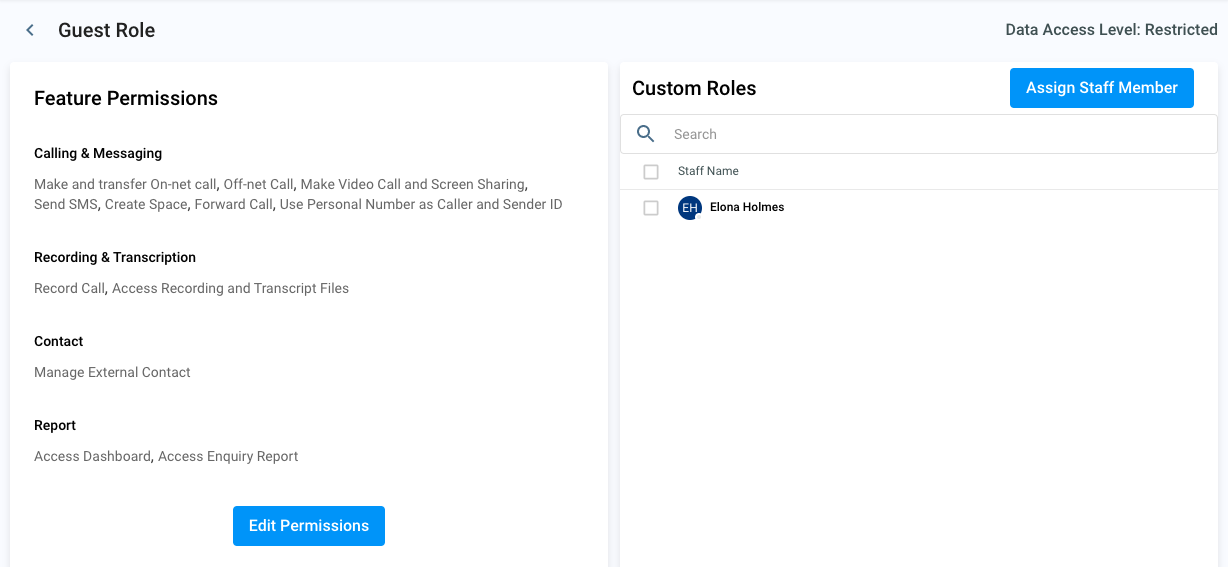
The Feature Permissions for the selected Custom Role details page appear.
- Click Edit Permissions to modify the feature and permission of the custom role.
Role details
- On the page that will appear, scroll down through and tick or untick the checkboxes next to the features and permissions. You may use the Quick Access links on the right side of the page to jump to specific sections of the features list.
- If you wish to undo all your changes in the permissions settings, click on Reset Settings.
- If you wish to edit the Role Name and Data Scope, click on Edit under each of these details on the lower-right side of the screen.
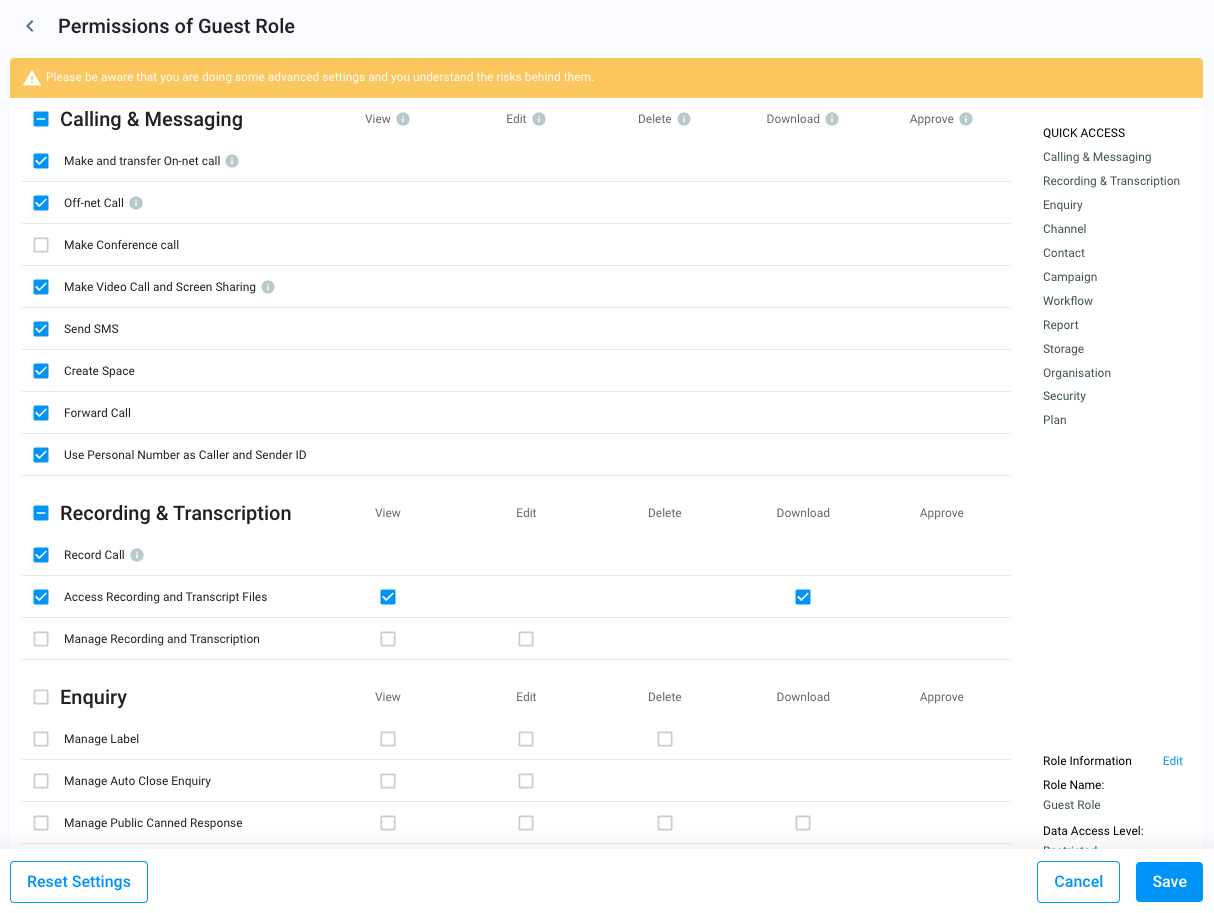
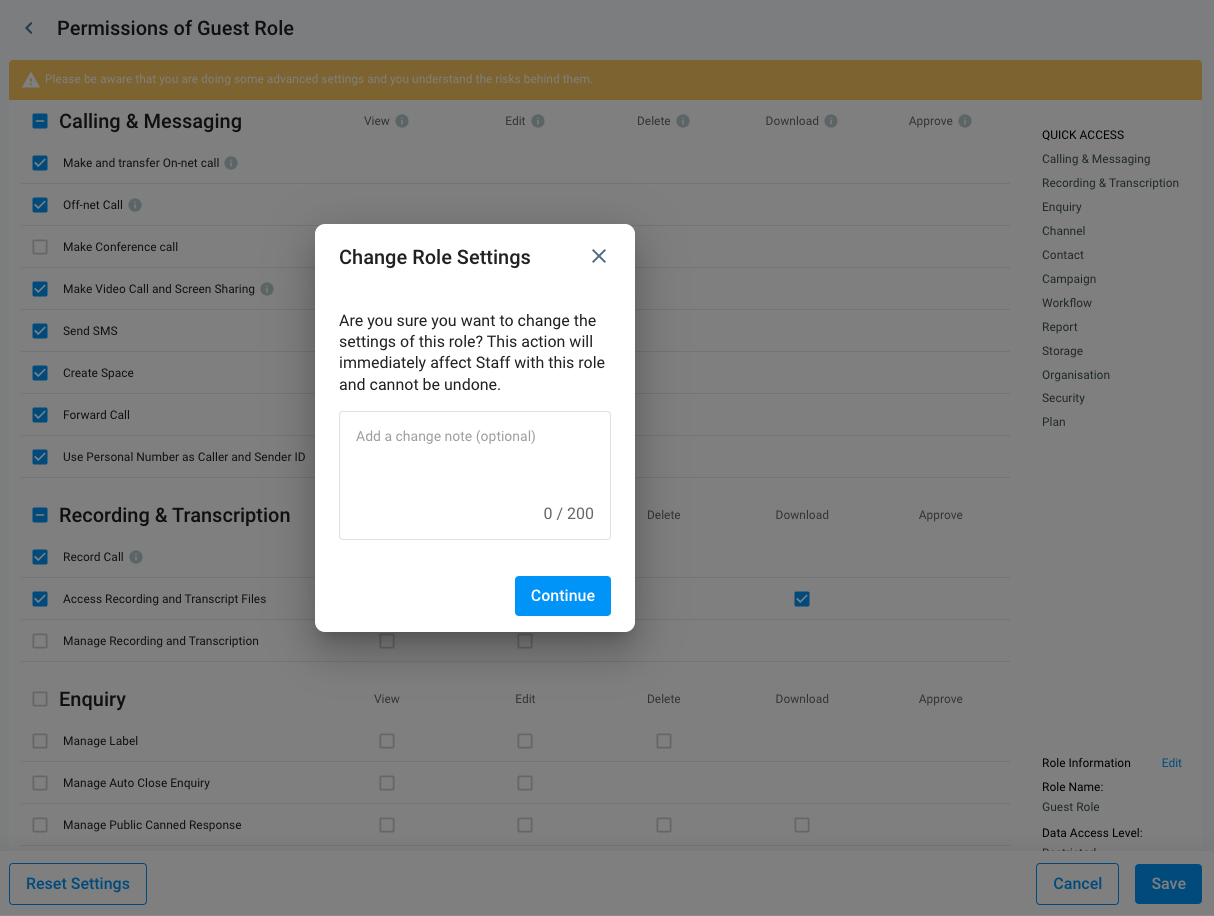
- Click on Save. A pop-up message will appear, "This action will immediately affect staff with this role and cannot be undone." I am asking you to confirm the changes.
- You can add a note for the change, but it is optional, then click on Continue.
🚧
You can only edit the permission settings of custom roles. CINNOX Default roles cannot be edited.
Deleting a Custom Role
To delete a Role:
- Go to Administration > Organisation > Roles and Permissions.
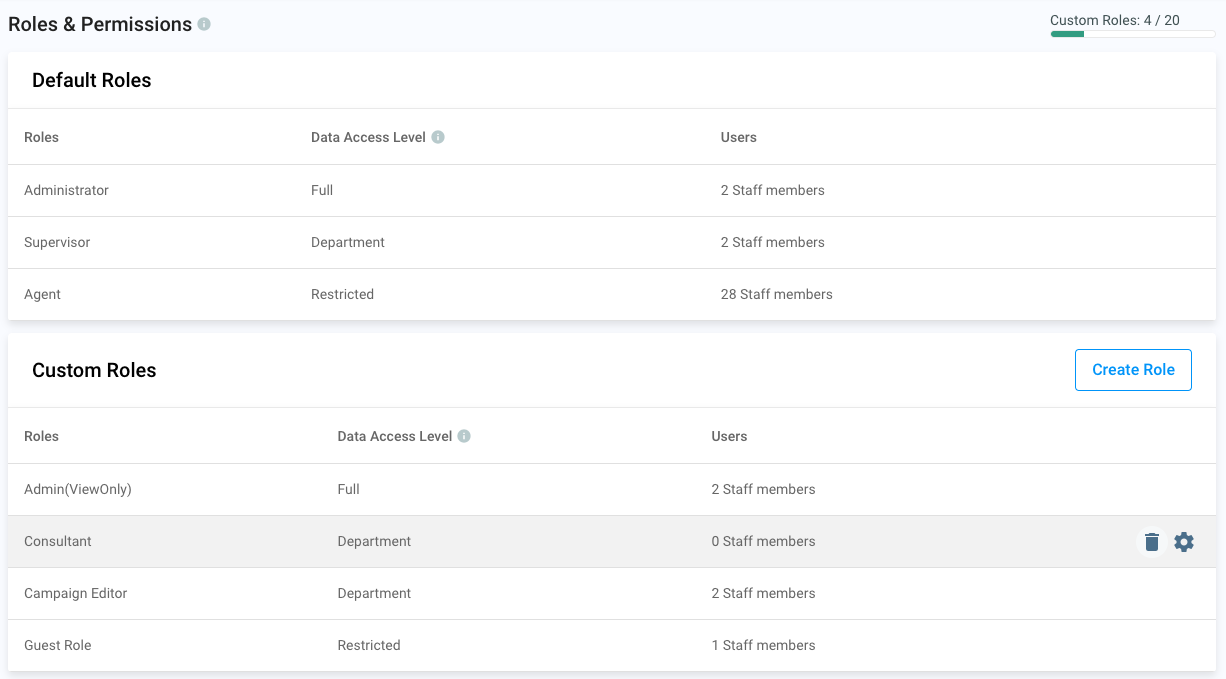
- Under Custom Roles, go to the custom role you wish to delete, but ensure no staff member is assigned to it. Otherwise, you have to re-assign the Staff to a new role first.
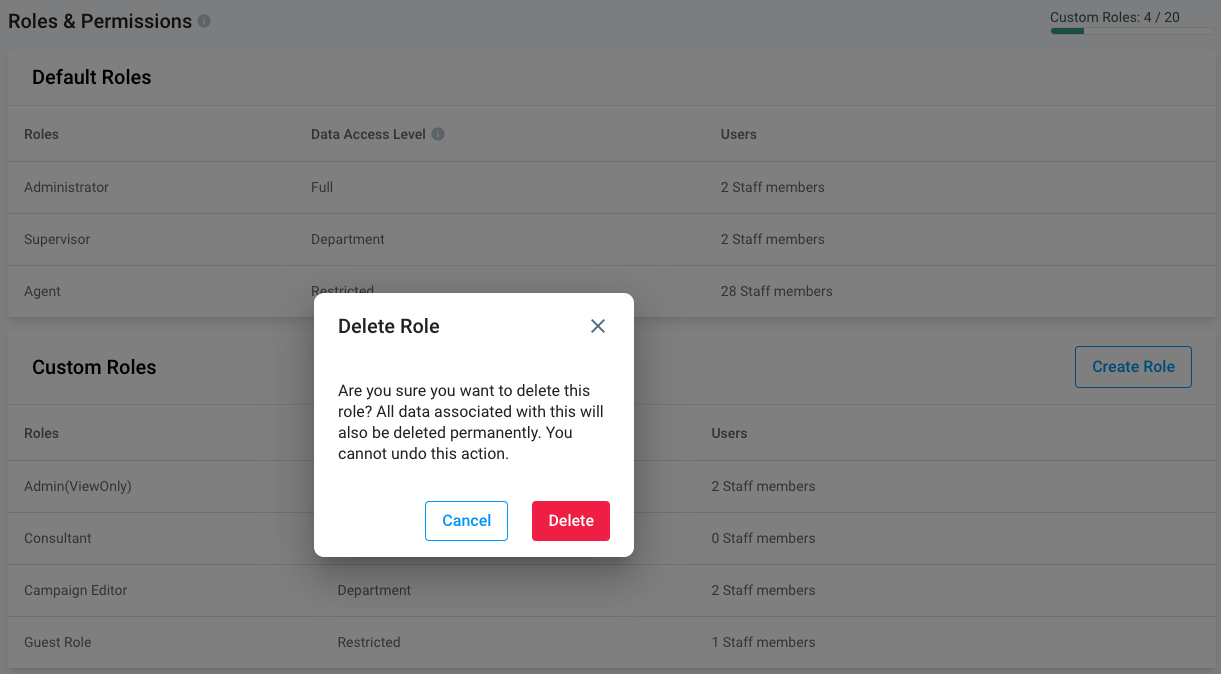
- Click on the trash icon on the right. A pop-up message will appear asking for confirmation of the action.
- Click on Delete. The created custom role will be removed from the list.
🚧
You can only delete created custom roles. CINNOX Default roles cannot be deleted.
Assign Role to Staff
Assigning a Role to a New Staff Member
To assign a role to a new Staff member, refer to the Staff Management section of this Guide.
Re-assigning a Role to an existing Staff Member
A Staff administrator can assign existing Staff members new roles by adding them to a newly-created role or moving them out of an existing one.
To add a Staff Member to a new Role:
- Go to Administration > Organisation > Roles and Permissions.
- Click on any of the listed default roles under Default Roles or on any of the custom roles listed under Custom Roles.
- On the details page under Custom Roles, click on Assign Staff Member.
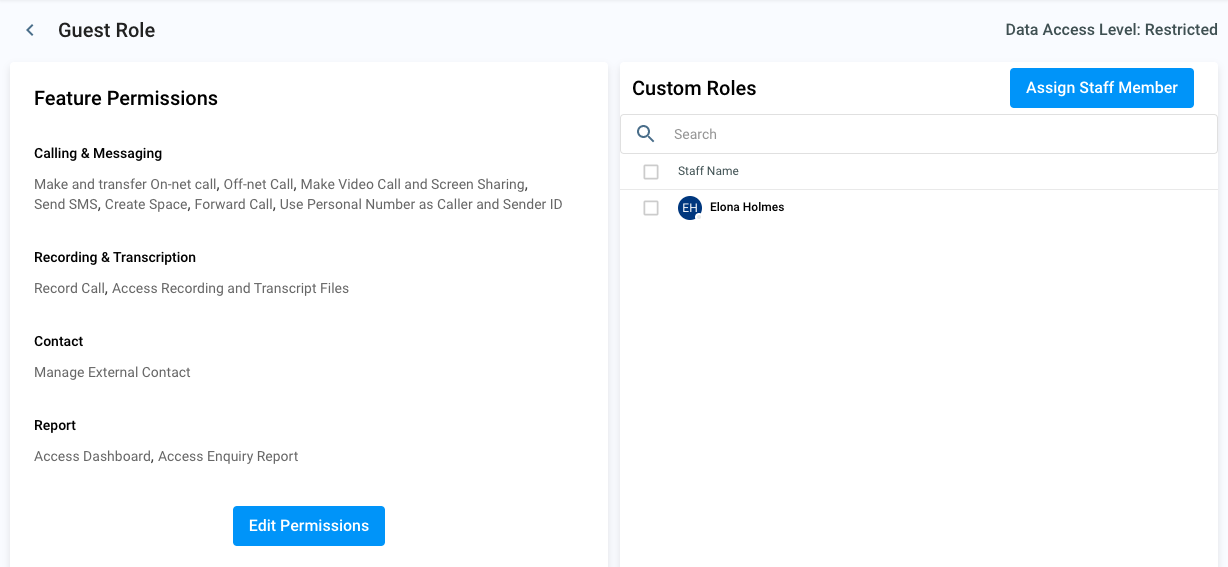
- On the pop-up window that will appear, scroll down through or search for the Staff member you wish to add, then tick the checkbox beside their name.
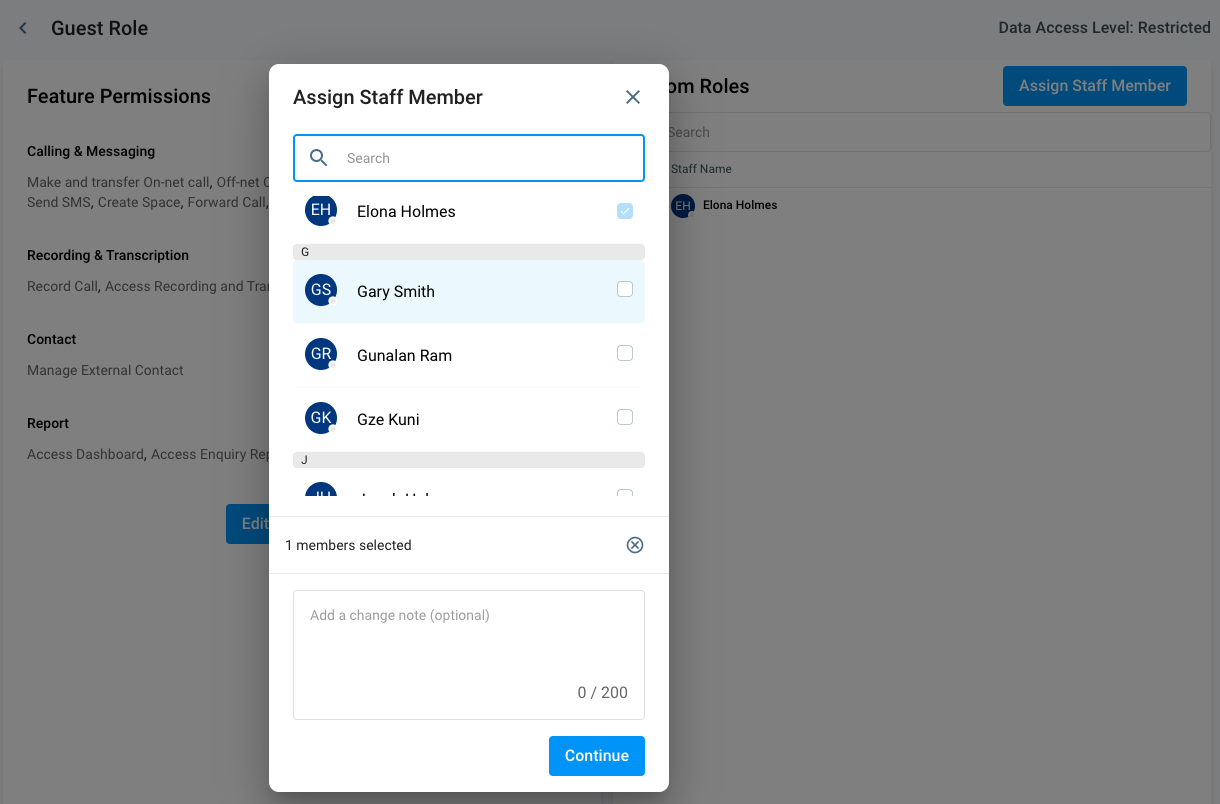
- Enter an optional Change Note, then click on Assign. The Staff member will then be added to this new role and removed from their previous one.
To transfer a Staff Member from an existing Role:
- Go to Administration > Organisation > Roles and Permissions.
- Click on any of the listed default roles under Default Roles or on any of the custom roles listed under Custom Roles.
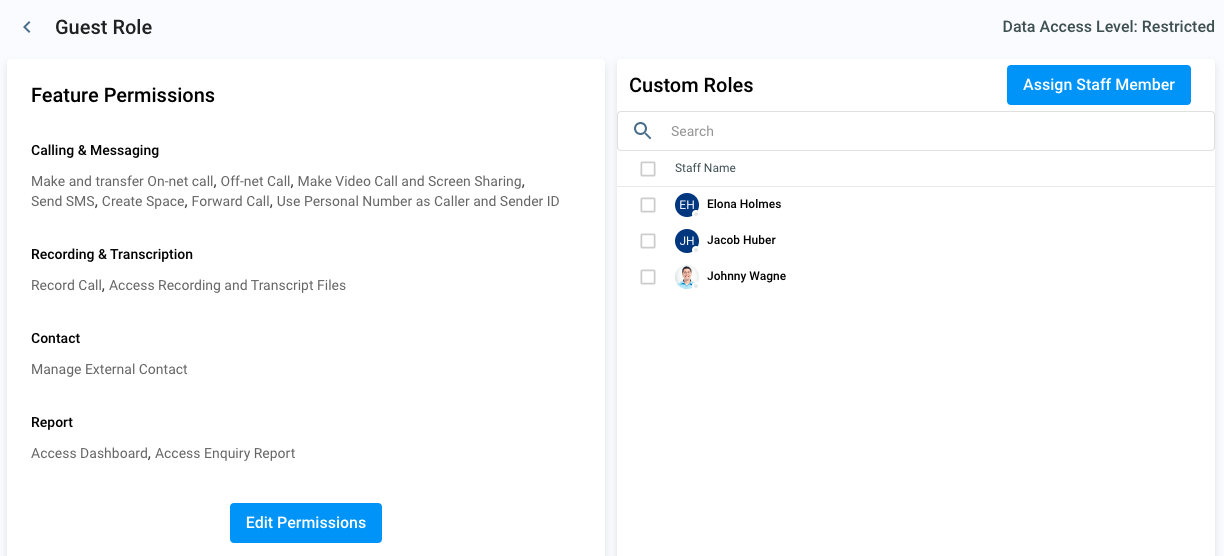
- On the details page that will appear, under Custom Roles, find the Staff members you wish to assign to another Role, tick the checkboxes beside their names, then click on Assign Other Role.
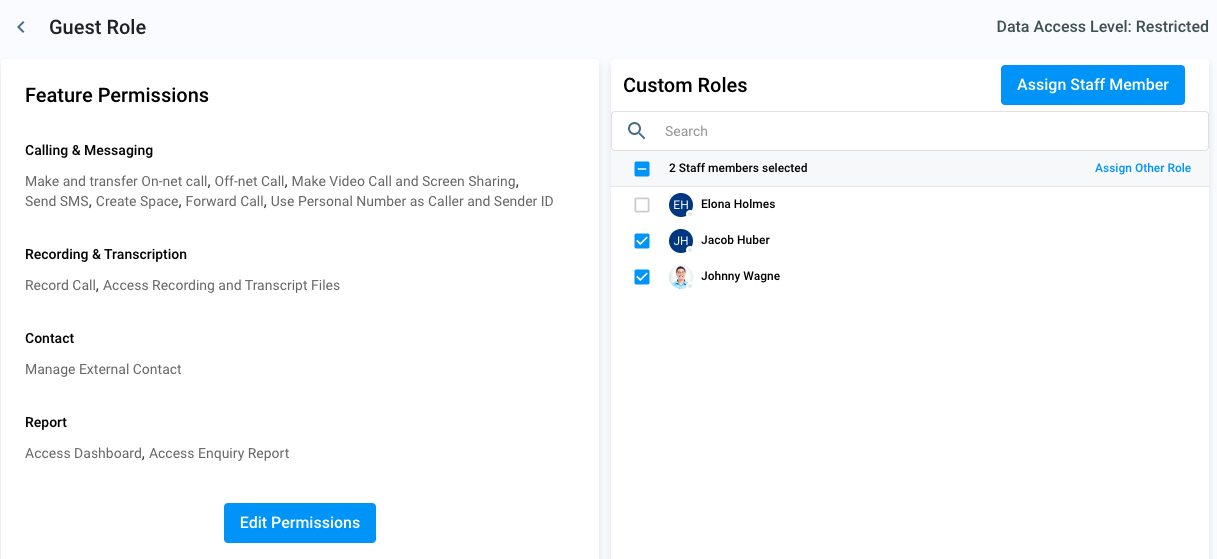
- Select the new role you wish to assign to the Staff members in the pop-up window.
- Enter Change Note but optional, then click on Assign.
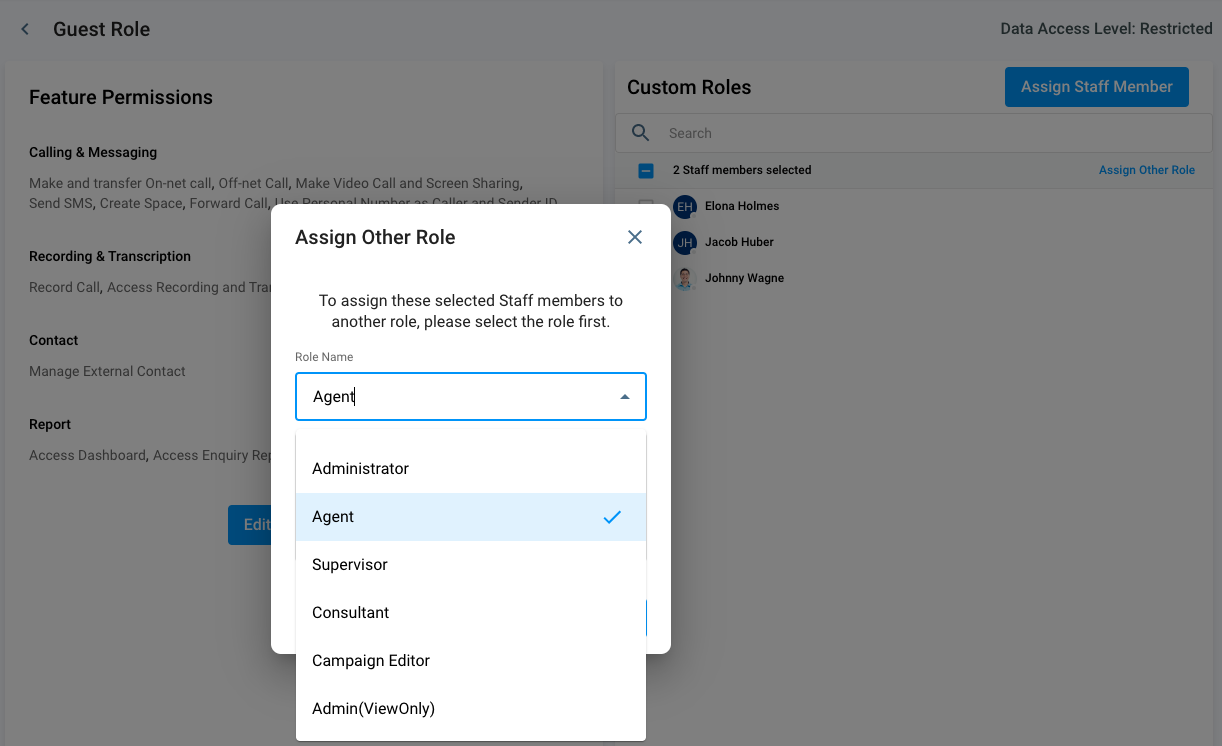
The Staff member will then be removed from the current role and added to the new one.