
Integrating Salesforce
Increase your team's efficiency, productivity and response to opportunities by integrating your Salesforce organisation into your CINNOX service. Manage all of your customer information & interactions on a single platform.
Sync and link your contacts, automatically log enquiries as cases and calls as tasks between Salesforce and CINNOX efficiently and manage the conversations and engagements in your CINNOX account without switching between applications.
Prerequisites
📘
Your CINNOX plan must be the Ultimate CX Hub.
Your Salesforce organisation must be an Enterprise, Unlimited, Developer, or an edition with API access.
How do I know what Edition of Salesforce I have?
Identify which Edition you are on:
- From Salesforce Classic and Lightning Experience:
- Navigate to Setup. See Explore the Salesforce Setup Menu for more details.
- In the 'Quick Find' search box, type, Company
- Click Company Information
- Your Salesforce Edition is listed in the "Organization Edition" field.
Note: Other key org details such as "Salesforce.com Organization ID" and "Instance" will also be listed in the right-hand column of the Company Information page.
You may refer to this link to learn more.
Overview
What is Salesforce Sandbox?
A sandbox is a copy of your production environment where changes will not affect your data and users.
It's commonly used for integration testing between Salesforce and third-party applications.
What is Salesforce Production?
The Production is a live environment where changes will affect your data and users.
When integrating the Production environment with the third party, Salesforce requires deploying the configurations made in Sandbox (such as Apex classes and triggers) rather than touching the Production directly.
For each Instance (Sandbox and Production), you will need to create a new to the following in Salesforce:
- New Remote Site: Salesforce allows you and your organisation to access external website resources by registering the resource URL.
- New Connected App: It's a framework that enables an external application to integrate with Salesforce and grant access to its data with policies defining access restrictions.
- New Apex Class: It implements the actions associated with an object in Salesforce. It allows Salesforce to call operations of external web services through Apex class.
- New Apex Trigger: It enables you to perform custom actions before or after changes to Salesforce records (insert, update or delete a record such as your contacts).
You will need to provide the following information:
-
Consumer Key and Consumer Secret: are used to authenticate the application you will integrate with Salesforce.
-
Domain Name: the fully qualified domain name (FQDN) of your Salesforce Org.
Example:
#1. From this Sandbox URL https://abc--testsandbox.lightning.force.com/lightning/page/home, the domain name of your Salesforce org is https://abc--testsandbox.lightning.force.com.
#2. From this Production URL https://abc.lightning.force.com/lightning/page/home, the domain name of your Salesforce org is https://abc.lightning.force.com.
-
Location: is used for Sandbox integration only. Each created Sandbox has a corresponding location in your Sandbox account.
🚧
Please use your System Admin account when integrating your Salesforce to your CINNOX service.
The created Apex Class and Apex Trigger in Sandbox will be required to deploy in Production following the steps provided by Salesforce.
When the integration is successful, you and your staff can log in to your Salesforce user account, and the following features will be available:
CINNOX and Salesforce Integration Features
| Feature | Description |
|---|---|
| Salesforce Contact Information displays in CINNOX | When a customer enquiry is matched with Salesforce Contact information, it will display in CINNOX as the Enquiry Contact Profile. |
| Synchronous Contacts | Synchronise your Salesforce contacts in CINNOX and vice versa to view all your contacts on a single platform. Contact field mapping between CINNOX & Salesforce allows automatic data syncing between these two applications. Each staff must log in to their Salesforce account to sync their contacts to CINNOX. |
| Link Contacts | One Salesforce contact can link to one CINNOX external contact. One CINNOX external contact can link up to ten (10) Salesforce contacts. |
| Create Contact | Create a new contact in CINNOX, which will also be saved in Salesforce. |
| Search Contact | Search and view Salesforce contact in CINNOX. |
| Update Contact | Update and save Salesforce contact in CINNOX. |
| Automate CINNOX Enquiry to Salesforce Case | Your Contact's Enquiry will automatically be saved as a Contact's Case in Salesforce with information and chat history. |
| Automate CINNOX Call to Salesforce Task | Your Call inside the Enquiry is saved as a Task in Salesforce. The call log is posted in the Task Details. |
| SMS Campaign | Send SMS Campaign to Salesforce Contacts. |
Integrating CINNOX and Salesforce
Sandbox Environment
- You must create a sandbox org in your Salesforce.
- Log in to the created Salesforce Sandbox Org using your System Admin account
Afterwards, please proceed with the following steps:
- Log in to your CINNOX Dashboard using your staff admin account
- Navigate to Administration > Service Integration
- Click Edit.
- Select Salesforce Sandbox for the integration instance.
- Click Next
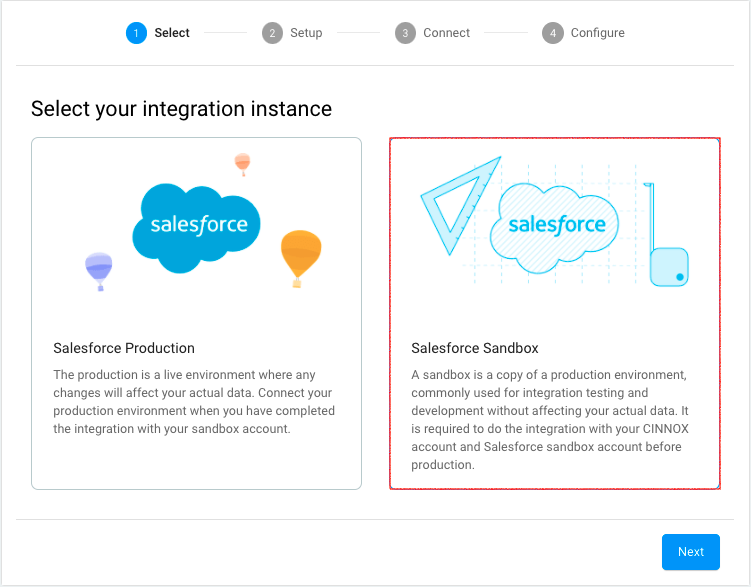
Selecting Salesforce Sandbox
Create New Remote Site
- Log in to your Salesforce Sandbox Org using your System Admin account.
- Navigate to Setup > Security > Remote Site Settings.
- Click New Remote Site.
- Copy the Remote Site Name and URL from CINNOX to Salesforce Remote Site Name and Remote Site URL.
- Click Save.
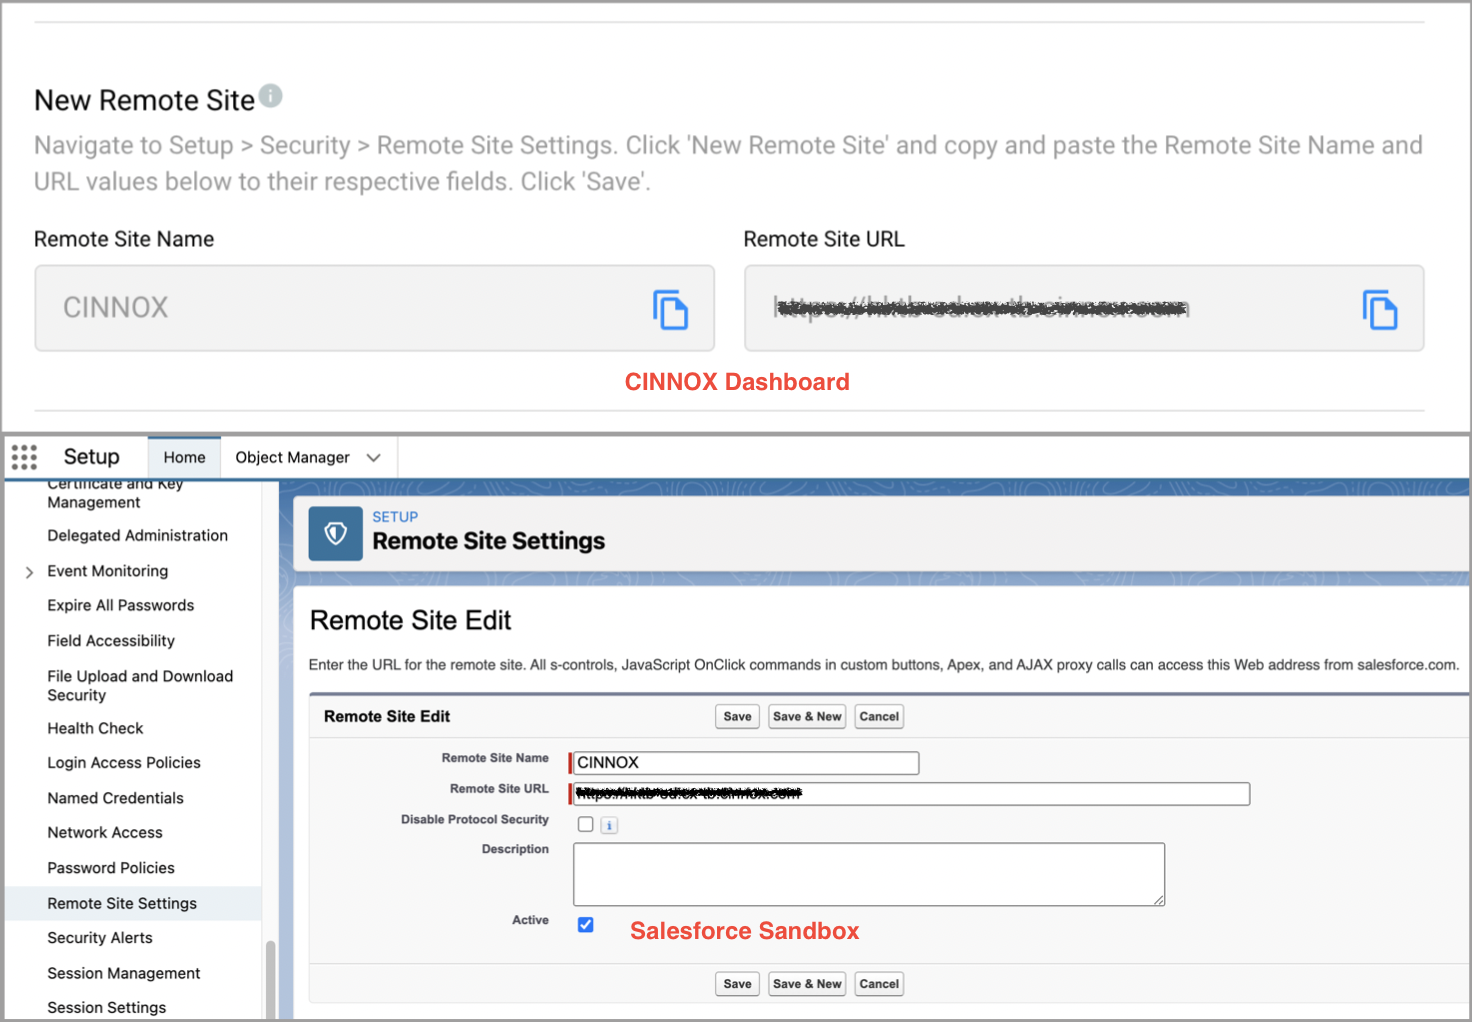
Sandbox - Create a New Remote Site
Create a New Connected App
-
Log in to your Salesforce Sandbox Org using your System Admin account.
-
Navigate to Setup > Apps > App Manager and click New Connected App.
-
Fill in all required fields in the form and tick the Enable OAuth Settings checkbox.
-
Copy the Callback URLfrom CINNOX to Salesforce Callback URL
-
Under the Selected OAuth Scopes , select and click Add for the following:
- Manage user data via APIs (API)
- Access the identity URL service (id, profile, email, address, phone).'
- Perform requests at any time (refresh_token, offline_access)
-
Click Save.
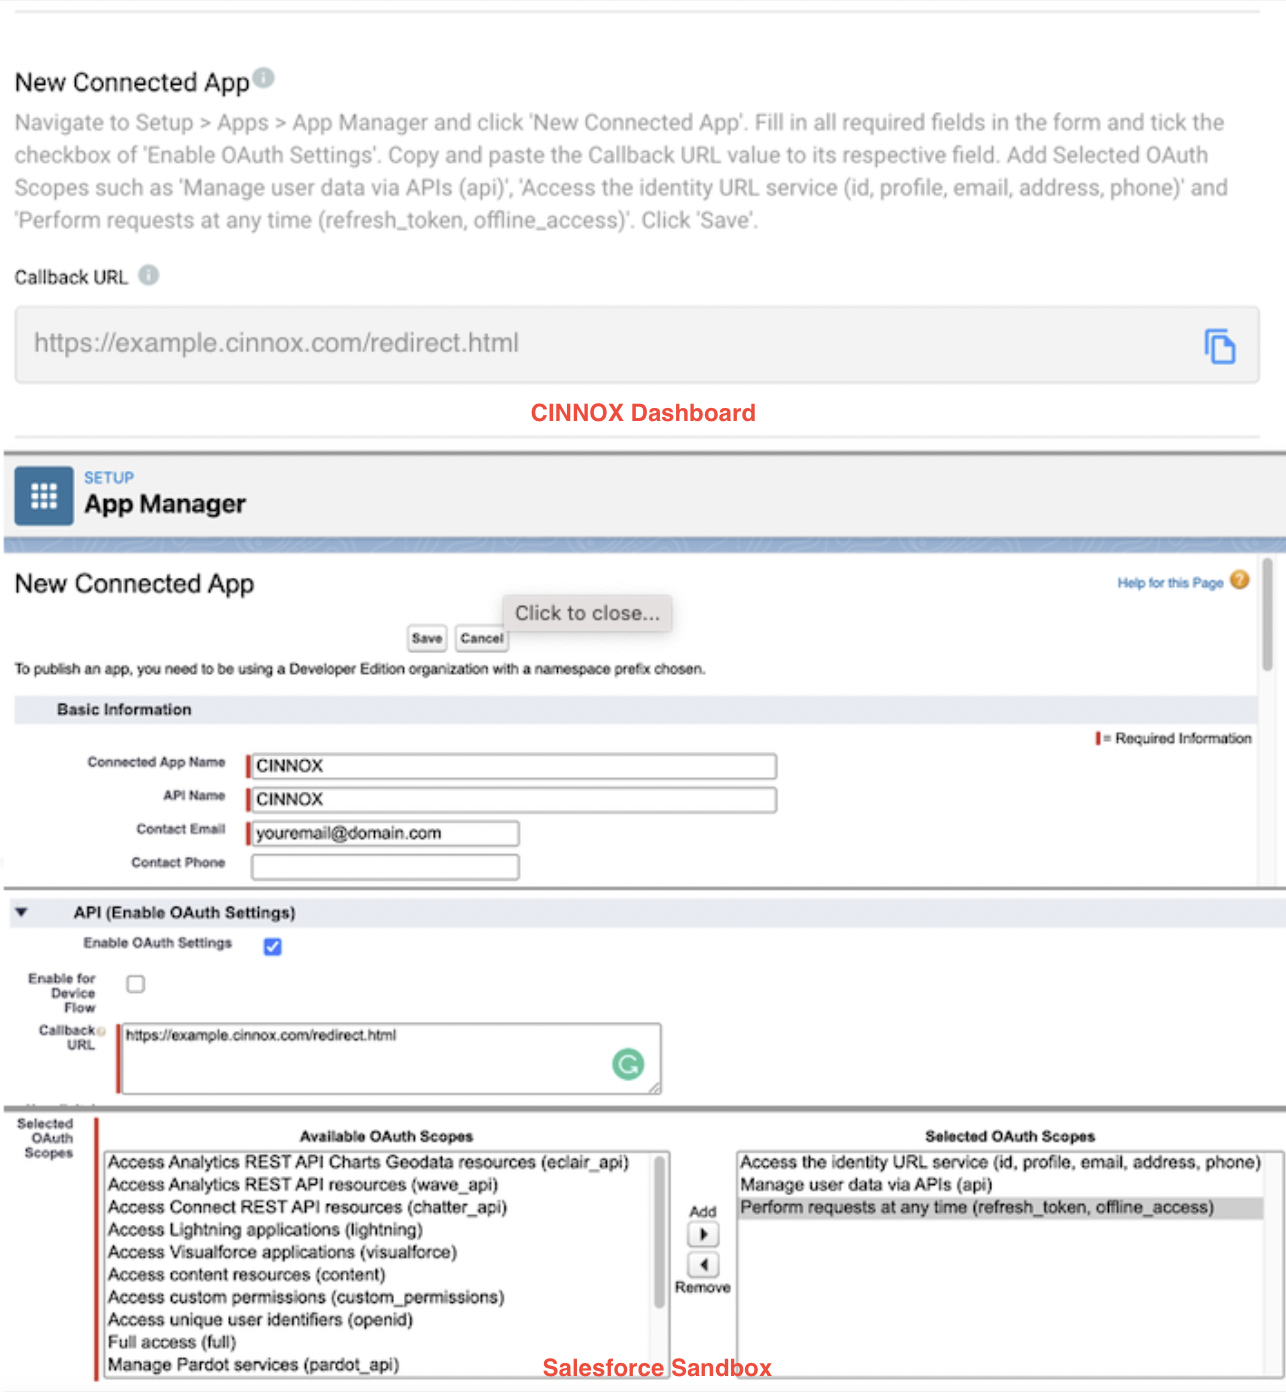
Sandbox - Create a New Connected App
A page will appear with a note Changes can take up to 10 minutes to take effect. Deleting a parent org also deletes all connected apps with OAuth settings enabled.
- Click Continue
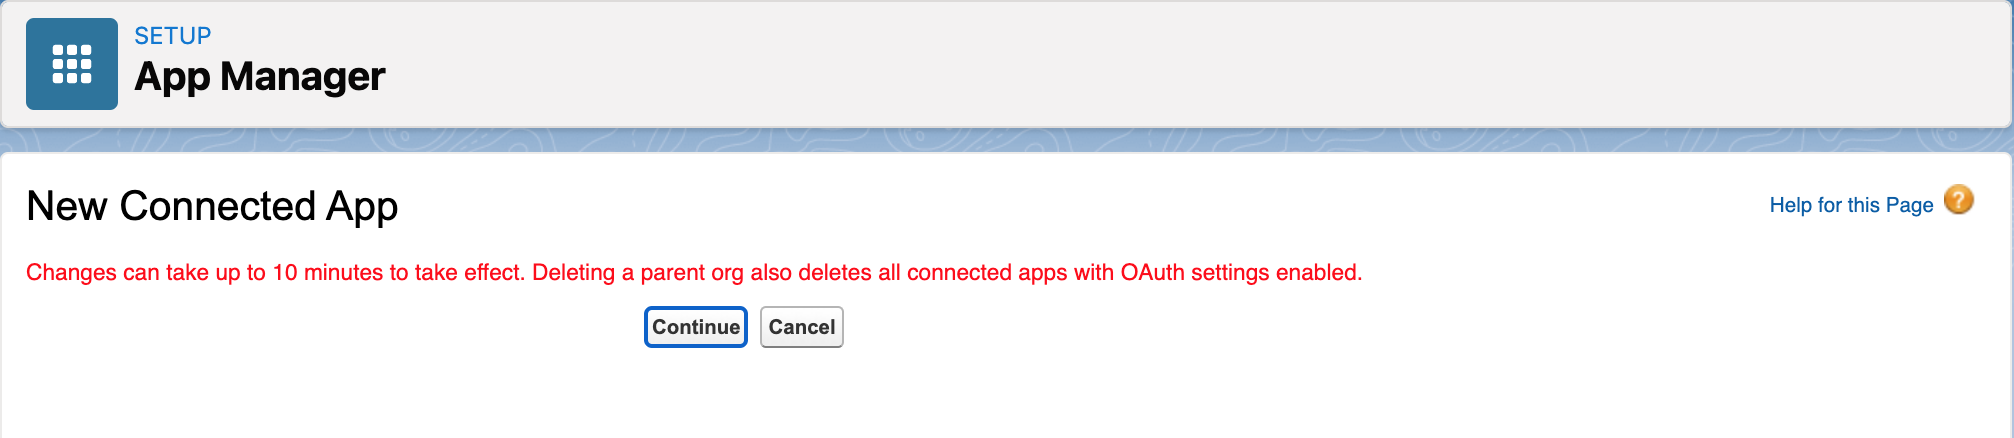
New Connected App Notice
Create New Apex Class
- Log in to your Salesforce Sandbox Org using your System Admin account.
- Navigate to Setup > Custom Code > Apex Classes and click New.
- Copy the Webhook Class code from CINNOX and paste it into the Salesforce Apex Class Editor.
- Click Save.
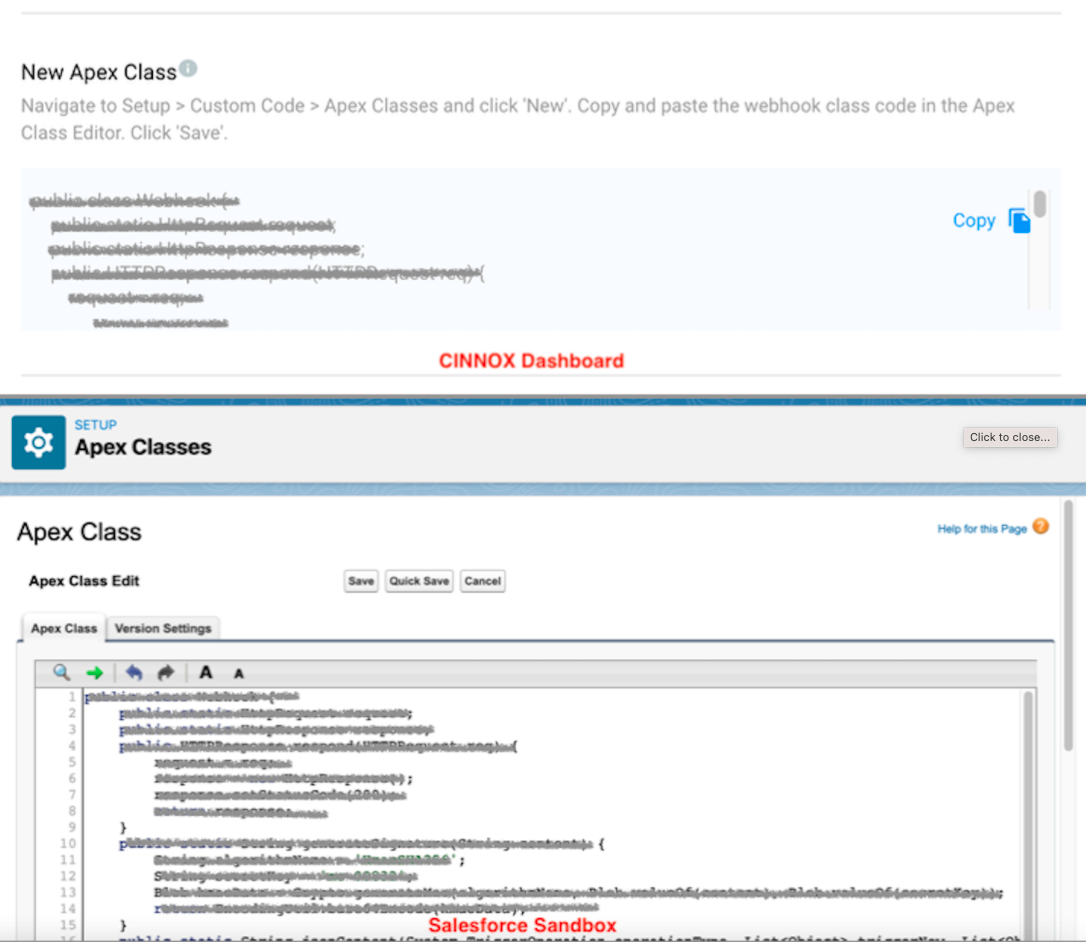
Sandbox - Create New Apex Class
Create New Apex Trigger
- Log in to your Salesforce Sandbox Org using your System Admin account.
- Navigate to Setup > Custom Code > Apex Triggers and click Developer Console.
- On the pop-up window, click File, select New, then select Apex Trigger.
- On the small window, enter a name, e.g., 'Triggercode1', select Contact for the sObject field and click Submit.
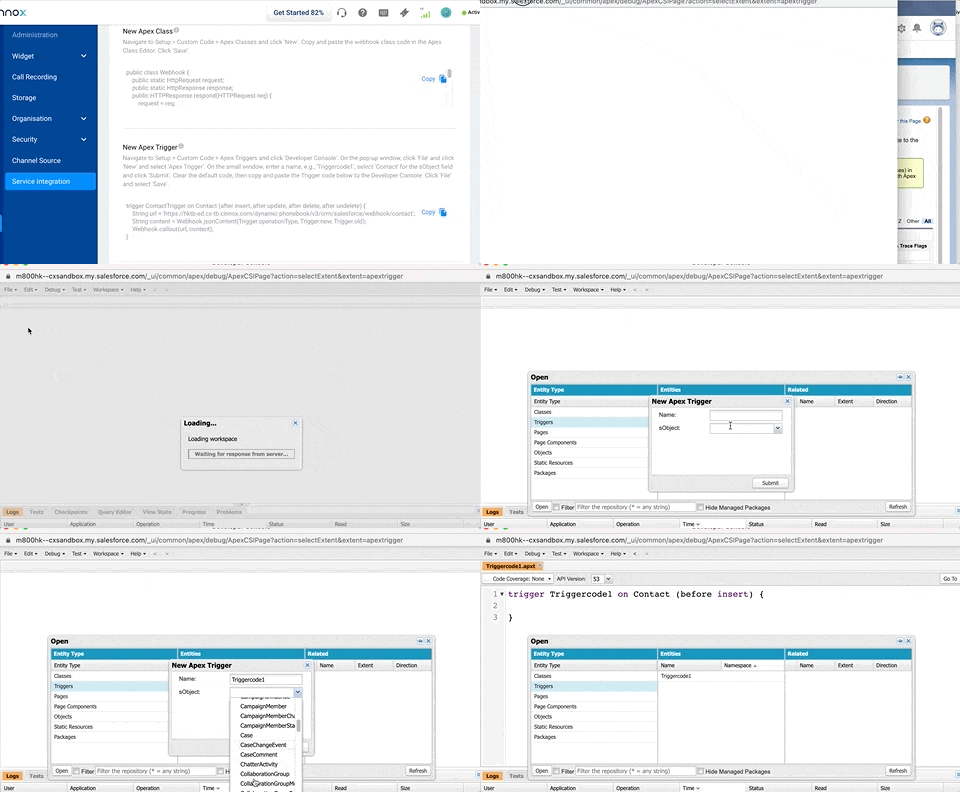
Sandbox - Create New Apex Trigger Part 1
- Copy the Trigger code from CINNOX
- Clear the default code in the Trigger Code Editor
- Paste the code
- Click File and select Save.
- Close the Code Editor
- Returning to the Apex Triggers and refreshing the page, the newly created Trigger will appear.
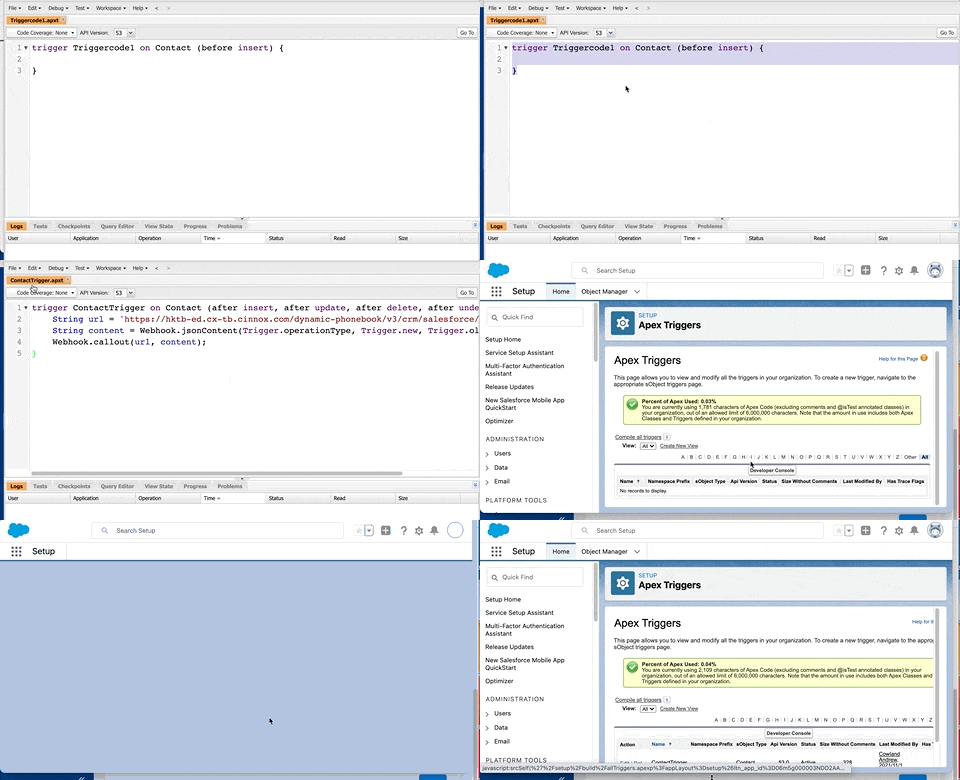
Sandbox - Create New Apex Trigger Part 2
- Back in the CINNOX Dashboard, click Next
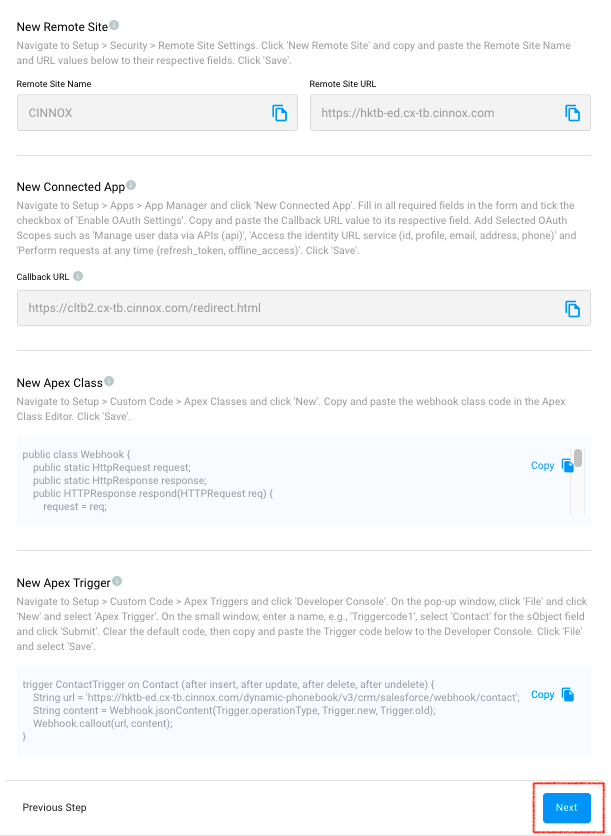
CINNOX Dashboard > Sandbox - Setup
Consumer Key and Consumer Secret
- Navigate to the Setup page > Apps > App Manager.
- Find the Connected App recently created for CINNOX.
- Click the arrow down icon and select View.
- You may be asked for the verification code to access the Consumer Details in another tab.
- To get the Consumer Key, click 'Copy'.
- Paste it on the respective field in CINNOX.
- To get the Consumer Secret, click 'Click to reveal' or click 'Copy'.
- Paste it on the respective field in CINNOX.
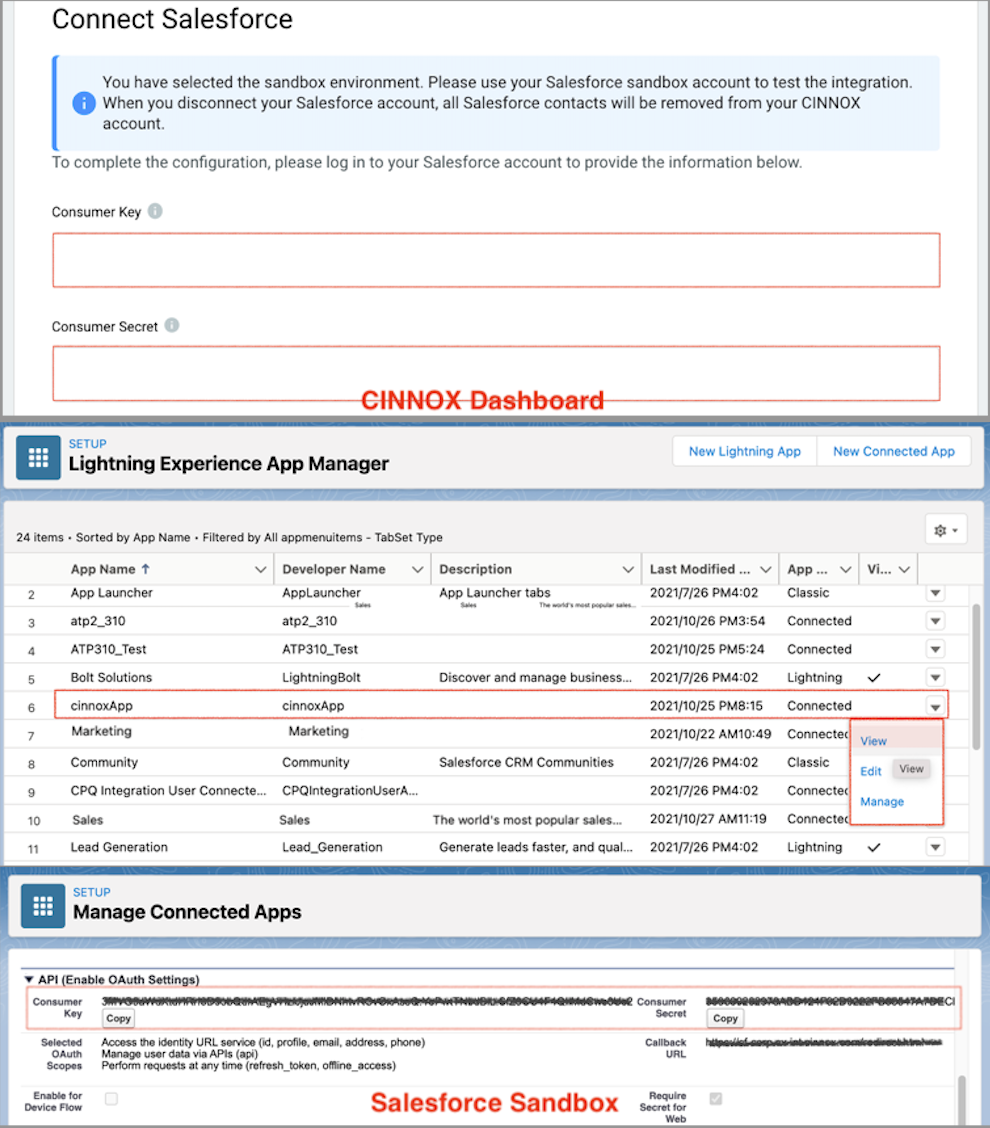
Sandbox - Consumer Key and Secret
Location
To find the Sandbox Location:
- Log in to your Salesforce Production org using your System Admin account
- Navigate to Setup> Environments > Sandboxes and locate the Sandbox account you use
- Copy the Location value
- Paste it on the respective field on the CINNOX side
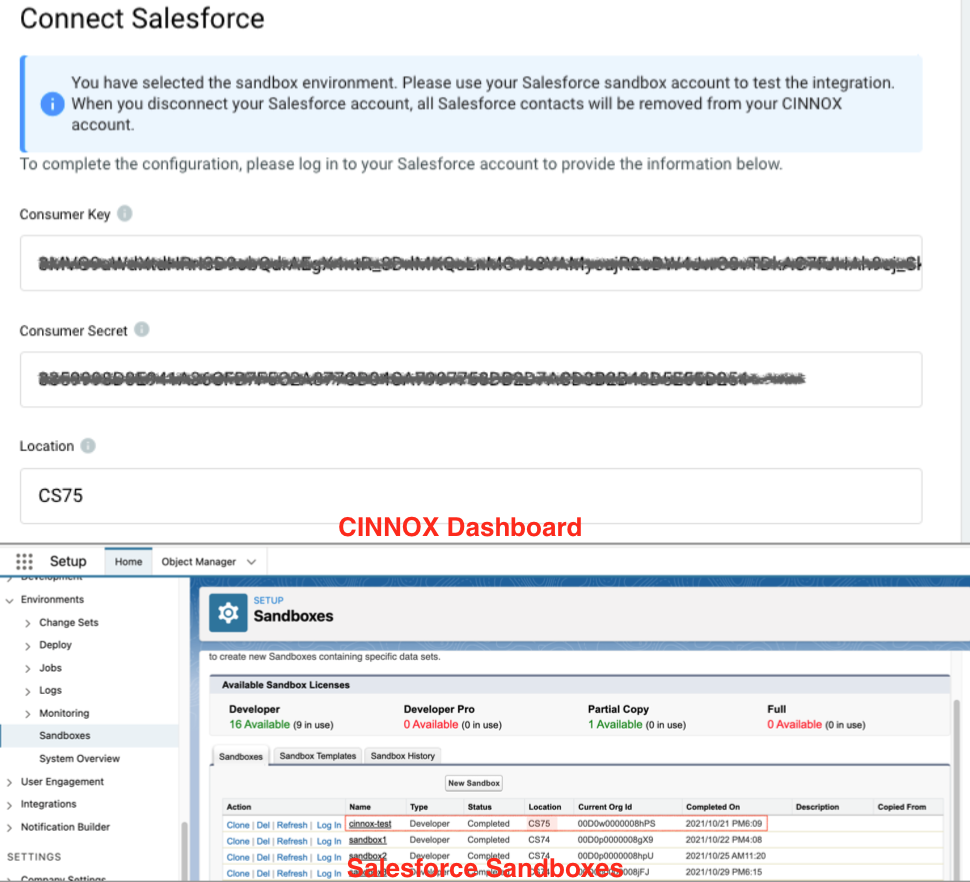
Sandbox Location in the Production Org
Domain Name
To find the Domain Name:
- On your Salesforce Sandbox Org page, navigate to the URL.
- Copy the domain name, e.g., https://abc.lightning.force.com.
- Paste it on the respective field in CINNOX.
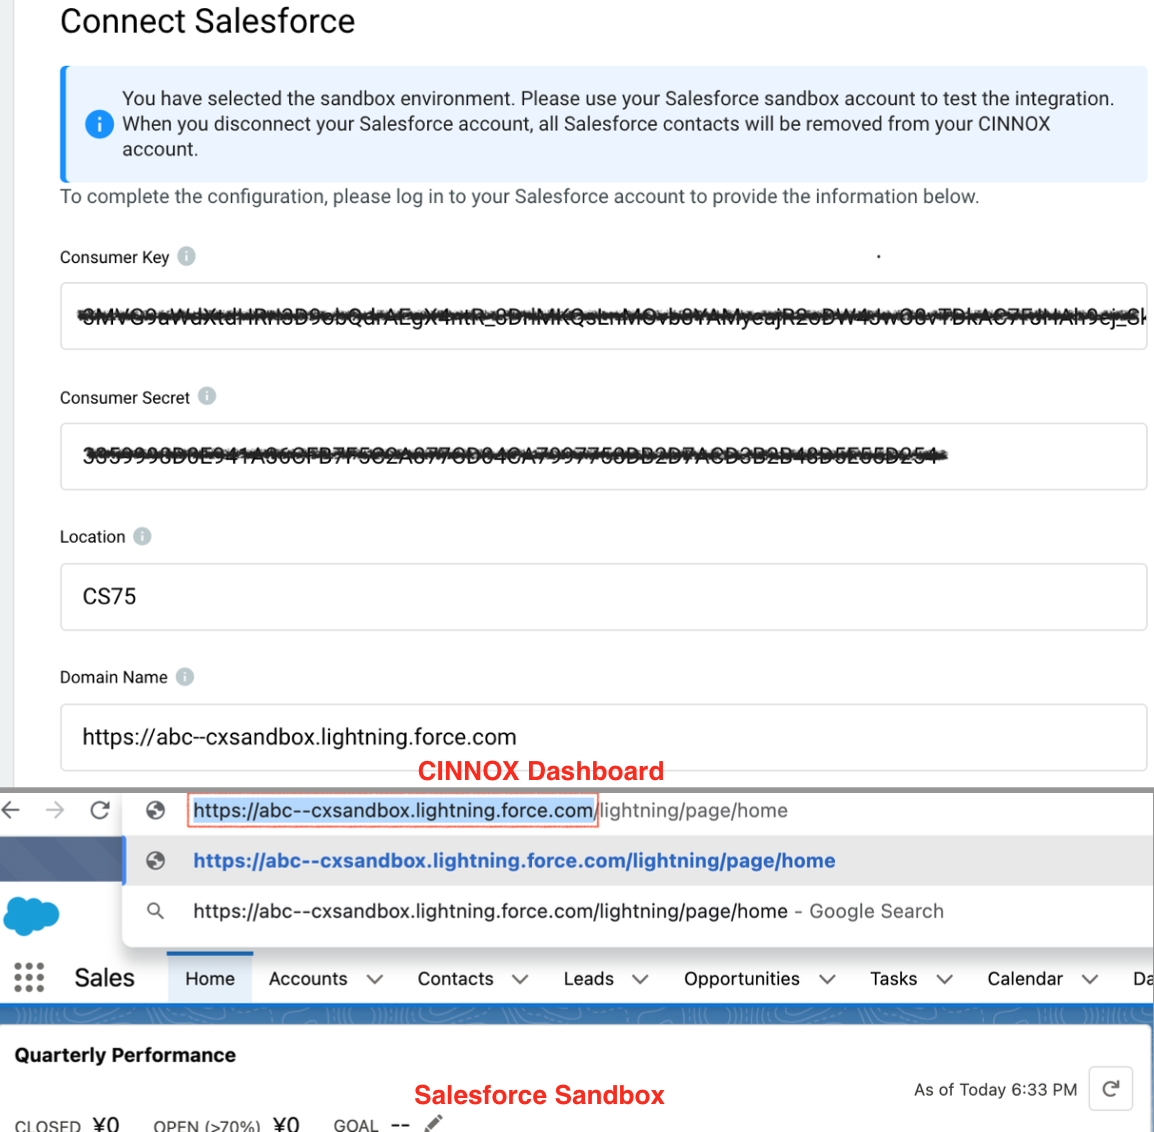
Sandbox Org Domain
- Click Validate.
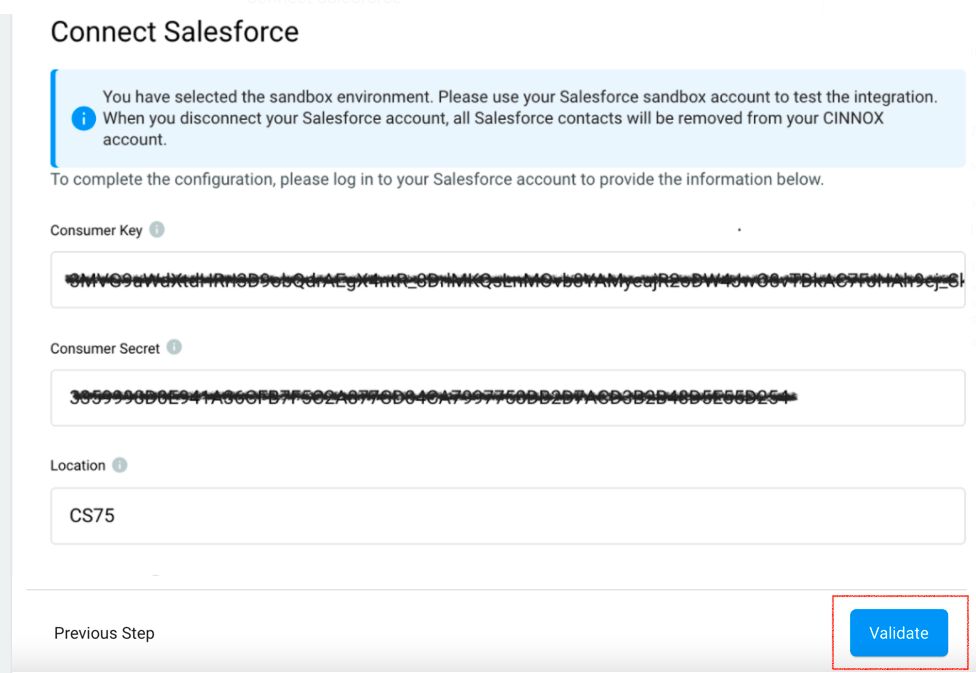
Validate Sandbox Details
A pop-up window will appear, asking you to log in to your Salesforce System Admin account to authorise CINNOX.
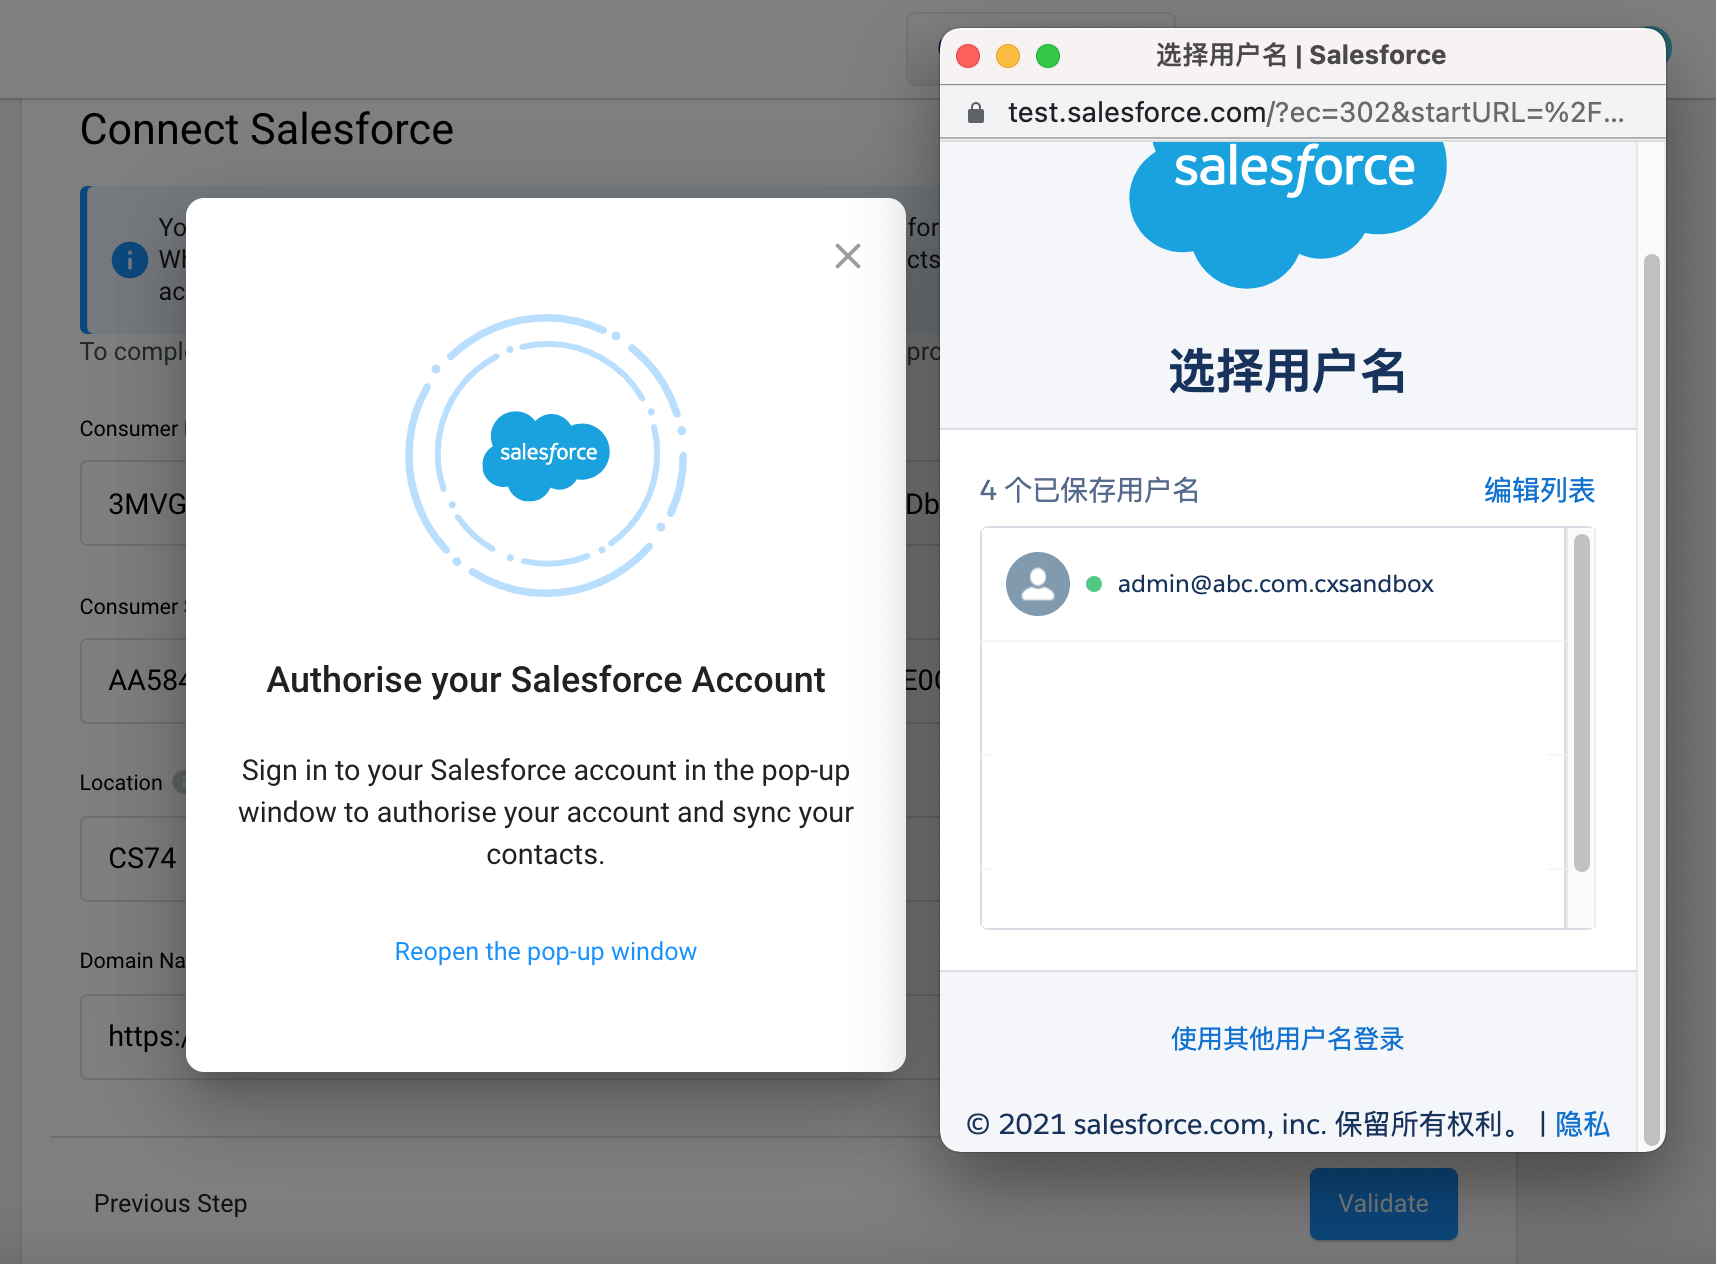
Validate the Sandbox Integration
Note: If your Salesforce account is logged into a device and browser for the first time, Salesforce will require the verification code sent to your email.
And provide permissions to CINNOX to access the following:
- Access the identity URL service
- Manager user data via APIs
- Perform requests at any time
- Click Allow
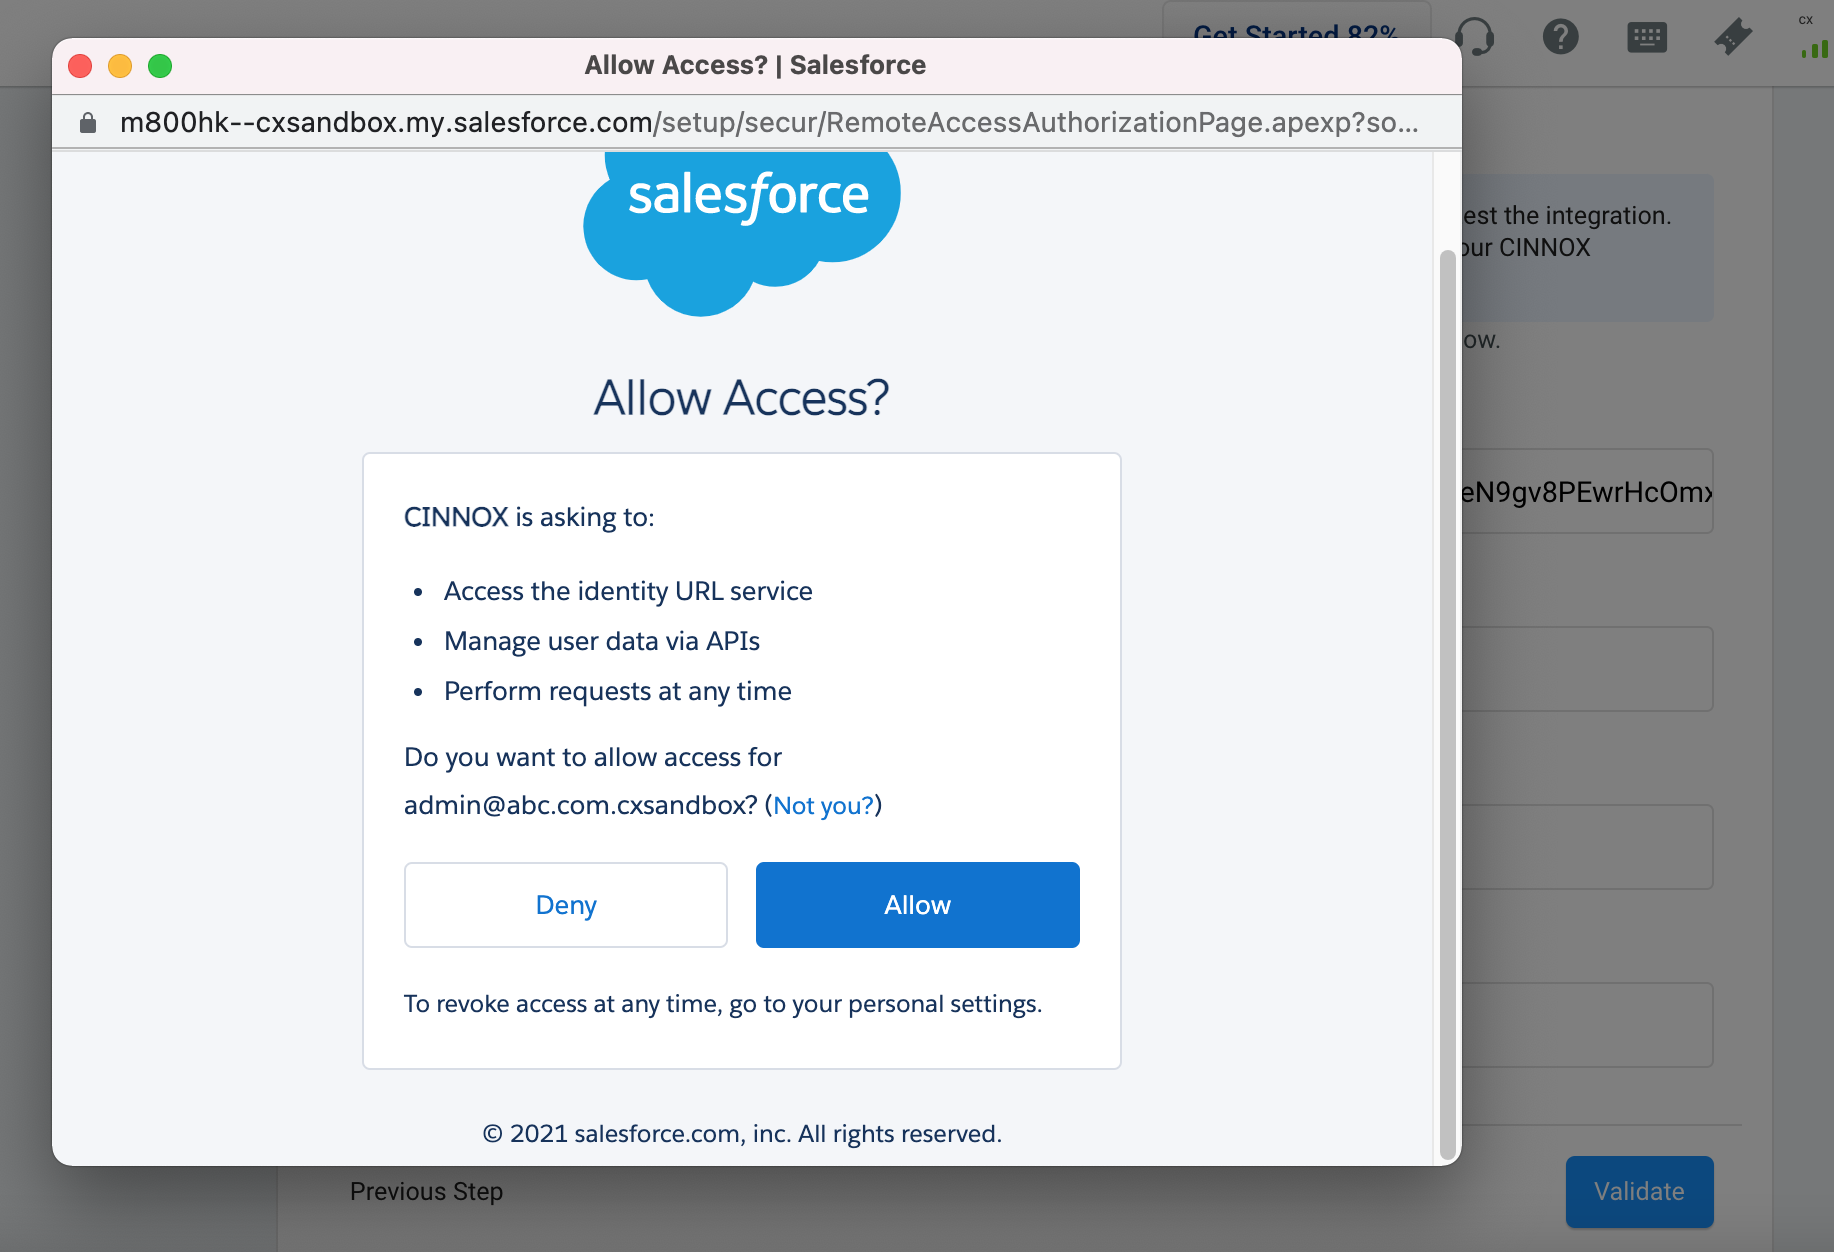
Allow Permissions to CINNOX
The page below will appear when you have completed the steps and successfully connected your Sandbox Org to your CINNOX service.
Your Salesforce contacts will sync and appear in your CINNOX Contacts by default.
You can toggle ON the Auto-sync External Contacts to Salesforce to sync and display your CINNOX external contacts in Salesforce.
- Click Next to confirm the auto-sync settings.
- Click Done to exit on the current page.
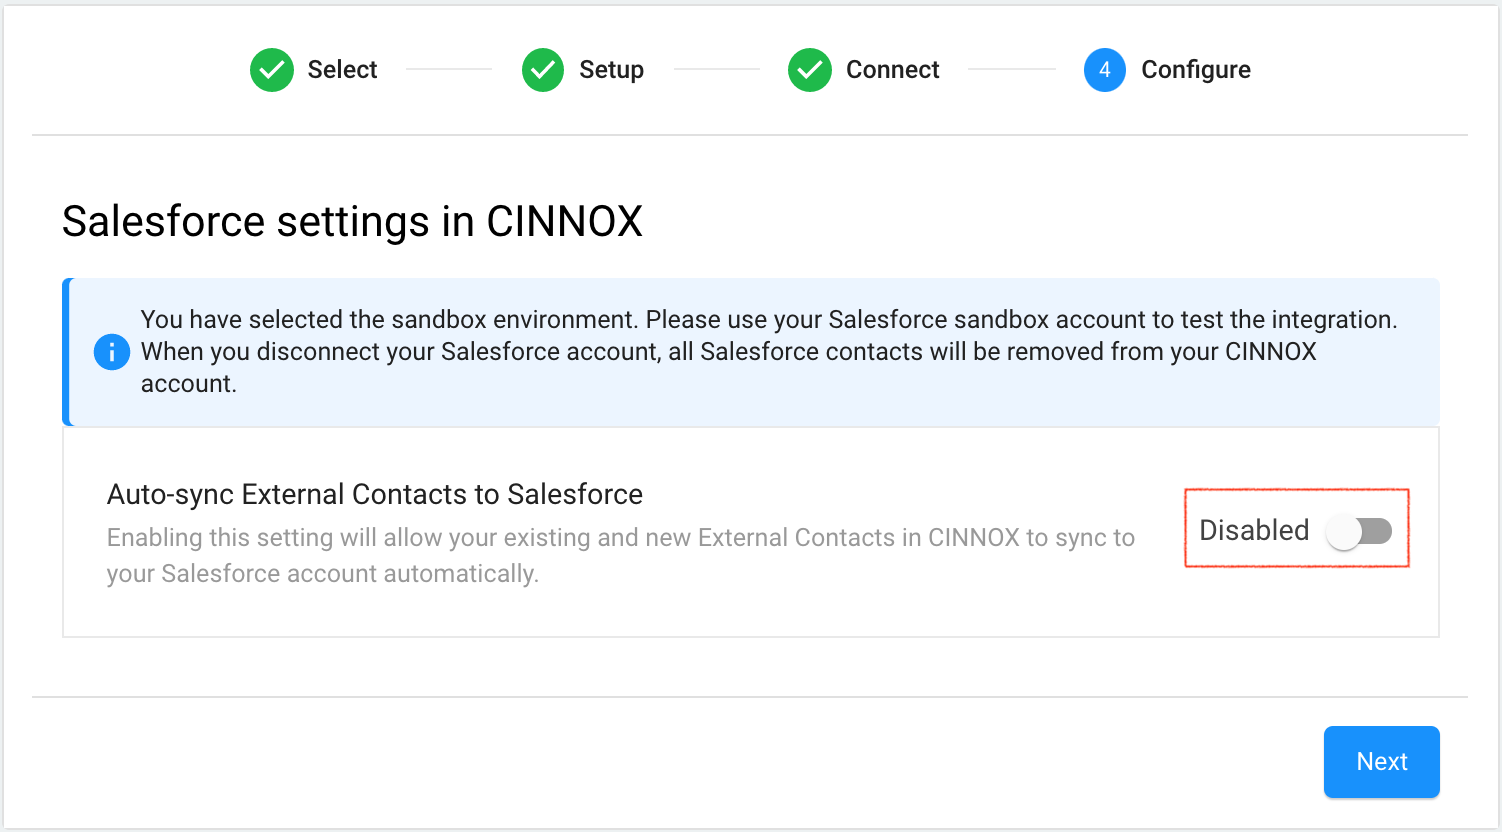
Auto-sync External Contacts to Salesforce Settings
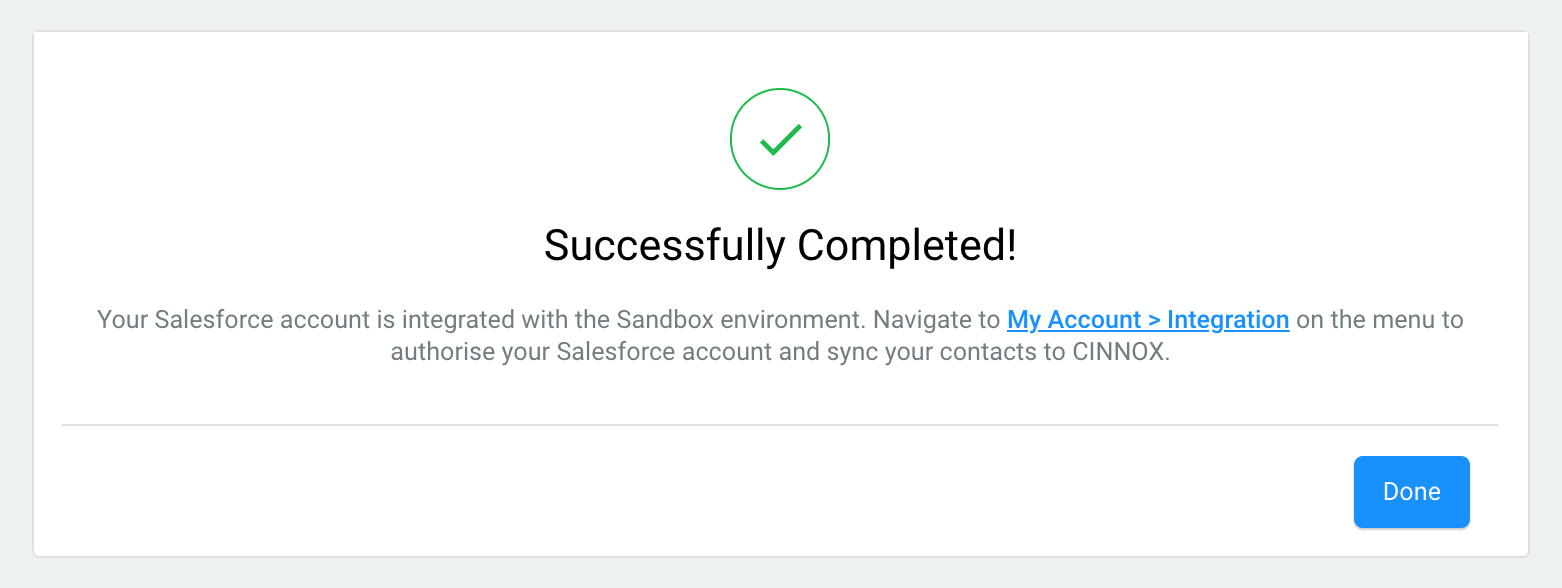
Sandbox Integration to CINNOX Successfully Completed
Salesforce and CINNOX Contact Fields Mapping
The table below shows how we map each field between Salesforce and CINNOX, which allows the automatic syncing of records between these two applications.
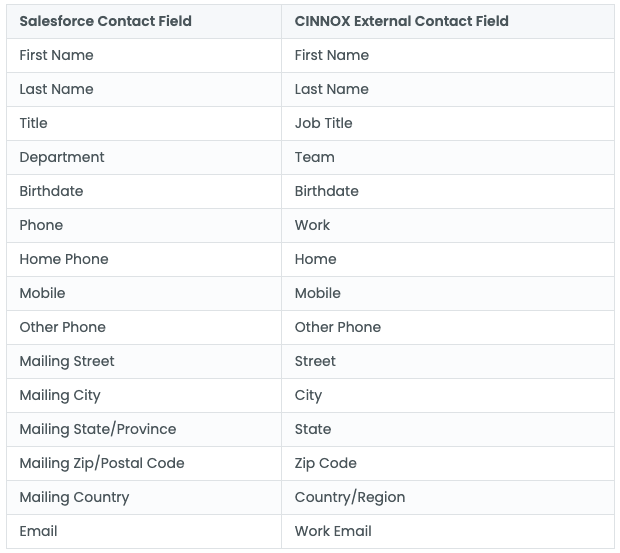
Salesforce and CINNOX Contact Fields Mapping
Or you can click the My Account > Integration to be redirected to your Integration page under your My Account to log in to your Salesforce account and sync your contacts.
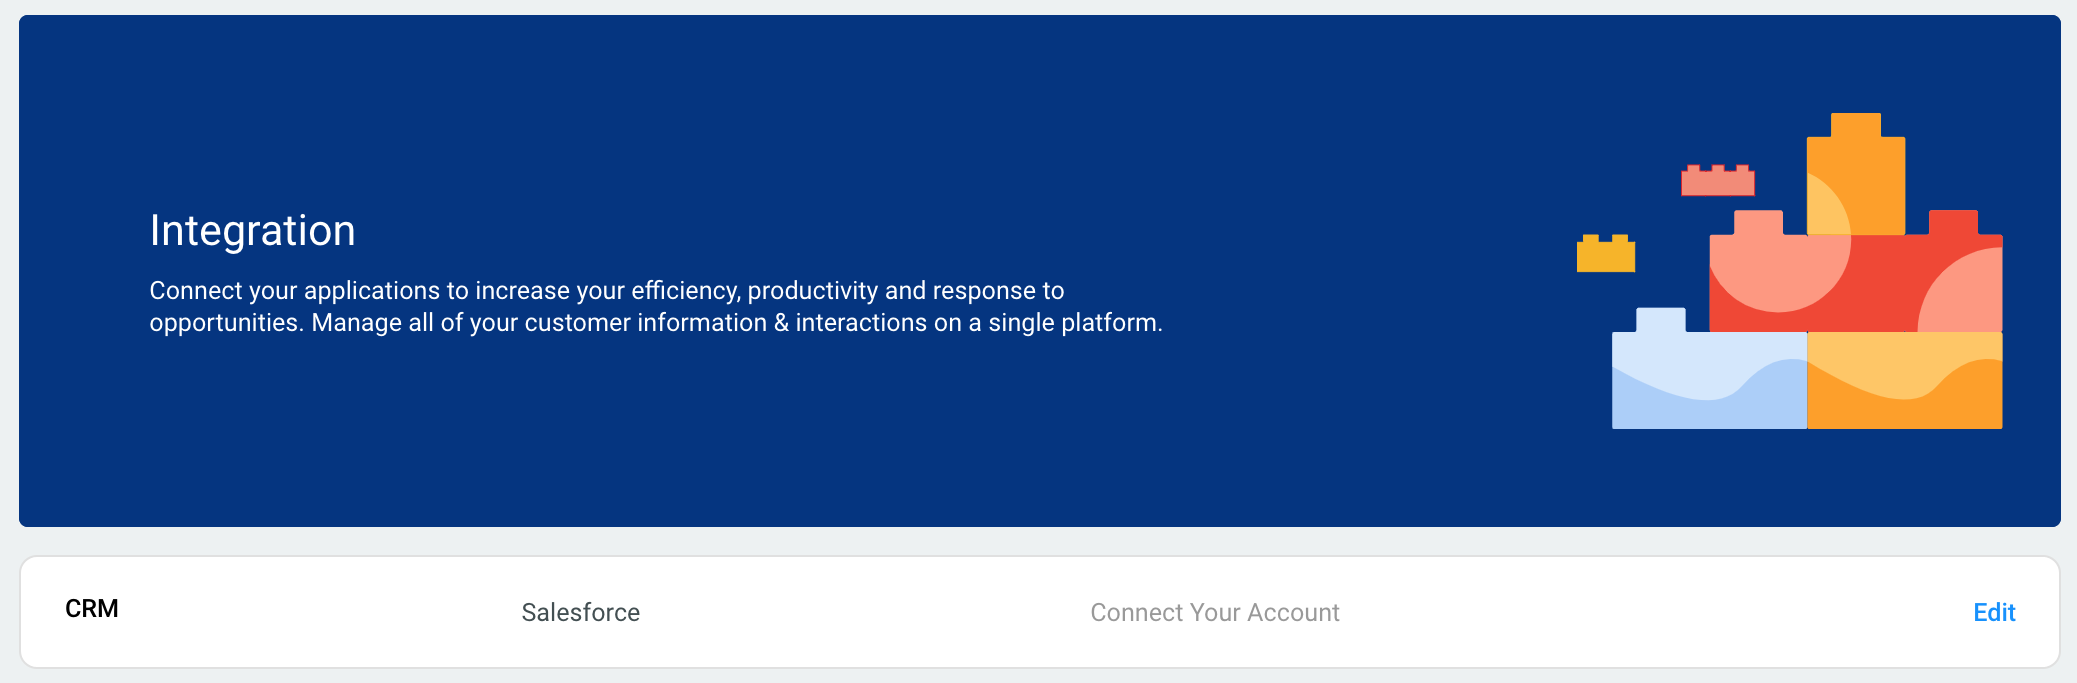
Salesforce Login in CINNOX
Refer to the Salesforce Contacts and Cases in CINNOX section of this Guide for details on logging in to your Salesforce and the features available in more information.
🚧
When you disconnect the sandbox integration, the changes made to Salesforce Contacts and external contacts will be no longer available in your CINNOX service.
The sandbox is used to test the integration and create Apex Classes and Trigger to deploy in the Production.
Disconnecting Sandbox and CINNOX
To disconnect the integration of Salesforce Sandbox and CINNOX.
- Log in to the CINNOX Dashboard using the staff admin account
- Navigate to Administration > Service Integration
- Click Disconnect
- A pop-up window will display to confirm the disconnection.
- Click Disconnect
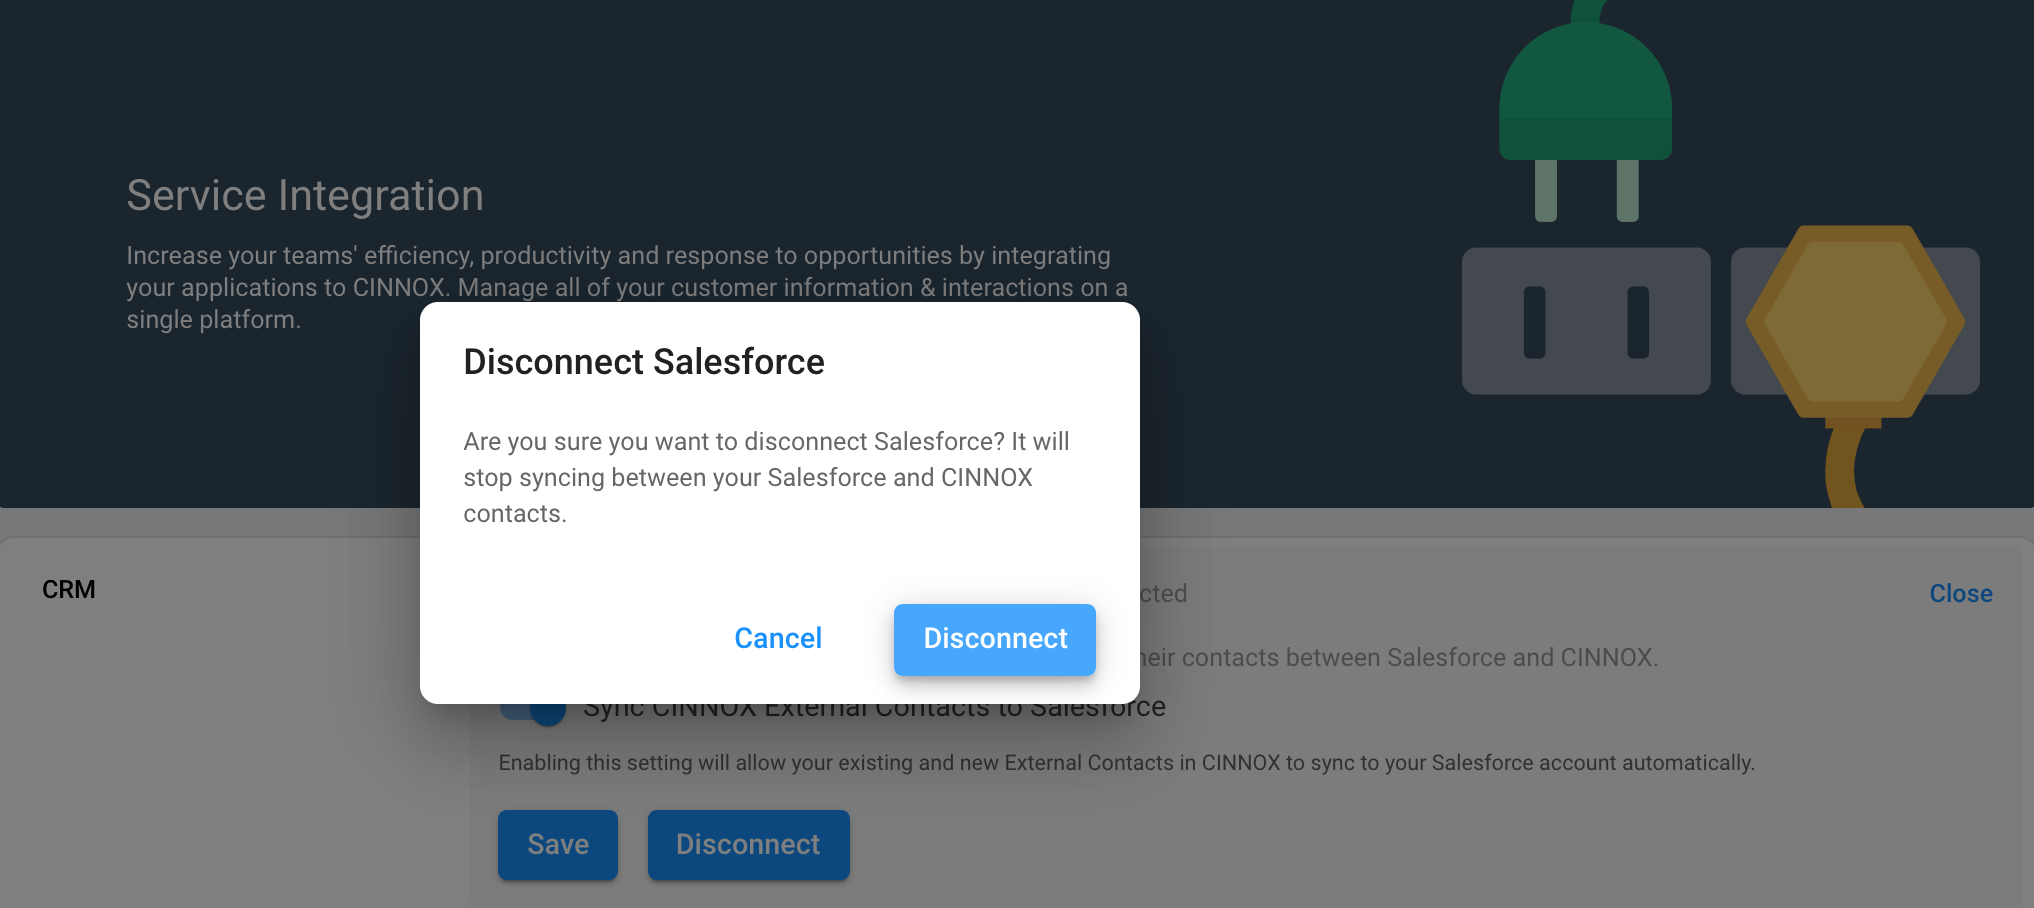
Disconnect Sandbox and CINNOX
Production Instance
- Log in to the created Salesforce Production Org using your System Admin account
Afterwards, please proceed with the following steps:
- Log in to your CINNOX Dashboard using your staff admin account
- Navigate to Administration > Service Integration
- Disconnect the Sandbox Integration
- Click Edit.
- Select Salesforce Production for the integration instance.
- Click Next
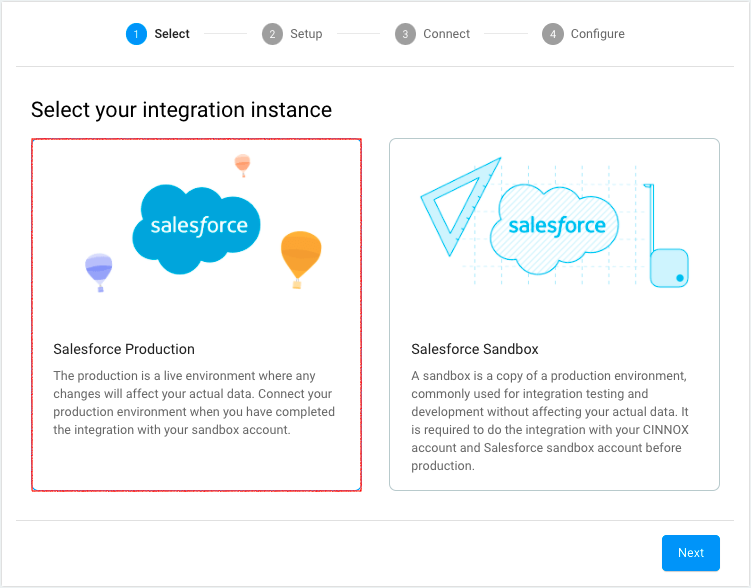
Selecting Salesforce Production
📘
The creation of New Remote Site and New Connected App steps are similar to the steps of Sandbox integration. The only difference is the environment.
Create New Remote Site
- Log in to your Salesforce Production Org using your System Admin account.
- Navigate to Setup > Security > Remote Site Settings.
- Click New Remote Site.
- Copy the Remote Site Name and URL from CINNOX to Salesforce Remote Site Name and Remote Site URL.
- Click Save.
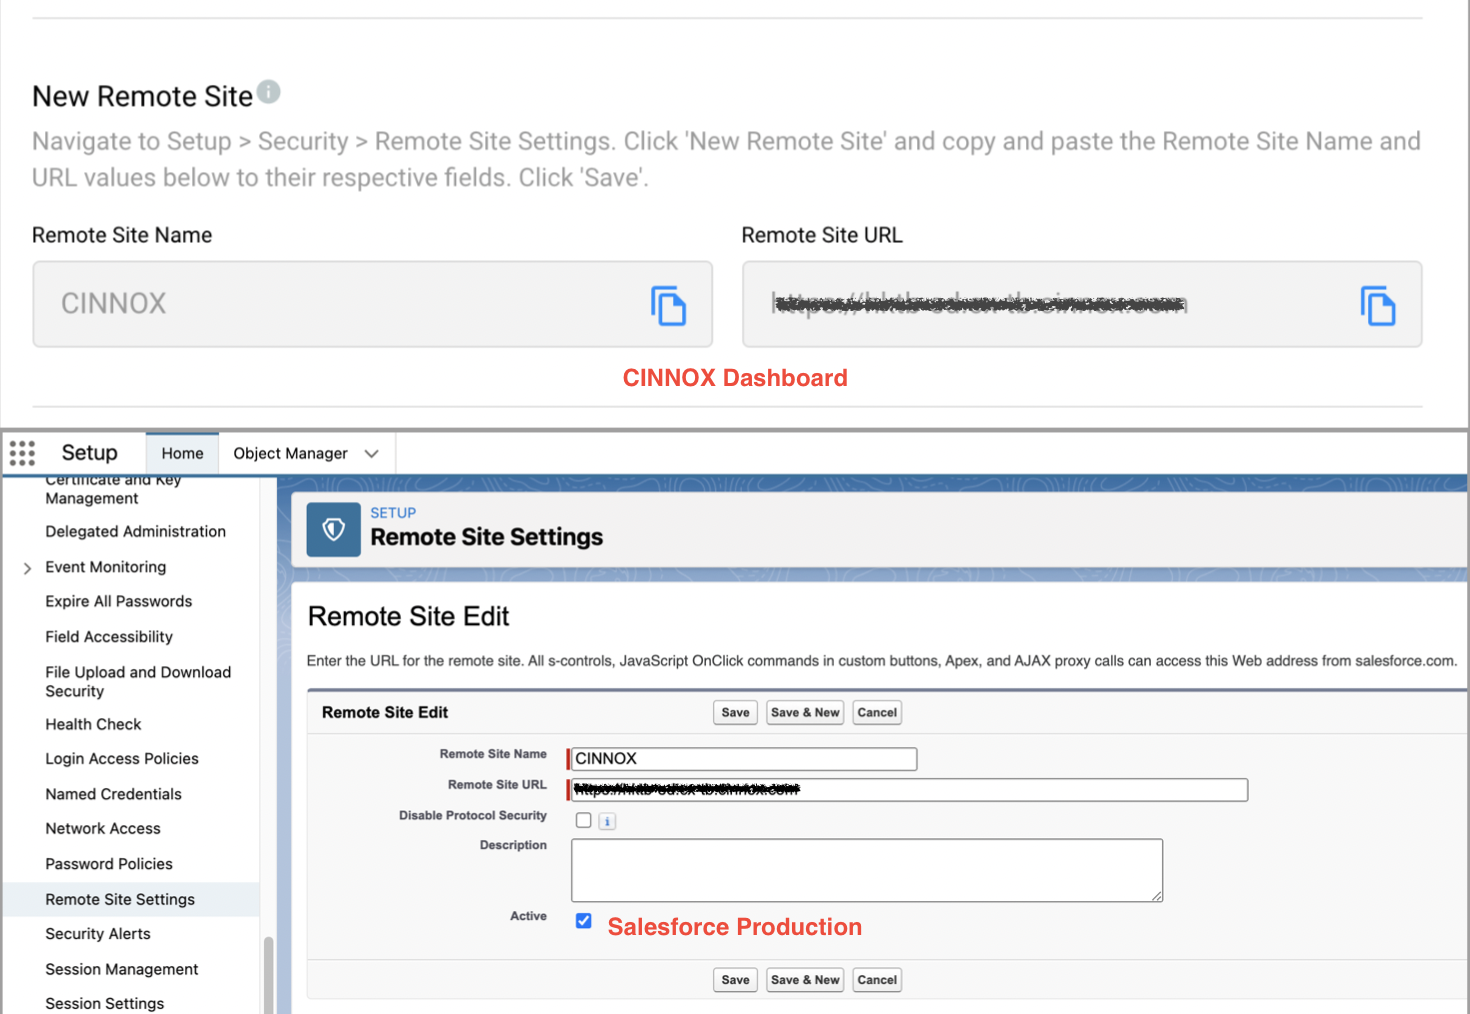
Production - Create a New Remote Site
Create a New Connected App
-
Log in to your Salesforce Production Org using your System Admin account.
-
Navigate to Setup > Apps > App Manager and click New Connected App.
-
Fill in all required fields in the form and tick the Enable OAuth Settings checkbox.
-
Copy the Callback URL from CINNOX to Salesforce Callback URL
-
Under the Selected OAuth Scopes , select and click Add for the following:
- Manage user data via APIs (api)
- Access the identity URL service (id, profile, email, address, phone)
- Perform requests at any time (refresh_token, offline_access)
-
Click Save.
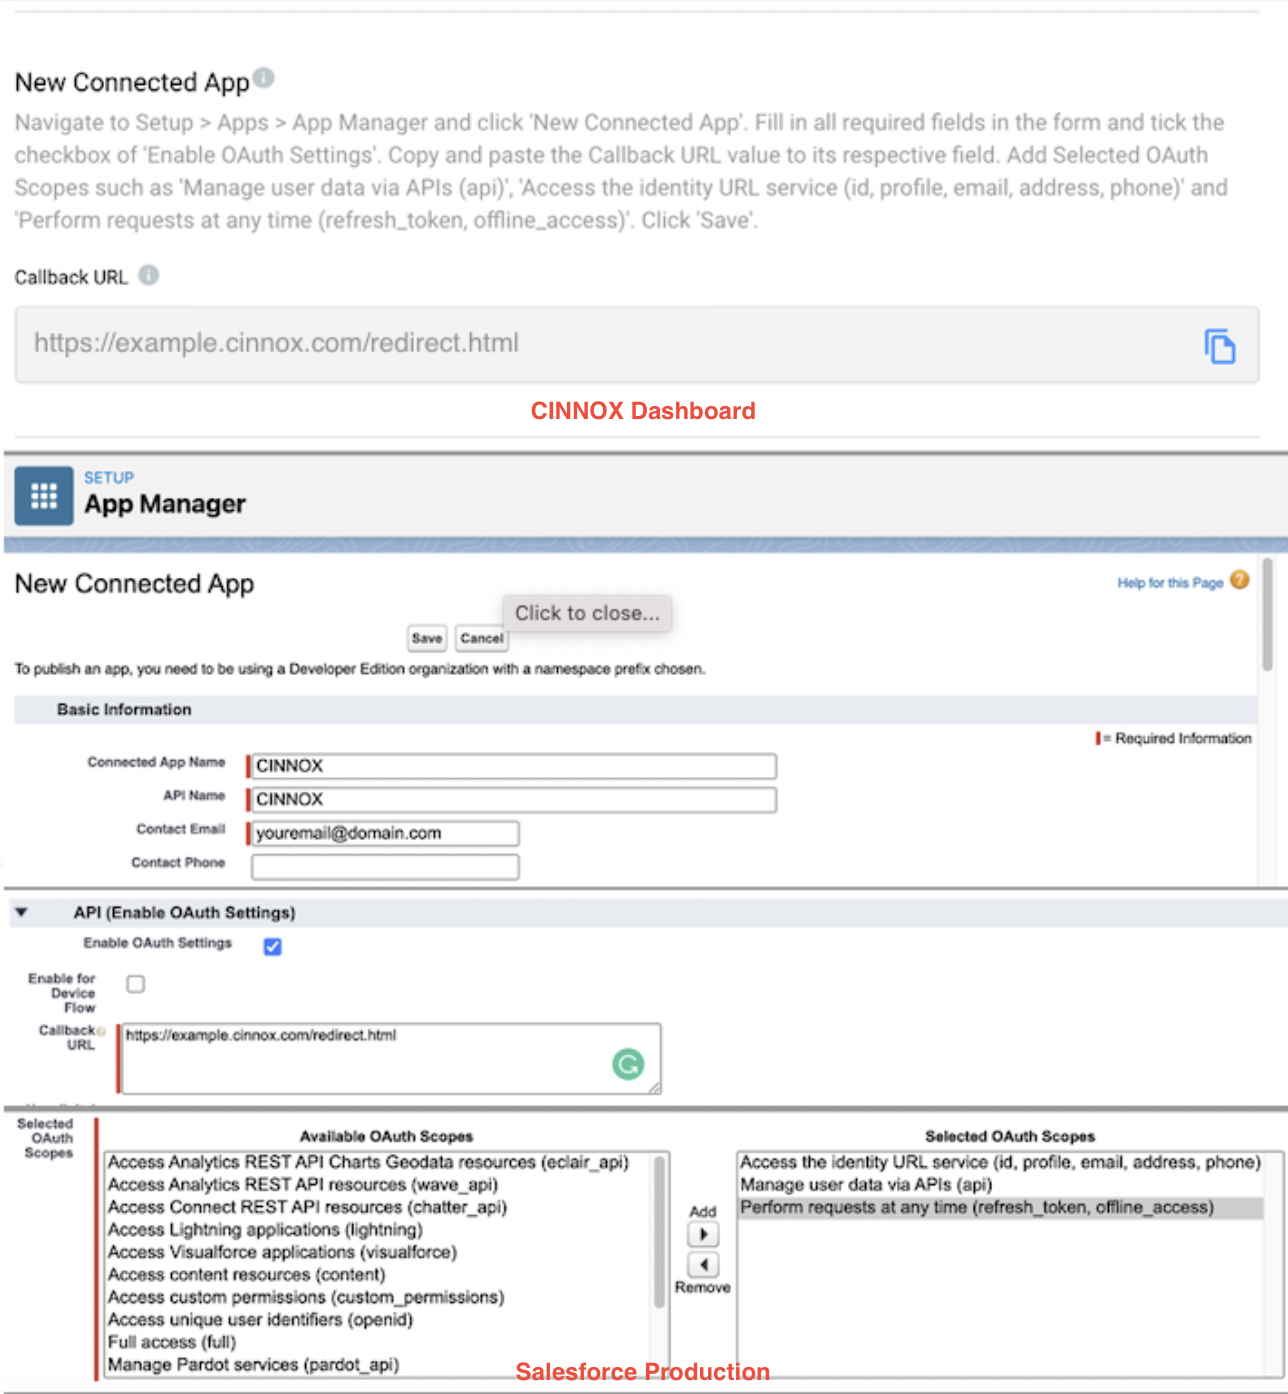
Production - Create a New Connected App
- A page will appear with a note Changes can take up to 10 minutes to take effect. Deleting a parent org also deletes all connected apps with OAuth settings enabled.
- Click Continue
Deploying Sandbox Apex Class and Triggers to Production
You must create test classes with a pass rate greater than 75% code coverage to deploy classes in Production.
For more details, please refer to Salesforce - Instructions to test Apex code.
I. Creating Test Classes
Here are the sample test classes you can add to your Sandbox Org.
- Log in to your Salesforce Sandbox environment using your System Admin account.
- Navigate to Setup page > Custom Code > Apex Classes
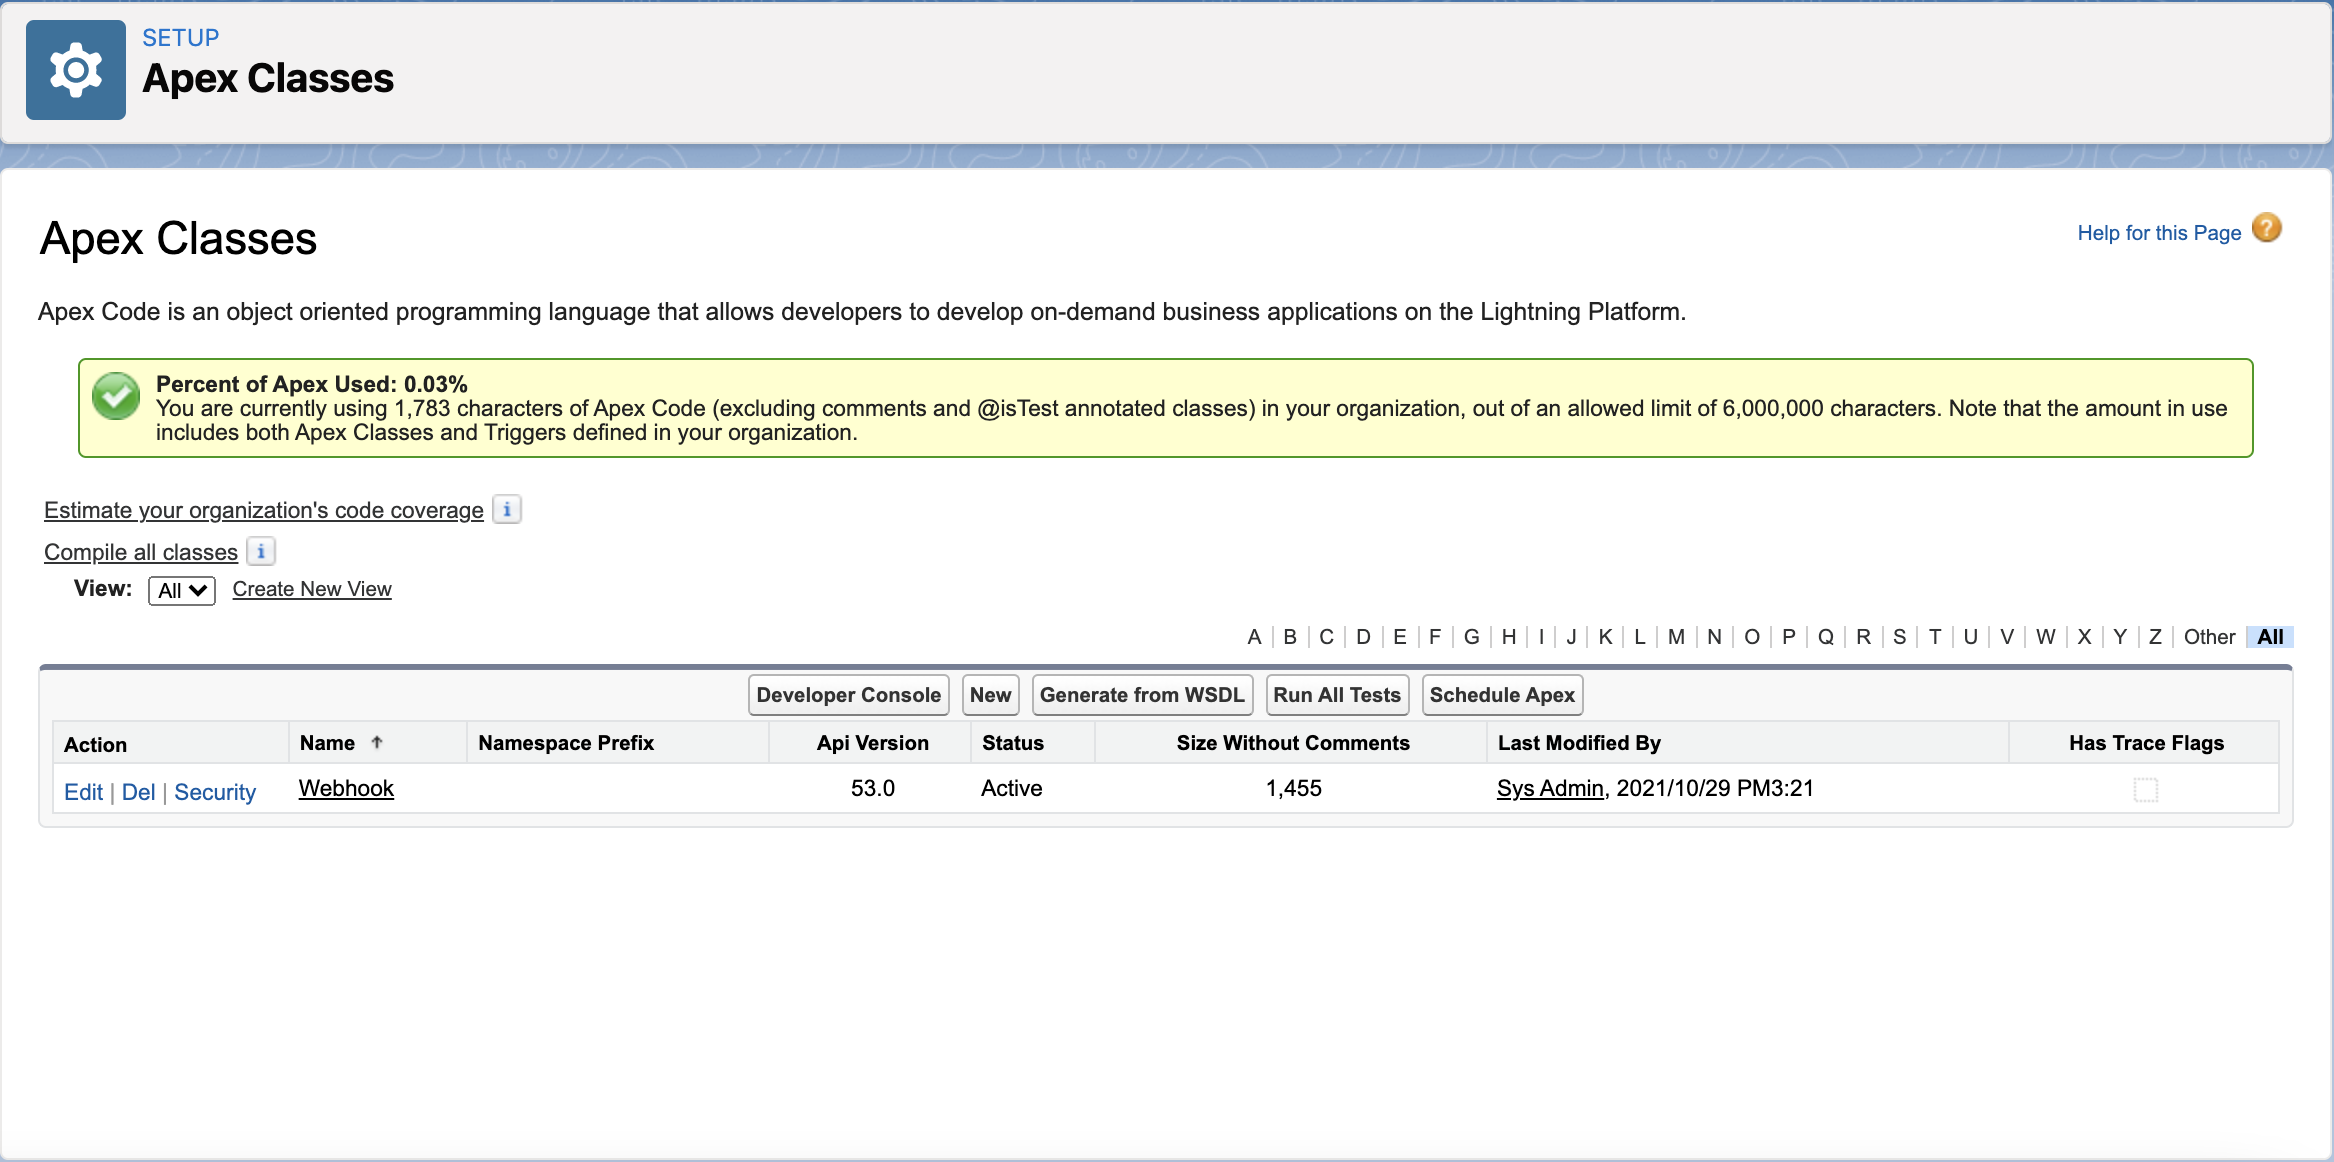
Created Apex Class (Webhook) in Sandbox
- Click New to create a new apex
- Copy and paste the code below
- Click Save
- A new Apex Class is created
WebhookMockImpl
global class WebhookMockImpl implements HttpCalloutMock {
    public static HttpResponse response;
    global HTTPResponse respond(HTTPRequest req) {
        response = new HttpResponse();
        response.setStatusCode(200);
        return response;
    }
    global static void callout(String url, String content) {

    }
}- Go back to Apex Classes' main page
- Click New to create a new apex
- Copy and paste the code below
- Click Save
- A new Apex Class is created
TestContactTrigger
@isTest
public class TestContactTrigger {
    @isTest static void TestTrigger() {
        // Test data setup
        // Create an account with an opportunity, and then try to delete it
        Account acct = new Account(Name='Test Account2');
        insert acct;
        Contact newContact = new Contact(LastName='TestContact3', AccountId=acct.id);
        //insert newContact;


        // Perform test
        Test.startTest();
        Test.setMock(HttpCalloutMock.class, new WebhookMockImpl());
        Database.SaveResult result = Database.insert(newContact, false);
        Test.stopTest();
        // Verify
    System.debug(result.getErrors());
        System.assert(result.isSuccess());
    }
}- Go back to Apex Classes' main page
- Click New to create a new apex
- Copy and paste the code below
- Click Save
- A new Apex Class is created
TestWebhook
@isTest
public class TestWebhook {
    @isTest static void TestJsonContent() {
        System.TriggerOperation op = TriggerOperation.AFTER_INSERT;
        List<Account> contacts = new List<Account>();

        String result = Webhook.jsonContent(op, contacts, contacts);
        System.assert(result.length()>0);
    }
}
📘
A total of four (4) Apex Classes should be created in your Sandbox Org.
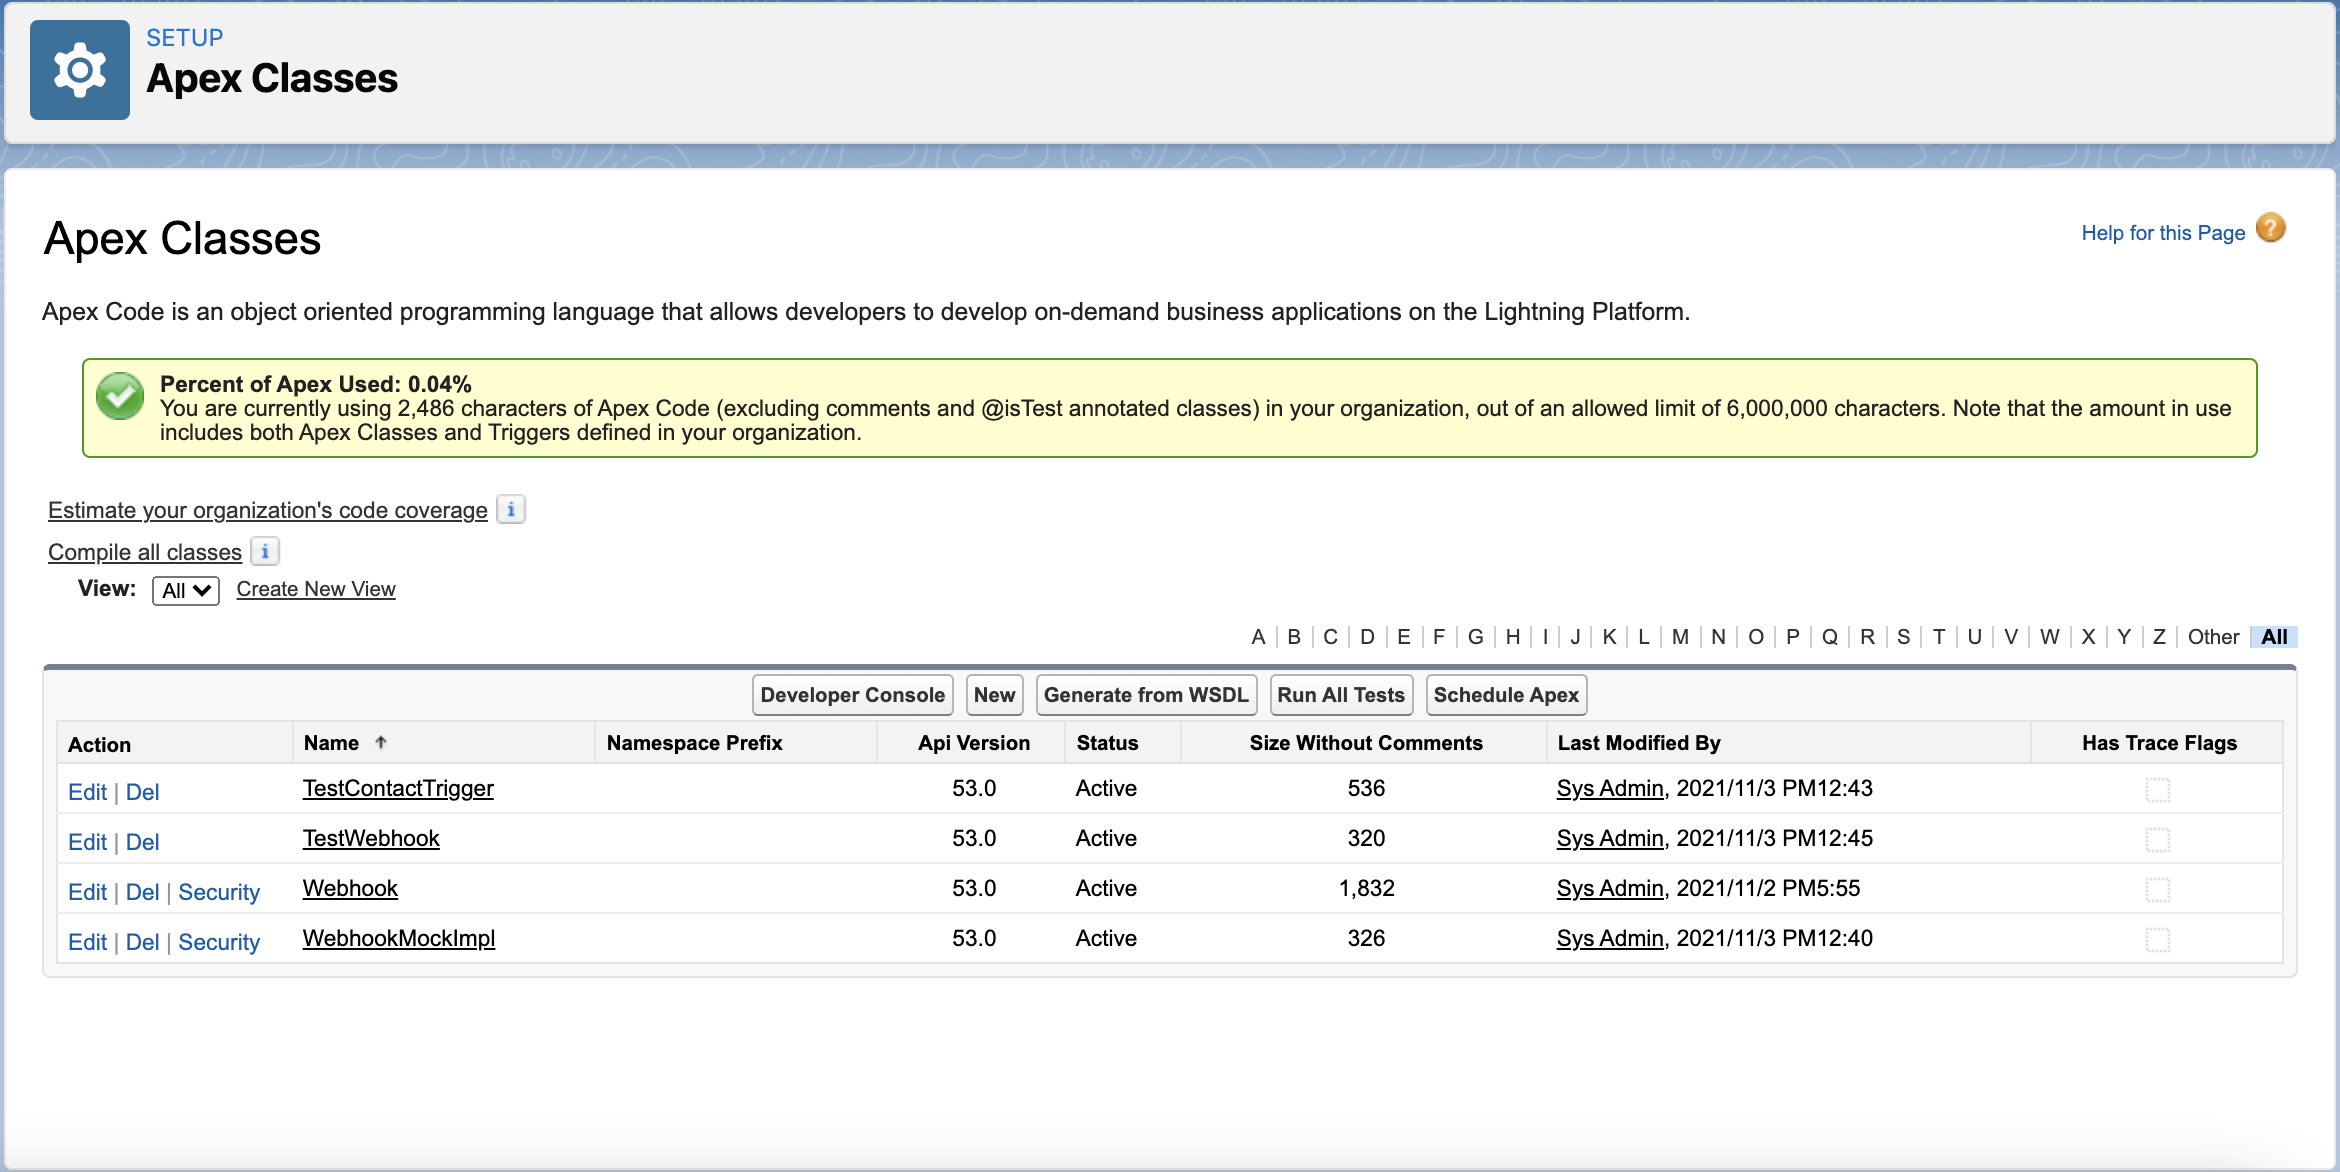
Created Apex Classes (Webhook + test classes) in Sandbox
II. Deploying the Apex Classes
- Log in to your Salesforce Production Org using your System Admin account
- Navigate to Environments > Deploy > Deployment Settings
- Check the Sandbox Org where your Apex Classes were located.
When the Upload Authorization Direction is not a green arrow pointing to Production from Sandbox. For example, it displays a separate red line (please refer to the image below).
- Click Edit near the Sandbox Name.
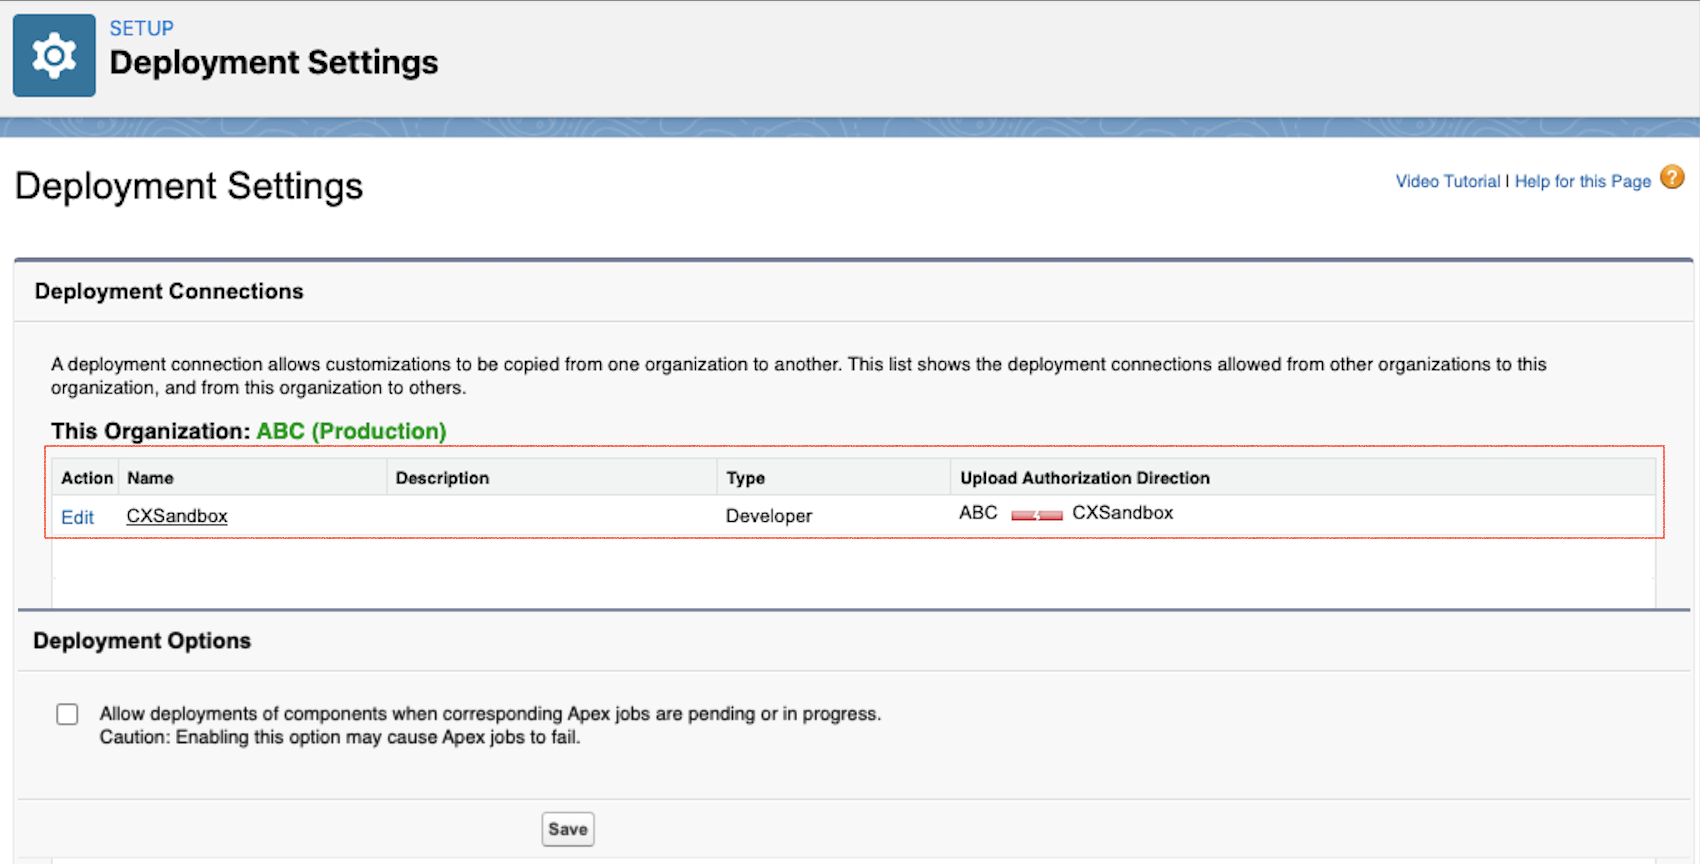
Deployment Settings - Upload Authorisation Direction Status
- Tick the Allow Inbound Changes check
- Click Save
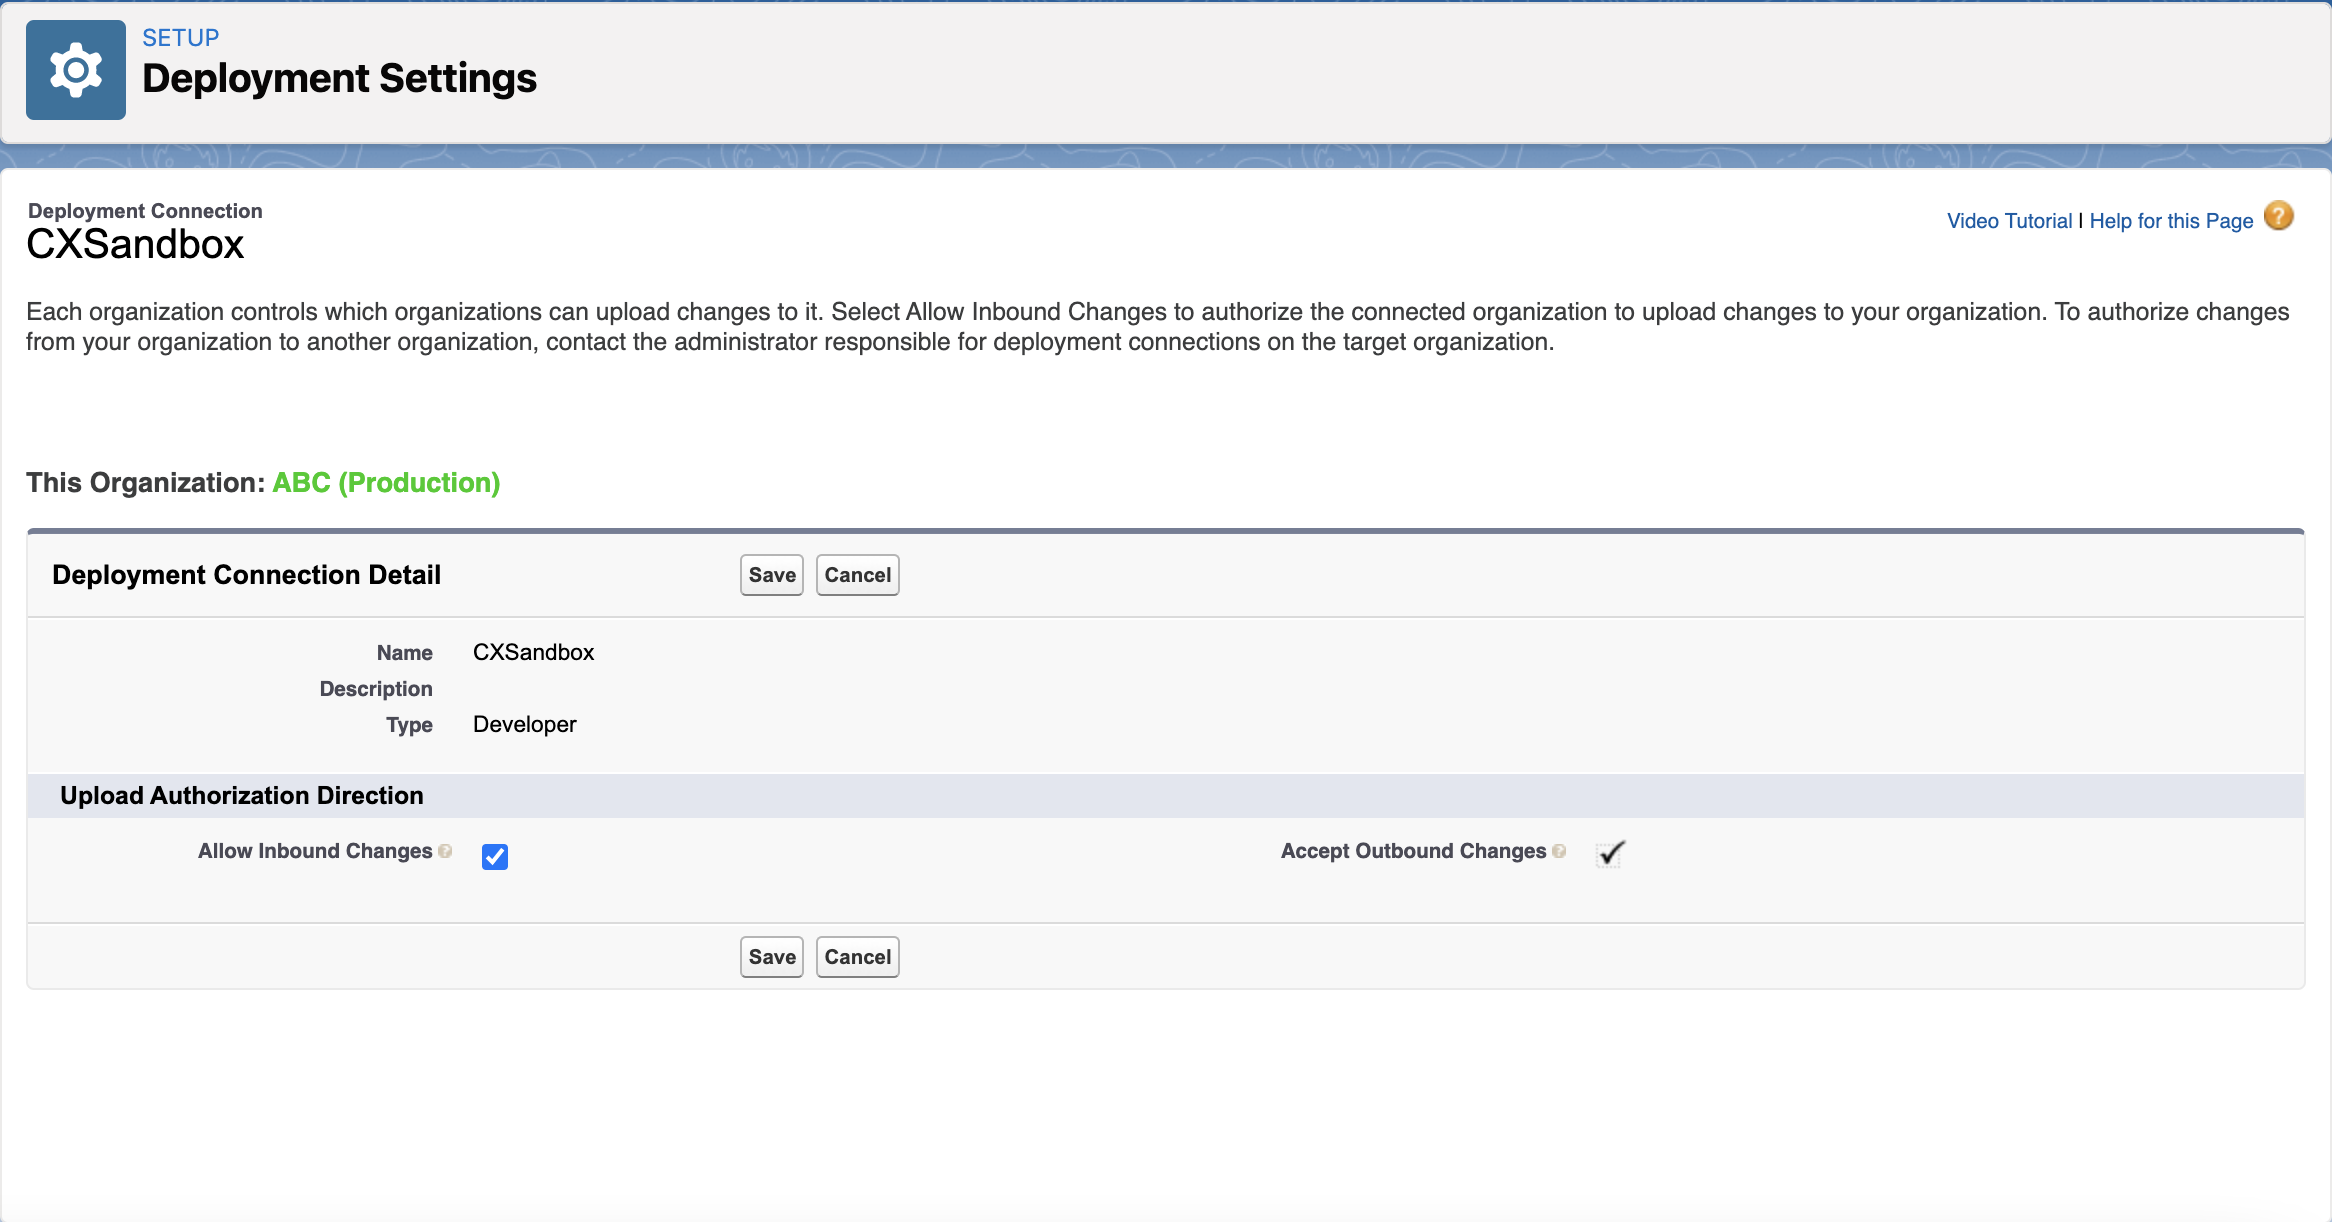
Production Deployment - Allow Inbound Changes
- Ensure the Upload Authorisation Direction green arrow points to Production from Sandbox. To successfully upload the change sets from Sandbox to Production.
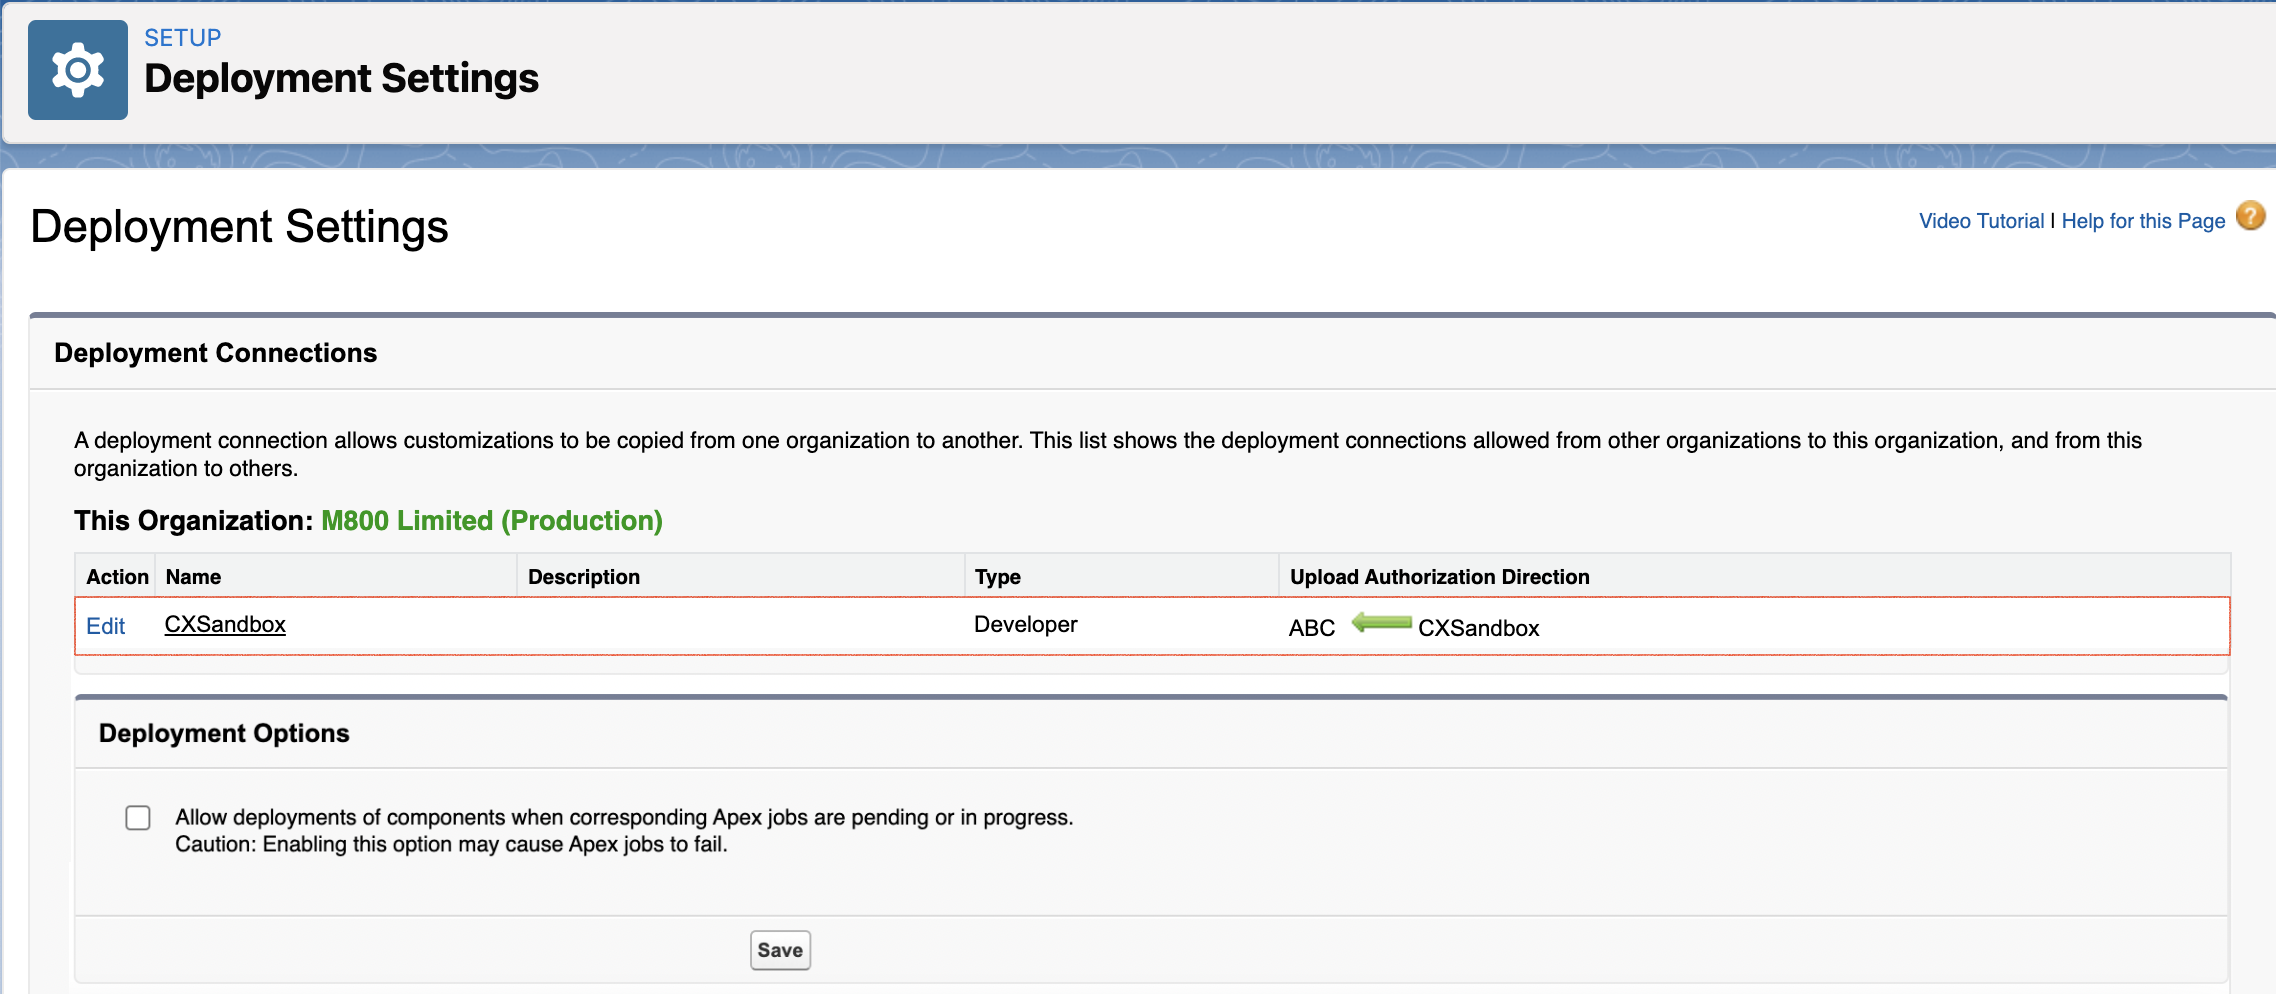
Production Deployment Settings
Next,
- Log in to your Salesforce Sandbox Org using your System Admin account
- Navigate to Environments > Change Sets > Outbound Change Sets
- Read through the details of the Understanding Deployments and click Continue
- In the Outbound Change Sets page, click New
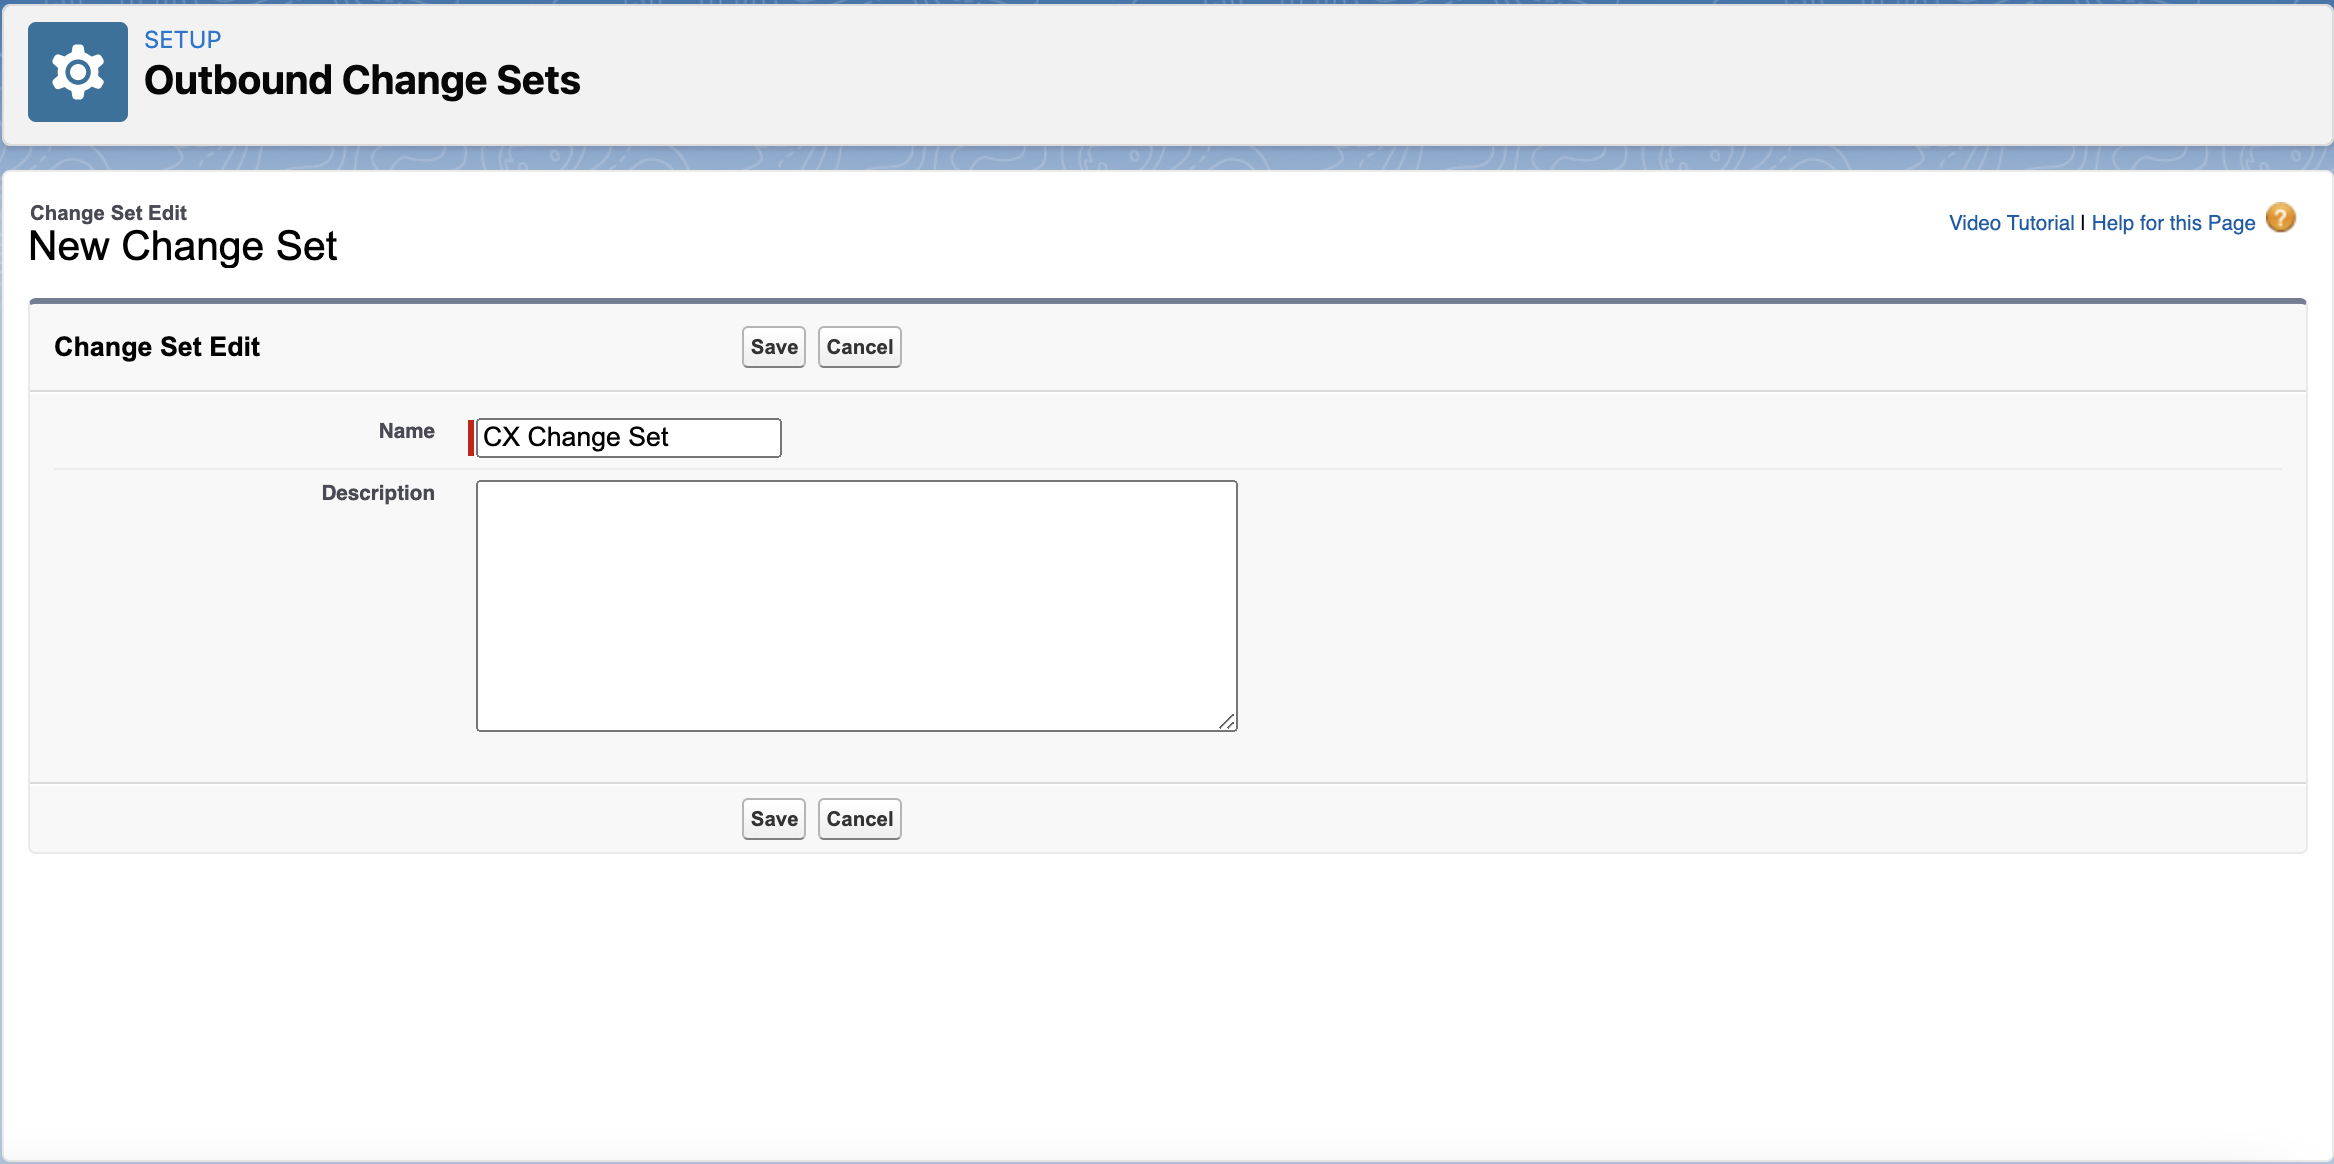
Sandbox Outbound Change Sets
- Name your New Change Set. It can be any name.
- Click Save
Sandbox Outbound Create New Change Set
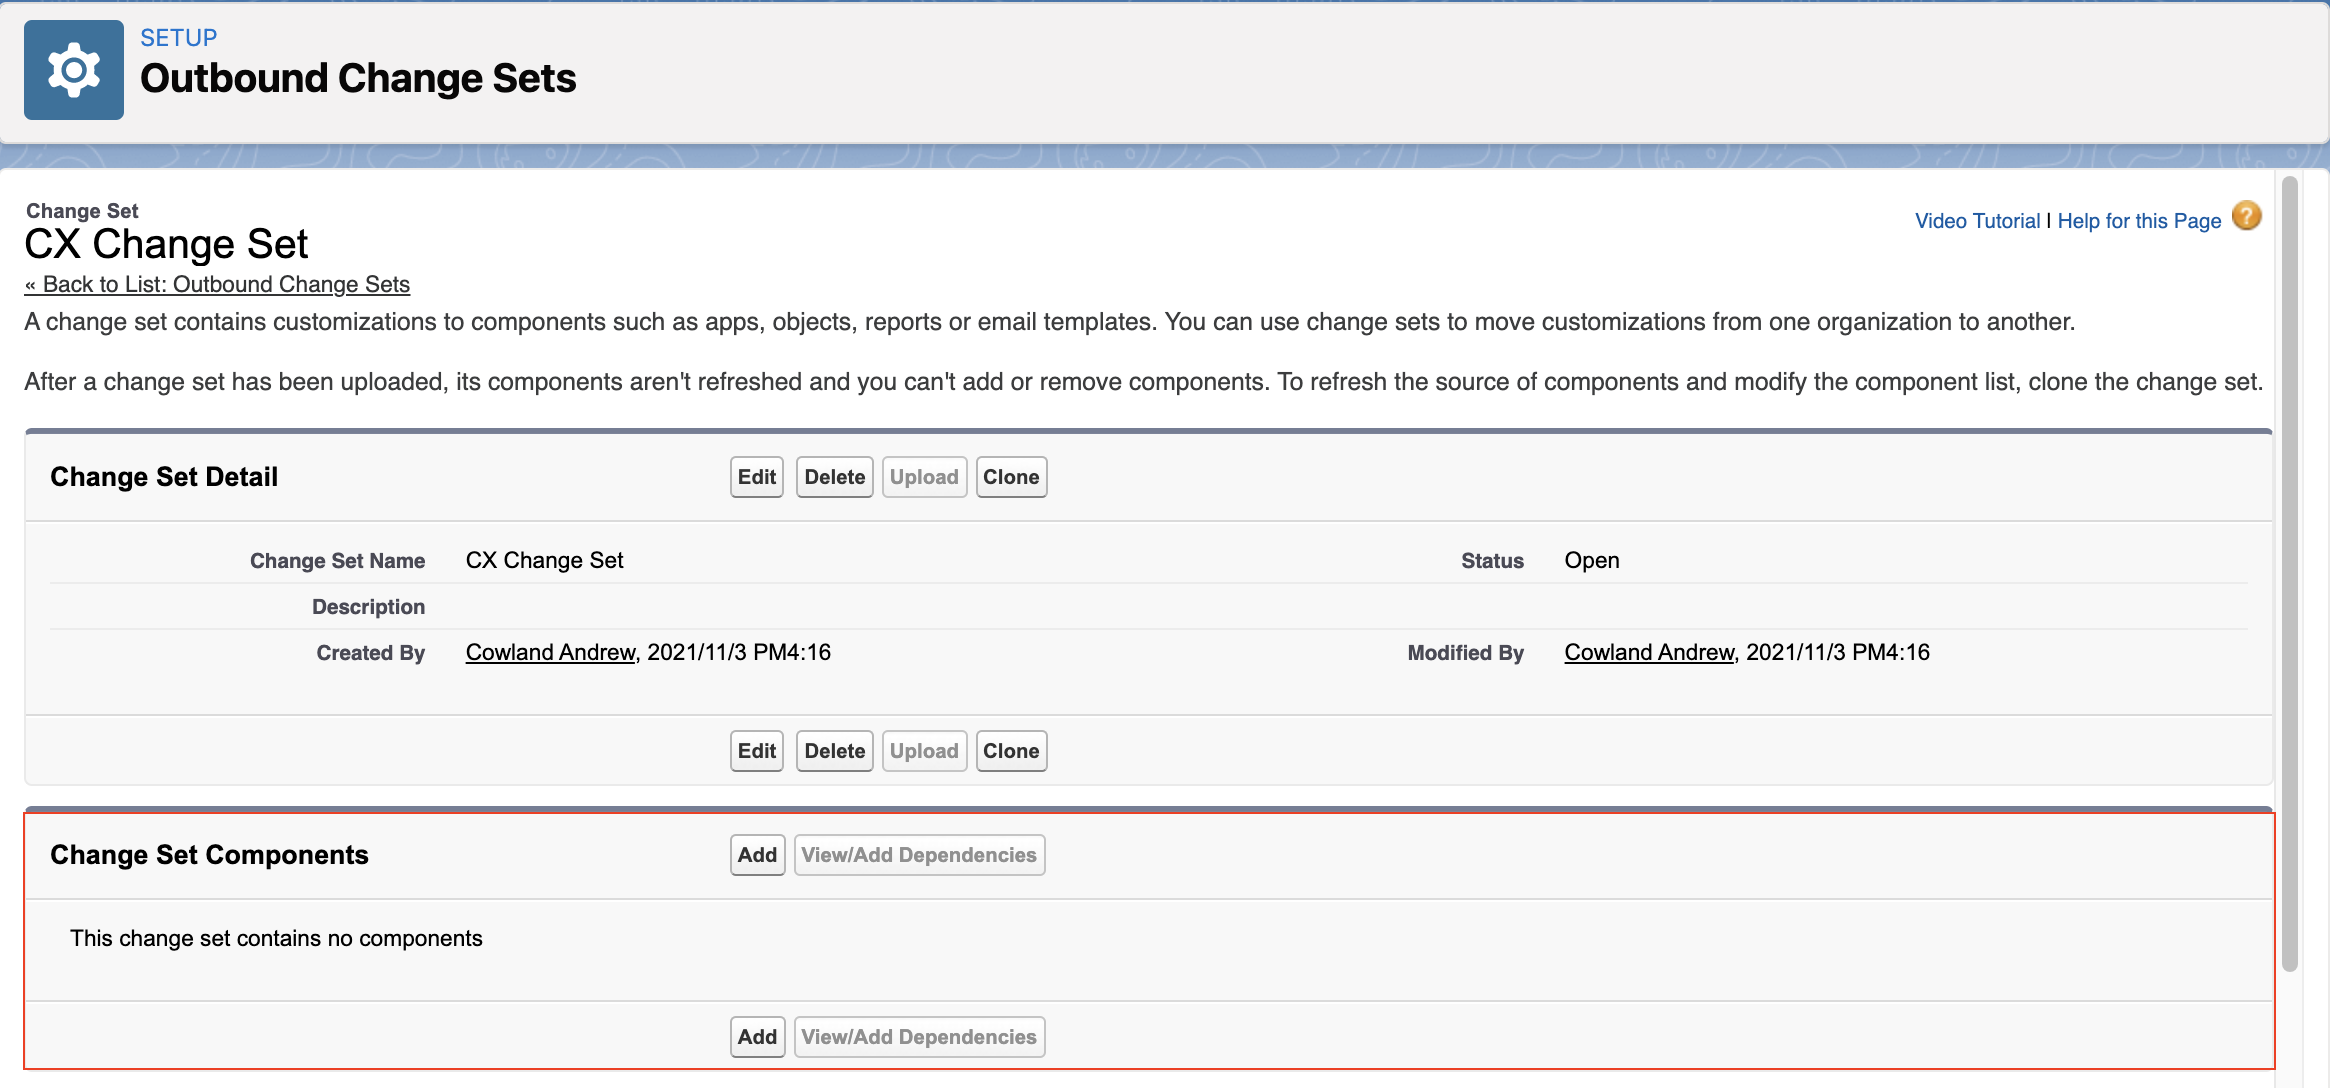
- In the created Change Set, navigate to Change Set Components
- Click Add
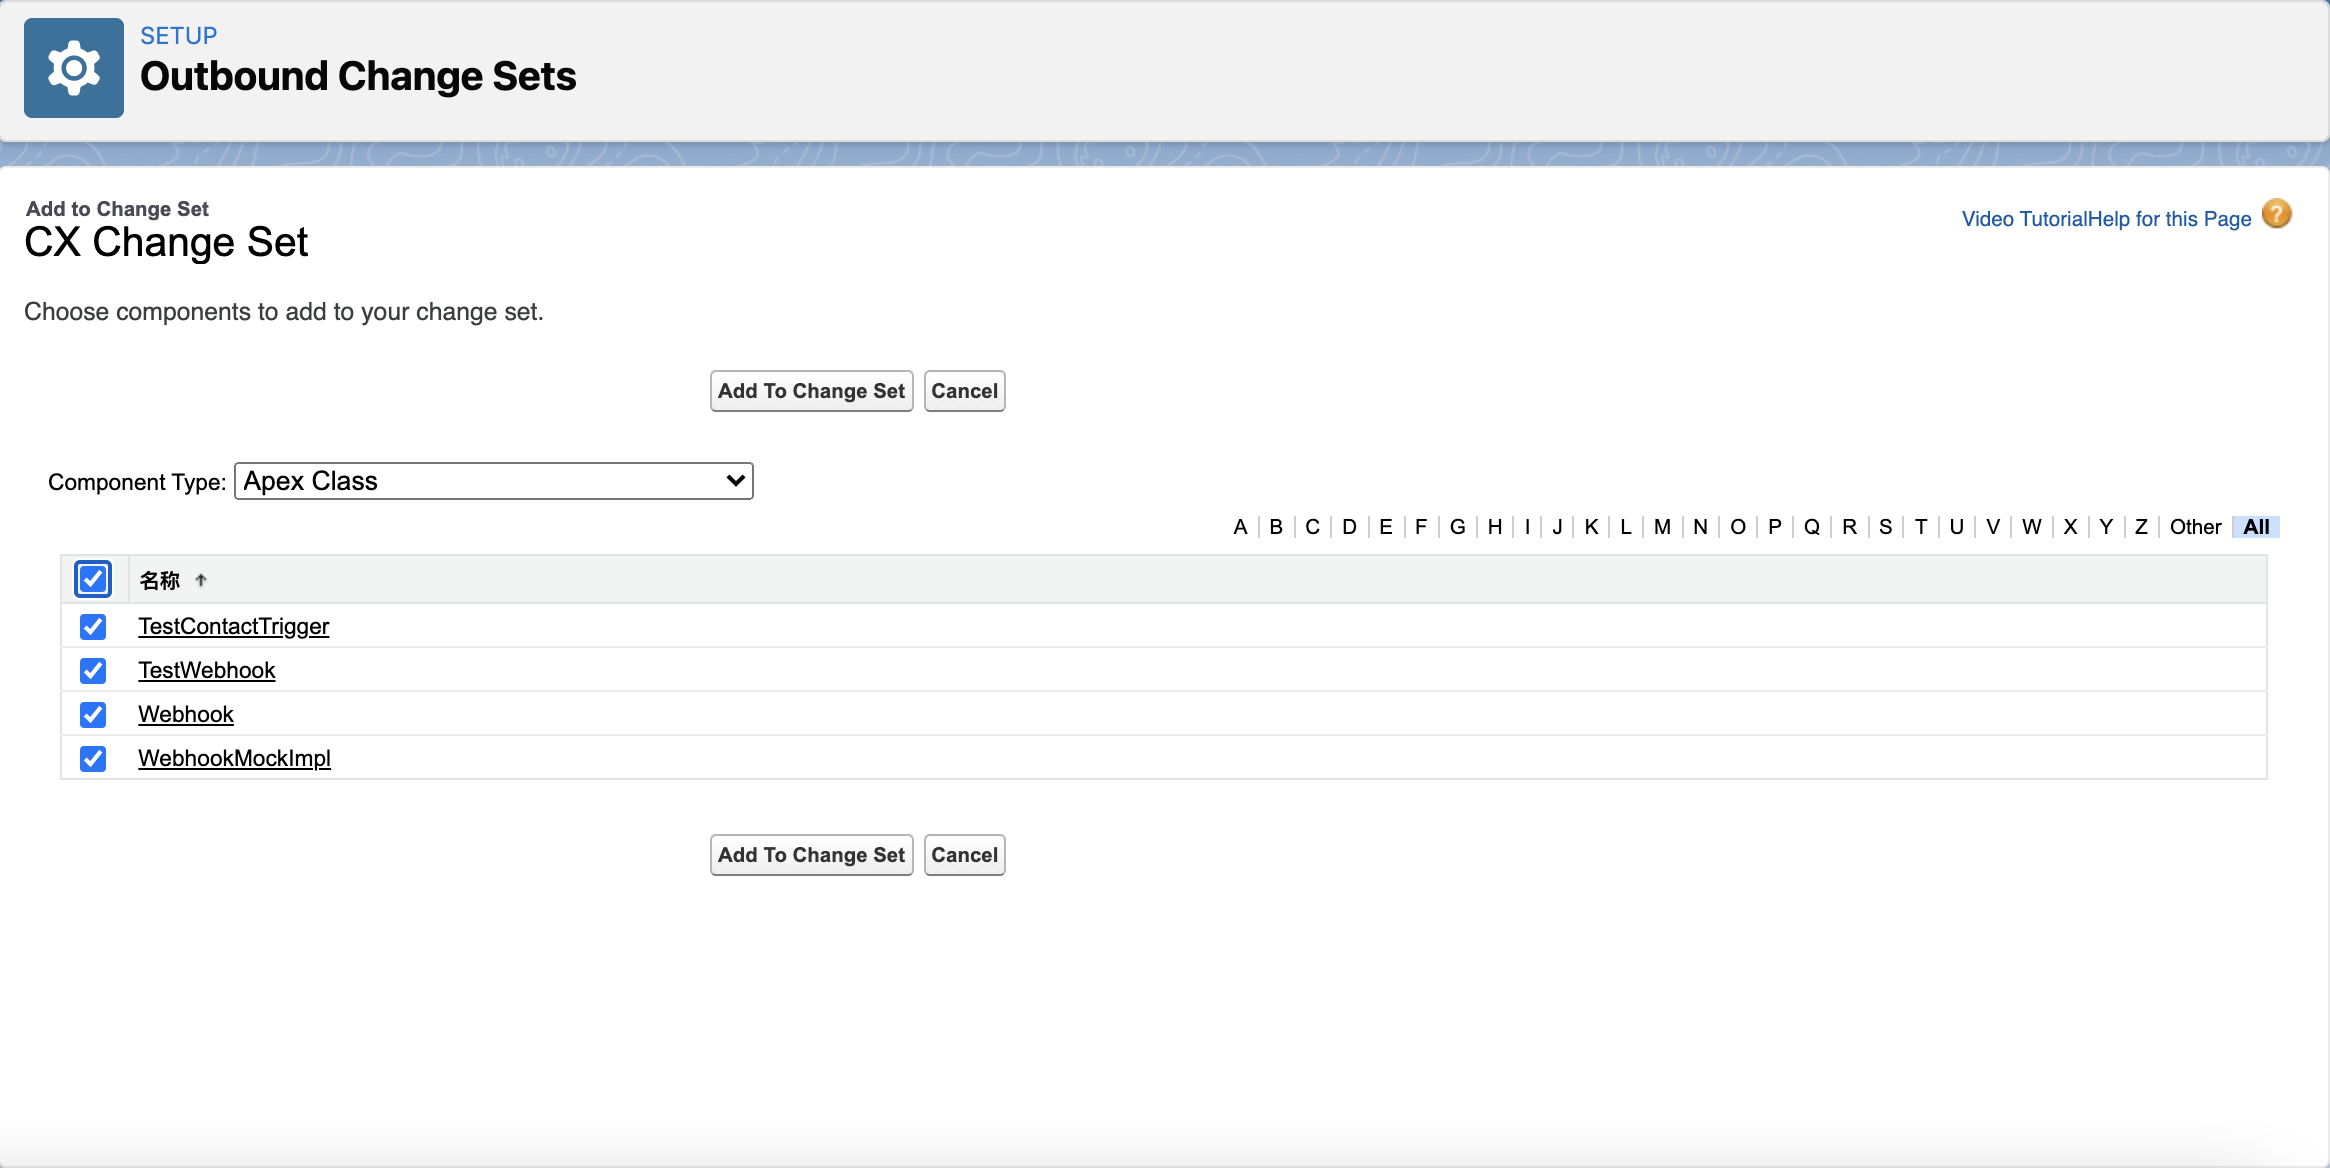
Sandbox Outbound Change Set Components
- In the Component Type dropdown, select Apex Class
- Tick all the checkboxes of the created four (4) Apex Classes
- Click Add to Change Set
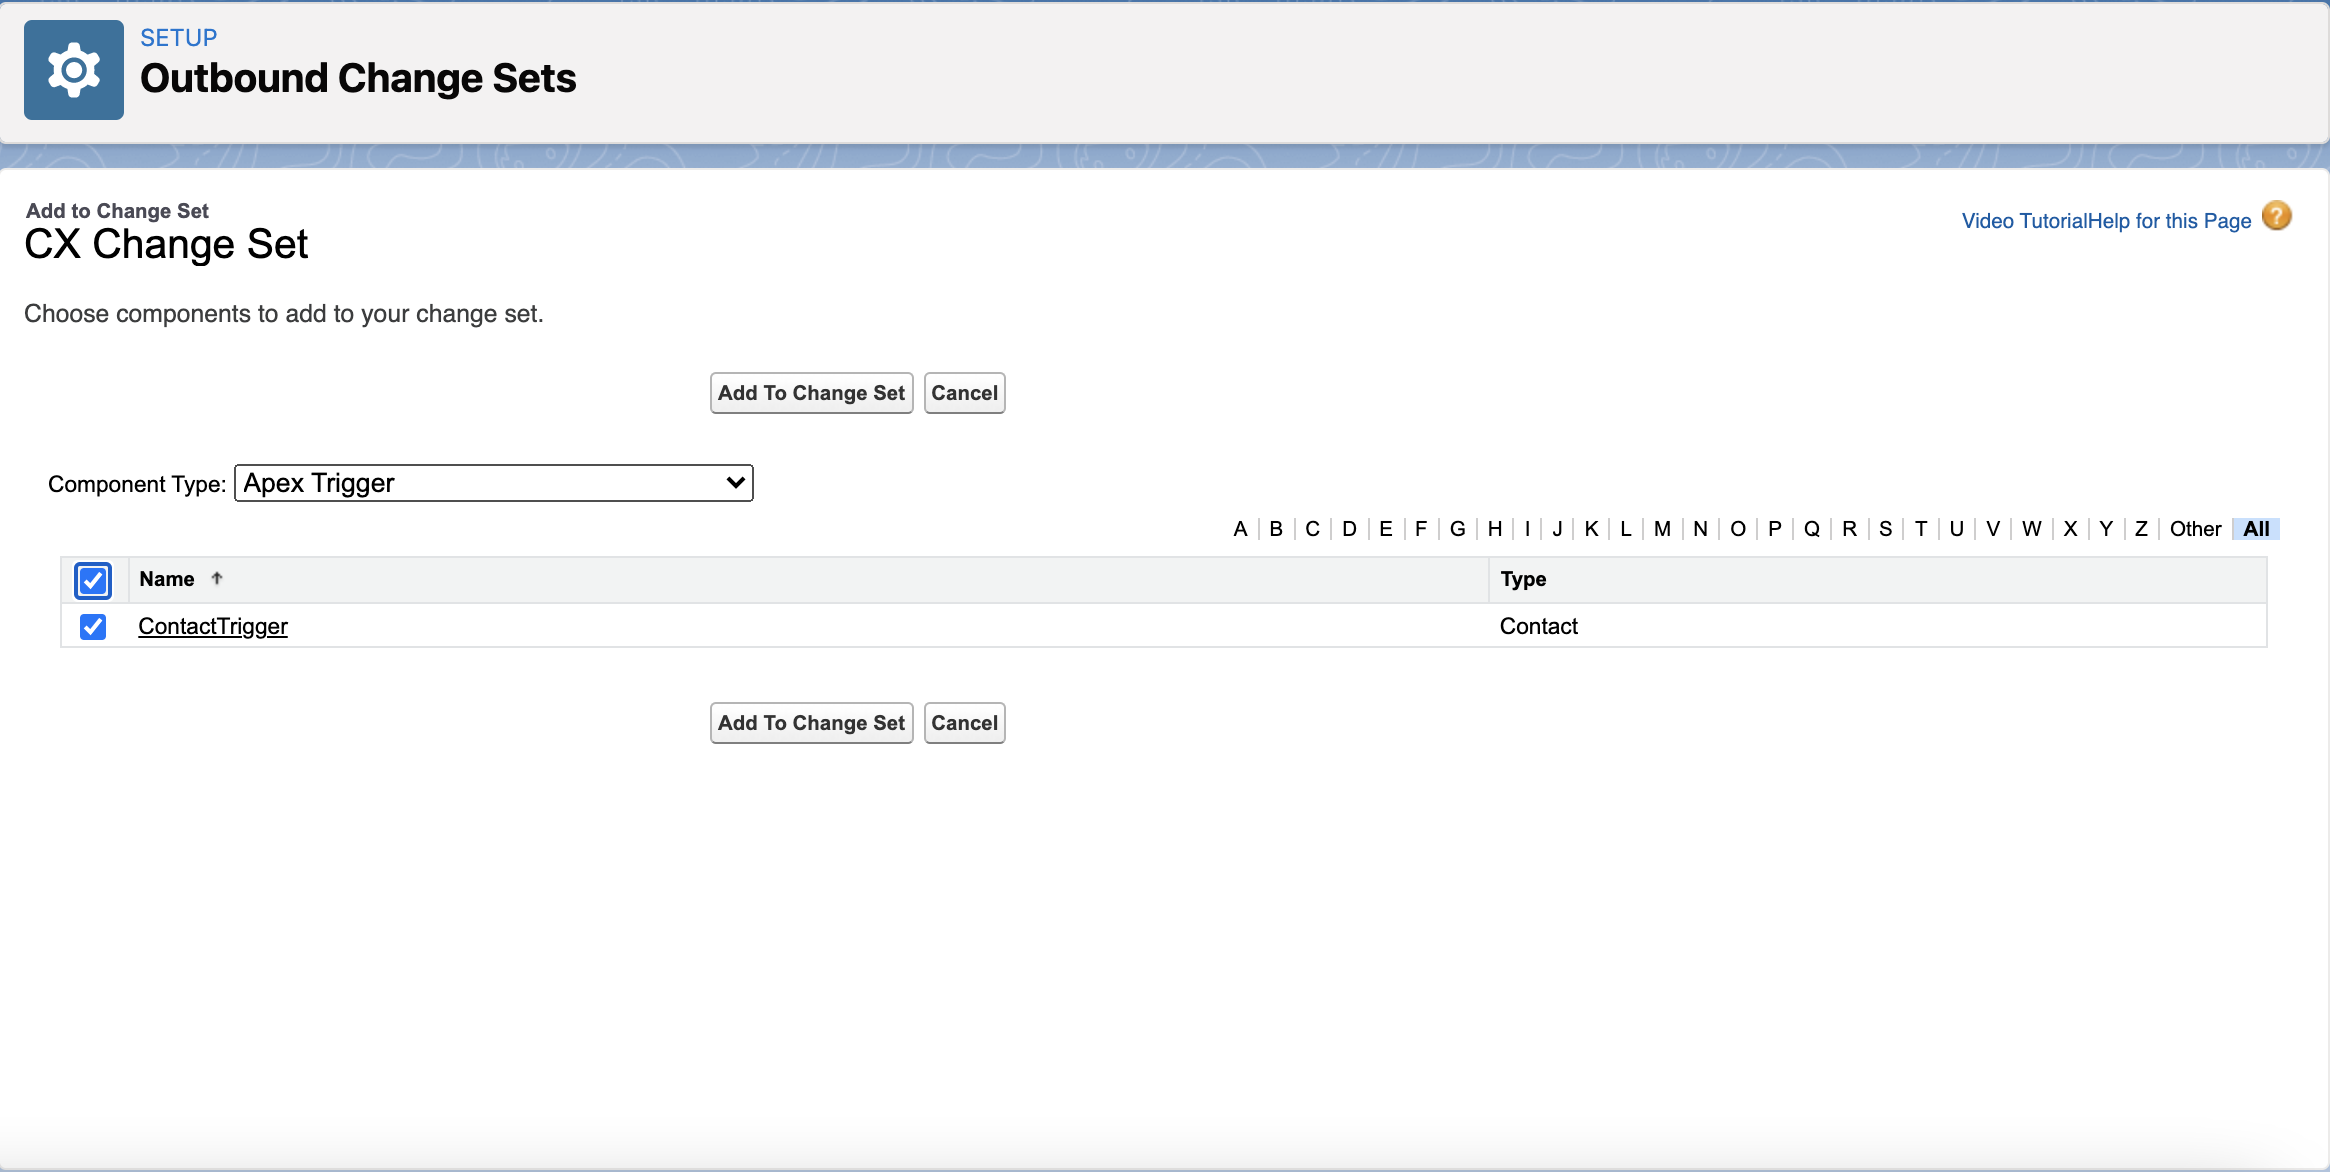
Sandbox Outbound Change Set Components - Apex Classes
- In the created Outbound Change Set, navigate again to Change Set Components
- Click Add
- In the Component Type dropdown, select Apex Trigger
- Tick the checkbox of the created Apex Trigger
- Click Add to Change Set
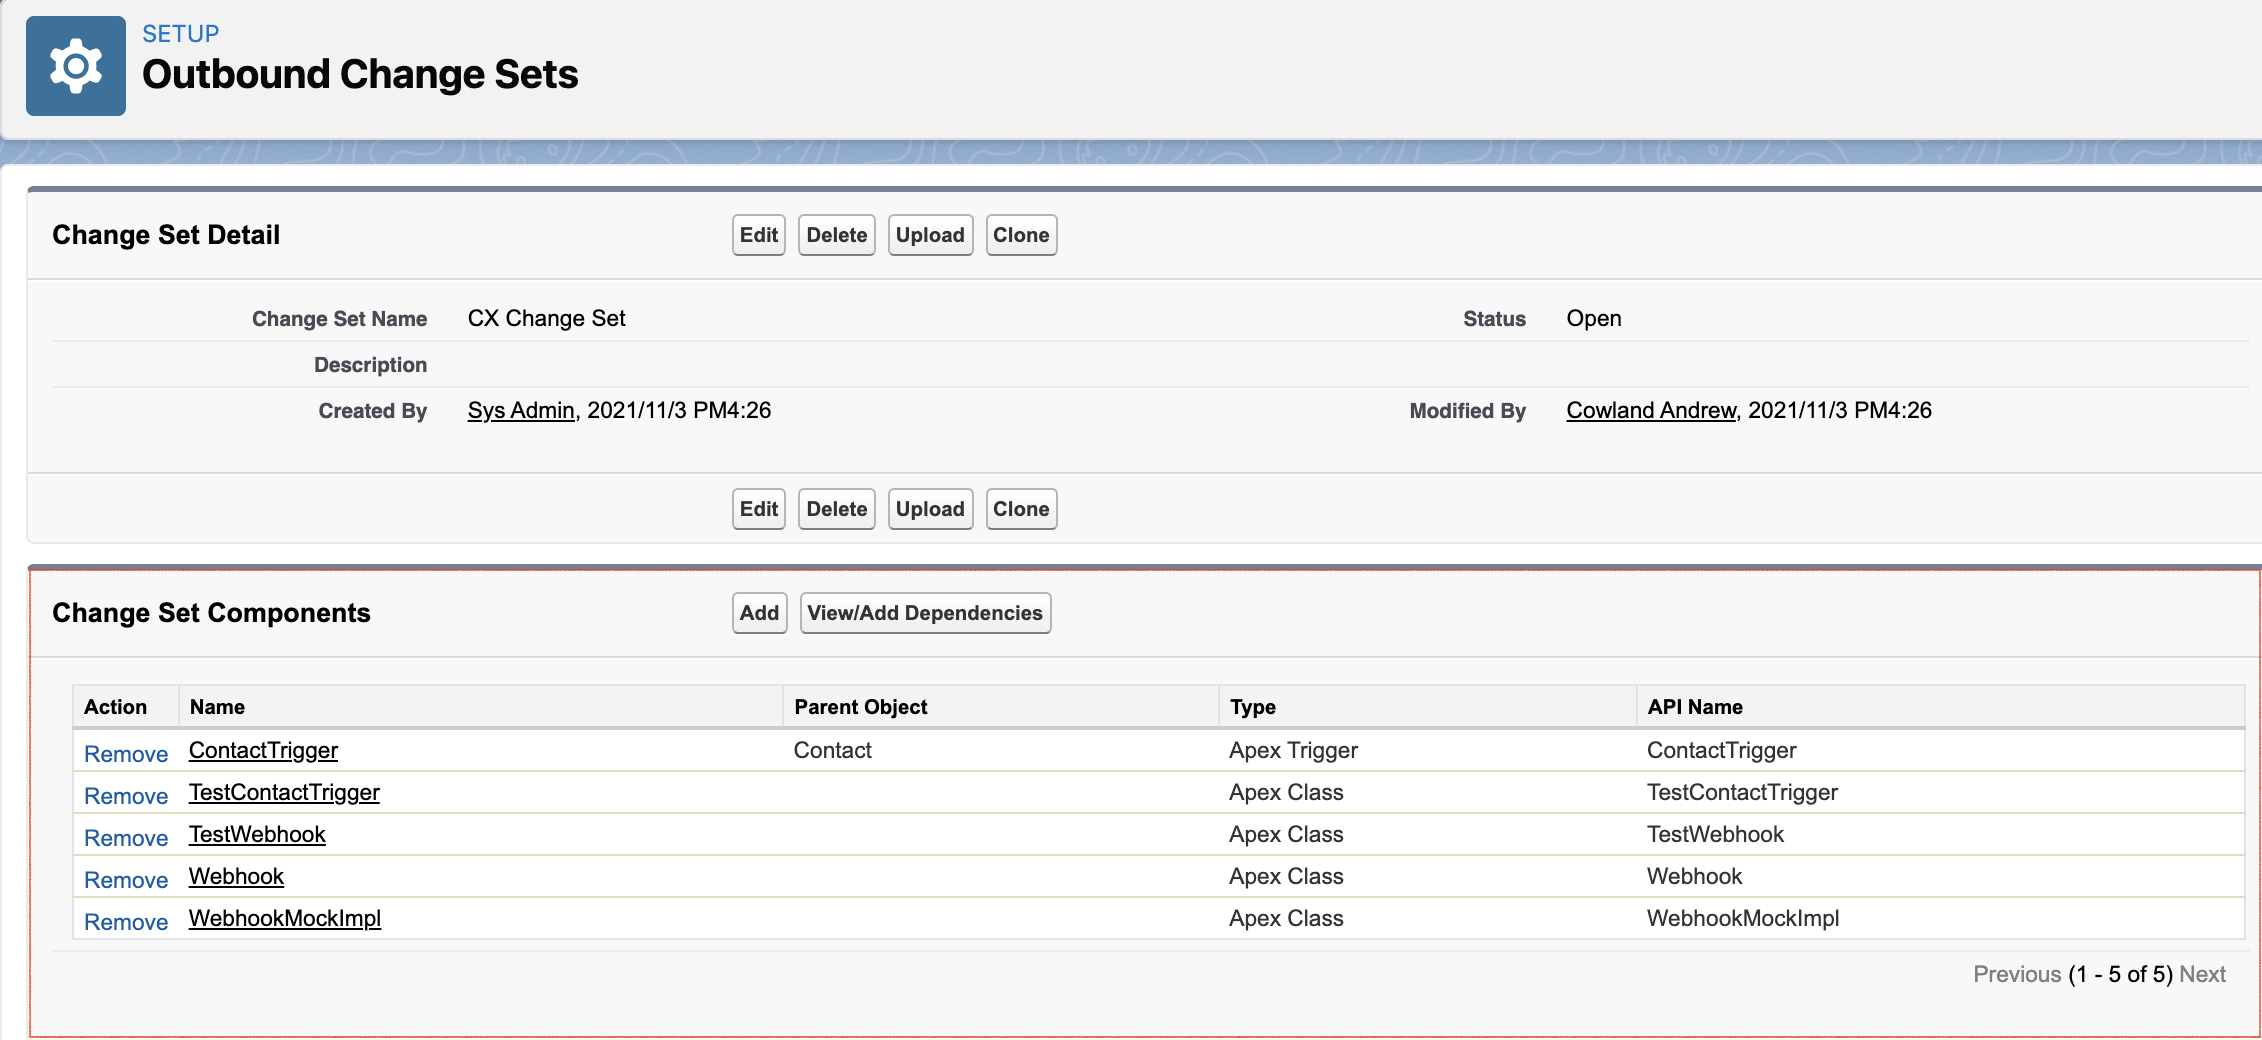
Sandbox Outbound Change Set Components - Apex Trigger
- Your Outbound Change Sets must have five (5) items from your Apex Classes and Apex Triggers.
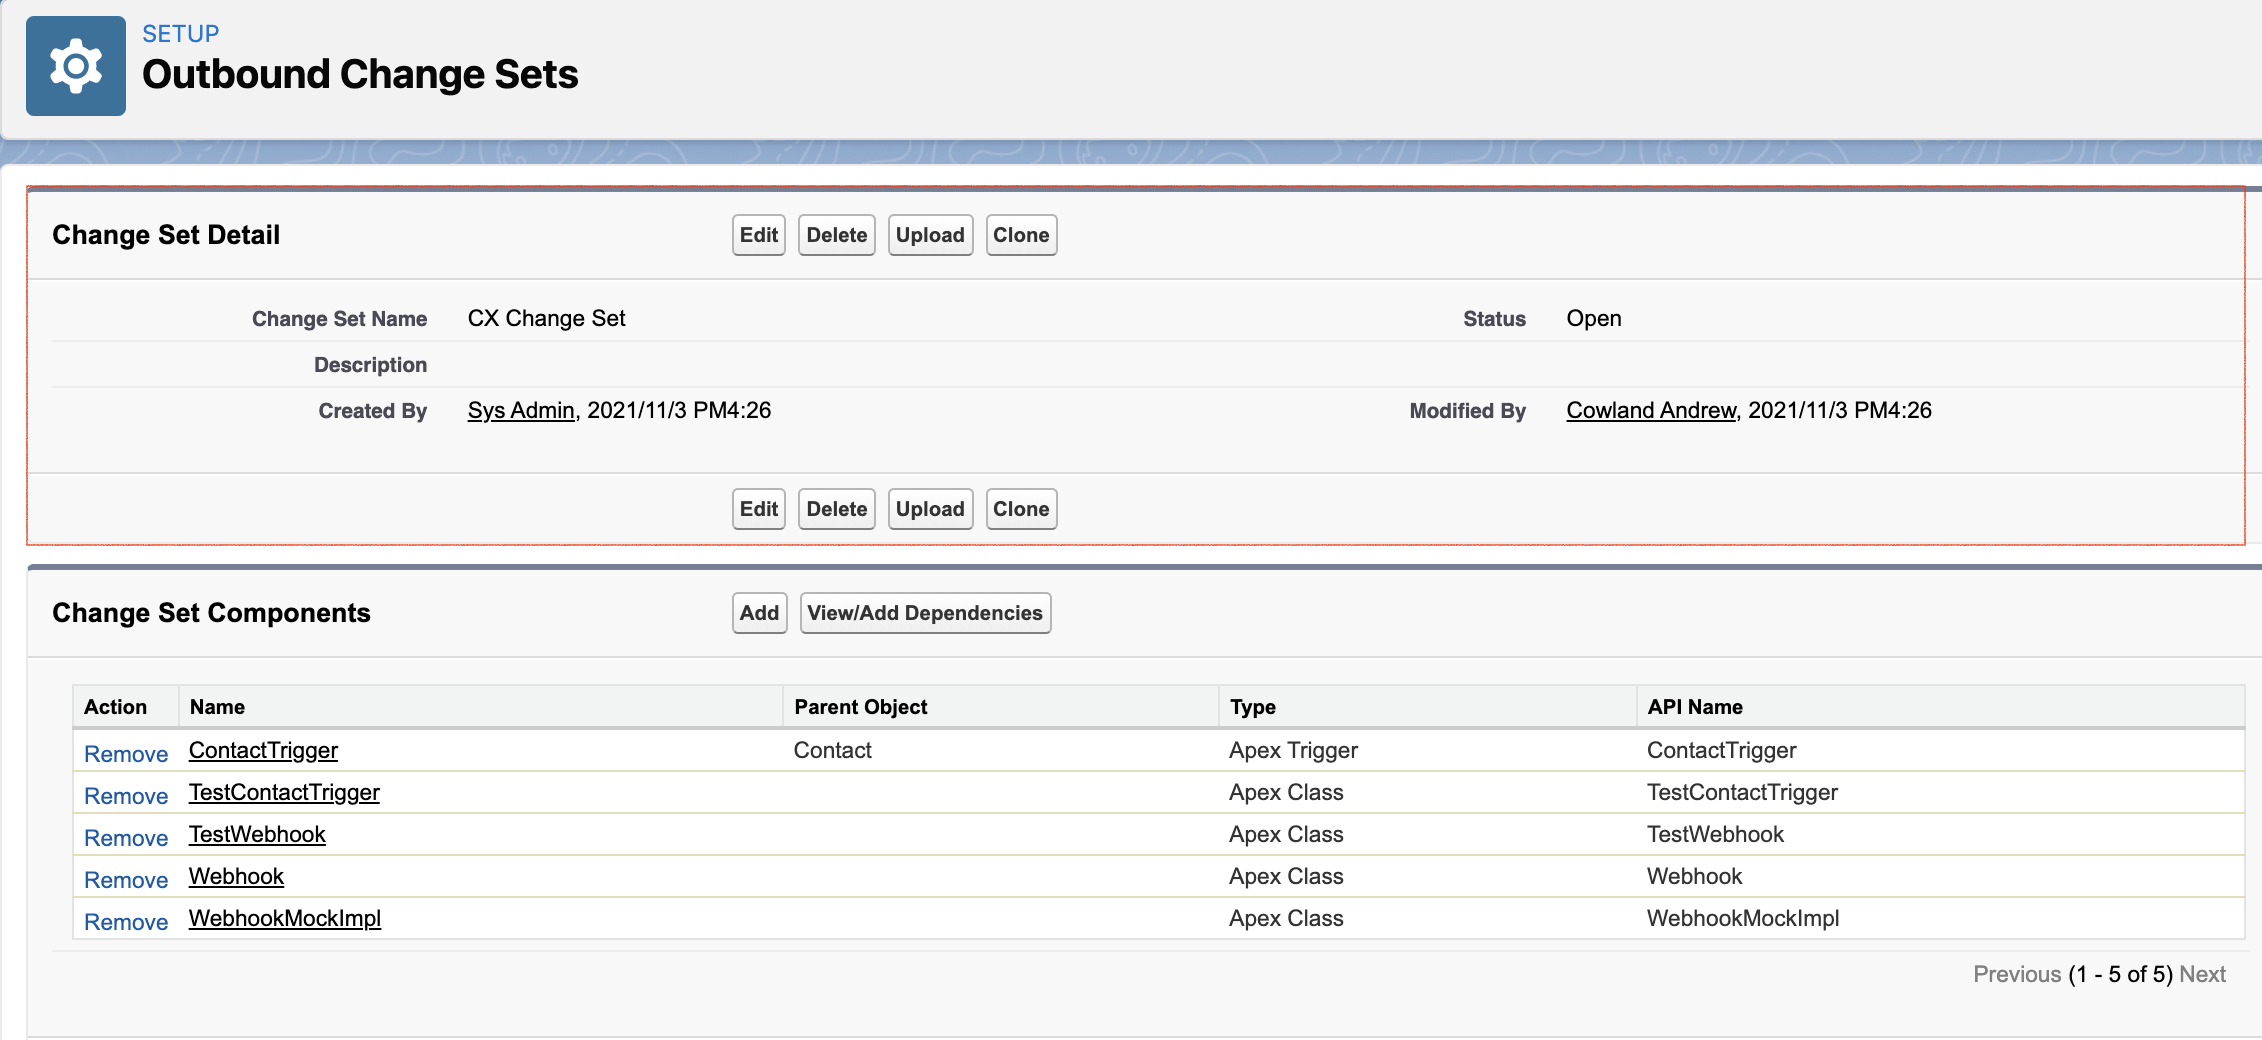
Sandbox Outbound Change Set Components - Apex Classes & Trigger
- Click Upload
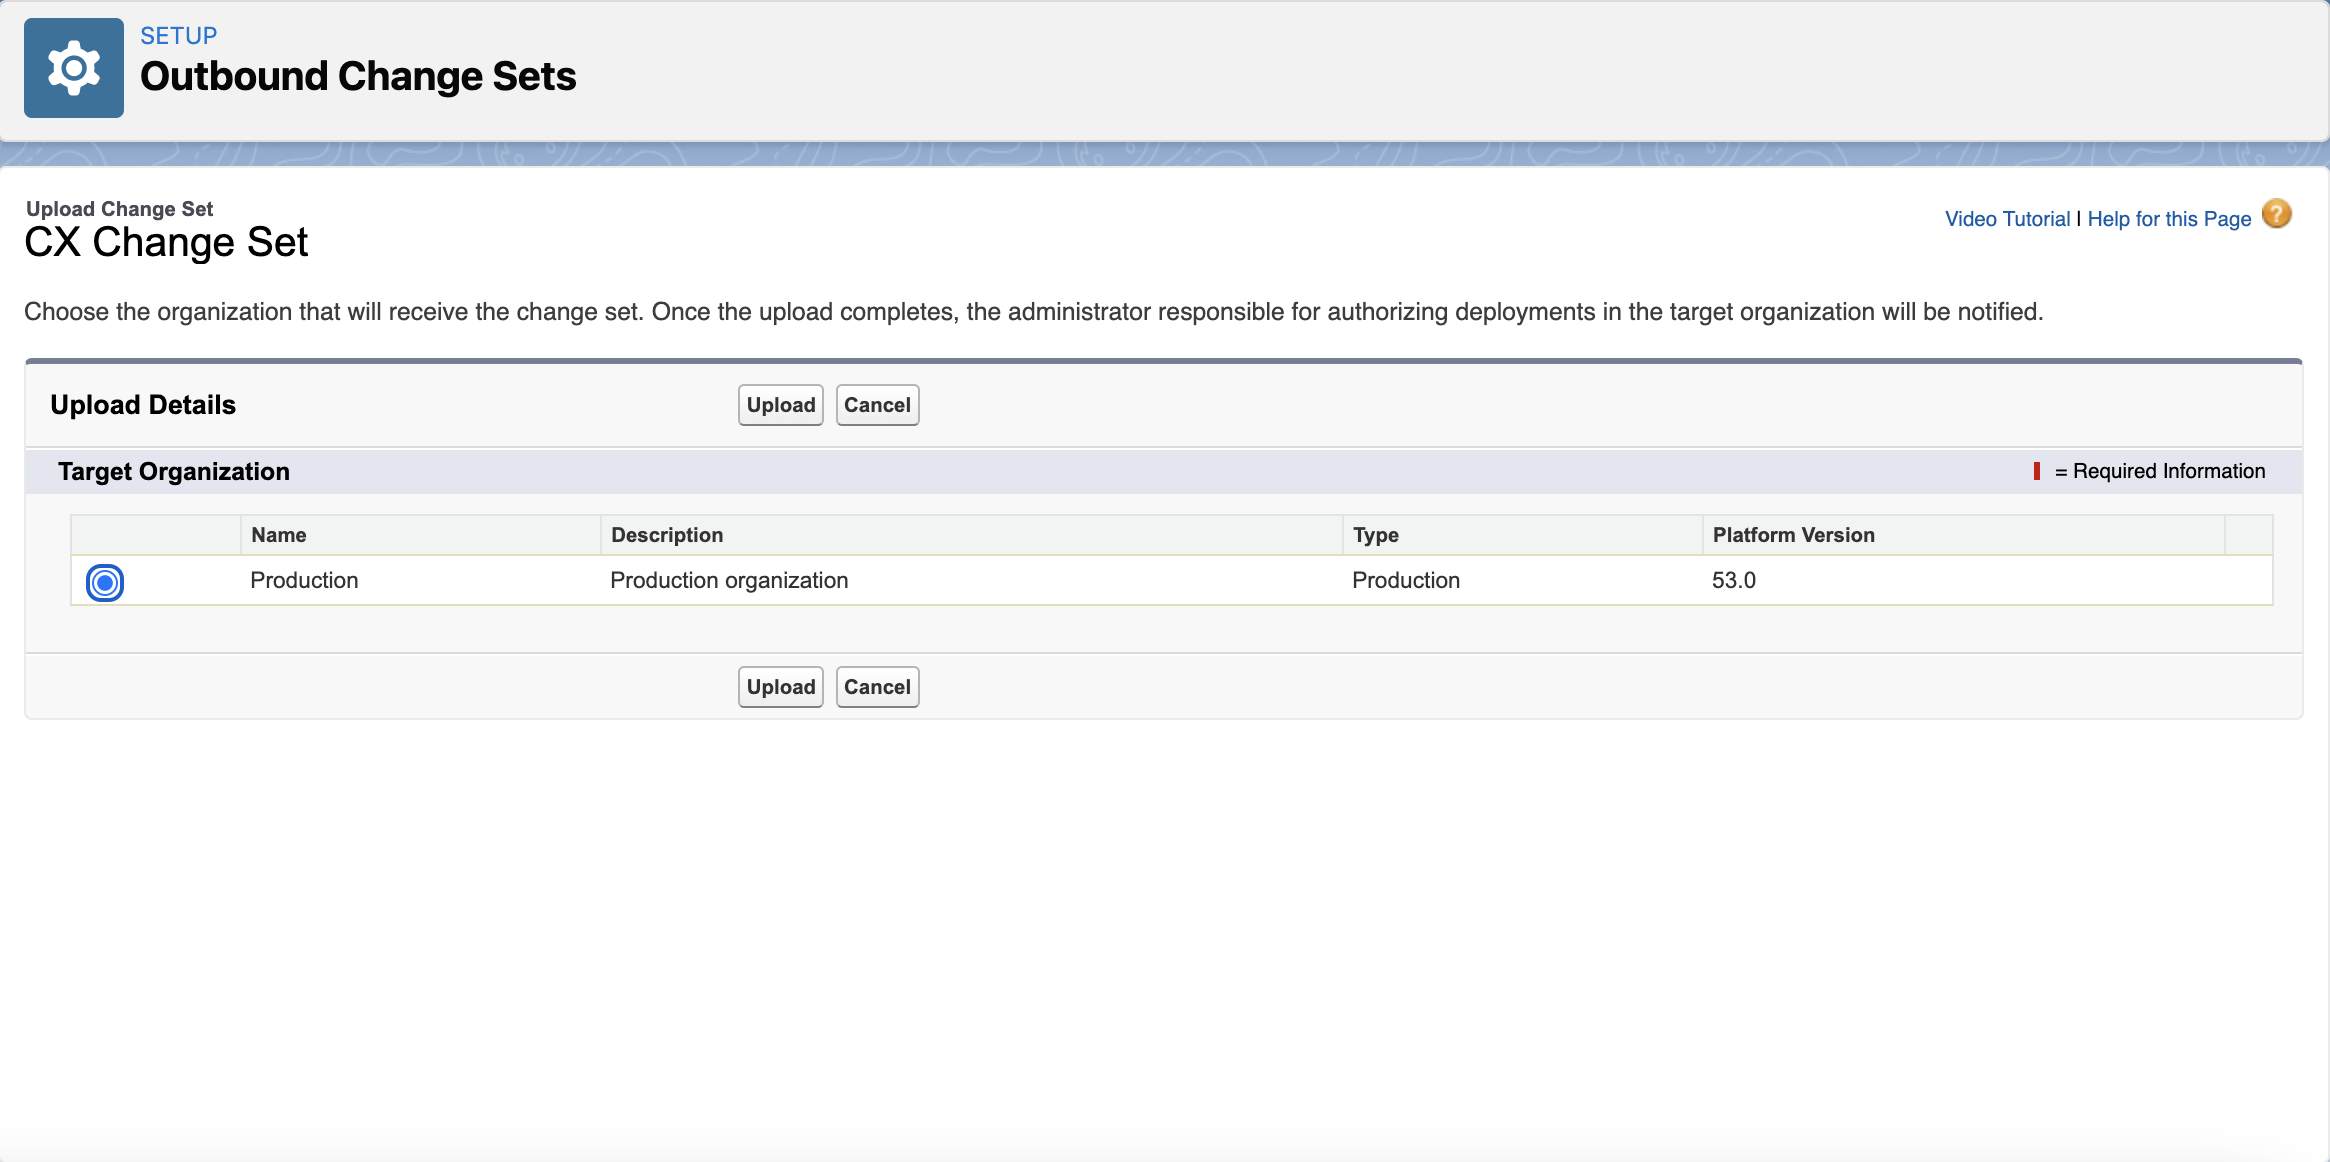
Sandbox Outbound Change Set Upload
- Tick the Production radio button in the Upload Details - Target Organization.
- Click Upload
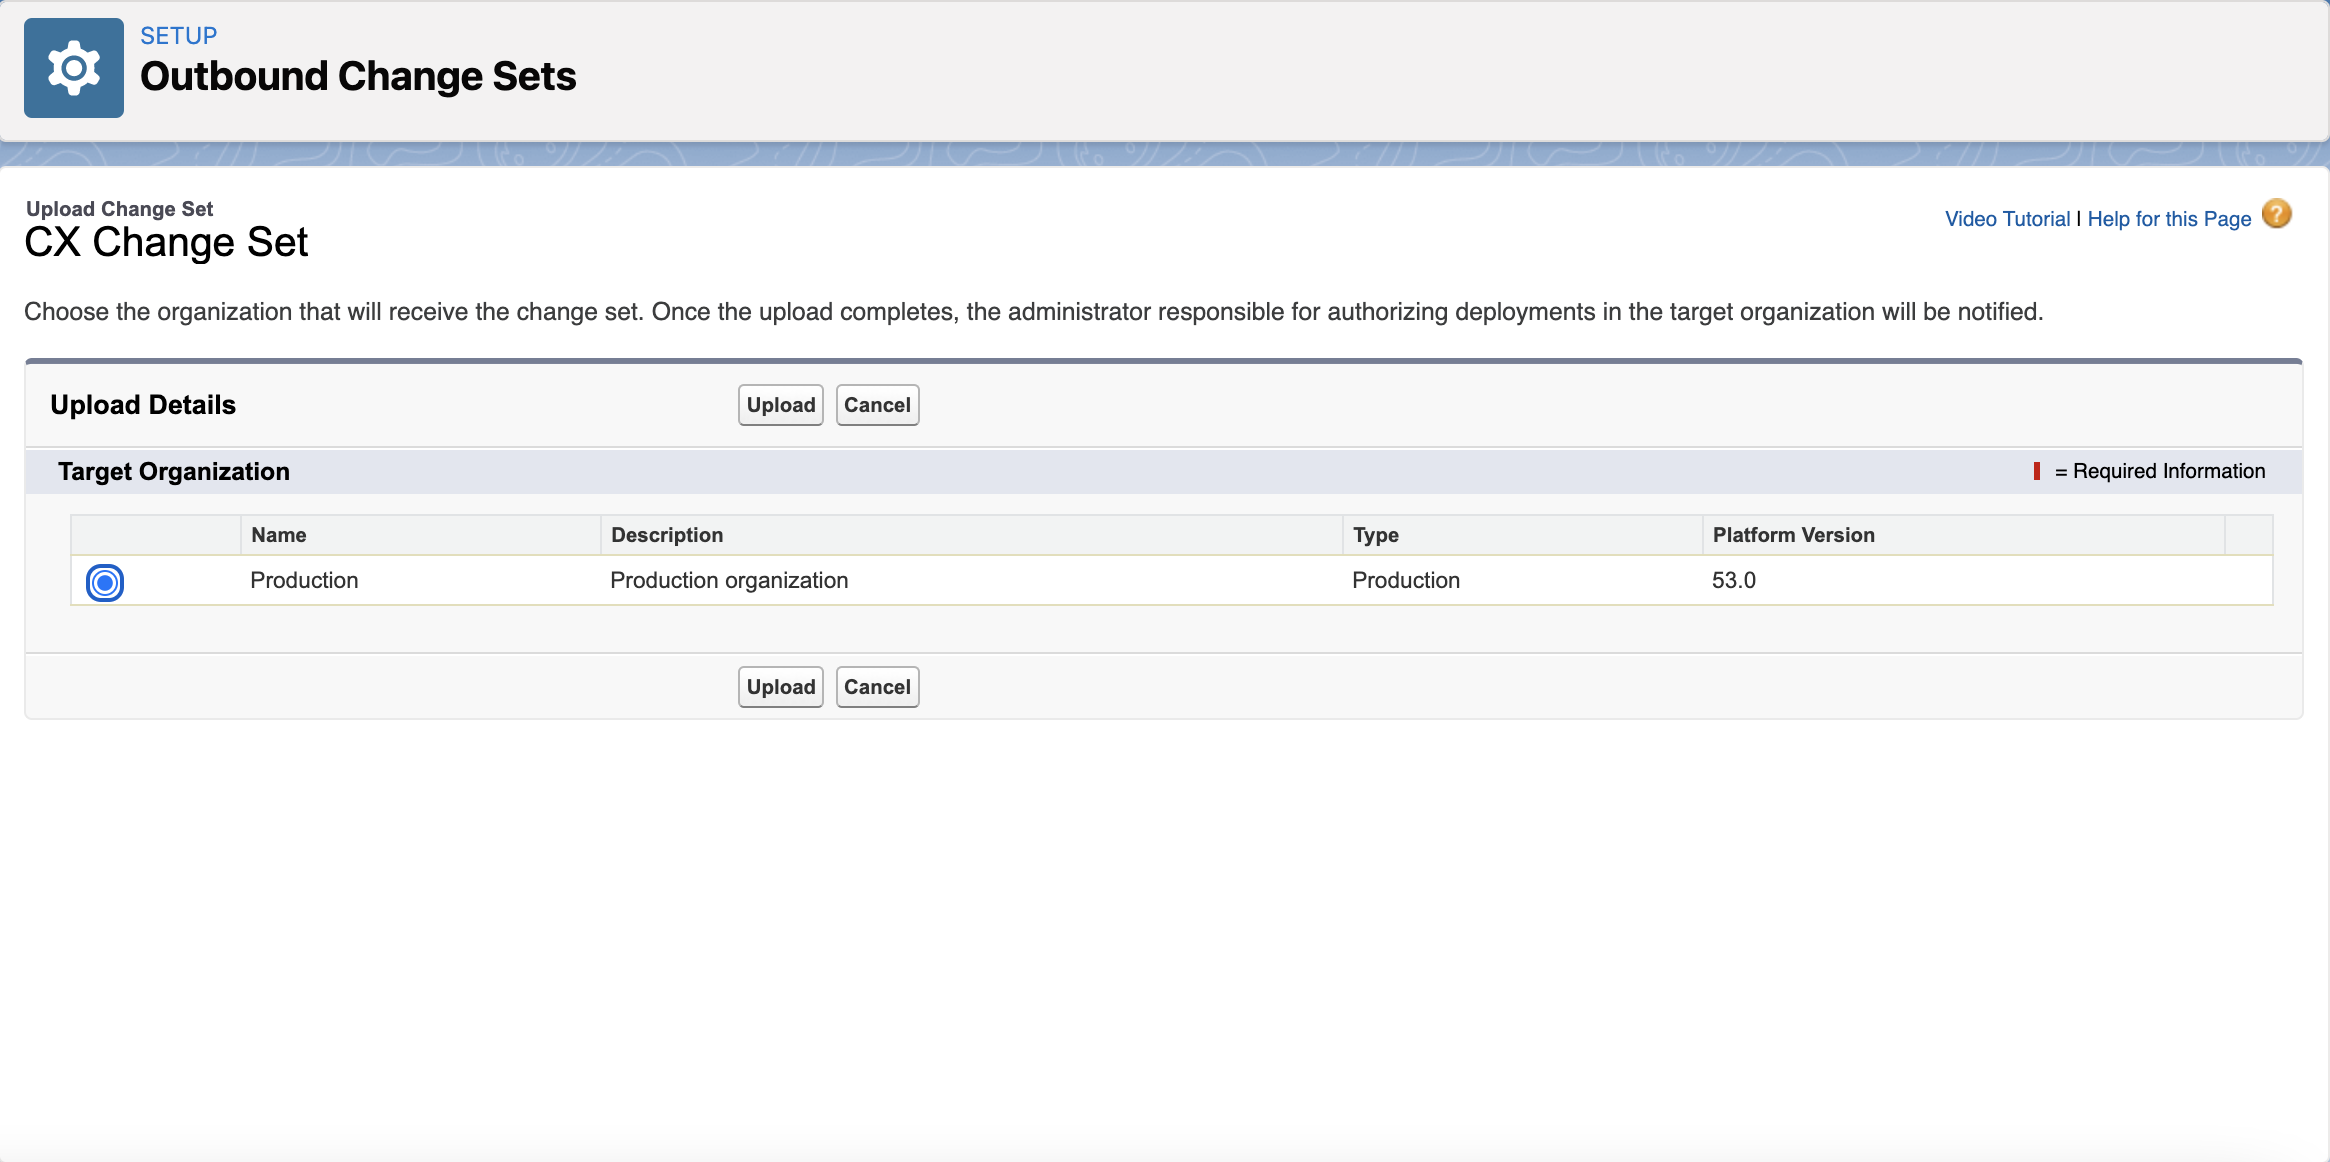
Sandbox Outbound Change Set Upload
- The Outbound Change Sets successful upload notice will appear on the page.
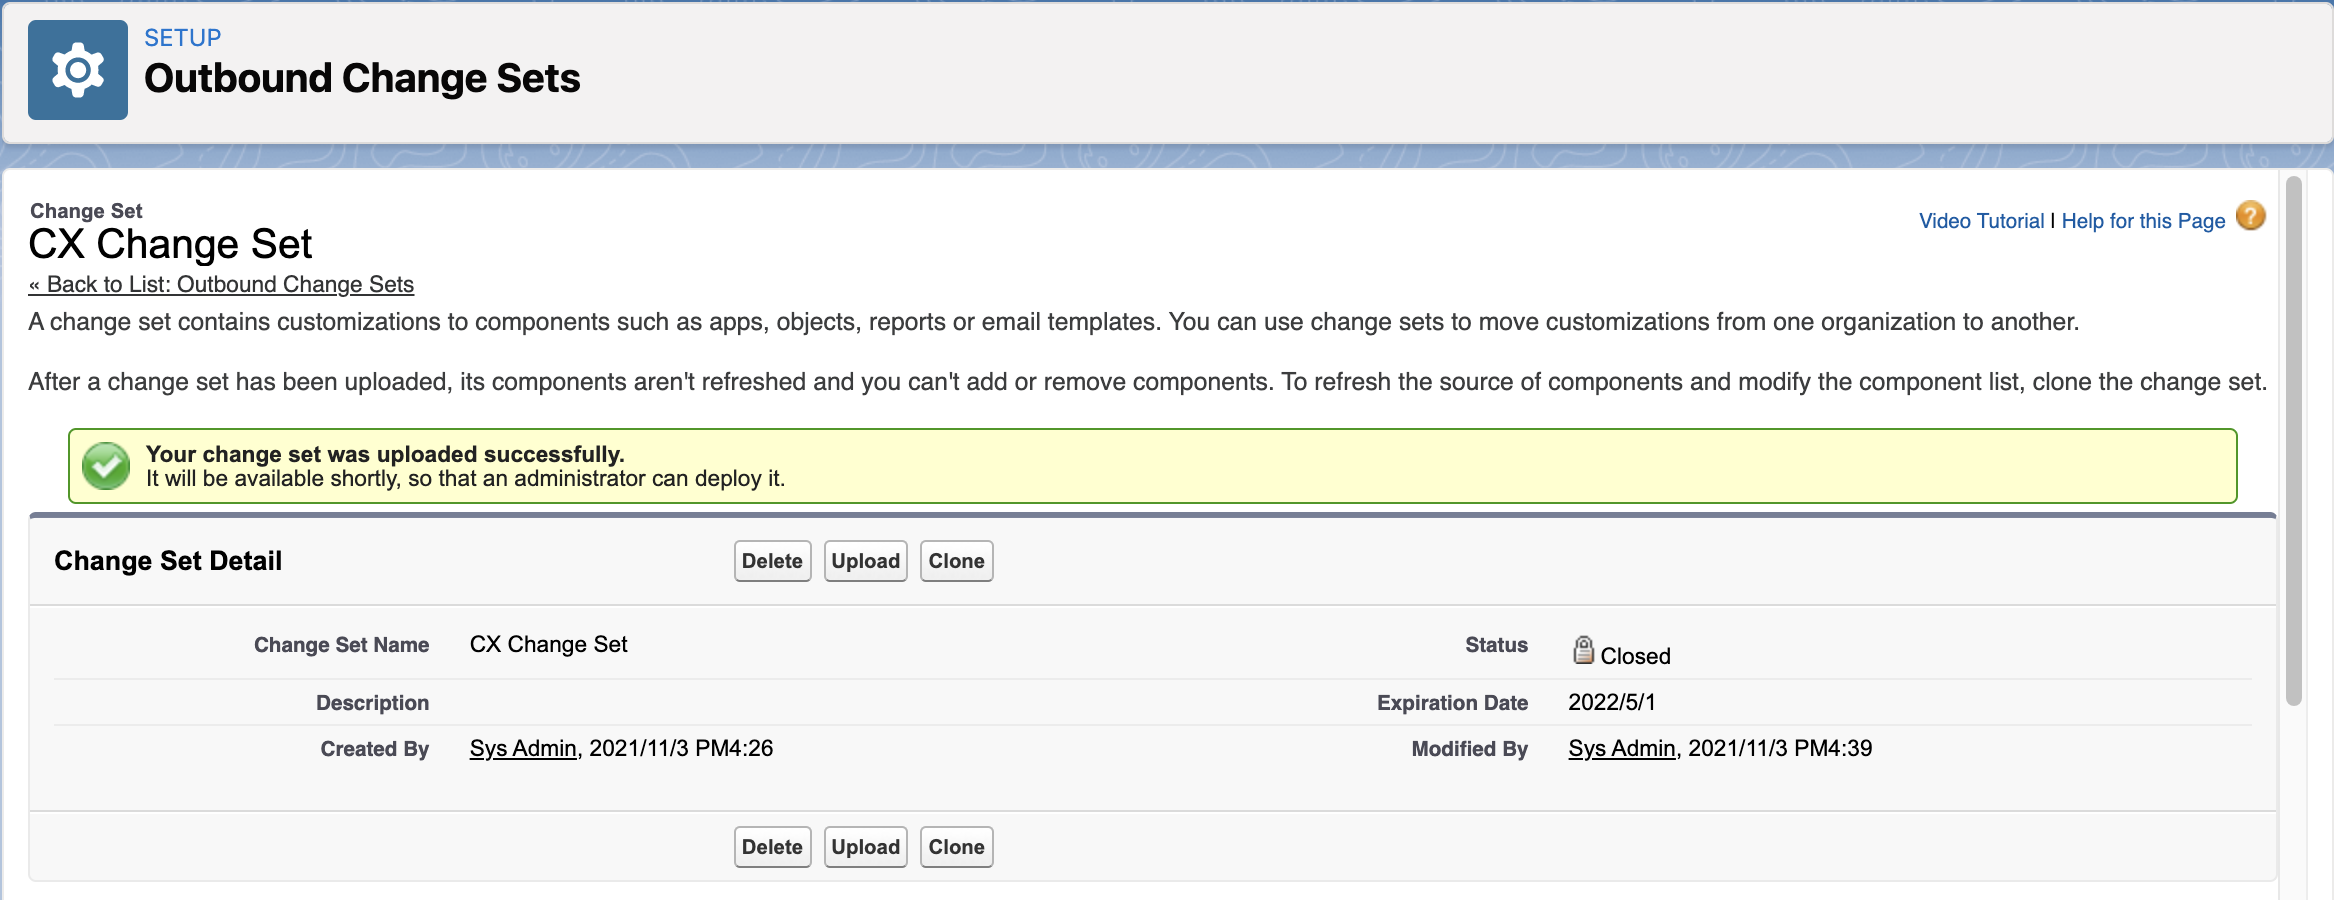
Sandbox Outbound Change Set Upload Status
- Also, an email will be received when the upload is completed successfully.
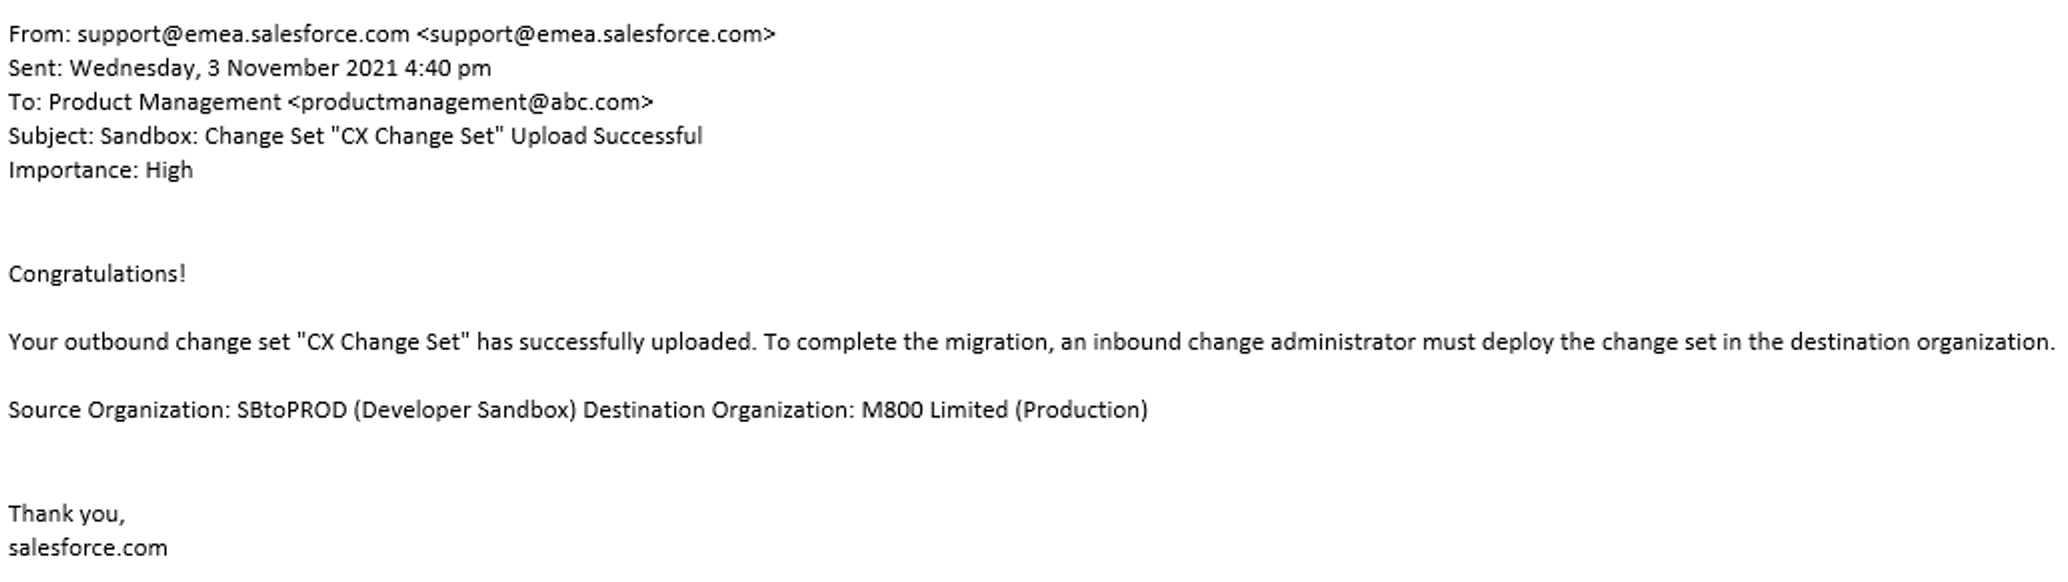
Email Received - Successful Upload of Change Sets
Then,
- Log in to your Salesforce Production Org using your System Admin account
- Navigate to Setup page > Environments > Change Sets > Inbound Change Sets
- Find the Change Set uploaded from the Sandbox Org and click Deploy
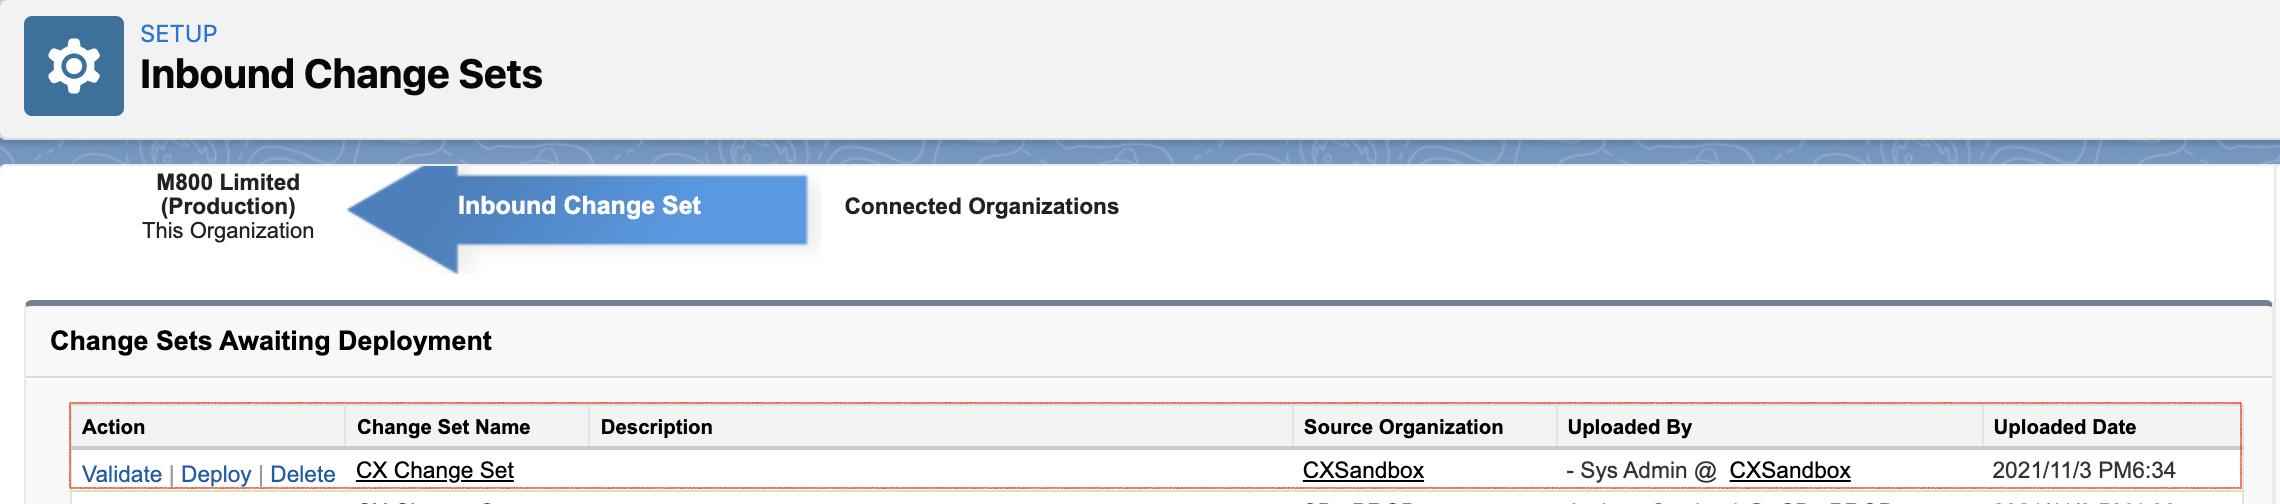
Production Inbound Change Set Deployment
- Keep the Test Option to Default, and click Deploy.
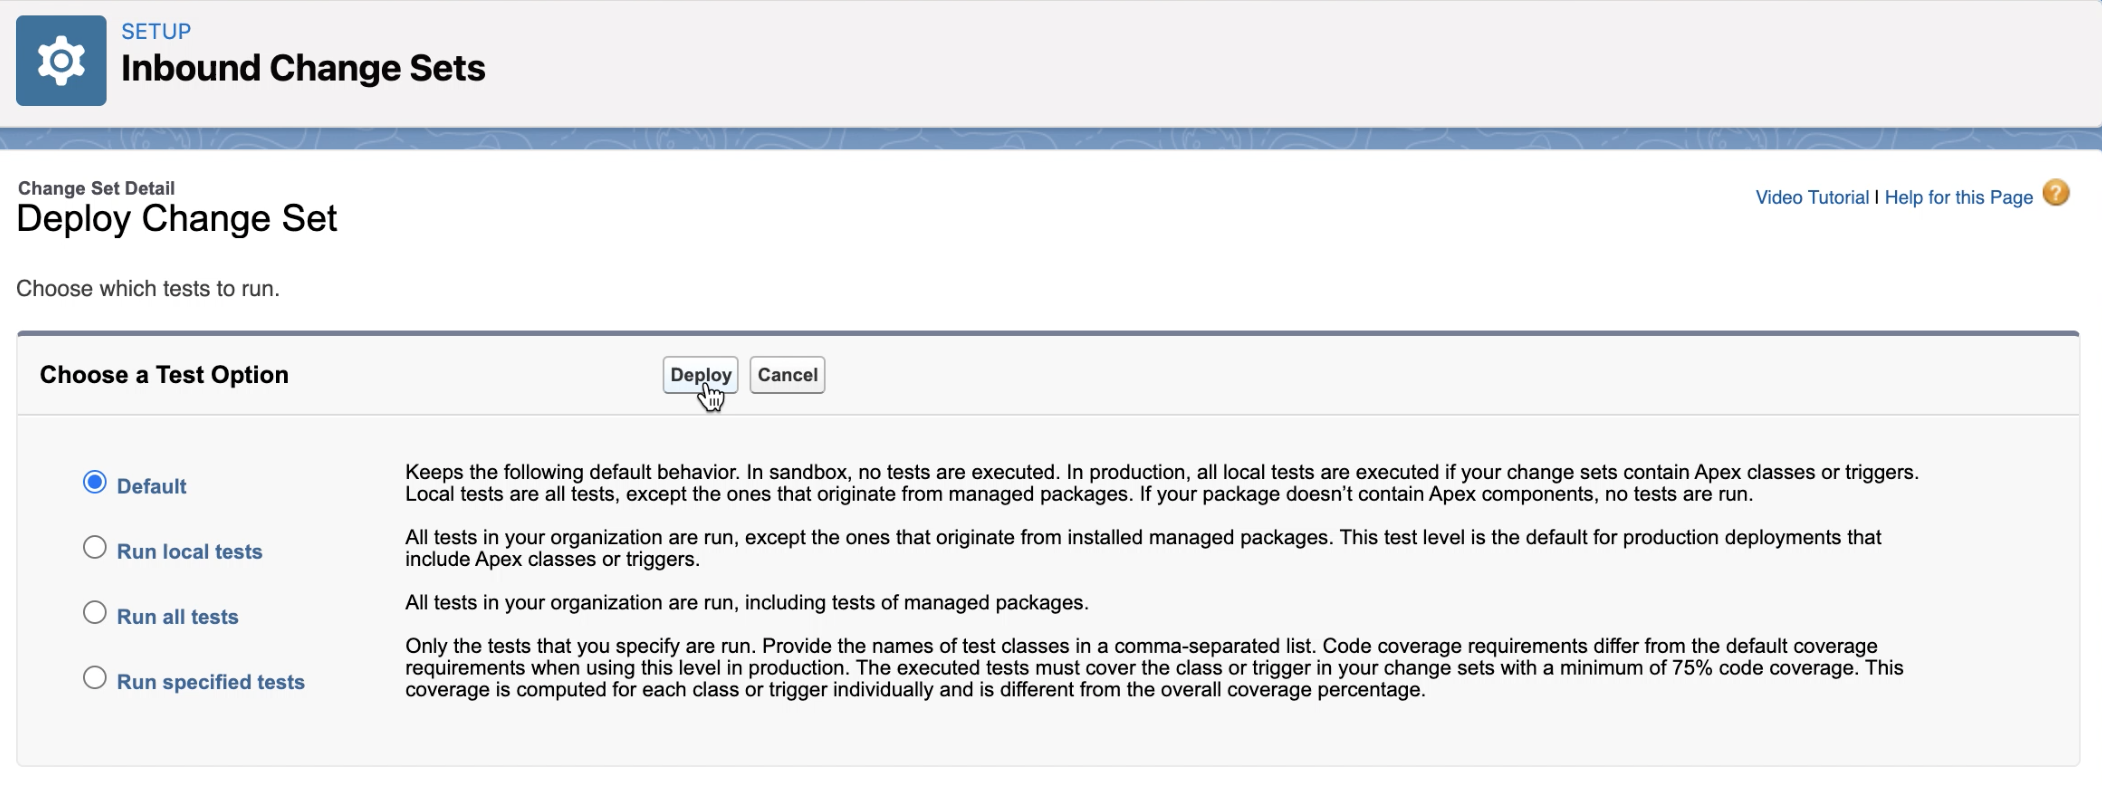
Production Inbound Change Set Deployment
- A pop-up warning window will appear about deploying the change sets. Click OK
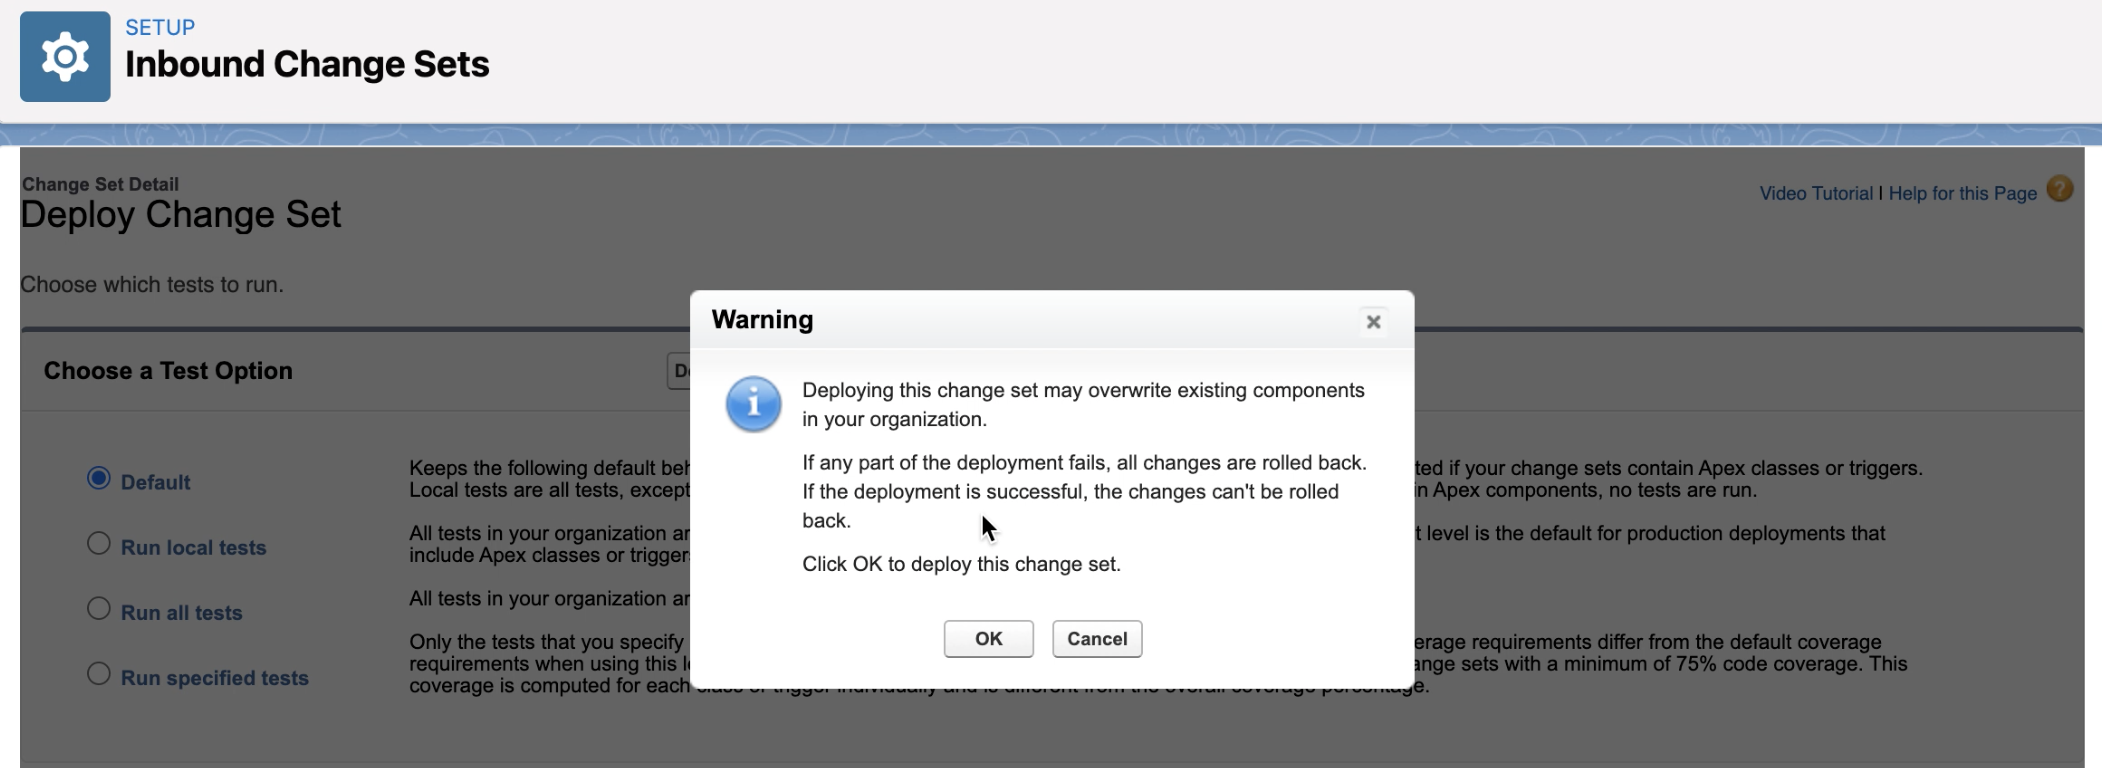
Production Inbound Change Set Deployment
- Back in the Inbound Chang Set, a notice of Deployment Started - Track the progress on the Deployment Status page.
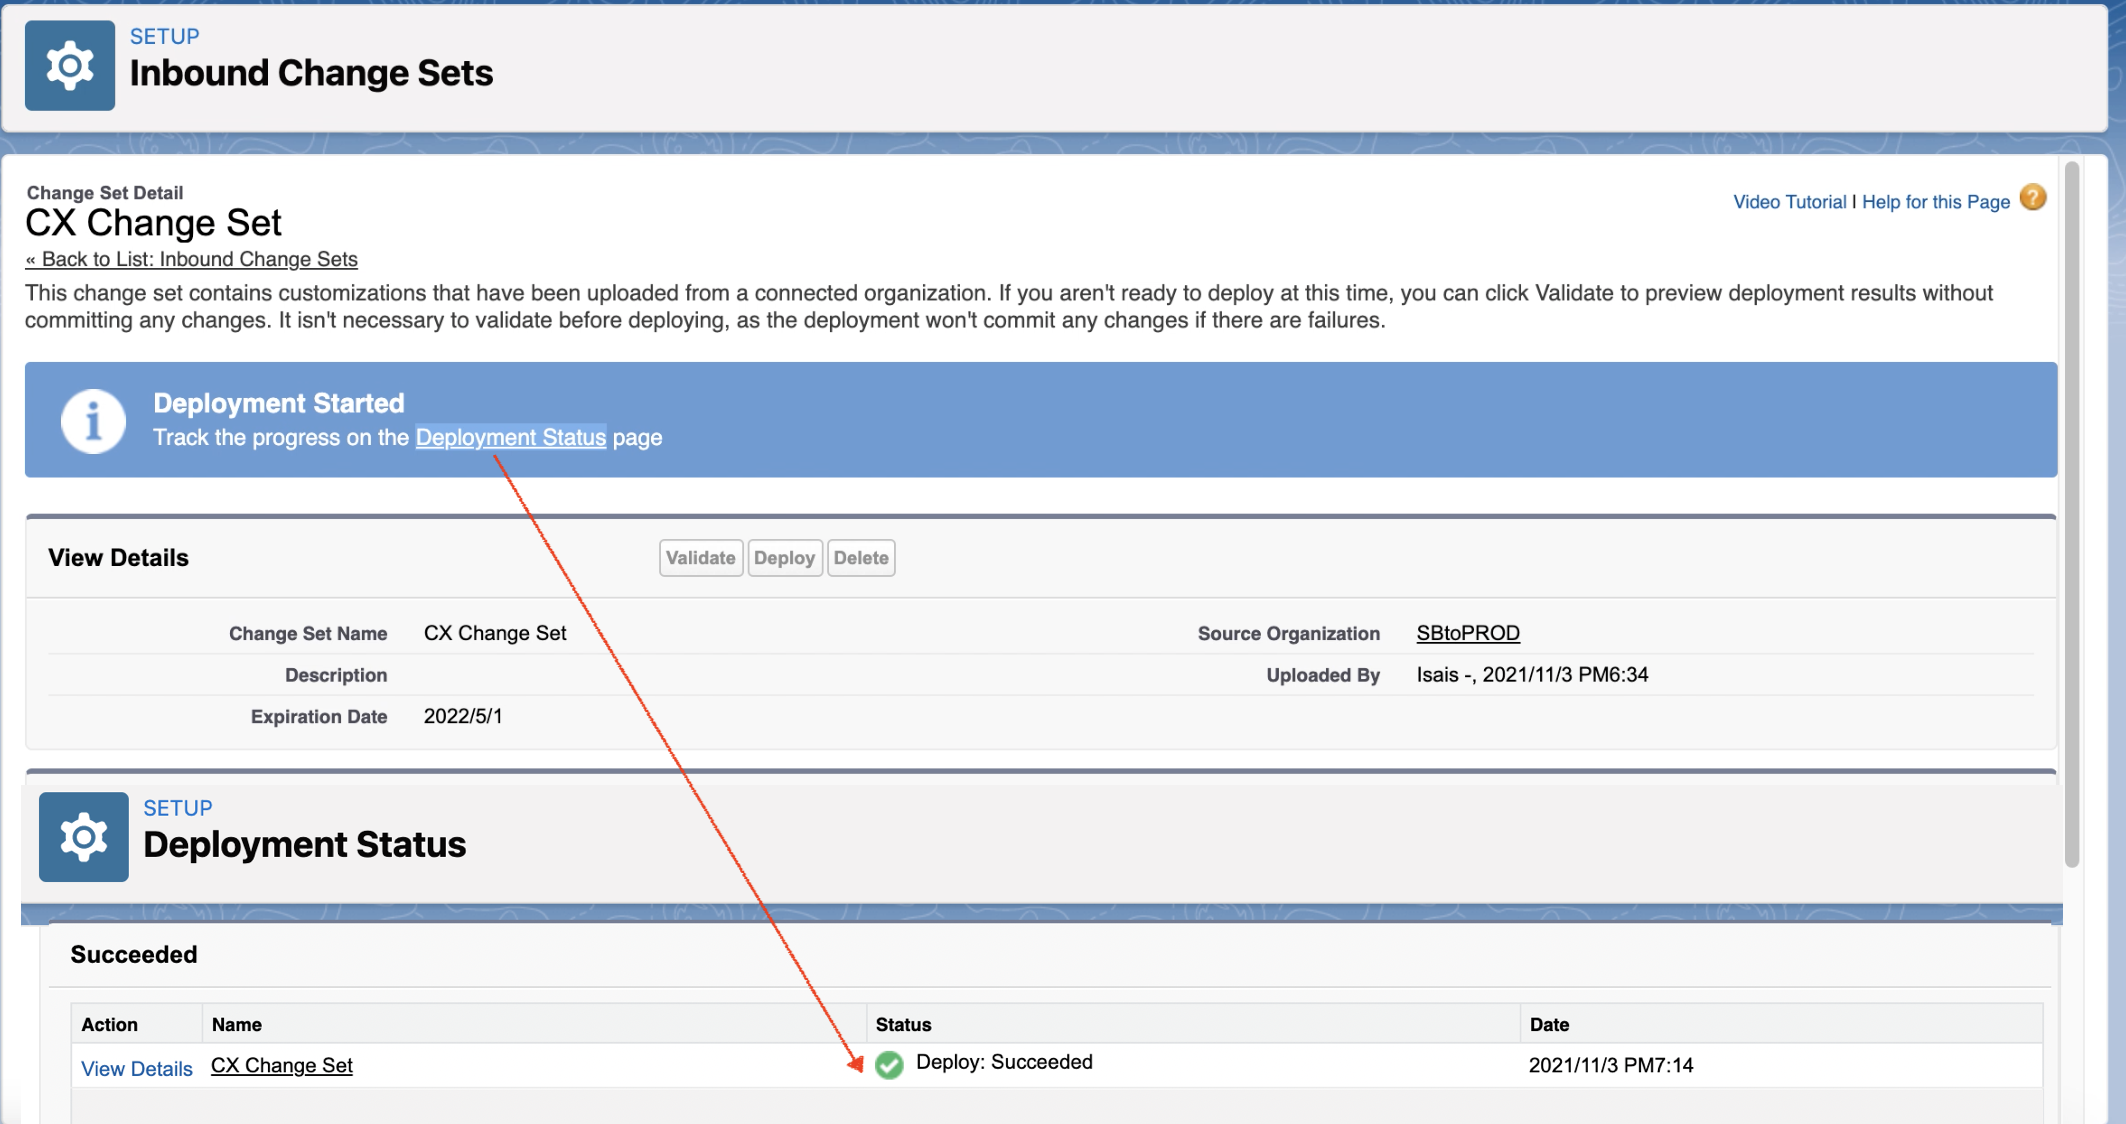
Production Inbound Change Set Deployment Status
- Also, an email will be received when the deployment is completed successfully.
- Navigate to Setup > Custom Code > Apex Classes
- Check that the four (4) Apex Classes from the deployed Change Sets appear in your Salesforce Production.
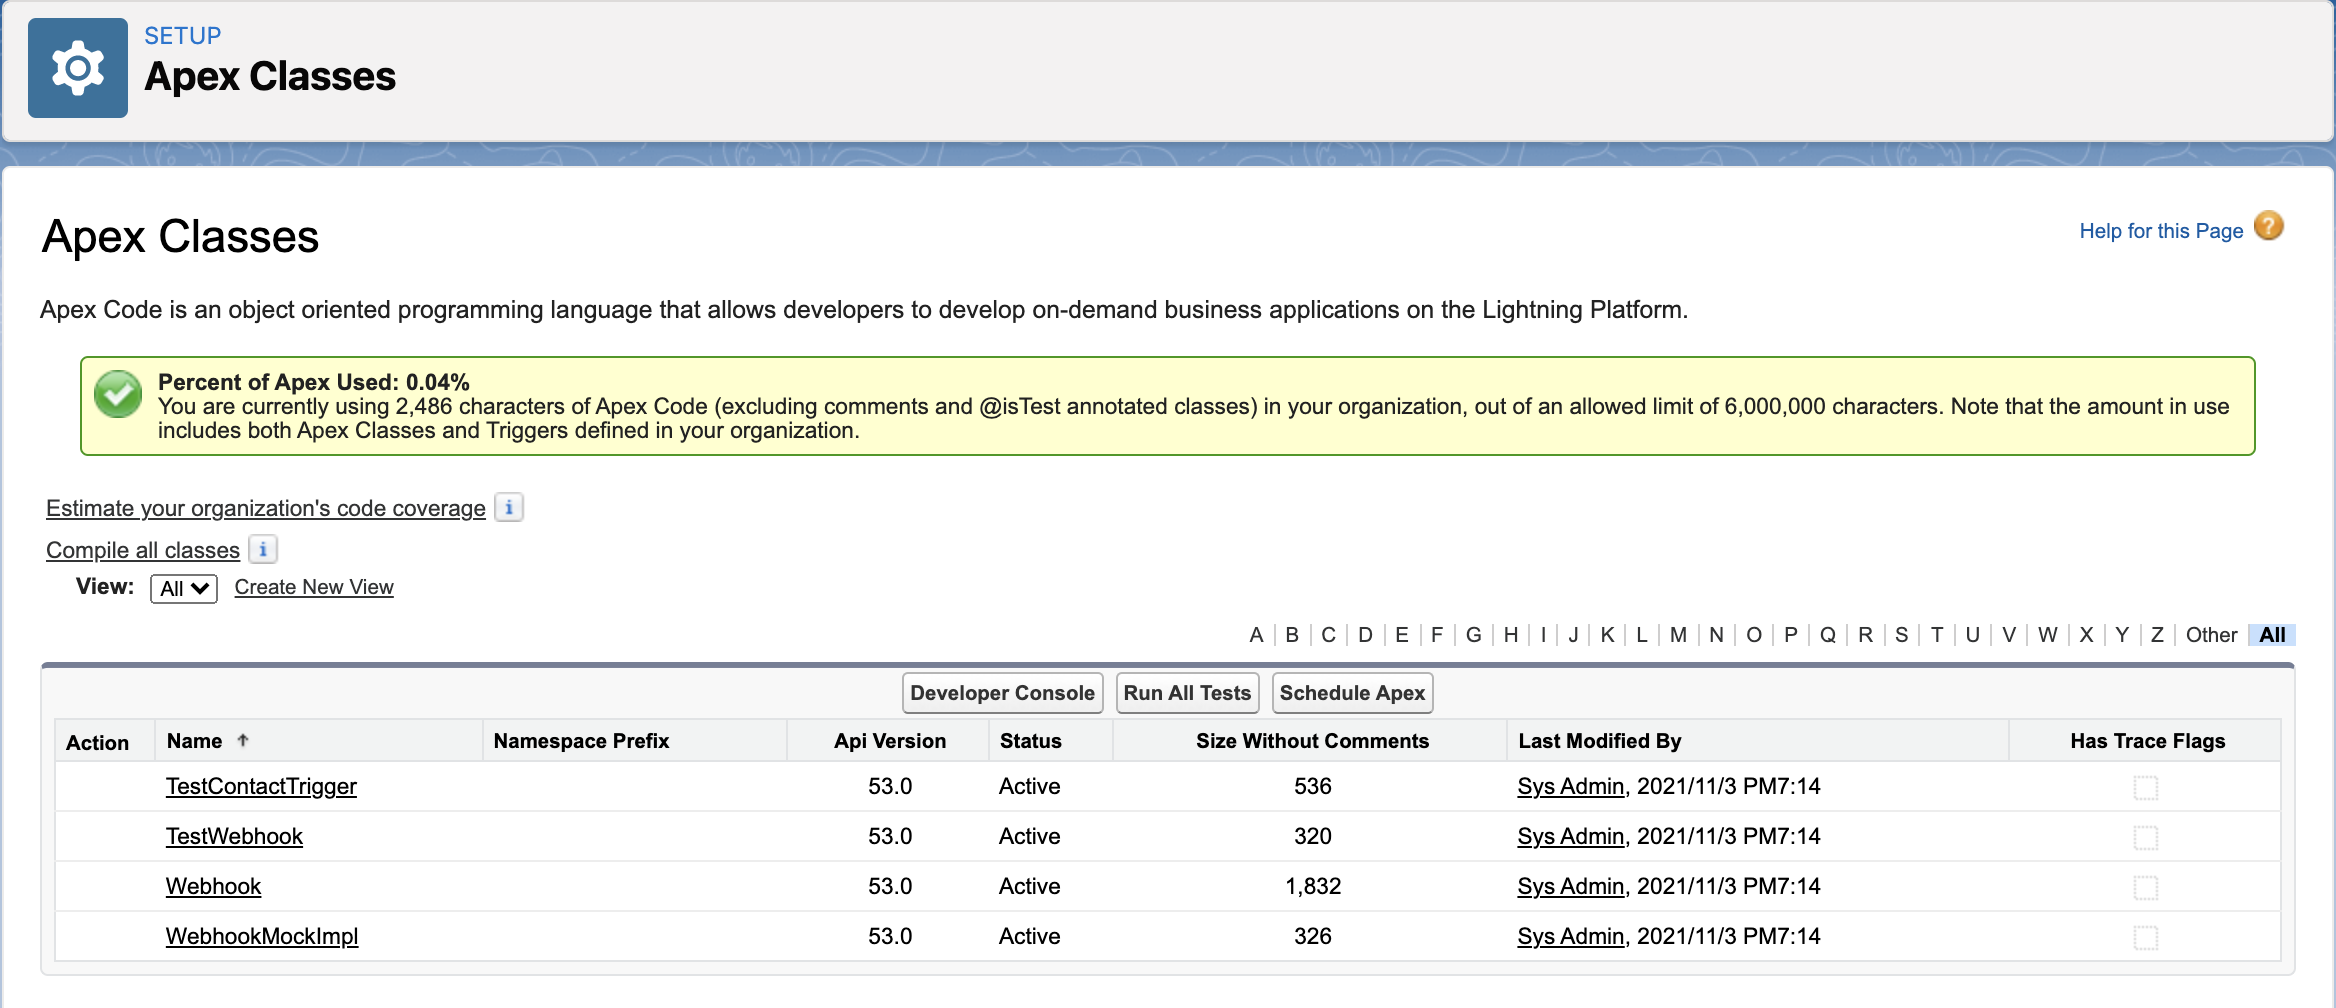
Production - Apex Classes
- Navigate to Setup > Custom Code > Apex Triggers
- Check that the Apex Trigger from the deployed Change Sets are appearing in your Salesforce Production
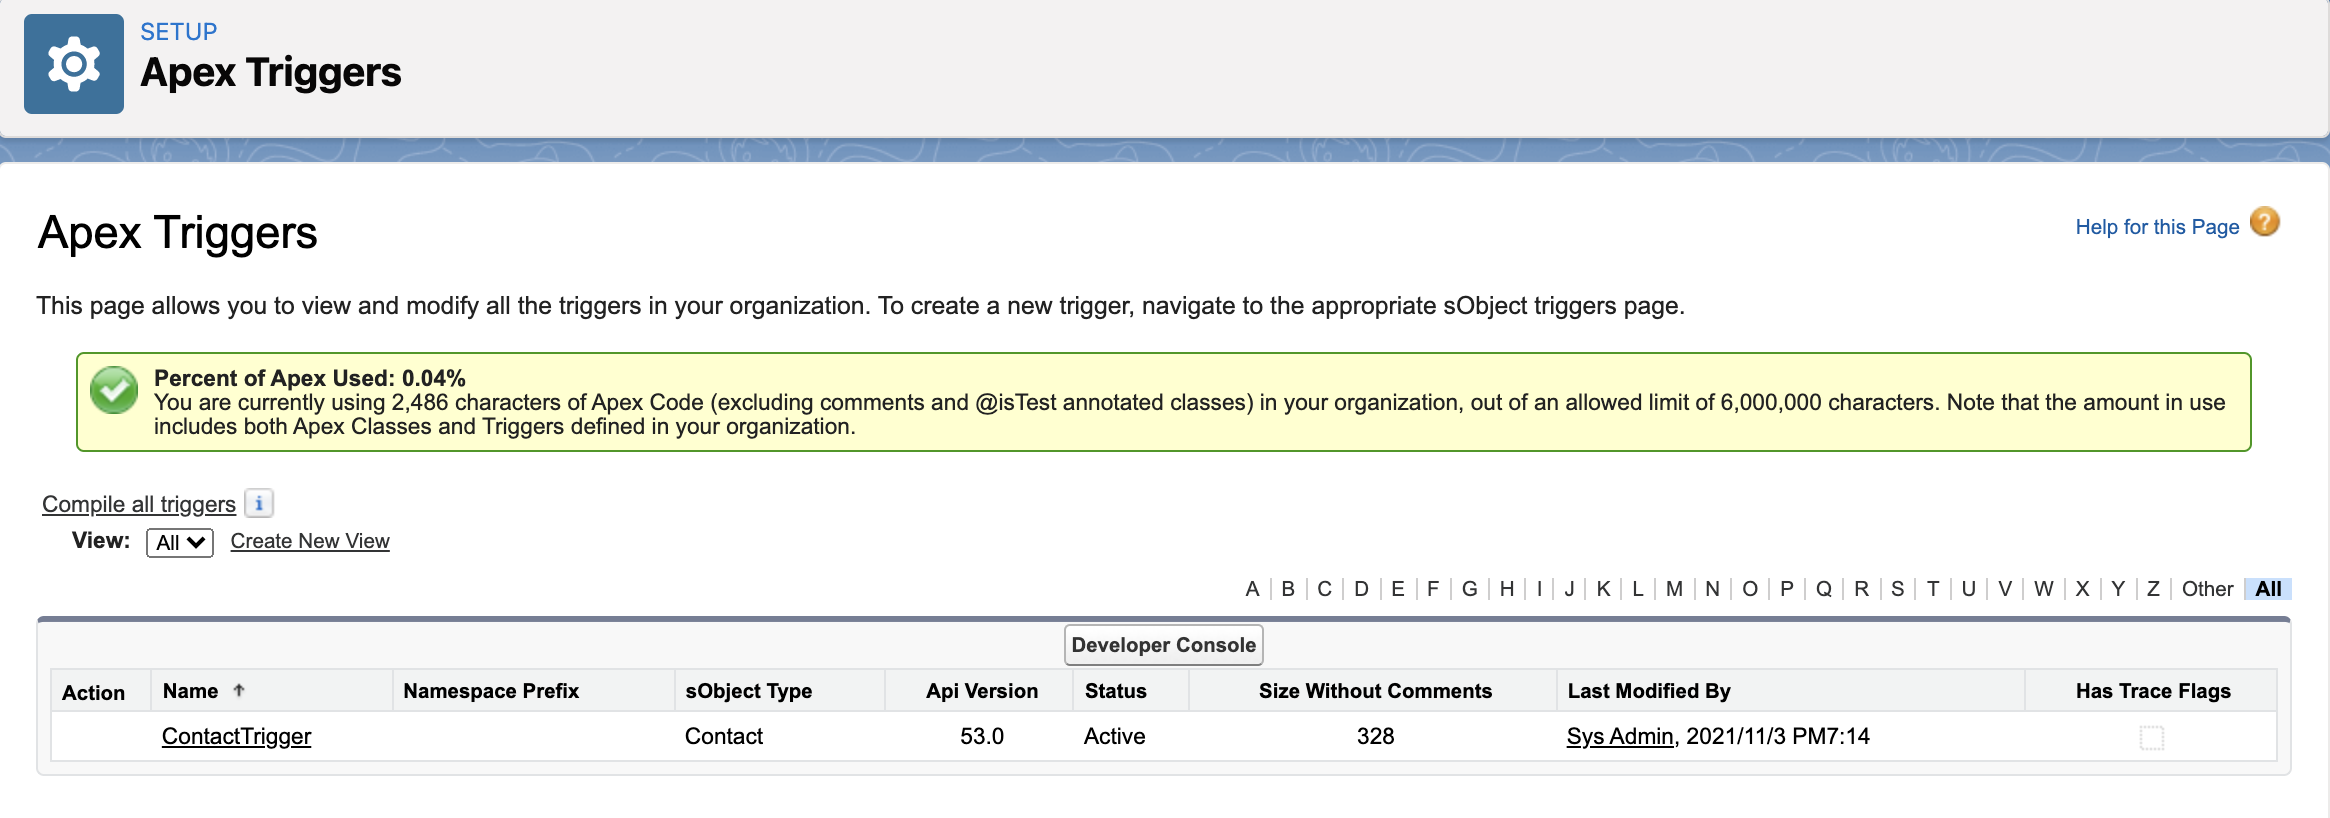
Production - Apex Trigger
- Back in the CINNOX Dashboard, click Next
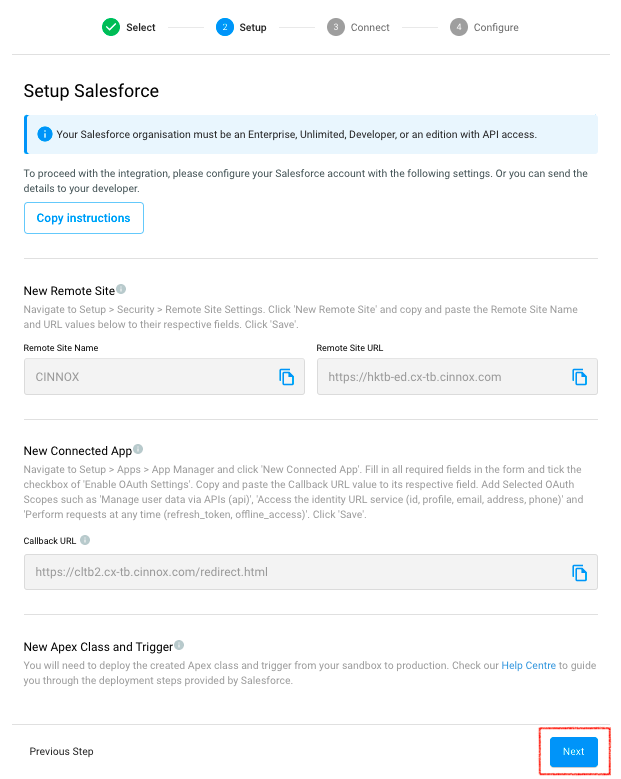
CINNOX Dashboard > Production - Setup
📘
Providing the Consumer Key, Consumer Secret, and Domain steps are similar to the steps of Sandbox integration. The only difference is the environment.
Consumer Key and Consumer Secret
To provide the Consumer Key:
- Log in to your Salesforce Production using your System Admin account
- Navigate to the Setup page > Apps > App Manager.
- Find the Connected App recently created for CINNOX.
- Click the arrow down icon and select View.
- Click 'Copy' for the Consumer Key.
- Paste it on the respective field in CINNOX.
To provide the Consumer Secret:
- Click 'Click to reveal' and copy the value.
- Paste it on the respective field in CINNOX.
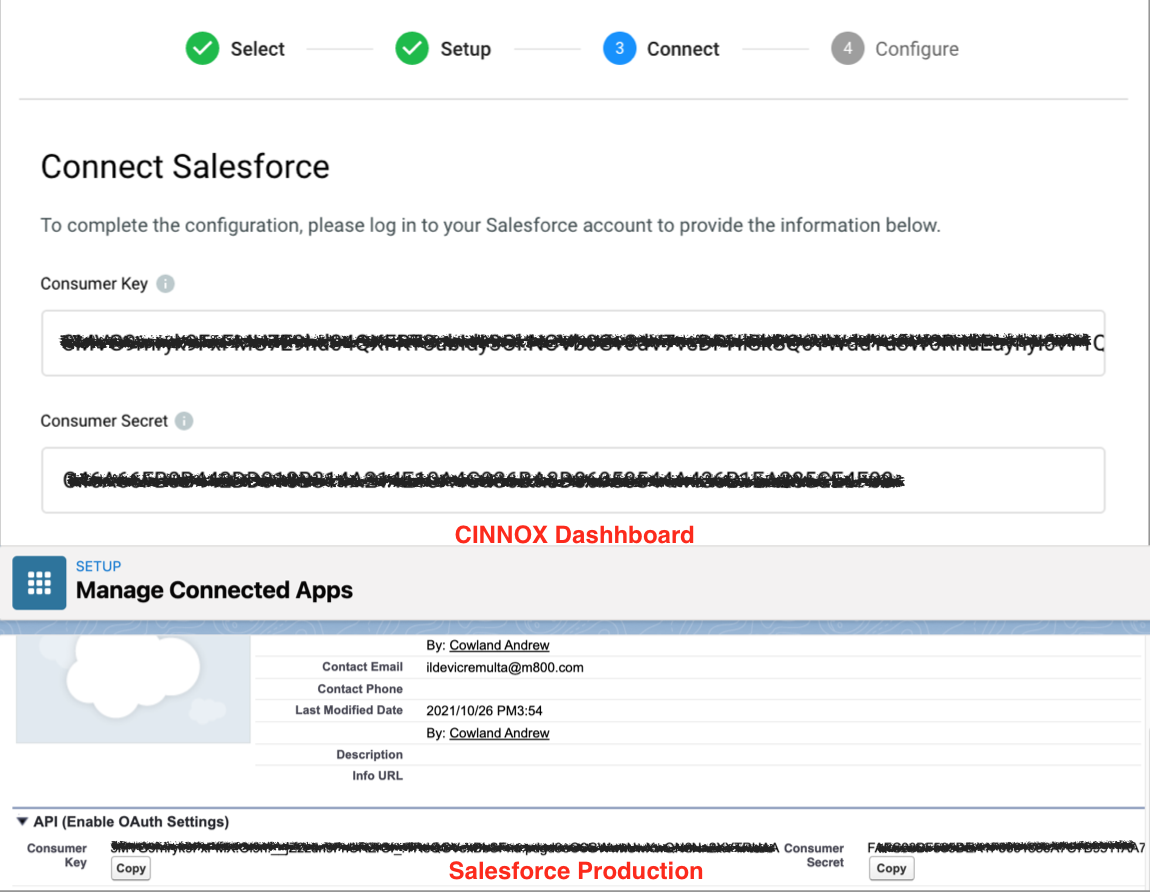
Production - Consumer Key and Secret
Domain Name
To find the Domain Name:
- On your Salesforce Production Org page, navigate to the URL.
- Copy the domain name, e.g., https://abc.lightning.force.com.
- Paste it on the respective field in CINNOX.
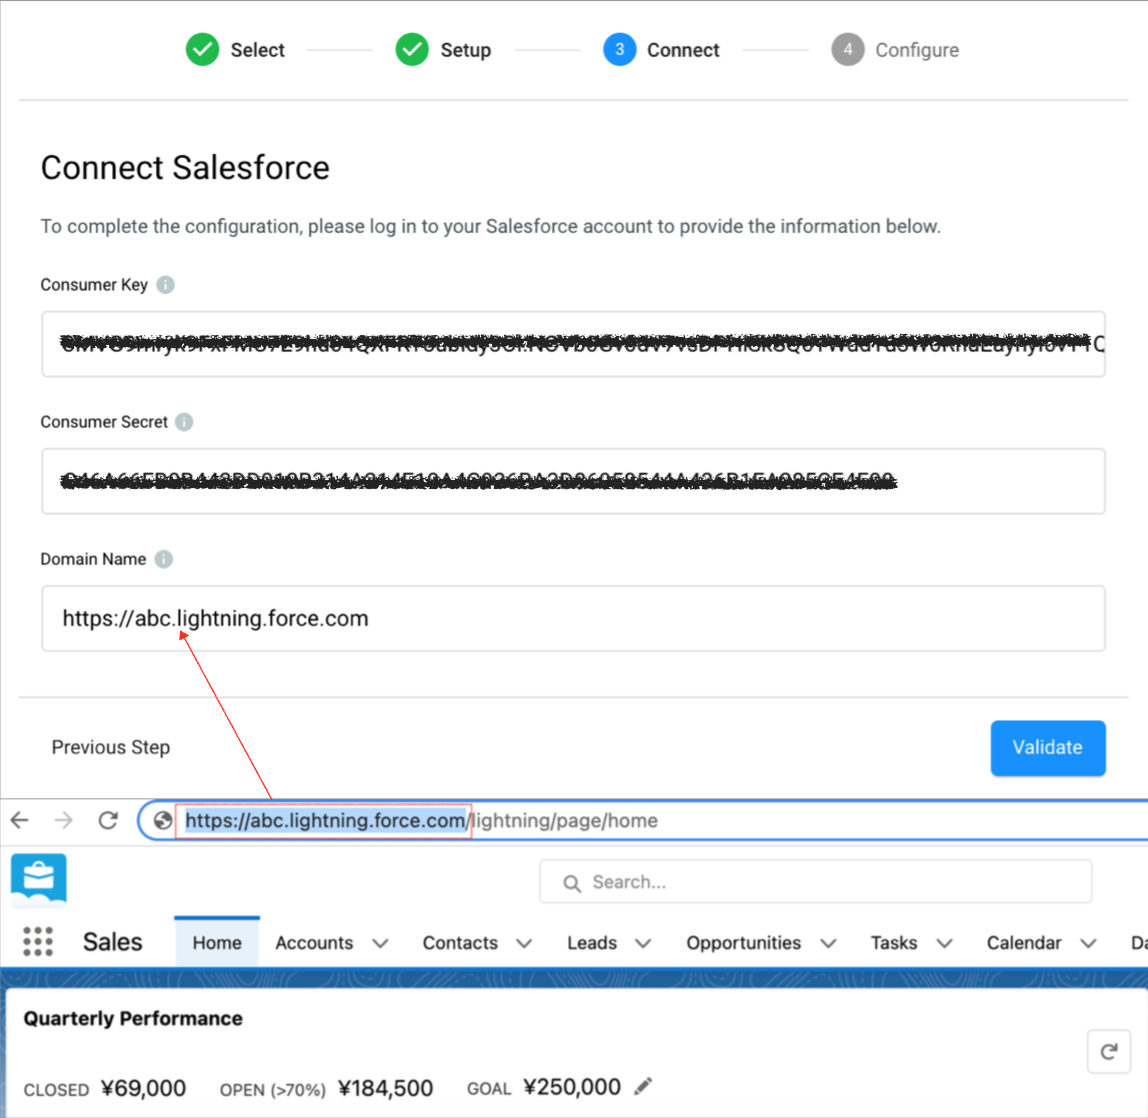
Production Org Domain
- Click Validate.
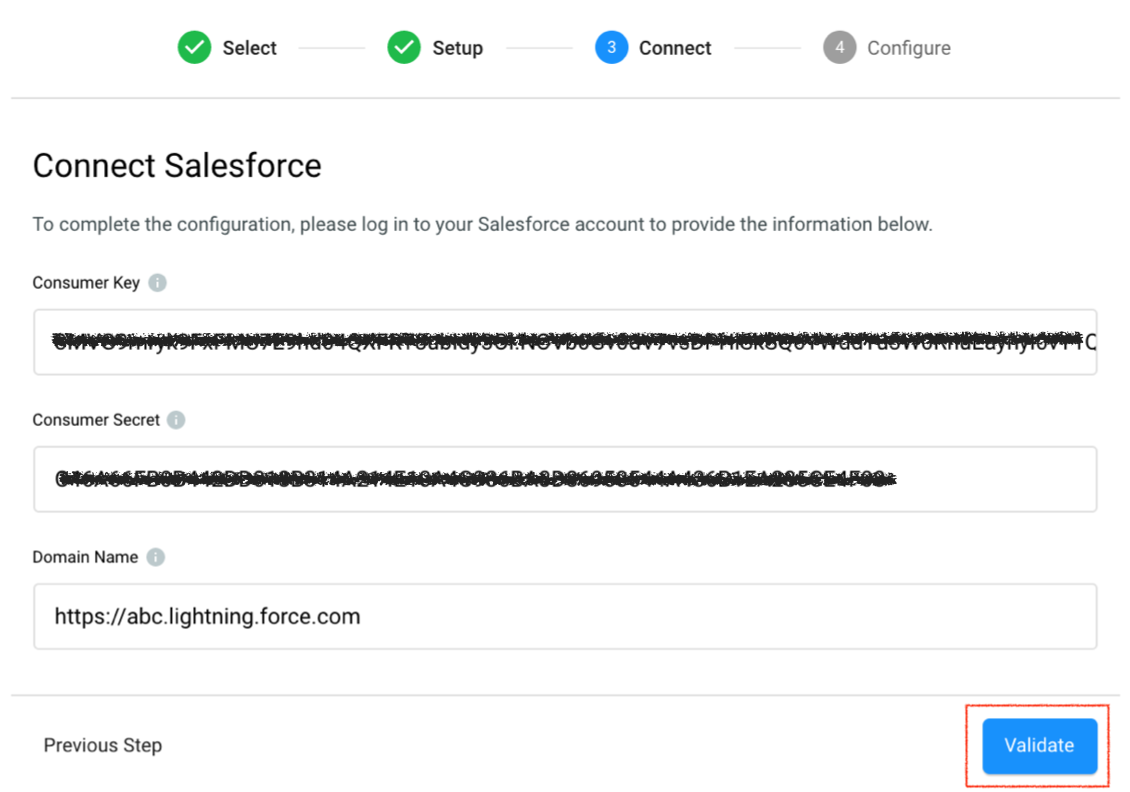
Validate Production Details
A pop-up window will appear, asking you to log in to your Salesforce System Admin account to authorise CINNOX.
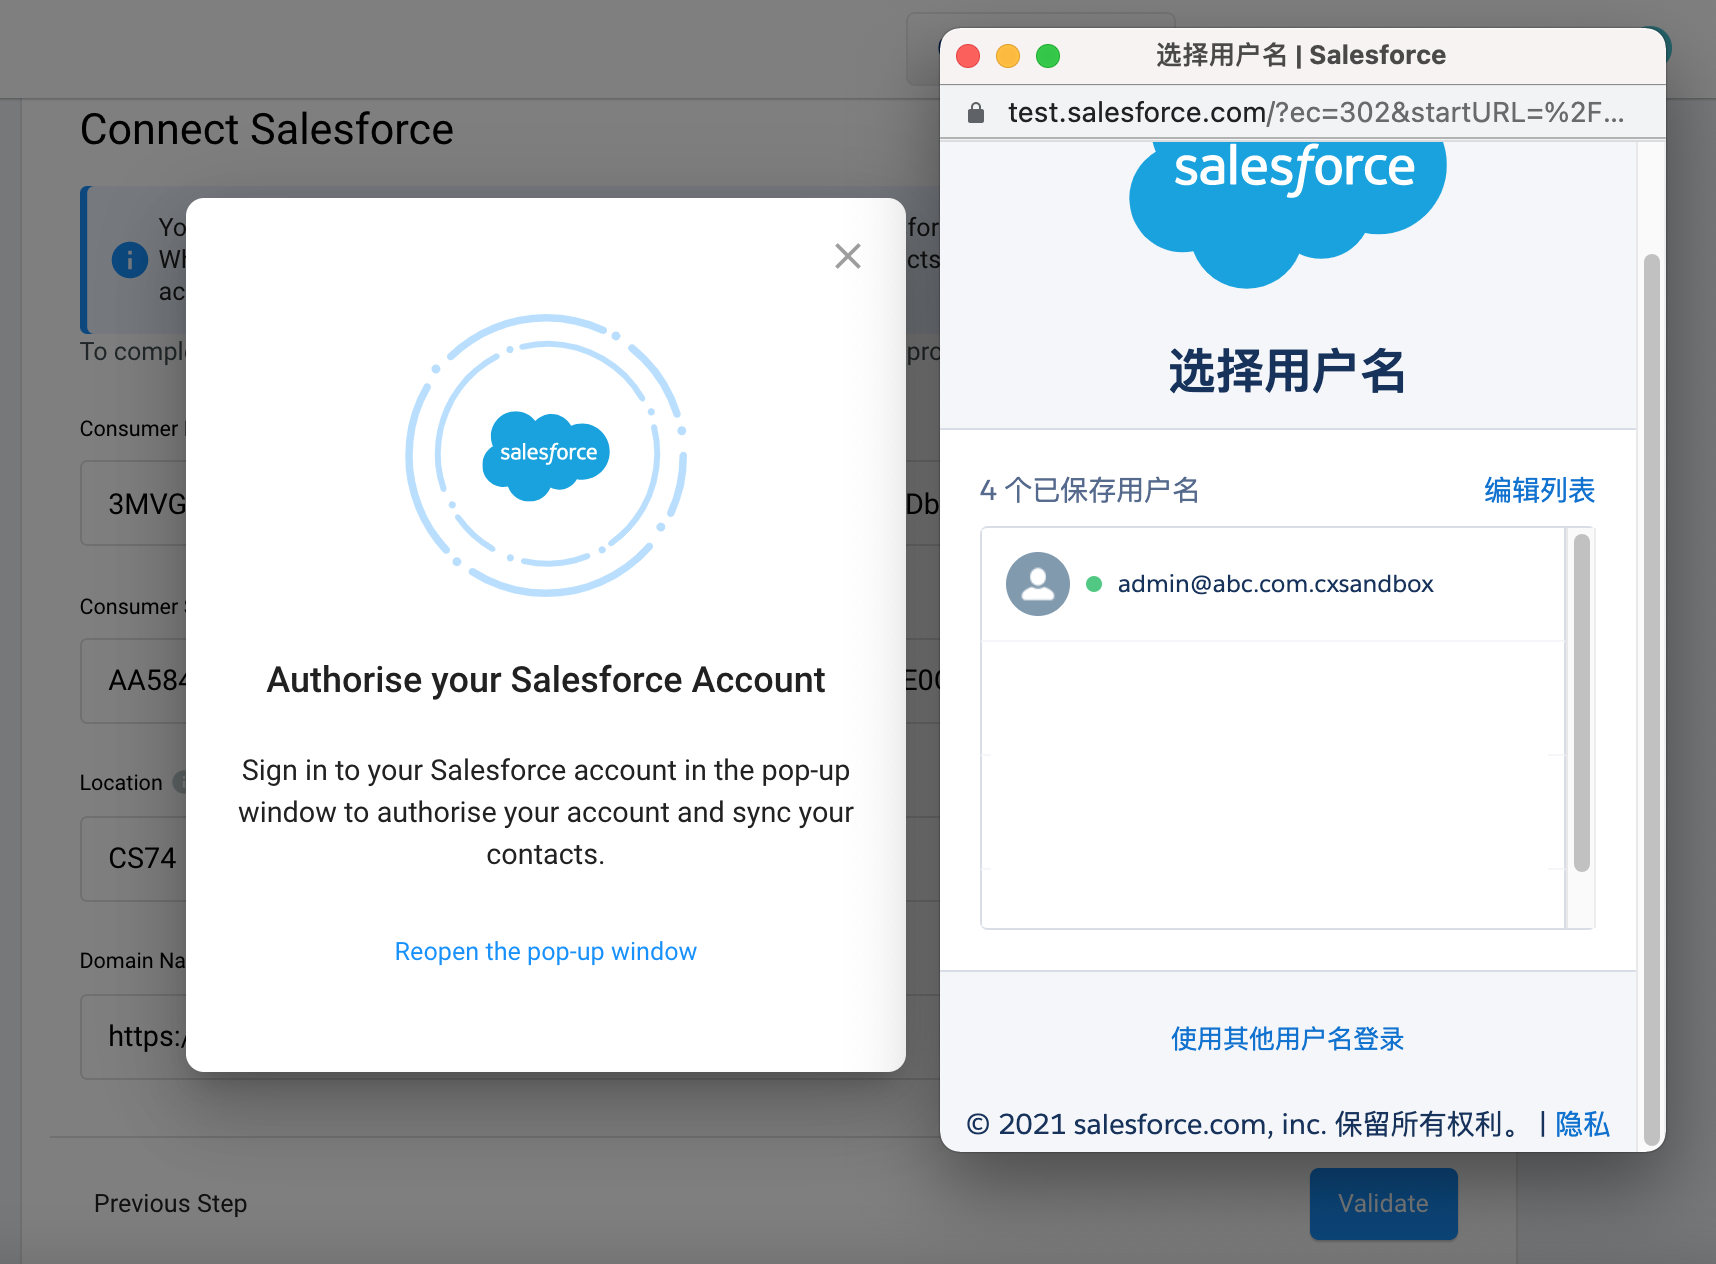
Validate the Production Integration
Note: If your Salesforce account is logged into a device and browser for the first time, Salesforce will require the verification code sent to your email.
And provide permissions to CINNOX to access the following:
- Access the identity URL service
- Manager user data via APIs
- Perform requests at any time
- Click Allow
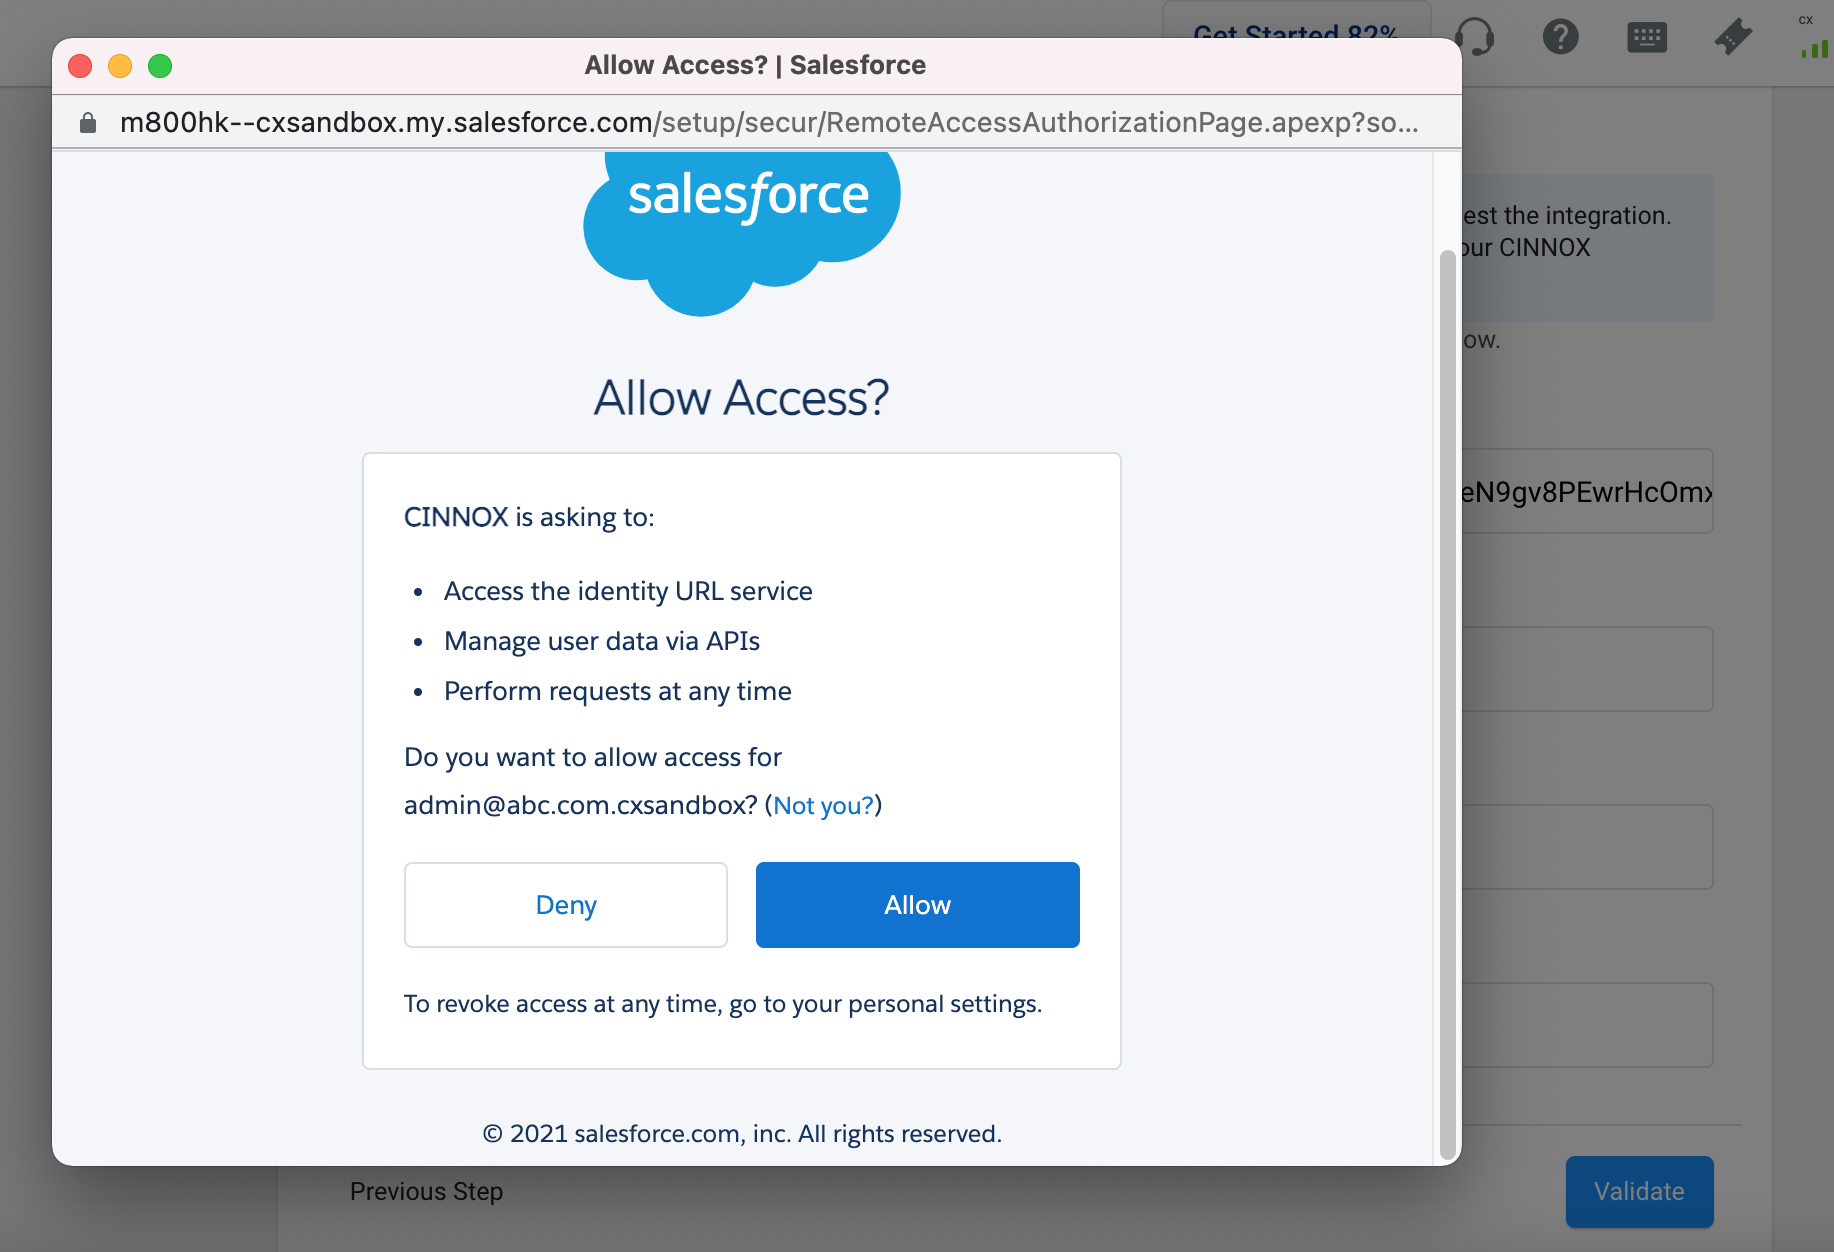
Allow Permissions to CINNOX
The page below will appear when you have completed the steps and successfully connected your Production Org to your CINNOX service.
Your Salesforce contacts will sync and appear in your CINNOX Contacts by default.
You can toggle ON the Auto-sync External Contacts to Salesforce to sync and display your CINNOX external contacts in Salesforce.
- Click Next to confirm the auto-sync settings.
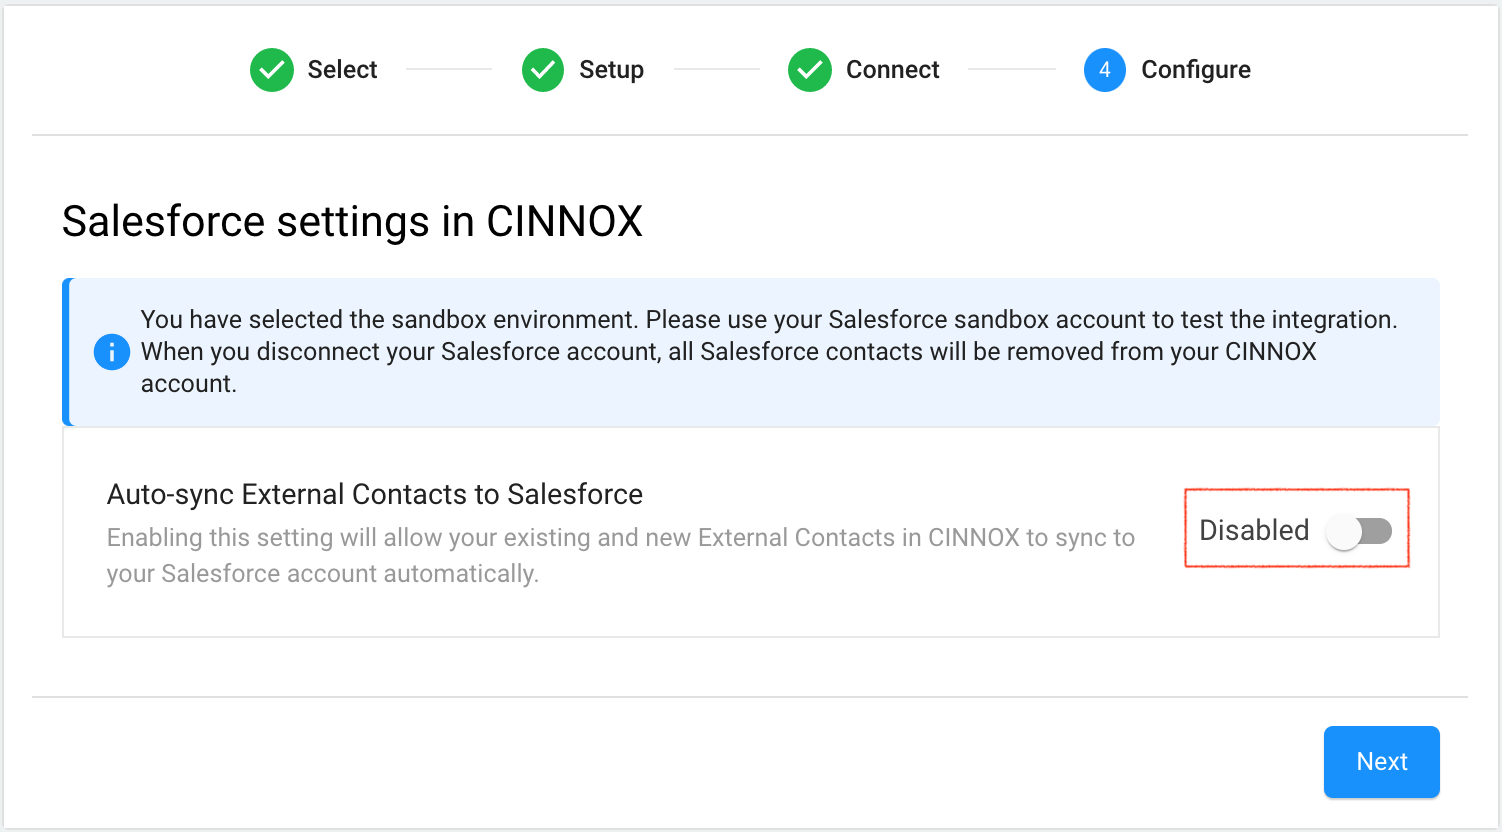
Auto-sync External Contacts to Salesforce Settings
- Click Done to exit on the current page.
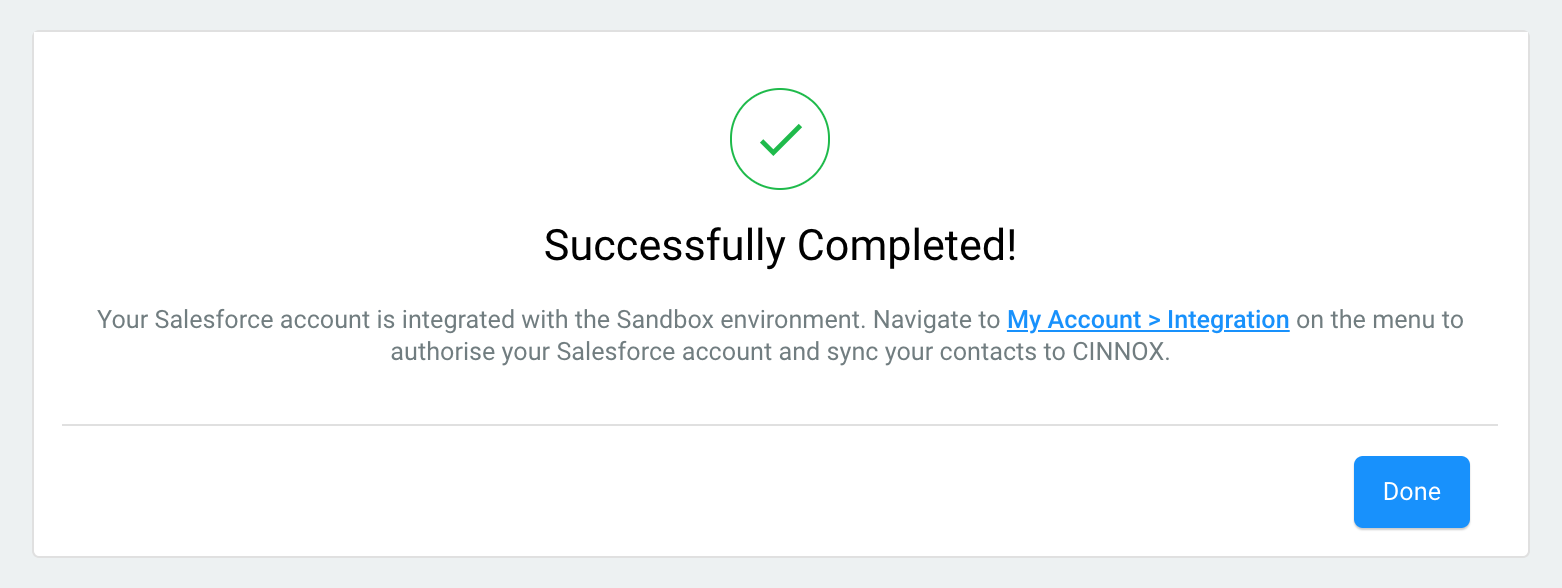
Production Integration to CINNOX Successfully Completed
Staff Login to Salesforce in CINNOX
Refer to Salesforce Contacts and Cases in CINNOX section of this Guide for details on logging in to your Salesforce and the features available in more information.