
CINNOX Keyword Bot for SMS Auto-Reply
Overview
The Keyword Bot for SMS Auto-Reply feature in CINNOX allows businesses to automatically respond to inbound SMS messages based on predefined keywords.
When a customer sends an SMS containing a matching keyword, CINNOX instantly sends a preset reply message — without any agent involvement.
This helps you:
- Respond instantly to customer replies
- Automate campaign opt-in and opt-out
- Reduce manual workload for agents
- Stay compliant with SMS consent regulations
- Support SMS marketing campaigns and event promotions
How It Works
- A customer sends an SMS to your CINNOX virtual number.
- CINNOX checks the message for configured keywords.
- If a match is found, CINNOX automatically sends the assigned auto-reply message.
- The inbound message appears in the SMS Inbox and SMS Report.
- No agent action is required.
Keyword rules apply to all incoming SMS messages once the Keyword Bot is assigned to a virtual number.
Common Use Cases
| Use Case | Example |
|---|---|
| Campaign opt-in | Customer replies YES to receive promo details |
| Campaign opt-out | Customer replies NO or STOP to unsubscribe |
| Event follow-up | Customer receives event info after replying YES |
| Lead acknowledgement | Auto-reply to confirm the interest has been received |
Before You Start
Make sure you have:
- An active Virtual Number with SMS IN and OUT capability in CINNOX.
- Your keyword list and reply messages are prepared.
Set up keyword rules by defining:
- Keywords — the words or phrases customers are likely to send.
- Auto-Reply Messages — the message CINNOX should send when a keyword is detected.
Step-by-Step Setup
Setting up SMS Keyword Auto-Reply in CINNOX requires two configurations:
I. Create Your Keyword Bot and Add Keywords
II. Assign the Keyword Bot to your Virtual Number
I. Create Your Keyword Bot and Add Keywords
- Log in as an Admin to the CINNOX Web Dashboard.
- Navigate to: Administration → Destinations → Chatbot.
- Click Create Chatbot.
- Under Chatbot Source, select CINNOX Keyword Bot.
- Click Manage Keywords.
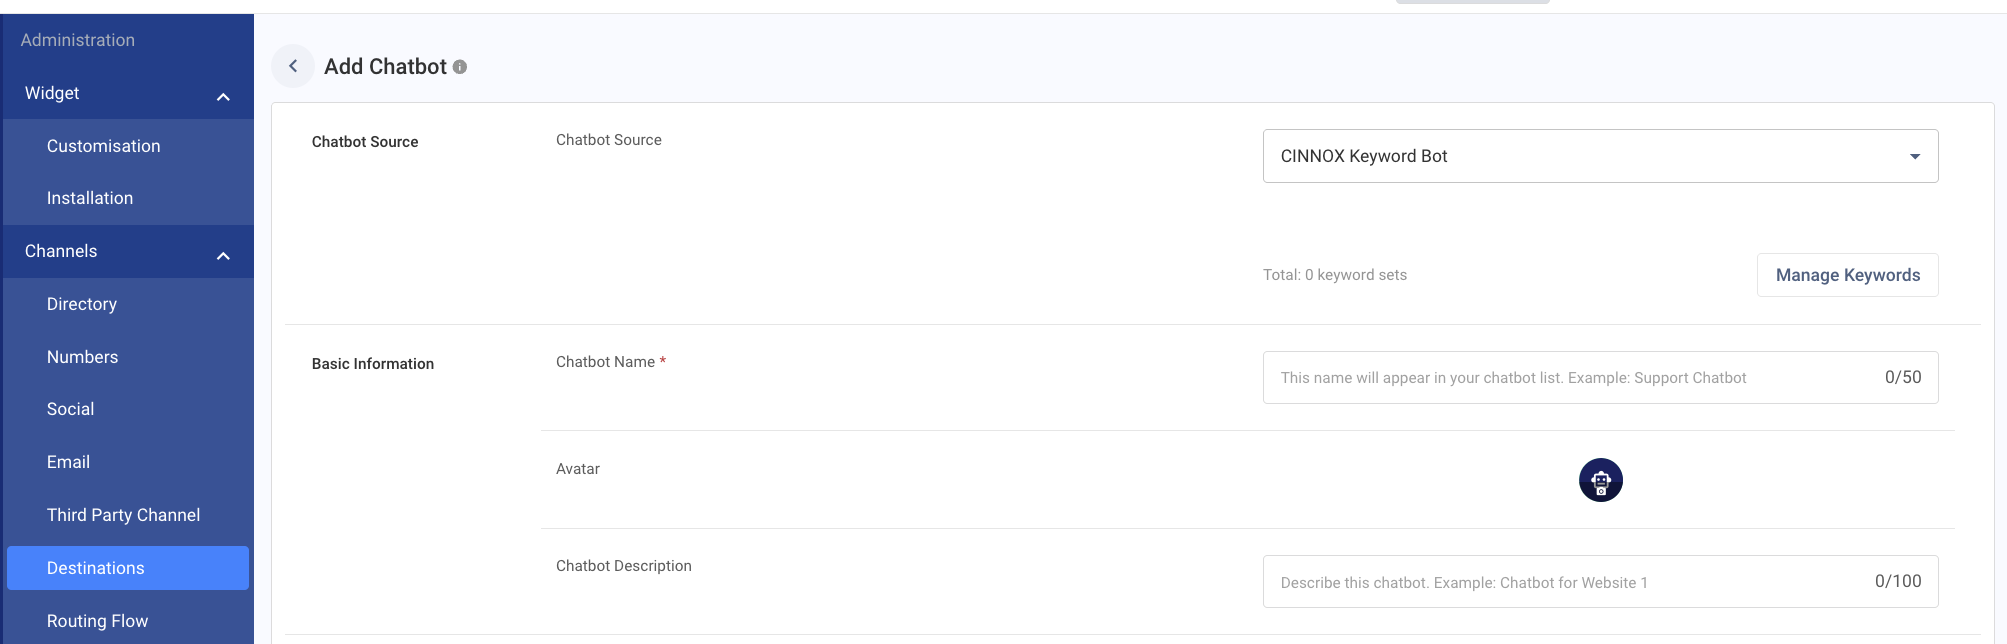
At this stage, you must add your keywords and auto-reply messages before creating the chatbot.
You can do this in two ways:
Option A — Import Keywords Using CSV (Recommended for Bulk Creation)
- Click Import, and a dialogue prompt will appear.
- Download the sample CSV template provided.
- The CSV file must contain 2 headers: keyword and Auto-Reply Message.
- Add your keyword sets and corresponding auto-reply messages into the file.
- Verify all keywords and reply messages are correct.
- Upload the file by drag-and-drop or browse to select the file.
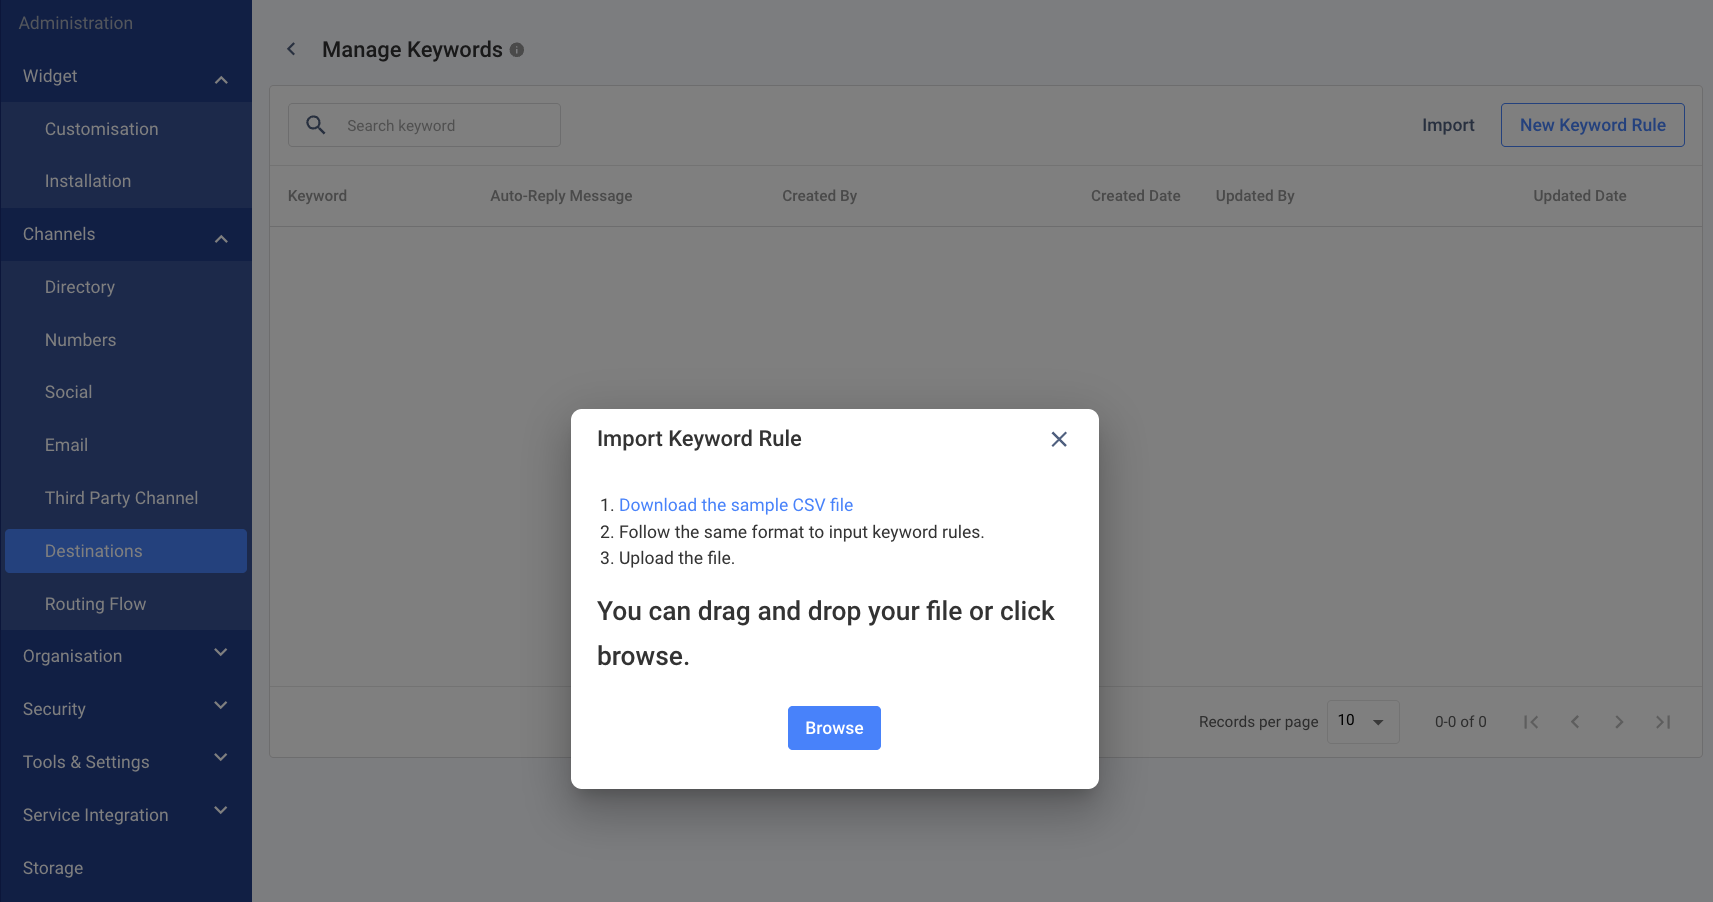
If there are any errors in the file, the system will prompt you to fix them before proceeding.
Option B — Add Keywords One by One
- Click New Keyword Rule.
- Enter the Keyword and its Auto-Reply Message.
- Click Create.
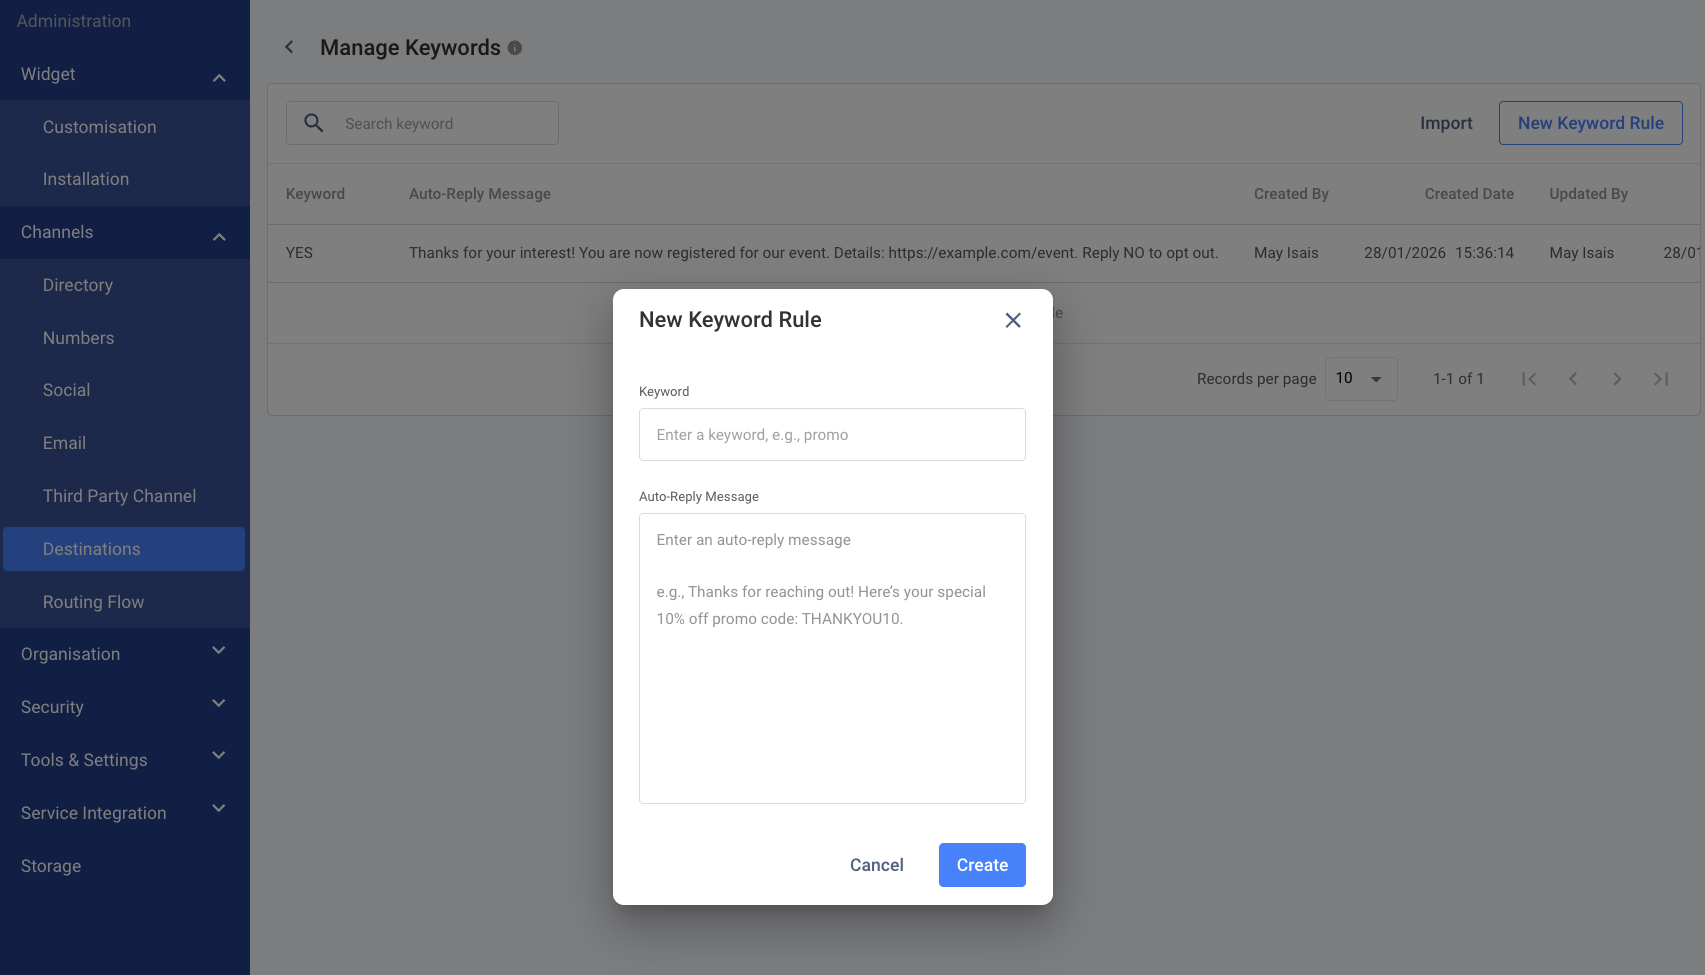
Repeat this step to add more keyword rules as needed.
Important:
- Keywords are not case sensitive. E.g., YES, Yes, and yes will all trigger the same rule.
- Duplicate keywords are not allowed within the same Keyword Bot.
- Each keyword can only be used once per Keyword Bot.
- Each Keyword Bot supports a maximum of 1000 keyword rules.
- Keywords are matched based on text contained anywhere in the message, not the entire message.
After all keywords are added and verified:
- Click < Manage Keywords to go back to the Chatbot page.
Total: N keyword sets shows how many keyword rules have been added to this bot.
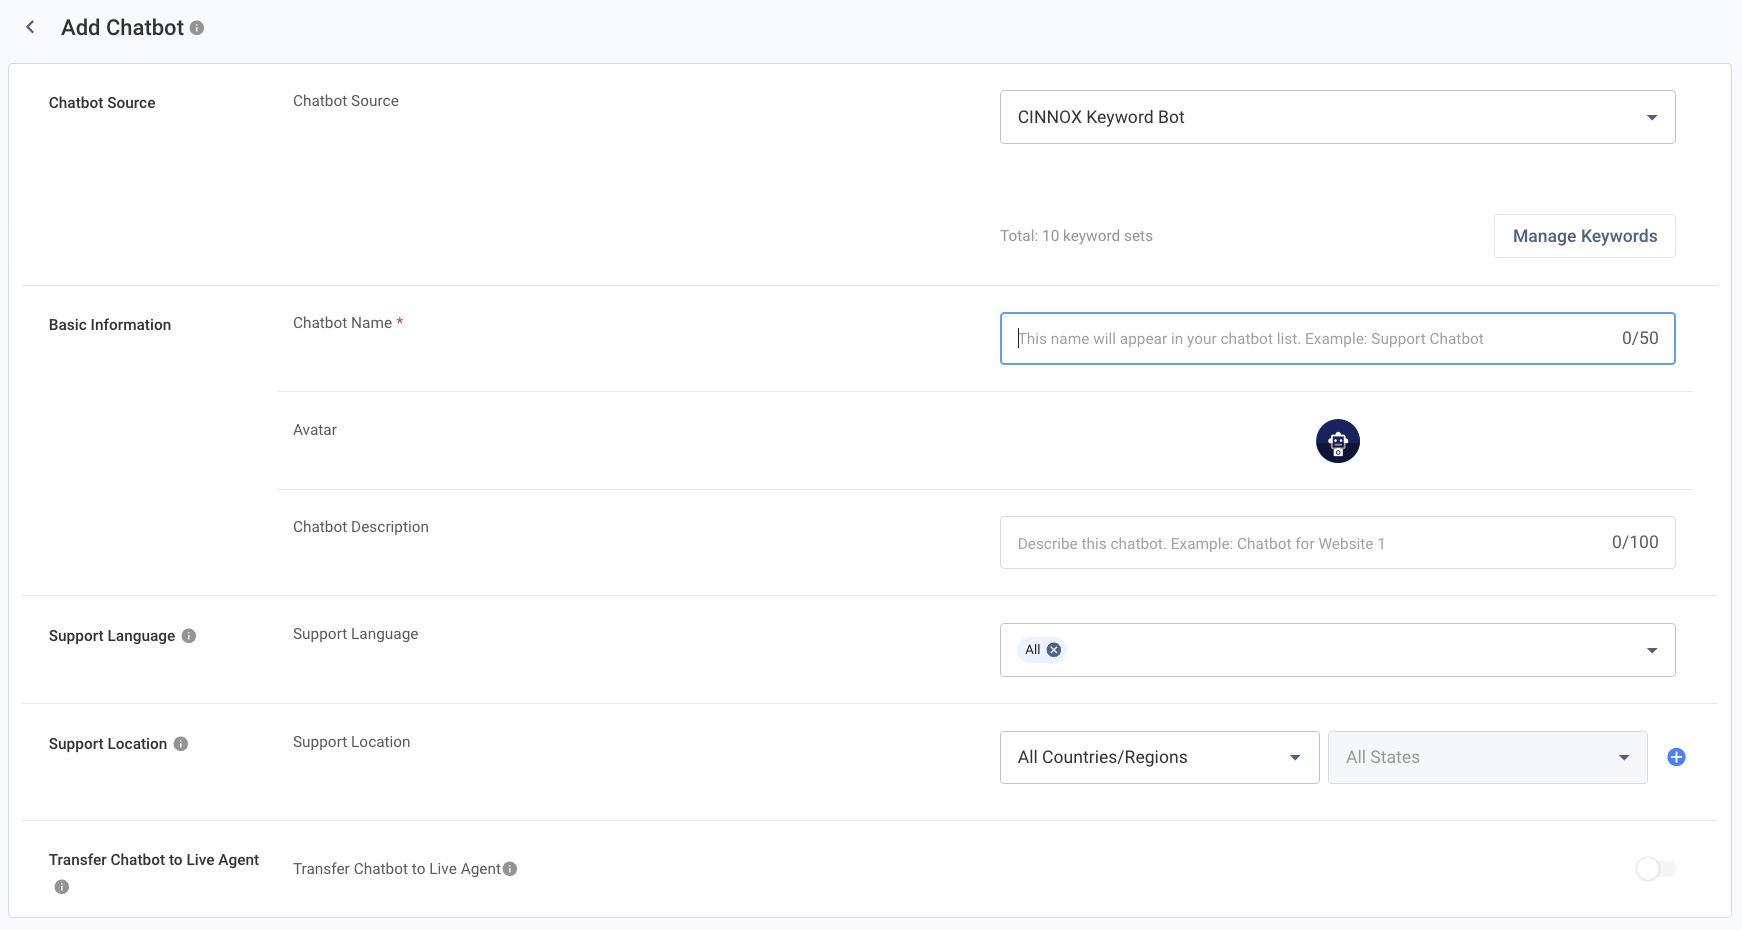
7. Enter a Chatbot Name.
8. (Optional) Add an Avatar and Chatbot Description.
Keep the following default settings unchanged:
- Support Language = All
- Support Location = All
- Transfer Chatbot to Live Agent = Disabled
- Click Create.
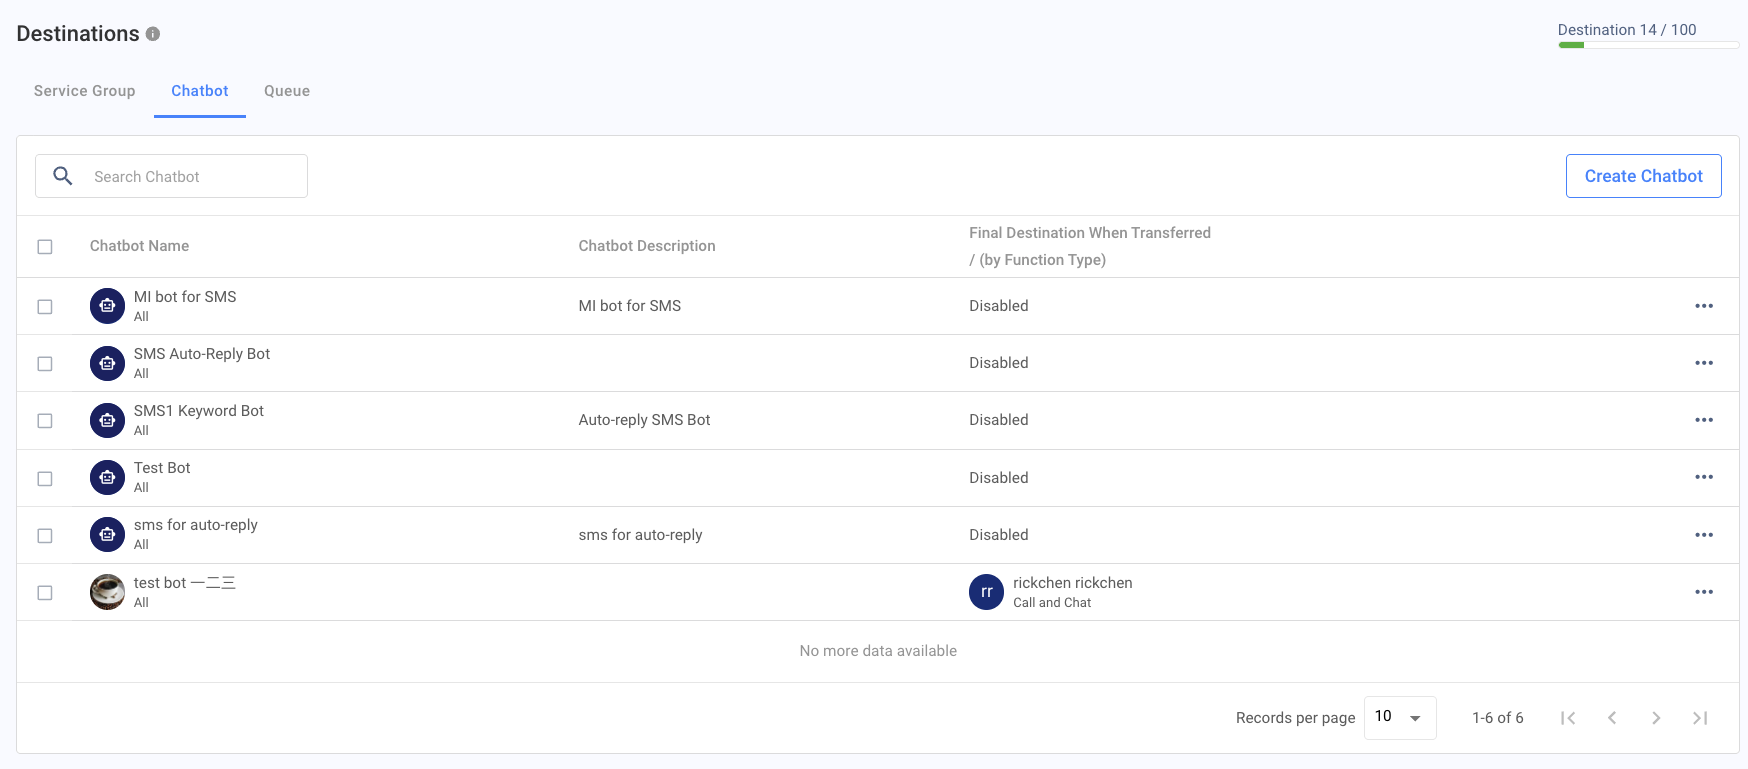
Your CINNOX Keyword Bot is now created and ready.
II. Add the Keyword Bot to your Virtual Number
After creating your Keyword Bot, you must assign it to the virtual number.
The auto-reply will not work until this step is completed.
- In the CINNOX Web Dashboard, go to: Administration → Channels → Virtual Numbers (Verified).
- Locate and click the virtual number you want to use.
✅ Ensure this virtual number has SMS inbound and outbound capability.
- On the Virtual Number Details page, find the Bot Auto-Reply setting.
- Select the Keyword Bot you created from the list.
- Click Save.
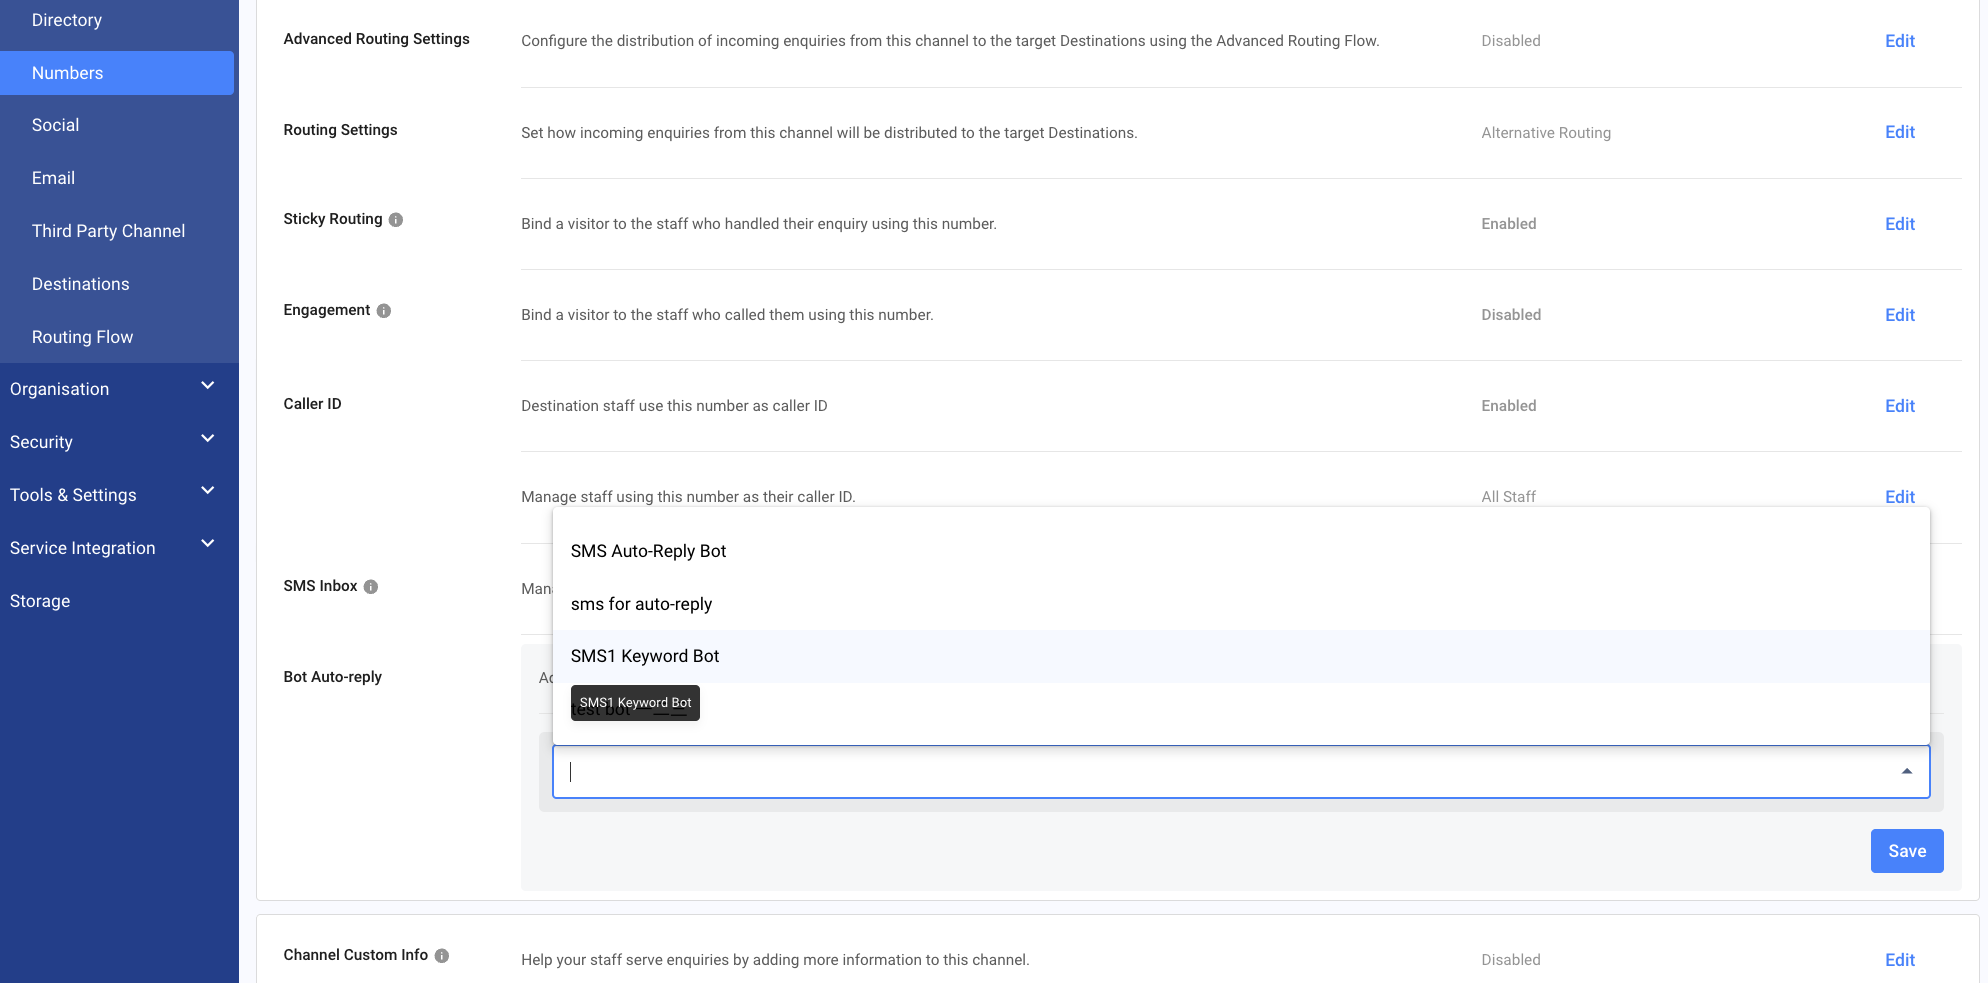
Your virtual number is now connected to the Keyword Bot and ready to trigger SMS keyword auto-replies.
Test Your Setup (Optional)
- Use a mobile phone to send an SMS to this virtual number
- Include one of your configured keywords (e.g., YES, NO, STOP, PROMO)
What should happen:
- The inbound SMS will appear in your CINNOX SMS Inbox or SMS Report
- The Keyword Bot will automatically send the corresponding auto-reply message based on the detected keyword
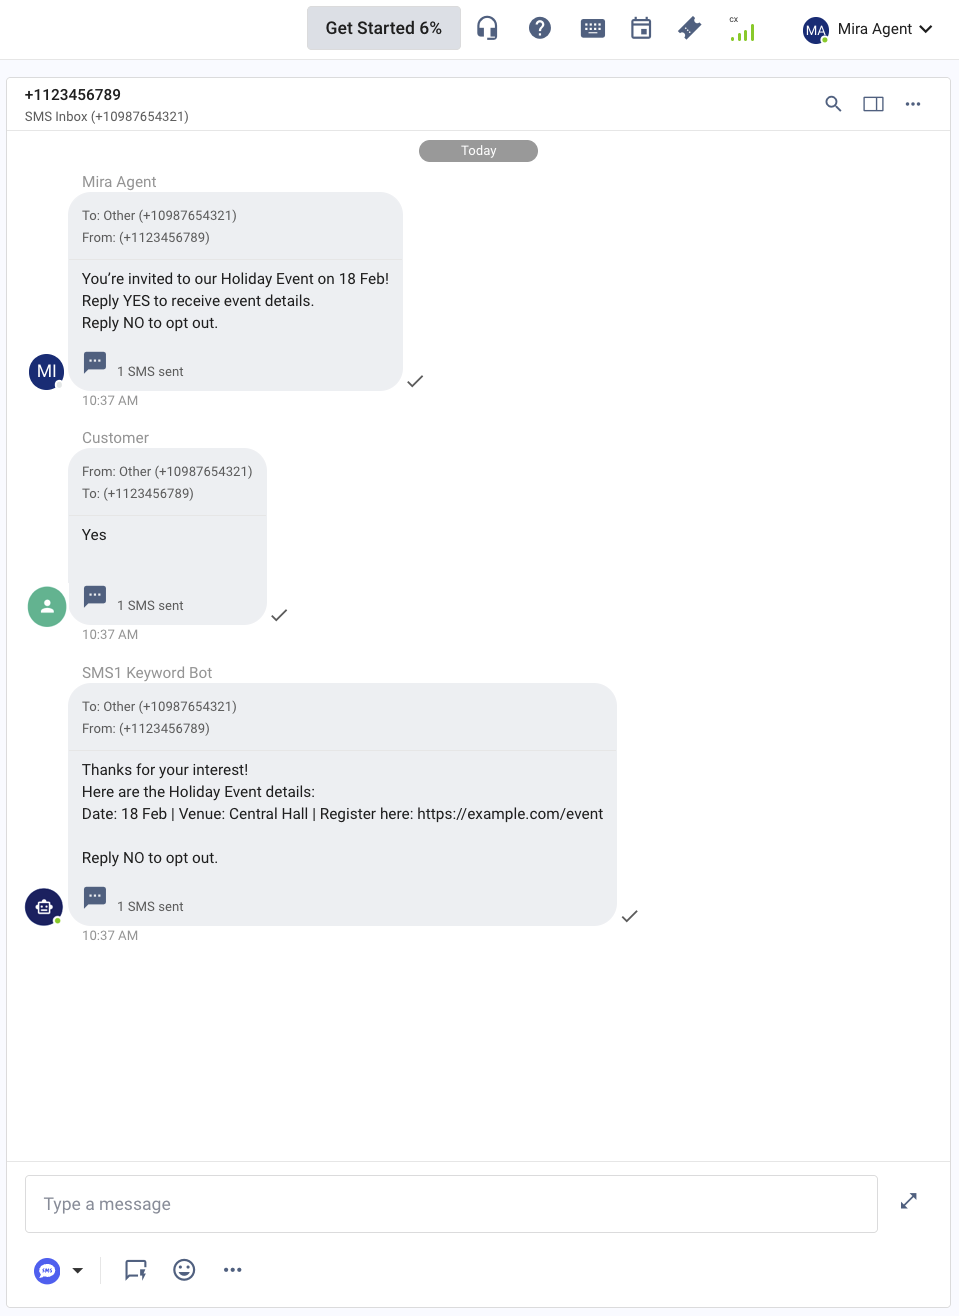
If the auto-reply is not triggered, check:
- The Keyword Bot is correctly assigned to the virtual number
- The keyword rule is created and saved
- There are no spelling differences between the keyword and the customer’s message
- The virtual number supports SMS inbound and outbound
Manage Keywords
After your Keyword Bot is created, you can add, update, or delete keywords and their auto-reply messages at any time.
- Log in as an Admin to the CINNOX Web Dashboard.
- Navigate to: Administration → Destinations → Chatbot.
- Locate and click the Keyword Bot you want to manage
- Click Edit in the Chatbot Source to expand.
- Click Manage Keywords
From here, you can:
- Add new keyword rules
- Update existing keywords or auto-reply messages
- Delete keyword rules
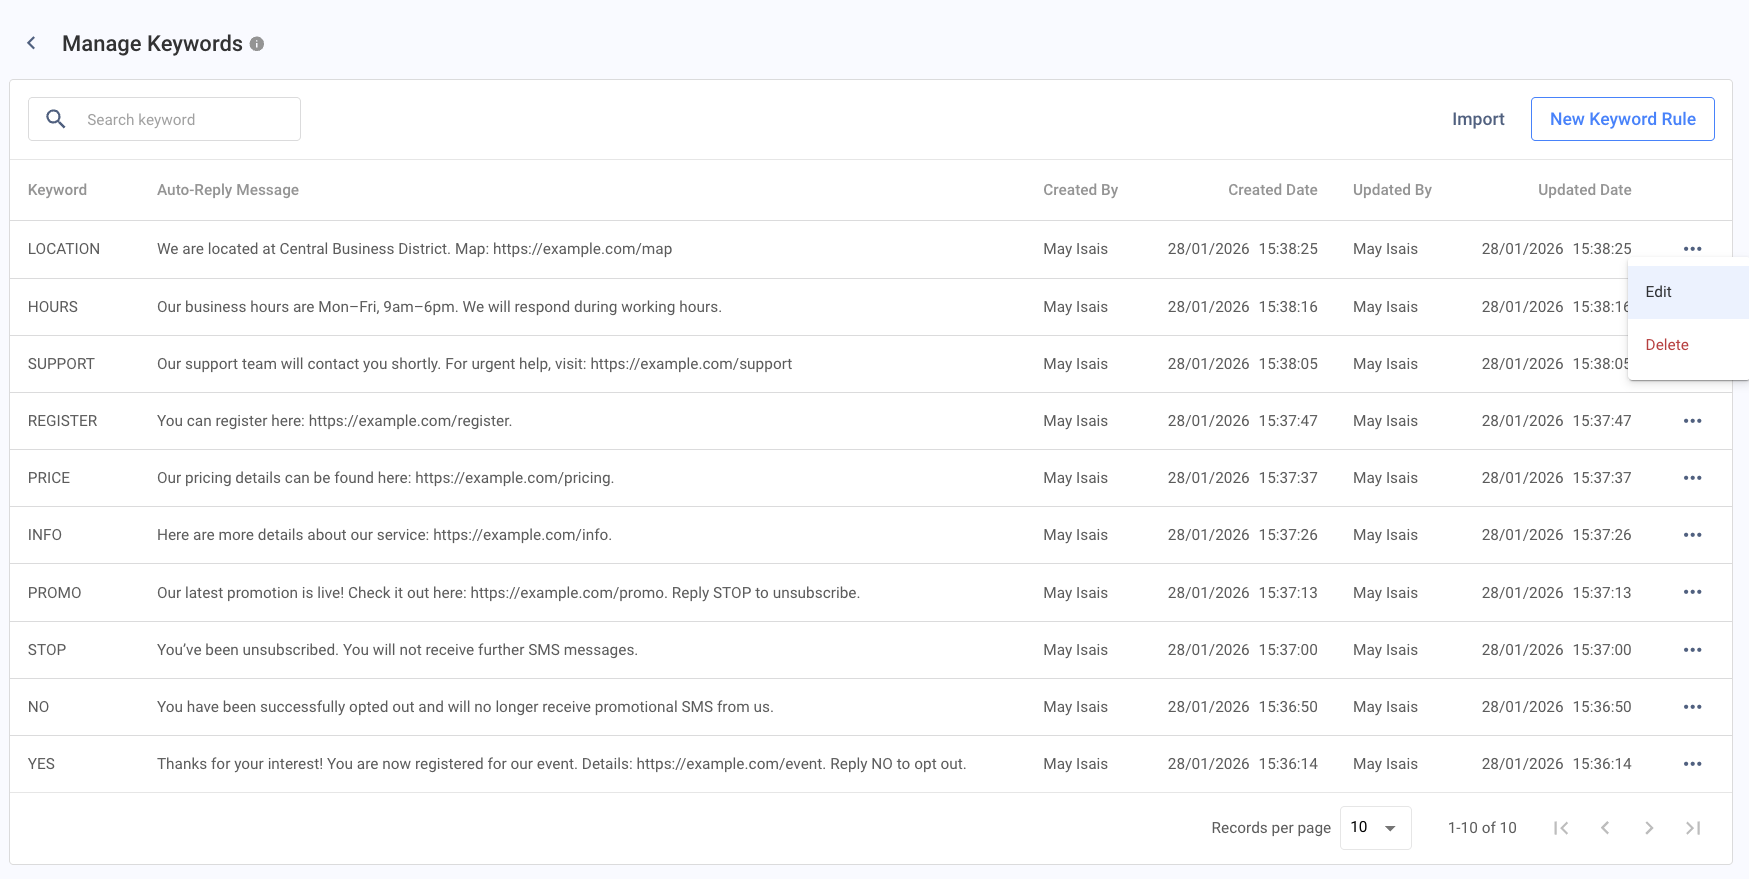
Any changes made here will take effect immediately for the virtual numbers assigned to this Keyword Bot.
Know More
- SMS Inbox: Learn how to view and manage inbound and outbound SMS messages in CINNOX.
- Sending SMS: Learn how to send 1-to-1 SMS messages to customers and contacts.
- Sending an SMS Campaign: Learn how to broadcast SMS campaigns to customers, visitors, and target recipients.
- SMS Report: Refer to the Viewing the SMS Report section of this guide for the overview and report details of the sent and received SMS.
Frequently Asked Questions
Are keywords case sensitive?
No. Keywords are not case sensitive.
For example, YES, Yes, and yes will all trigger the same rule.
What happens if a customer message contains multiple keywords?
If a message matches multiple keywords, CINNOX will trigger the first matching keyword rule based on the order configured in the Keyword Bot.
What happens if no keyword matches?
If the customer’s message does not contain any configured keyword:
- No auto-reply will be sent
- The message will appear in the SMS Inbox for manual handling by agents
Can I use phrases instead of single words as keywords?
Yes. You can configure phrases such as:
- interested
- more details
- stop sms
As long as the phrase appears anywhere in the message, the auto-reply will be triggered.
Will the Keyword Auto-Reply work outside business hours?
Yes. The Keyword Bot works 24/7, regardless of agent availability or business hours.
Can I edit or delete keywords after the bot is created?
Yes. You can manage keywords anytime under:
- Administration → Destinations → Chatbot → Manage Keywords
Changes take effect immediately.
Why is the auto-reply not triggering?
Check the following:
- The Keyword Bot is assigned to the correct virtual number
- The keyword rule is saved
- There are no spelling differences between the keyword and the message
- The virtual number supports SMS inbound and outbound
Can I use this for SMS consent (opt-in / opt-out)?
Yes. This feature is ideal for handling keywords such as YES, NO, STOP to support SMS consent management and compliance.
Is there a limit to the number of keywords I can create?
Yes. Each Keyword Bot supports up to 1000 keyword rules, and duplicate keywords are not allowed.