
Connecting Outlook/Microsoft 360 Email
Looking for an Omnichannel Contact Center Solution?
Discover the ultimate Omnichannel Service Solution with CINNOX. Effortlessly handle customer enquiries from any device, anywhere. Our top-notch service covers Outlook, Gmail, WhatsApp, Facebook Messenger, WeChat, other social media channels, live chat, and calls with virtual number offerings. Simplify your customer service and expand your reach today with CINNOX.
Overview
Connect your Microsoft 365 or Outlook Exchange Email to CINNOX to effortlessly manage customer emails as omnichannel enquiries. Leverage our intent data, insights and analytics to land sales, enhance experiences, and provide outstanding support.
Connect your Microsoft 365 and Outlook to CINNOX
Create an Email Channel
- Go to Administration > Channels > Email from the navigation menu.
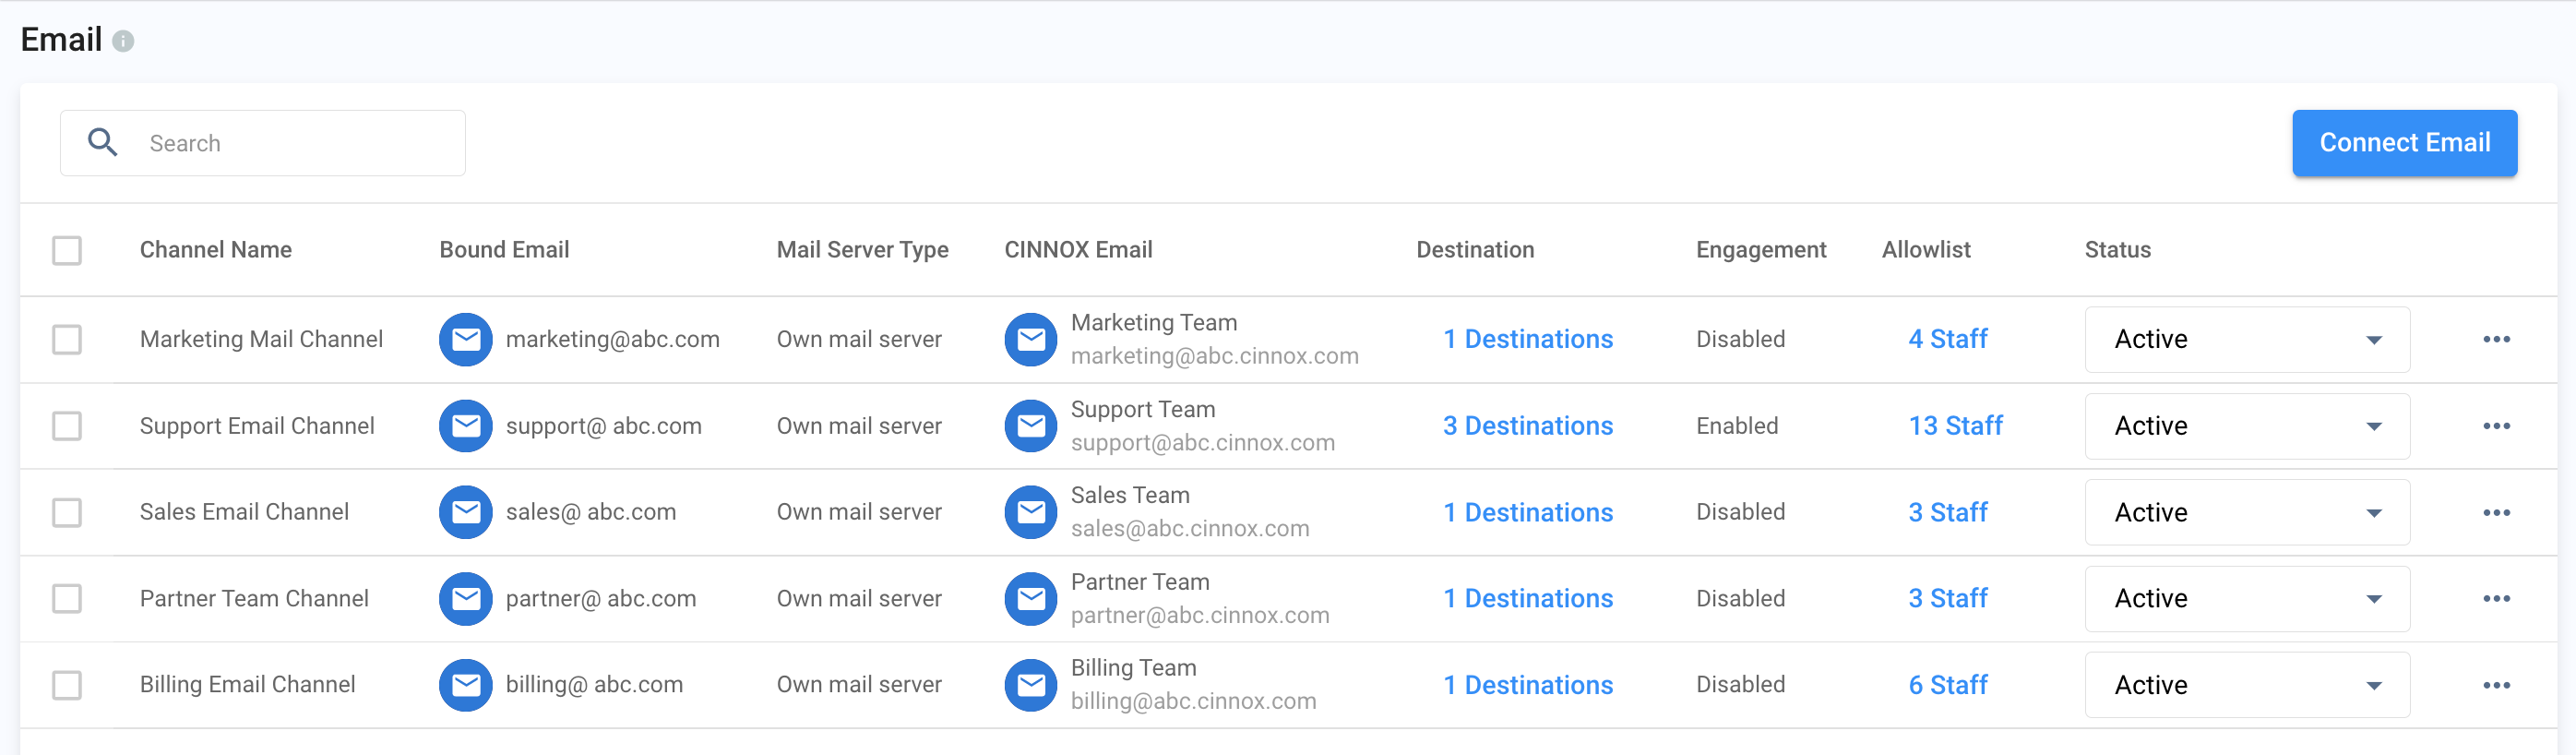
- On the Email main page, click Connect Email at the top-right corner.
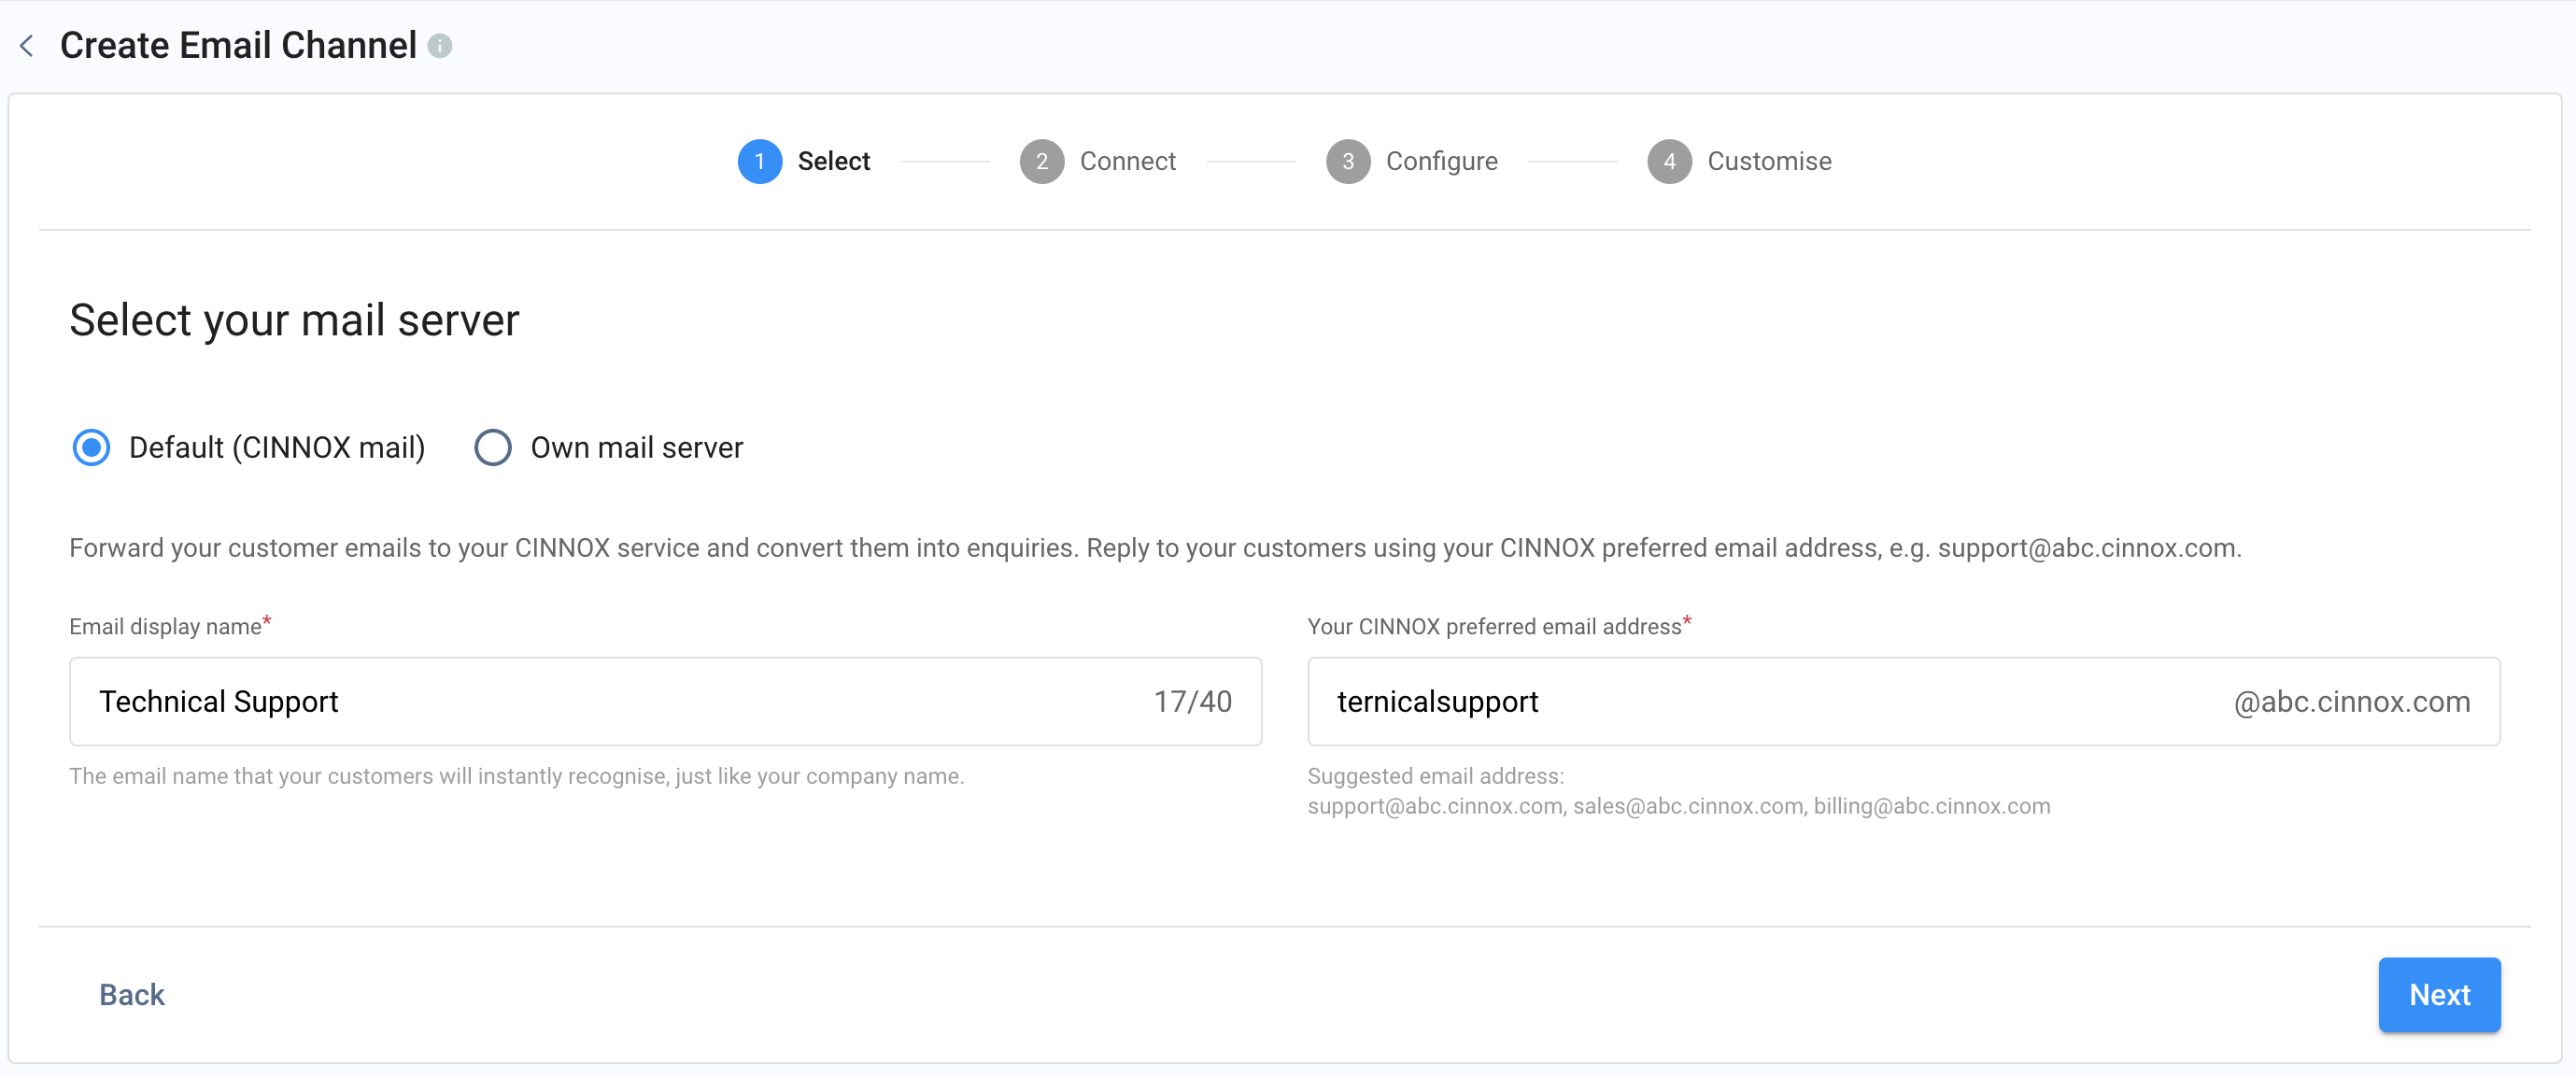
- On the Create Email Channel page, select your mail server, either Default (CINNOX mail server) or the Own mail server
CINNOX Mail Server or Own Mail Server
Click to expand the details for CINNOX Mail Server.
Choosing CINNOX mail would forward your customer emails to your CINNOX service and convert them into enquiries. Your CINNOX preferred email address, e.g. emial@cinnox.com, will be your email address when you reply to your customers.
- Enter the email display name of your CINNOX preferred email address, which your customers will instantly recognise, just like your company name.
- Enter your CINNOX preferred email address.
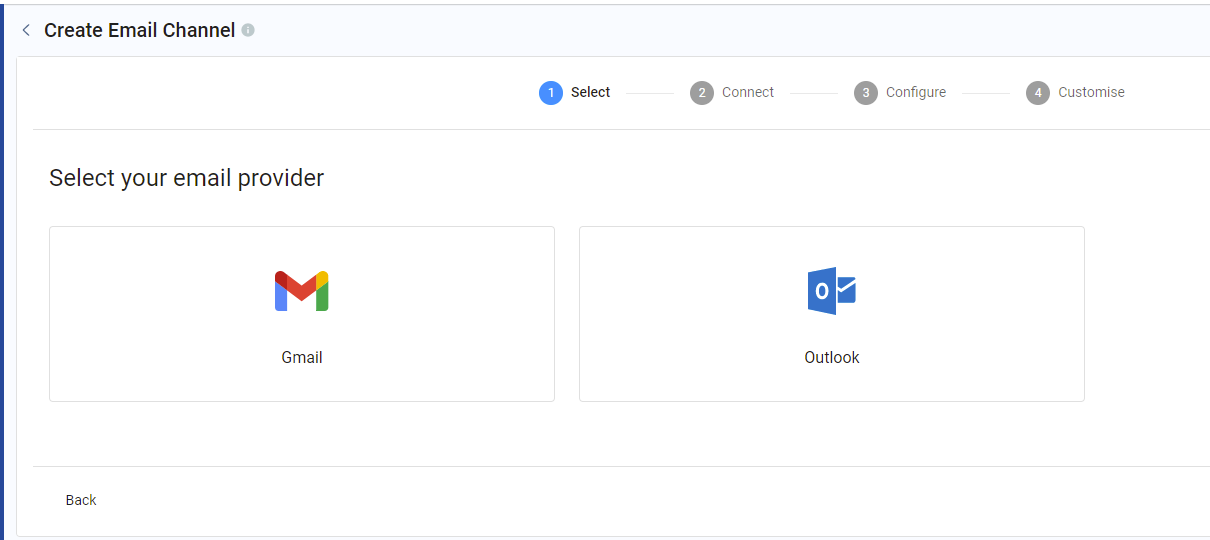
- Select your email provider as Outlook.
📘
IMPORTANT
- The Outlook account can be a free account (Outlook.com) or an Enterprise (Microsoft 365 or the On-Premise Exchange Server)
Microsoft Outlook.com and Microsoft 365 (CINNOX Mail Server)
- In your CINNOX Dashboard, enter your Outlook email address.
- Sign in to your Outlook account Outlook.com or Office 365.
- At the top of the page, select Settings > View all Outlook settings.
- Select Email > Rules.
- Click + Add new rule.
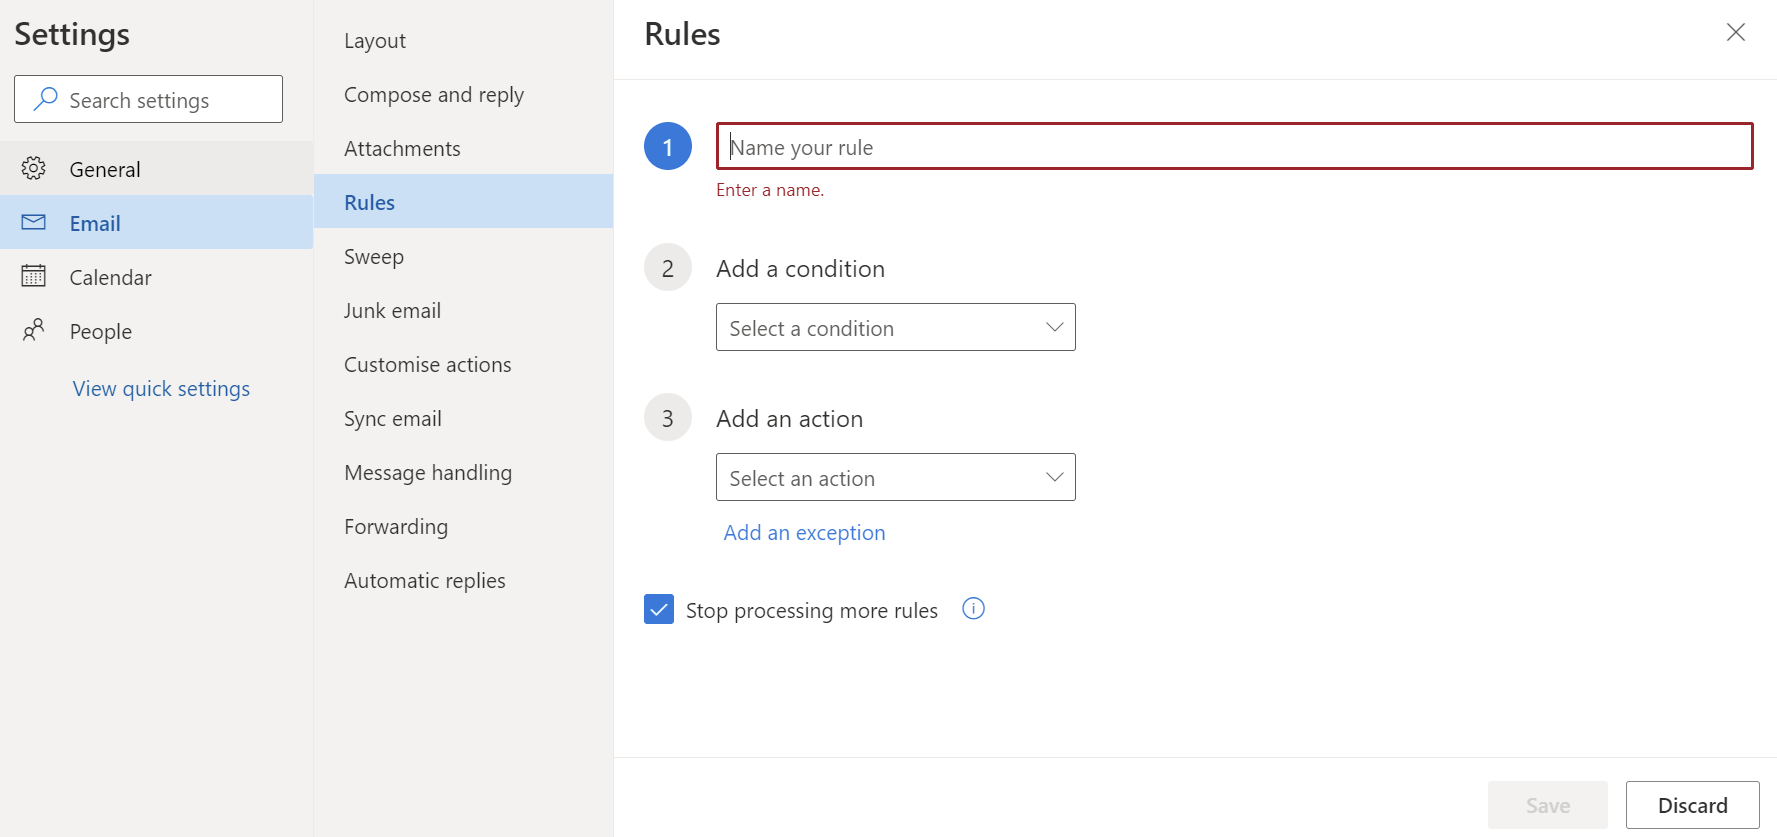
- Enter a name to the Name your rule. It can be any name.
- In the Add a condition drop-down, select Apply to all messages.
- In the Add an action drop-down, select Move to.
- In the drop-down Select a folder, select Inbox.
- Click Add another action.
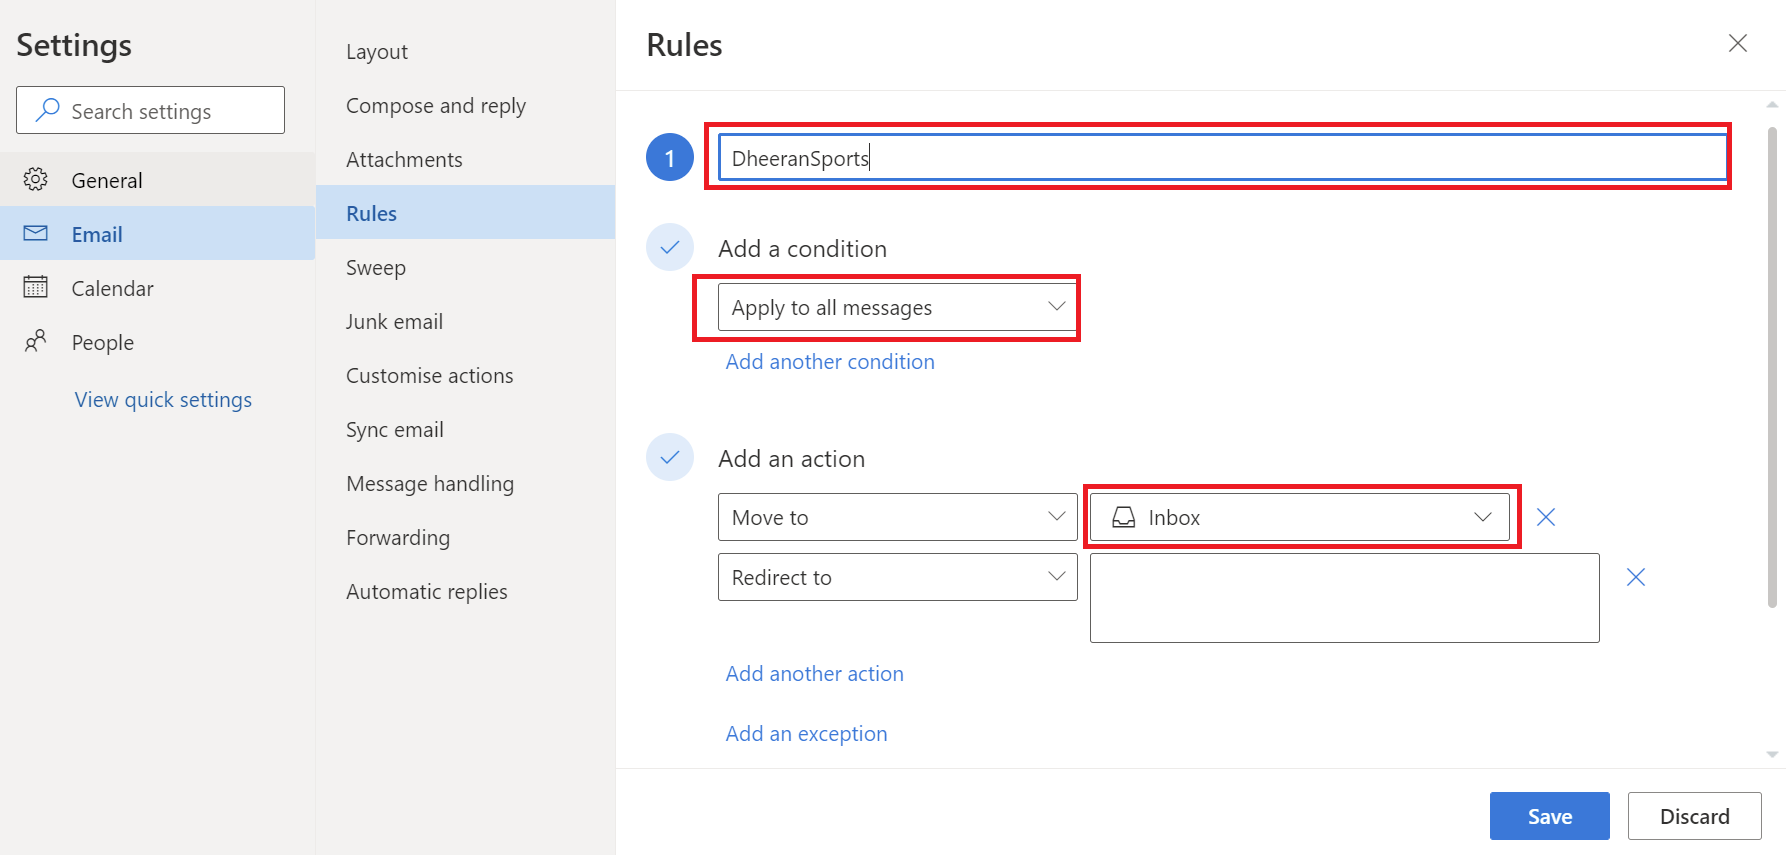
- In the Add an action drop-down, select Redirect to.
- Copy and paste the preferred CINNOX email address to the field next to Redirect to.
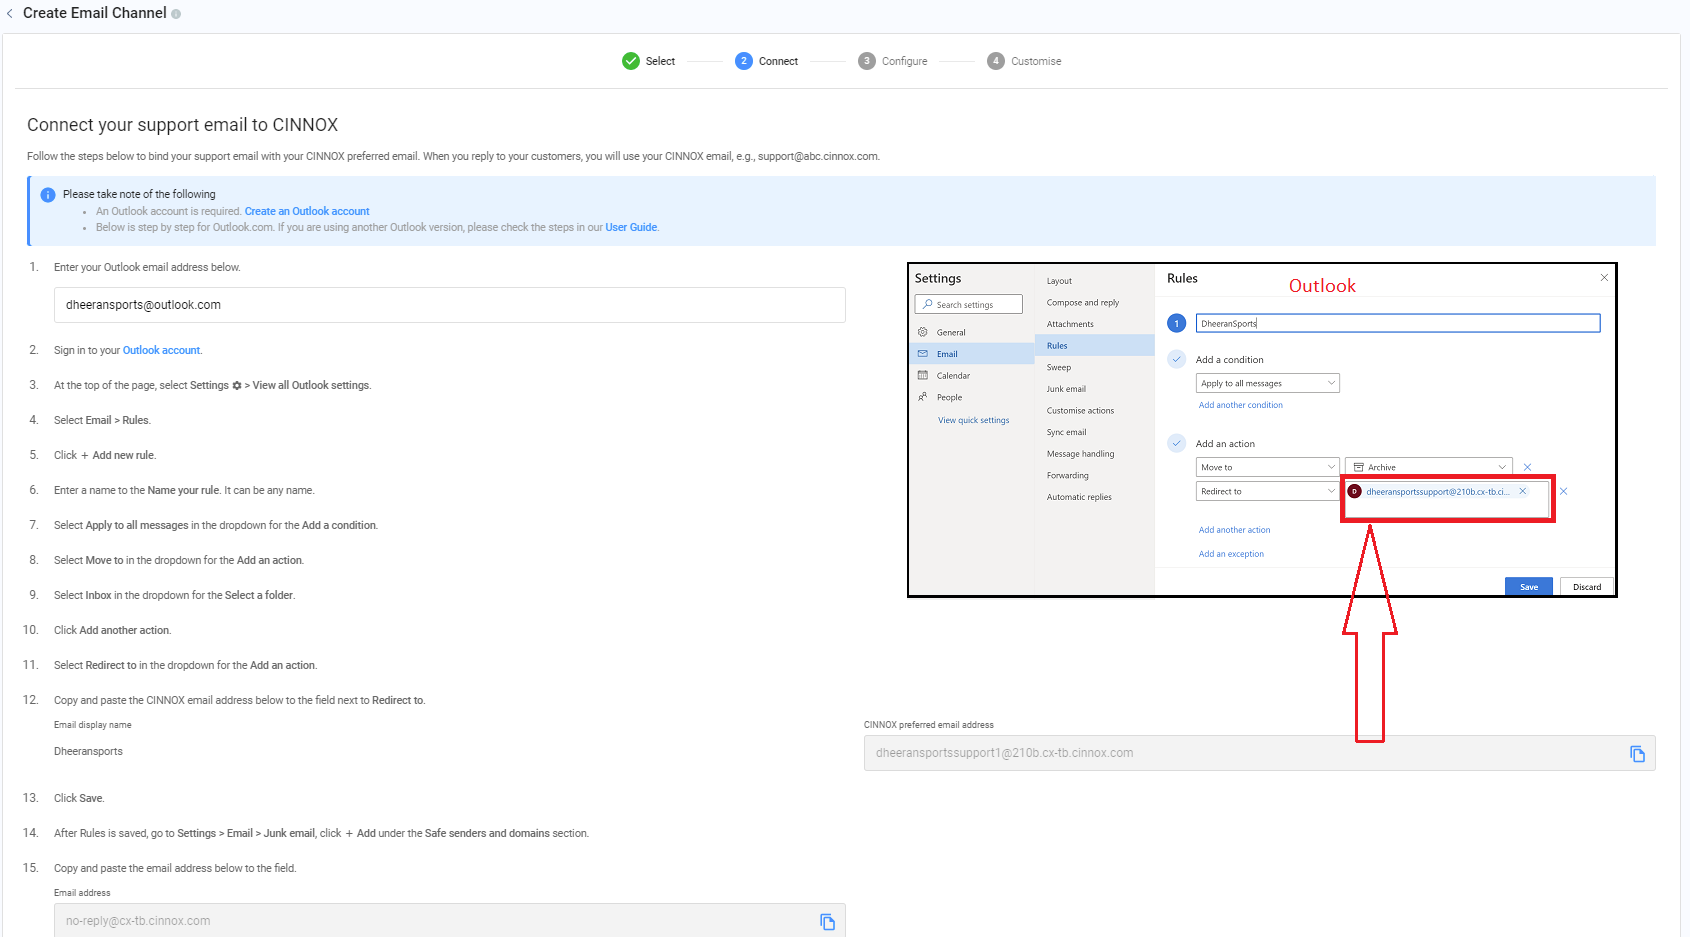
- Click Save.
- Go to Settings > Email > Junk email, under the Safe senders and domains, click + Add.
- Copy and paste the CINNOX no-reply email address to the field.
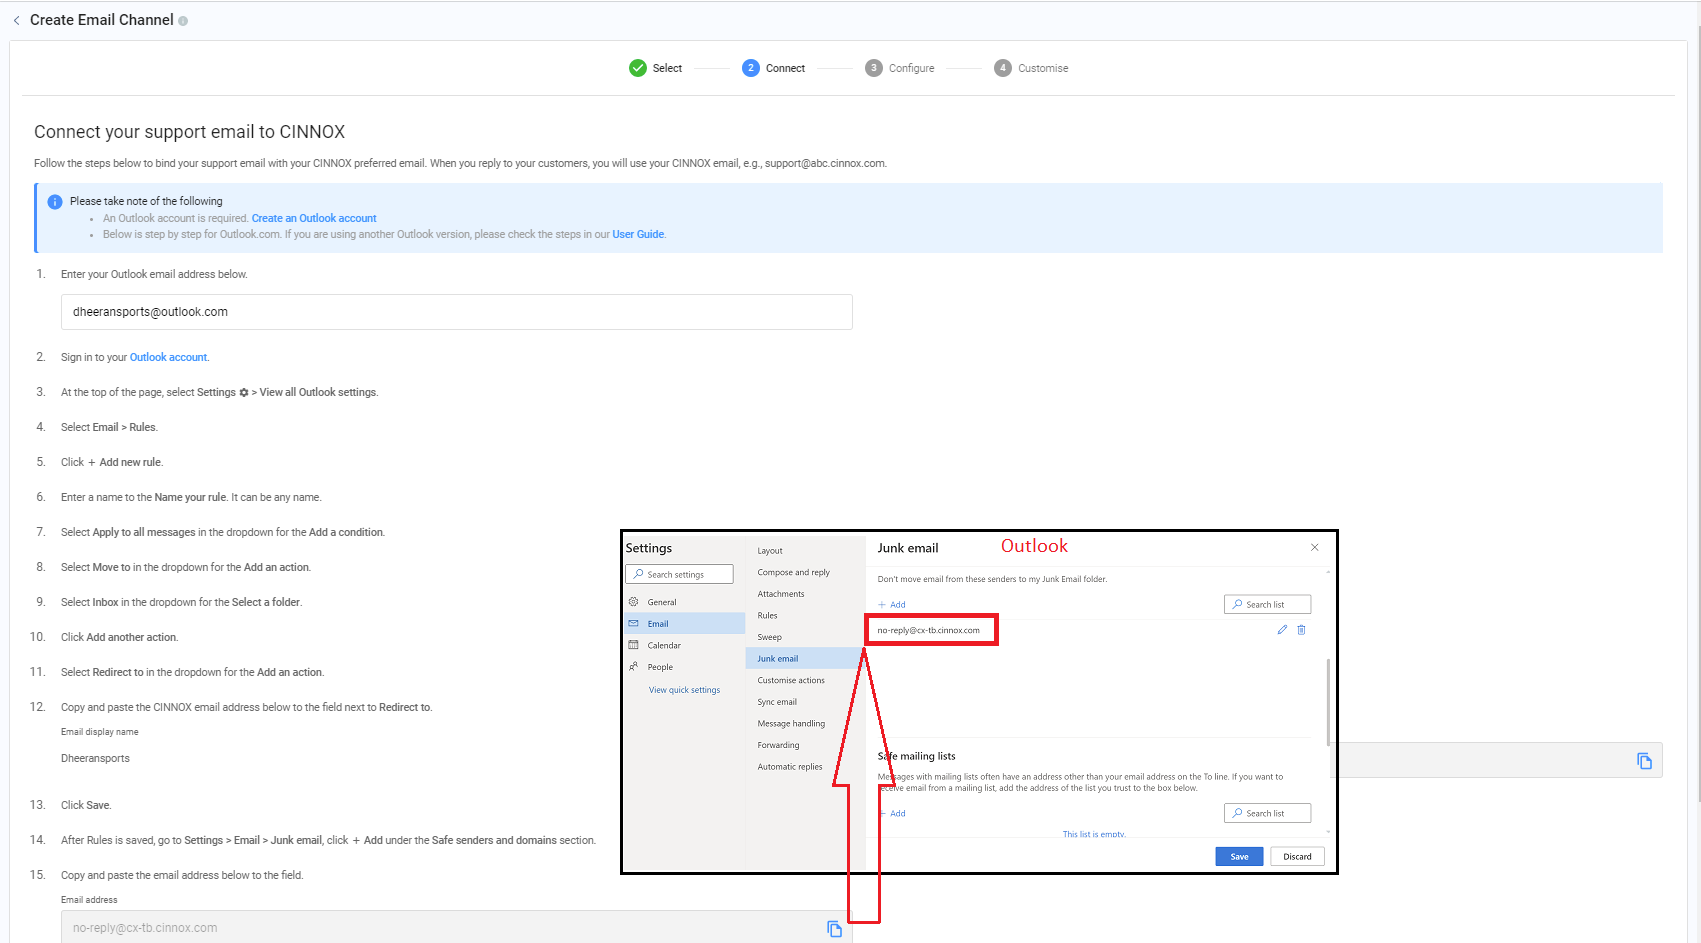
- Click Save.
- In your CINNOX Dashboard, click Next.
How to enable automatic forwarding for individual Microsoft 365 mailboxes
- Log in to your Office 365 Security & Compliance portal and go to Threat Management ->Anti-spam section.
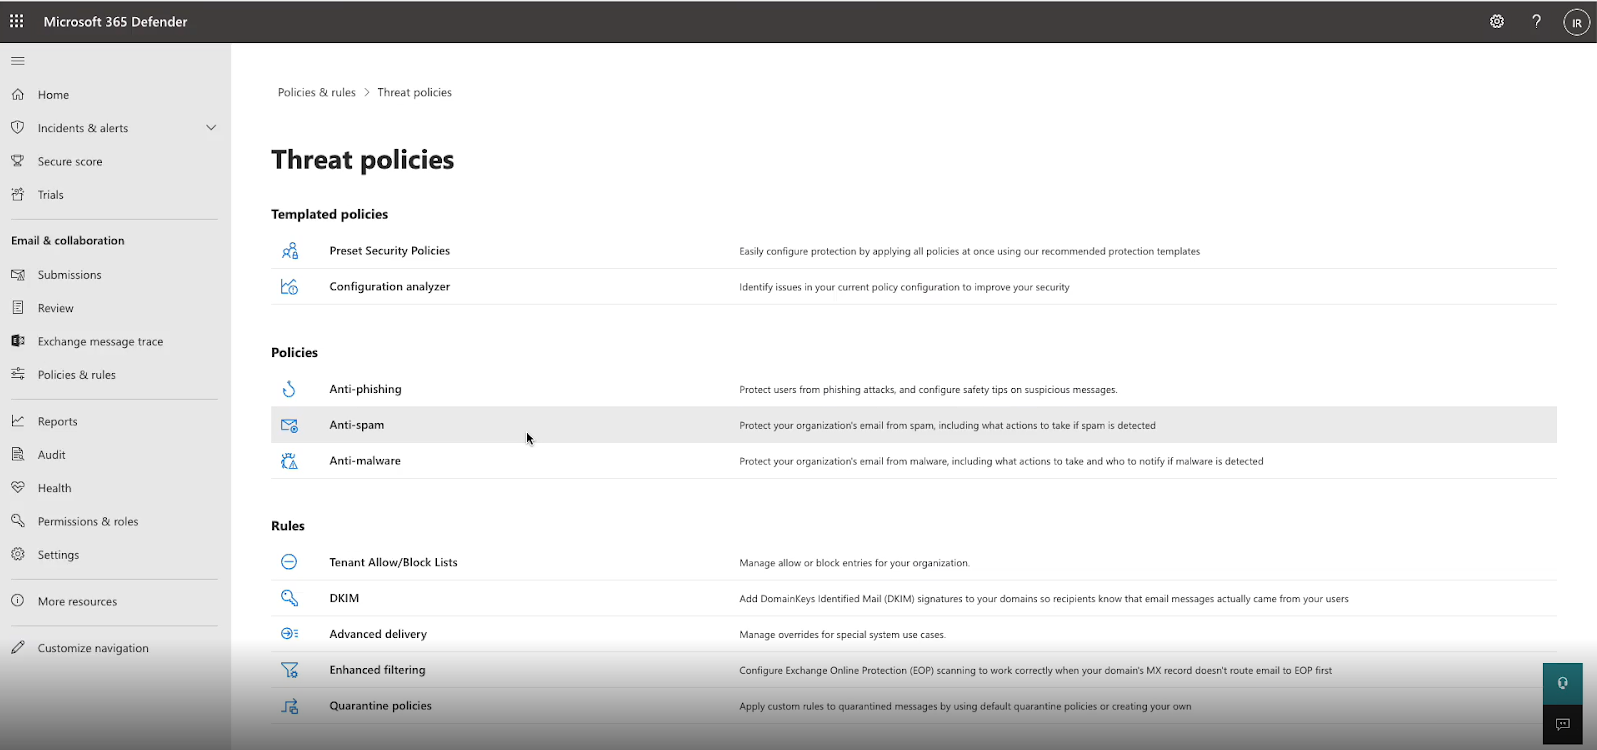
- Click the Create an Outbound Policy button.
- Name your new outbound spam filter policy and add some Description, then click the arrow next to Automatic forwarding and select On - Forwarding is enabled from the drop-down.
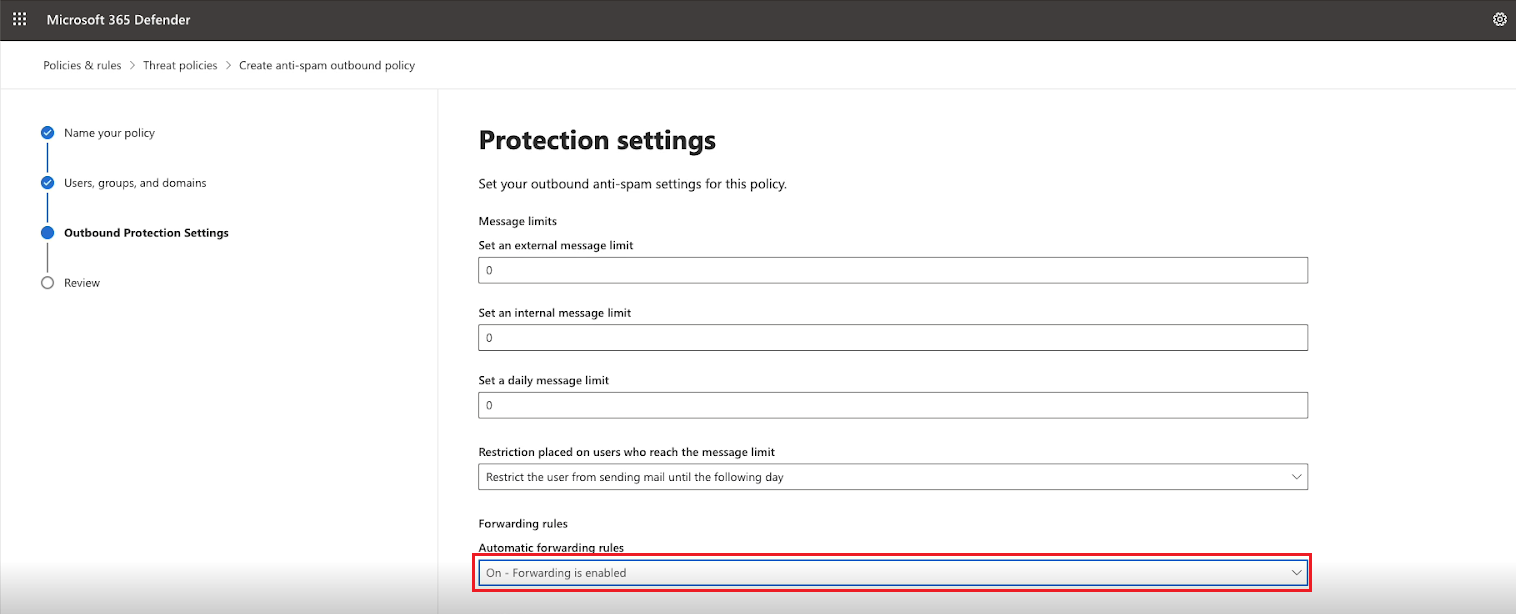
- Click the arrow next to Applied to and then the Add a condition button. From the drop-down list, select the Sender as the condition, then click in the Add a tag field to add the mailbox(es) for which you'd like to allow the automatic forwarding. Once you have all mailboxes added, click Save.
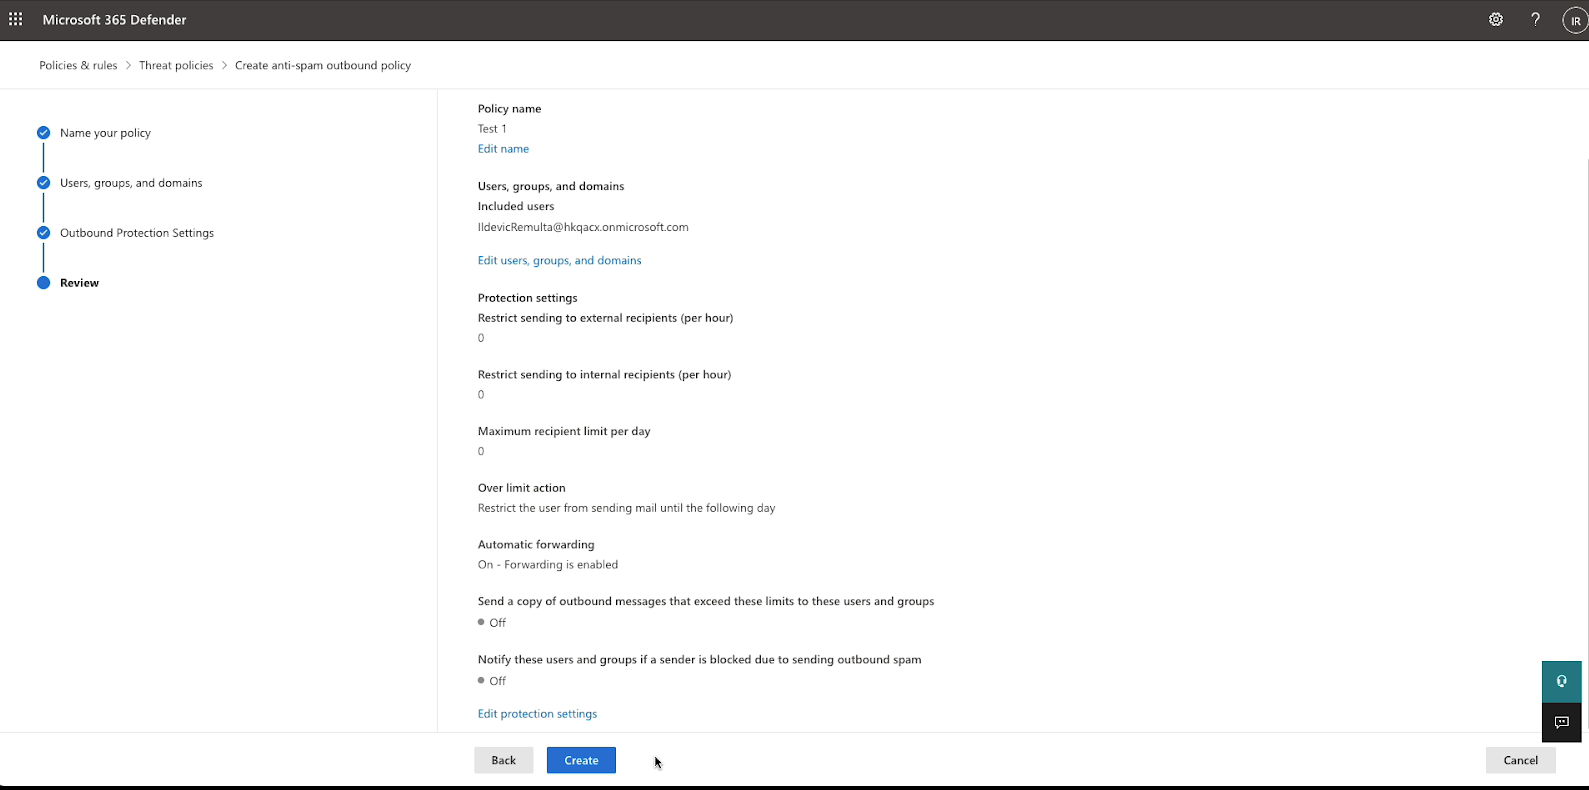
Outlook Exchange via Webmail (OWA) (CINNOX Mail Server)
- In your CINNOX Dashboard, enter your Outlook email address.
- Sign in to your Outlook account via webmail. Please get in touch with your Admin for the sign-in link.
- At the top of the page, click the gear icon Settings, then click Options to open the Mail options page.
- Select Inbox and sweep rules and click the ➕ icon to create a New inbox rule.
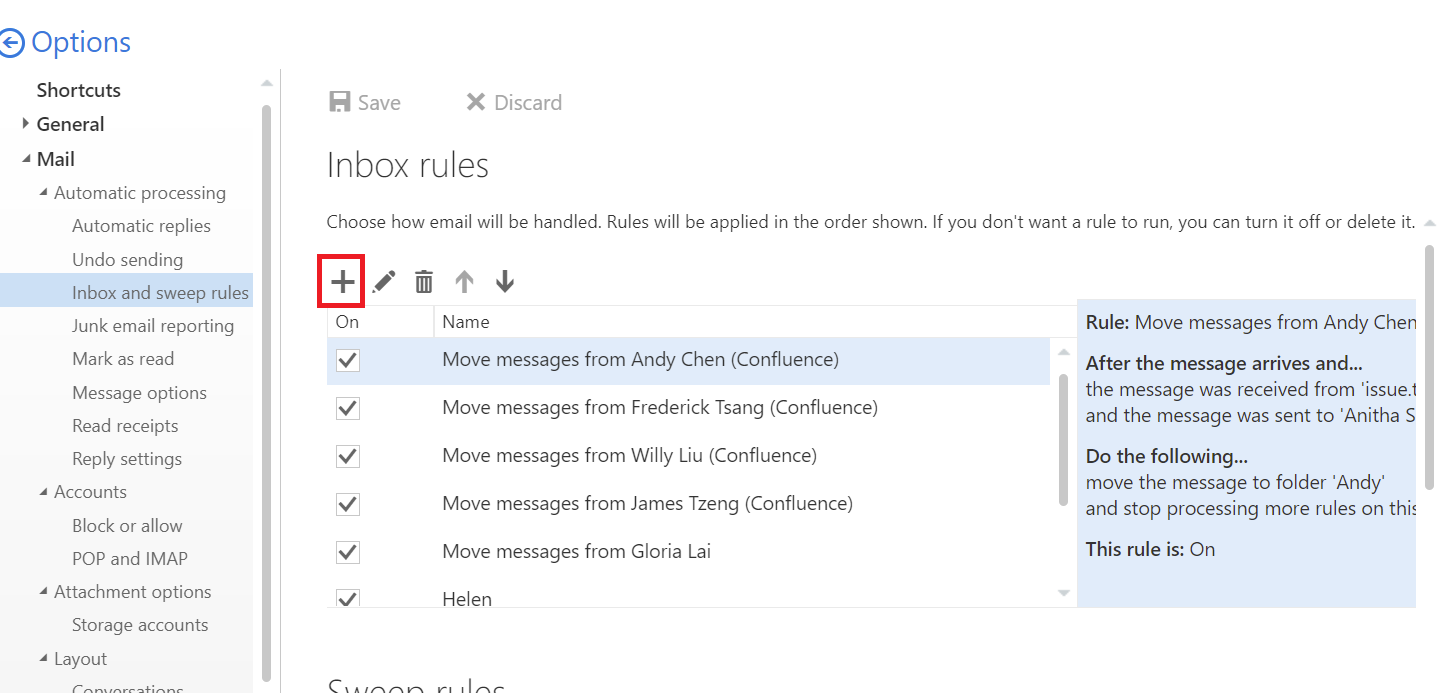
- Enter a name to the new inbox rule. It can be any name.
- In the When the message arrives and matches all of these conditions drop-down, select [Apply to all messages].
- In the Do all of the following drop-down, select Move, copy, or delete, select Move the messages to folder..., select Inbox and click OK.
- In the drop-down, click Add action, select Forward, redirect, or send, then select Redirect the messages to....
- Copy and paste the CINNOX preferred email address to the , redirect the message to, and click Save.
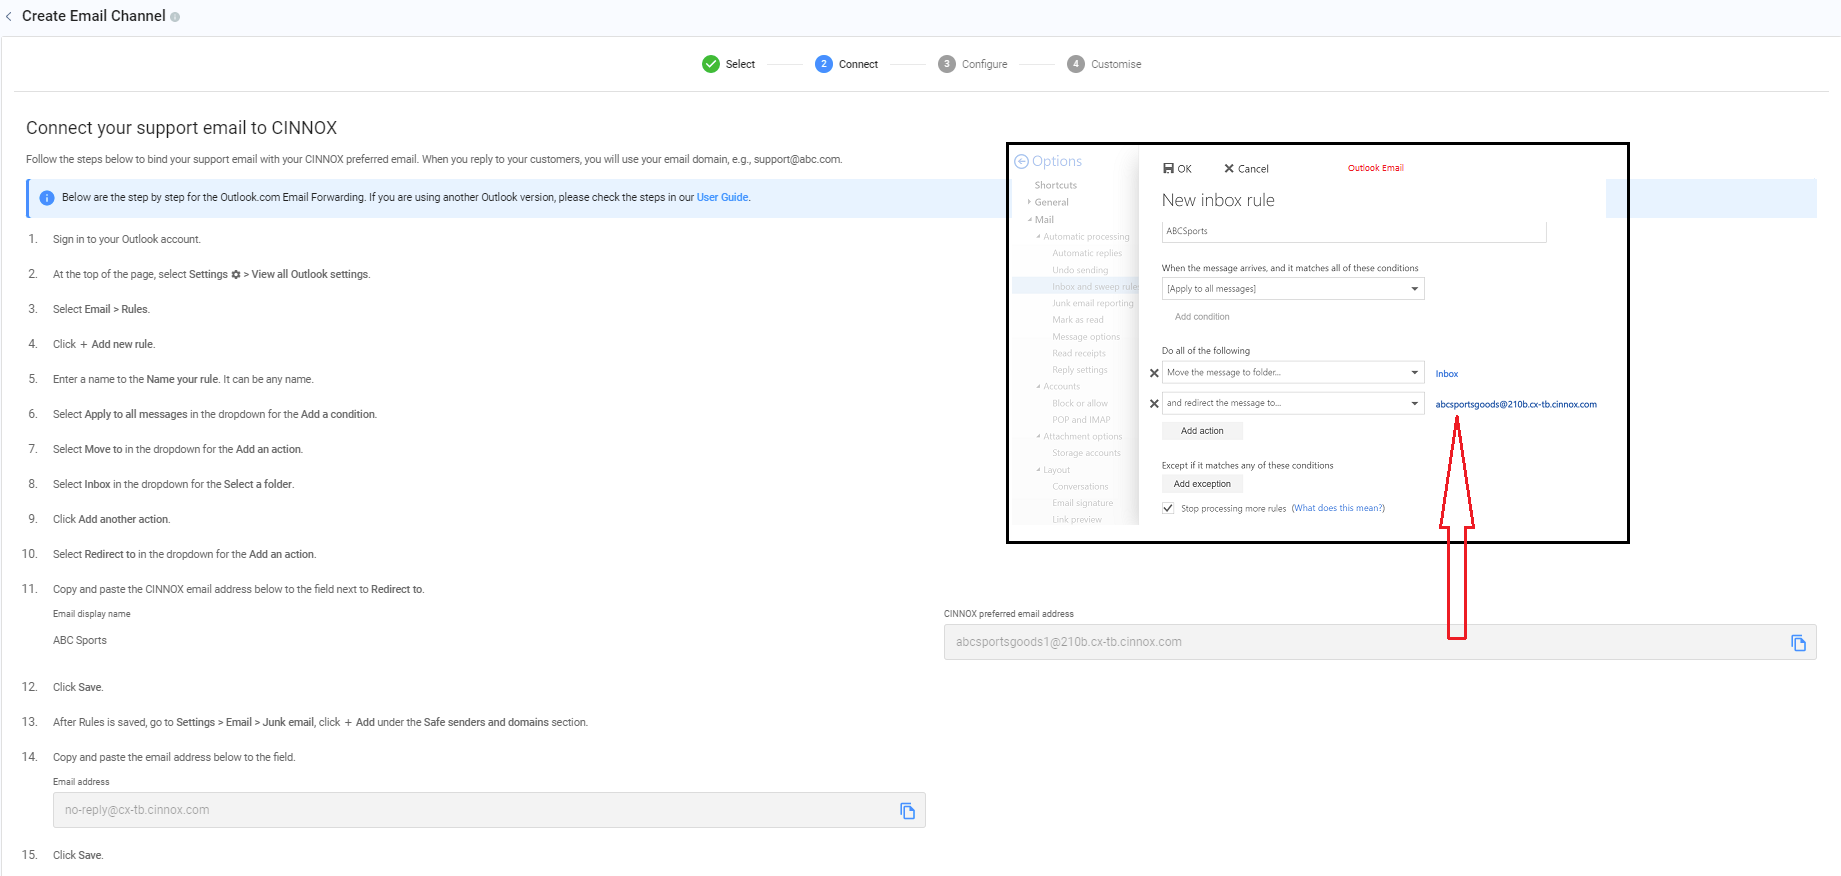
- Click OK on the New inbox rule to save the new rule.
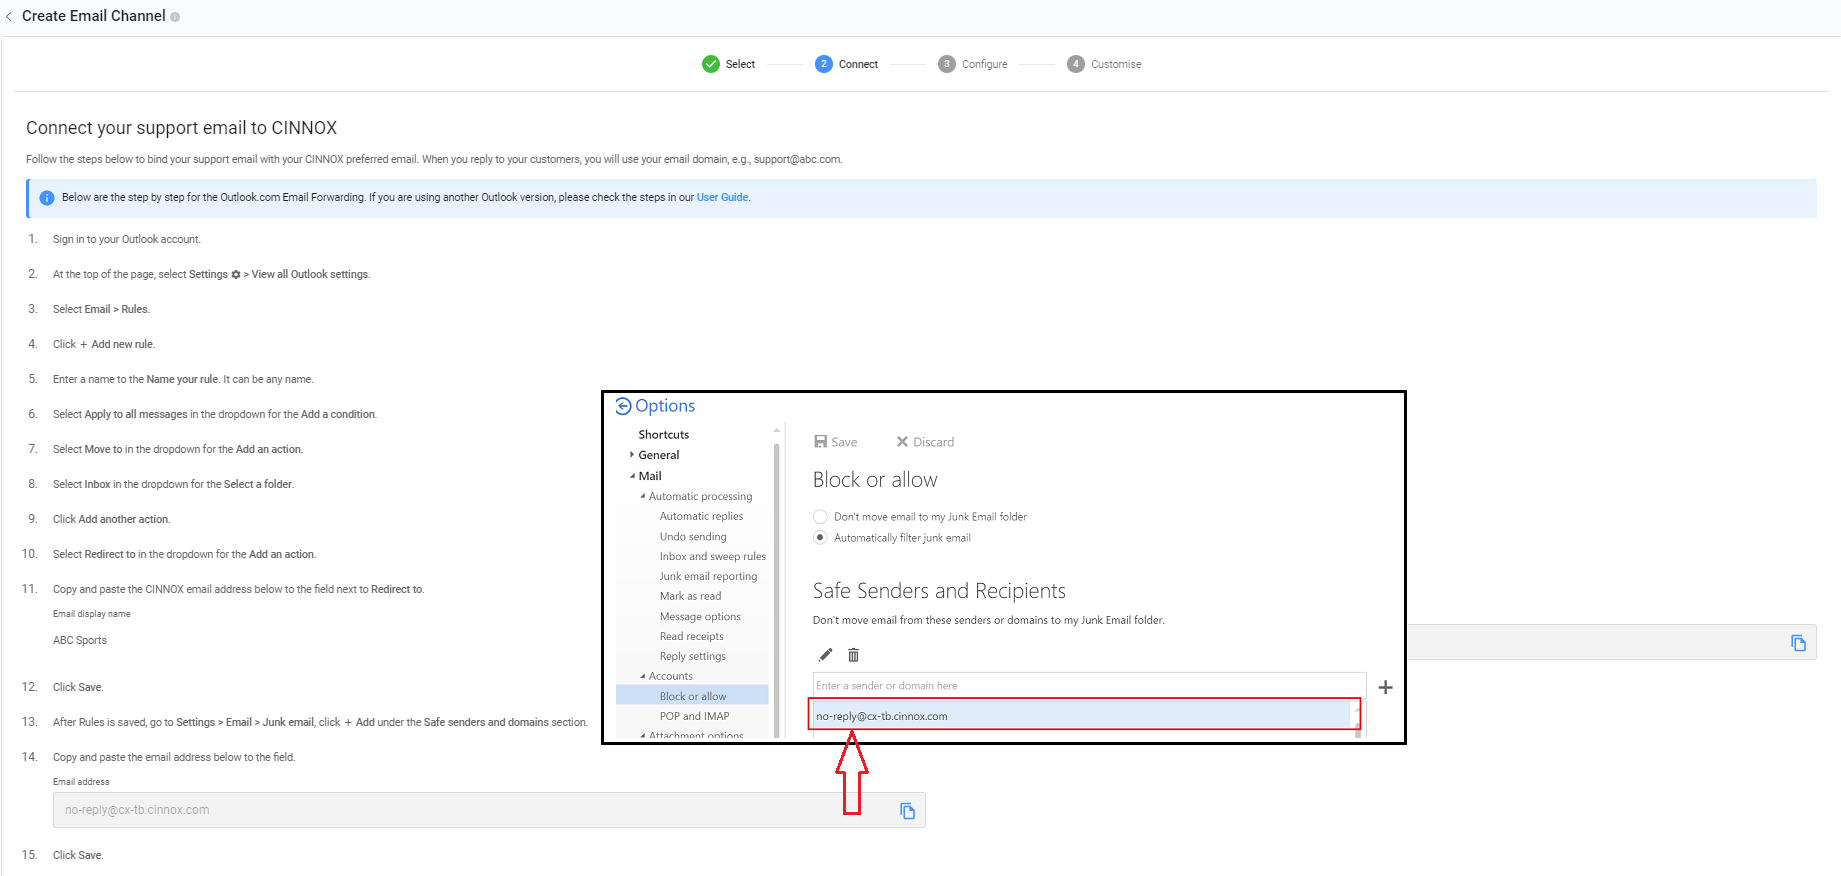
- On the Options menu, go to Block or allow
- Copy and paste the CINNOX no-reply email address to the Safe Senders and Recipients, then click ➕.
- Click Save
- In your CINNOX Dashboard, click Next.
Click to expand the details for Own Mail Server
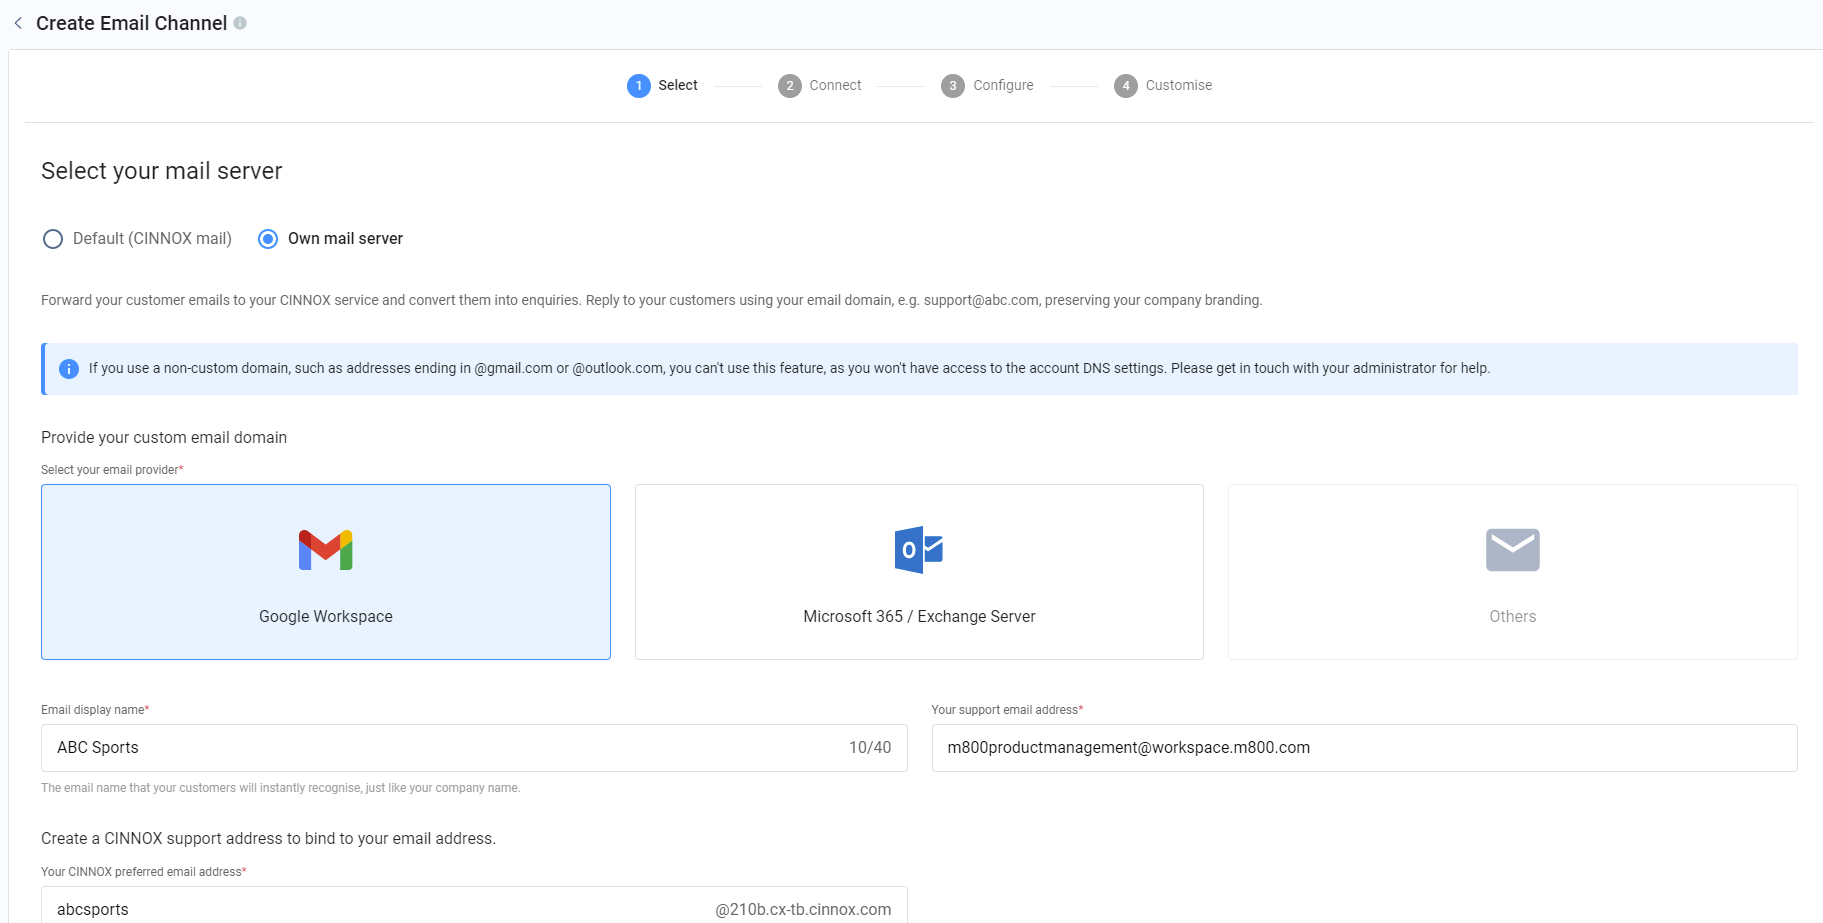
Choosing your own mail server would forward customer emails to your CINNOX service and convert them into enquiries. Reply to your customers using your email domain, e.g. email@company.com, preserving your company branding.
-
Enter the email display name of your CINNOX preferred email address, which your customers will instantly recognise, just like your company name.
-
Enter your CINNOX preferred email address.
-
Select Microsoft 365 or Exchange Server as your email provider.
Microsoft 365 (Own Mail Server)
- In your CINNOX Dashboard, enter your Outlook email address.
- Sign in to your Outlook account Office 365.
- At the top of the page, select Settings > View all Outlook settings.
- Select Email > Rules.
- Click + Add new rule.
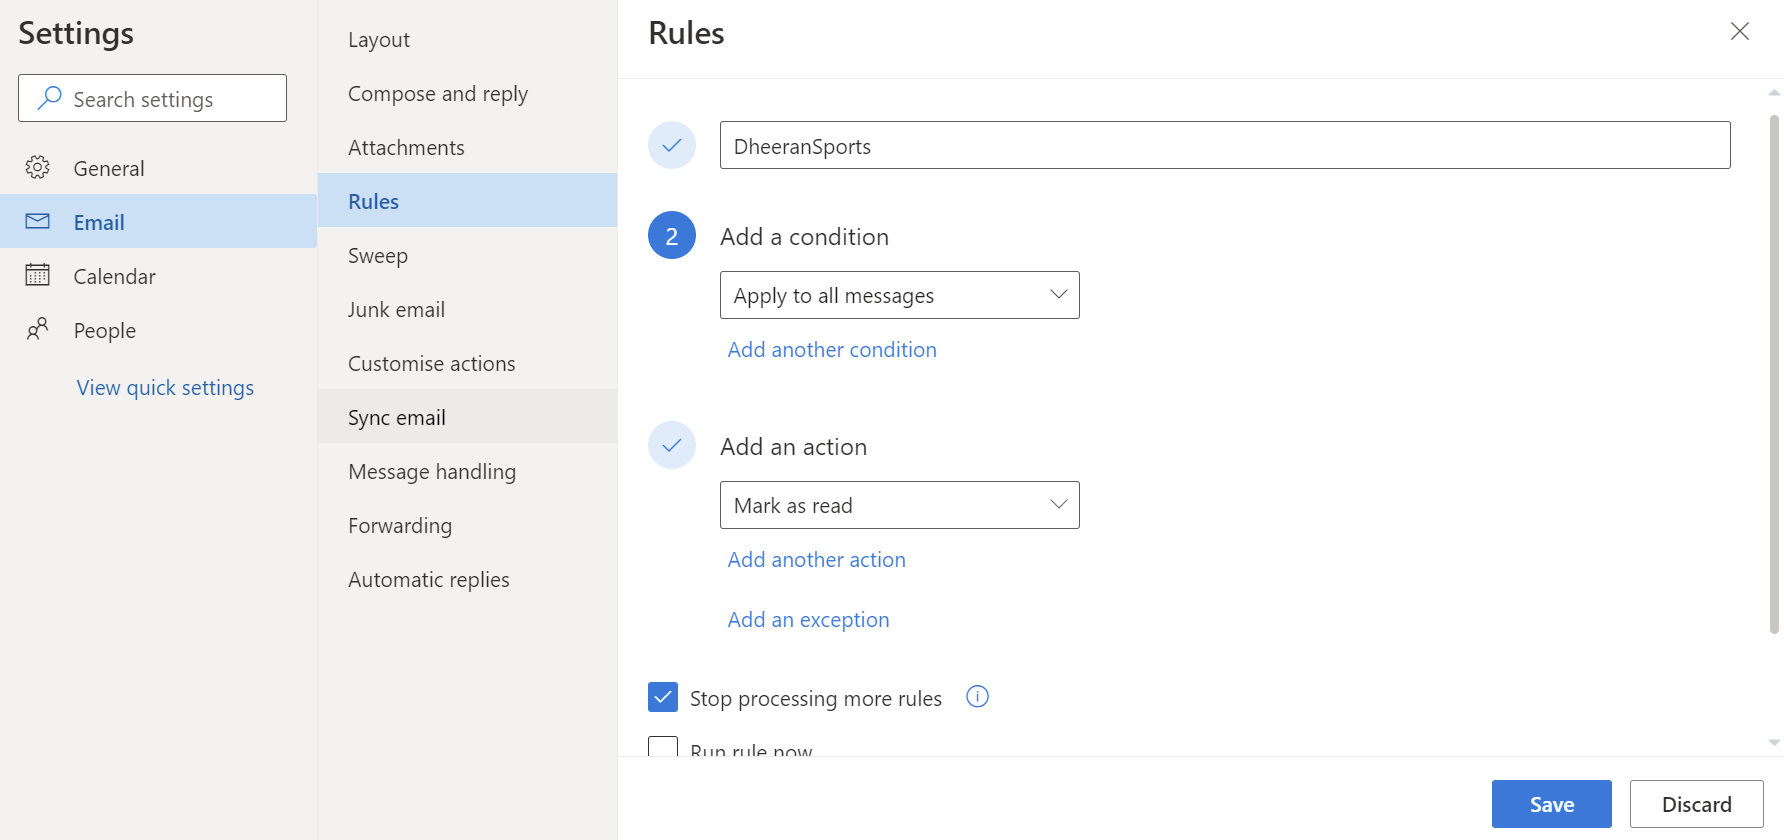
- Enter a name to the Name your rule. It can be any name.
- In the Add a condition drop-down, select Apply to all messages.
- In the Add an action drop-down, select Move to.
- In the drop-down Select a folder, select Inbox.
- Click Add another action.
- In the Add an action drop-down, select Redirect to.
- Copy and paste the preferred CINNOX email address to the field next to Redirect to.
- Click Save.
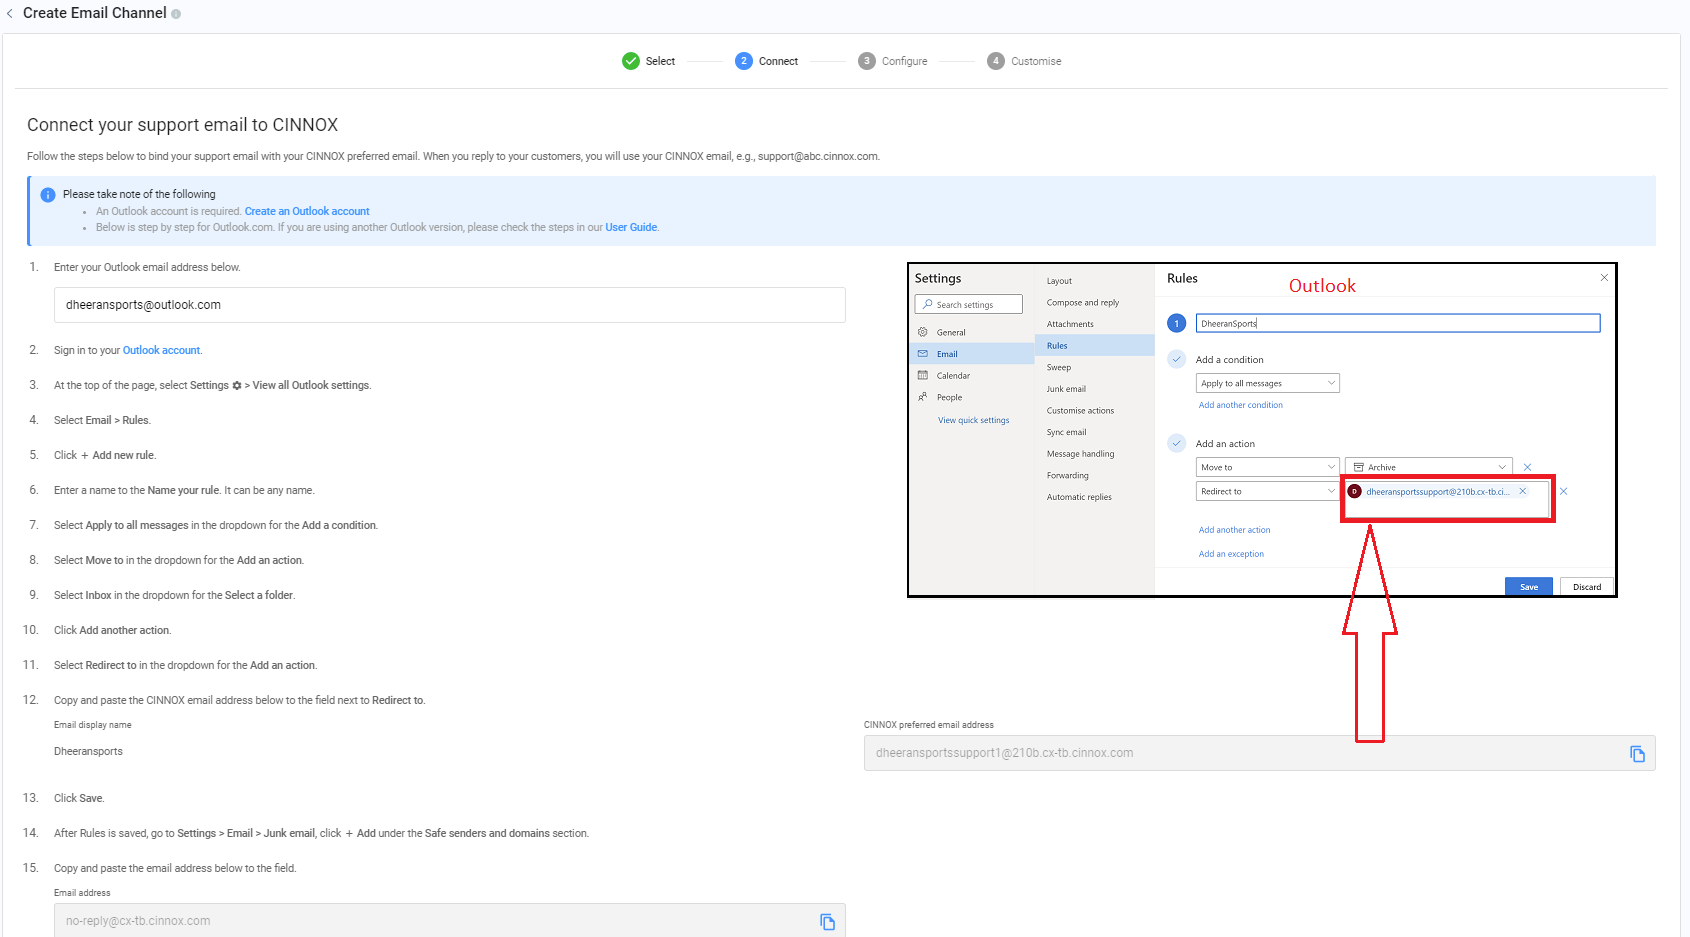
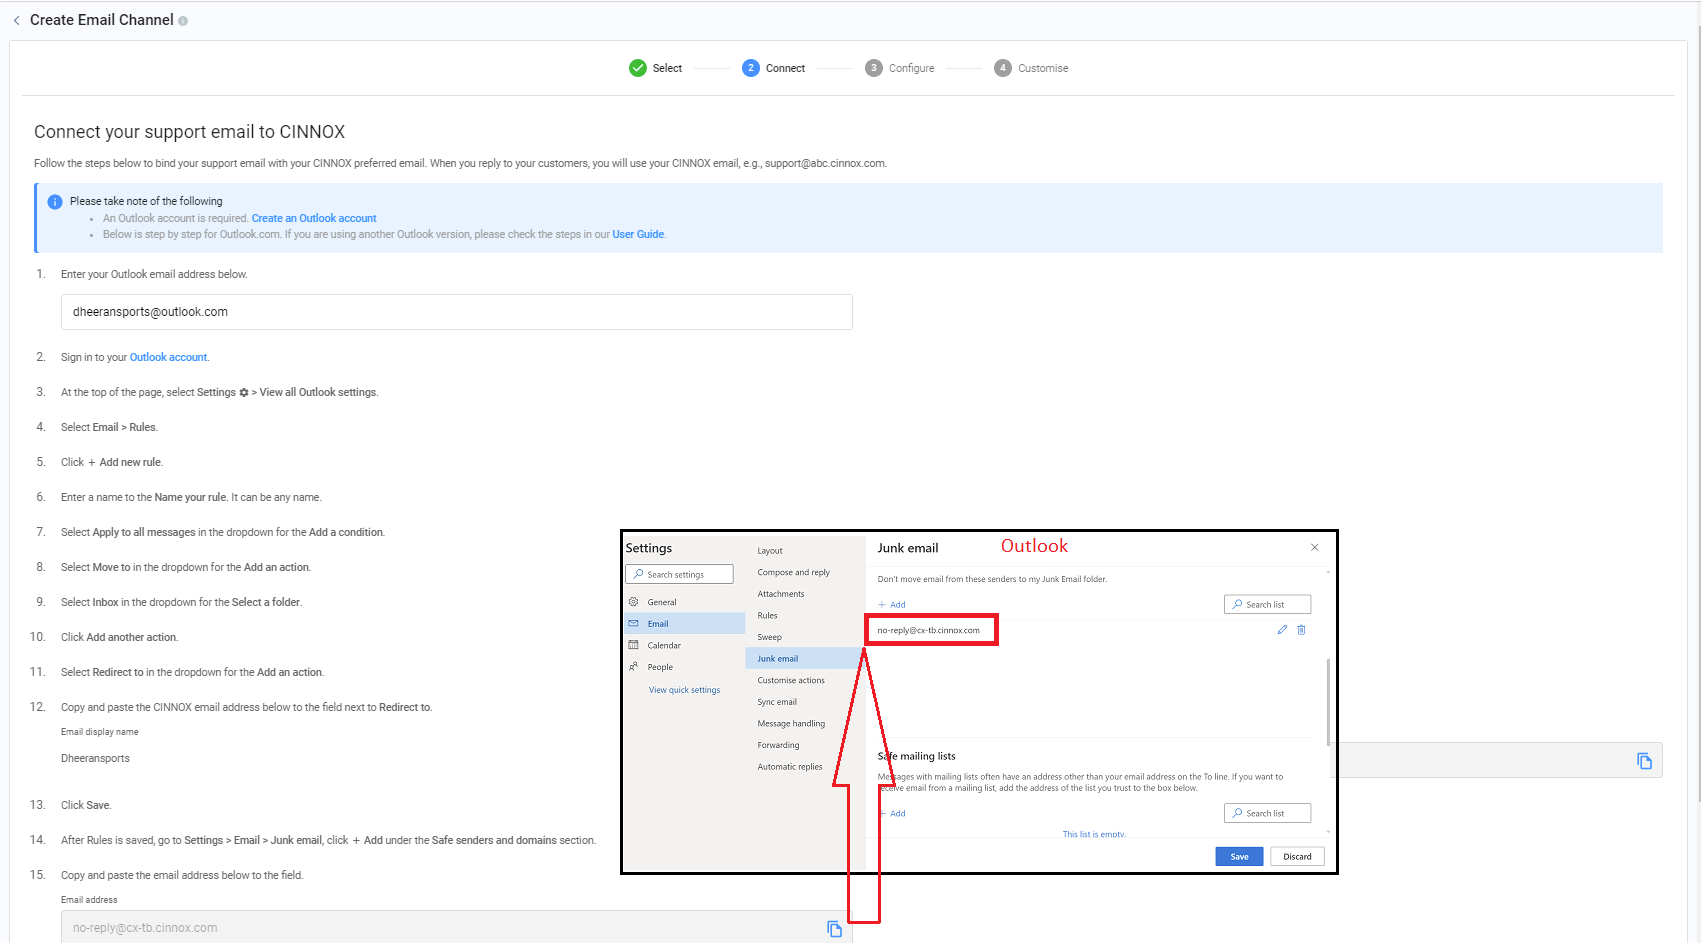
- Go to Settings > Email > Junk email, under the Safe senders and domains, click + Add.
- Copy and paste the CINNOX no-reply email address to the field.
- Click Save.
- In your CINNOX Dashboard, click Next.
Outlook Exchange via Webmail (OWA) (Own Mail Server)
-
In your CINNOX Dashboard, enter your Outlook email address.
-
Sign in to your Outlook account via webmail. Please get in touch with your Admin for the sign-in link.
-
At the top of the page, click the gear icon Settings, then click Options to open the Mail options page.
-
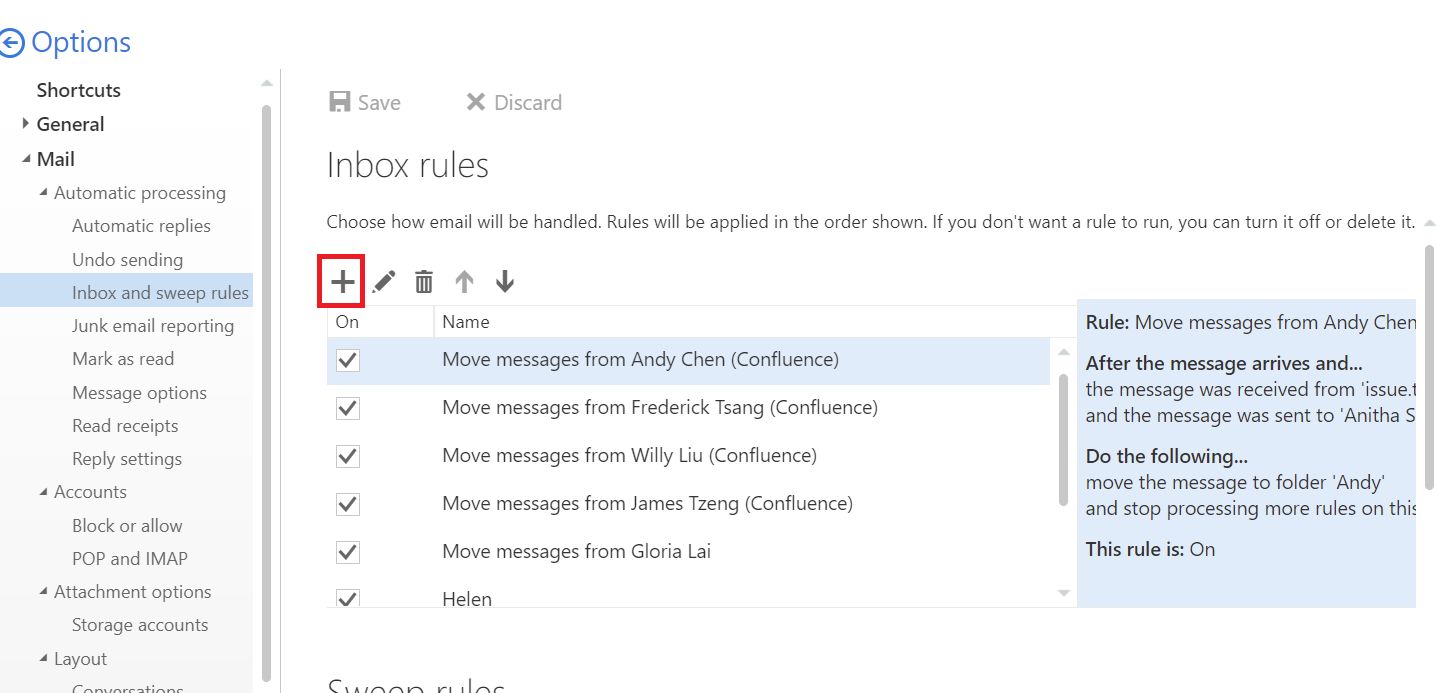
Select Inbox and sweep rules and click the ➕ icon to create a New inbox rule.
-
Enter a name for the new inbox rule. It can be any name.
-
In the When the message arrives and matches all of these conditions drop-down, select [Apply to all messages].
-
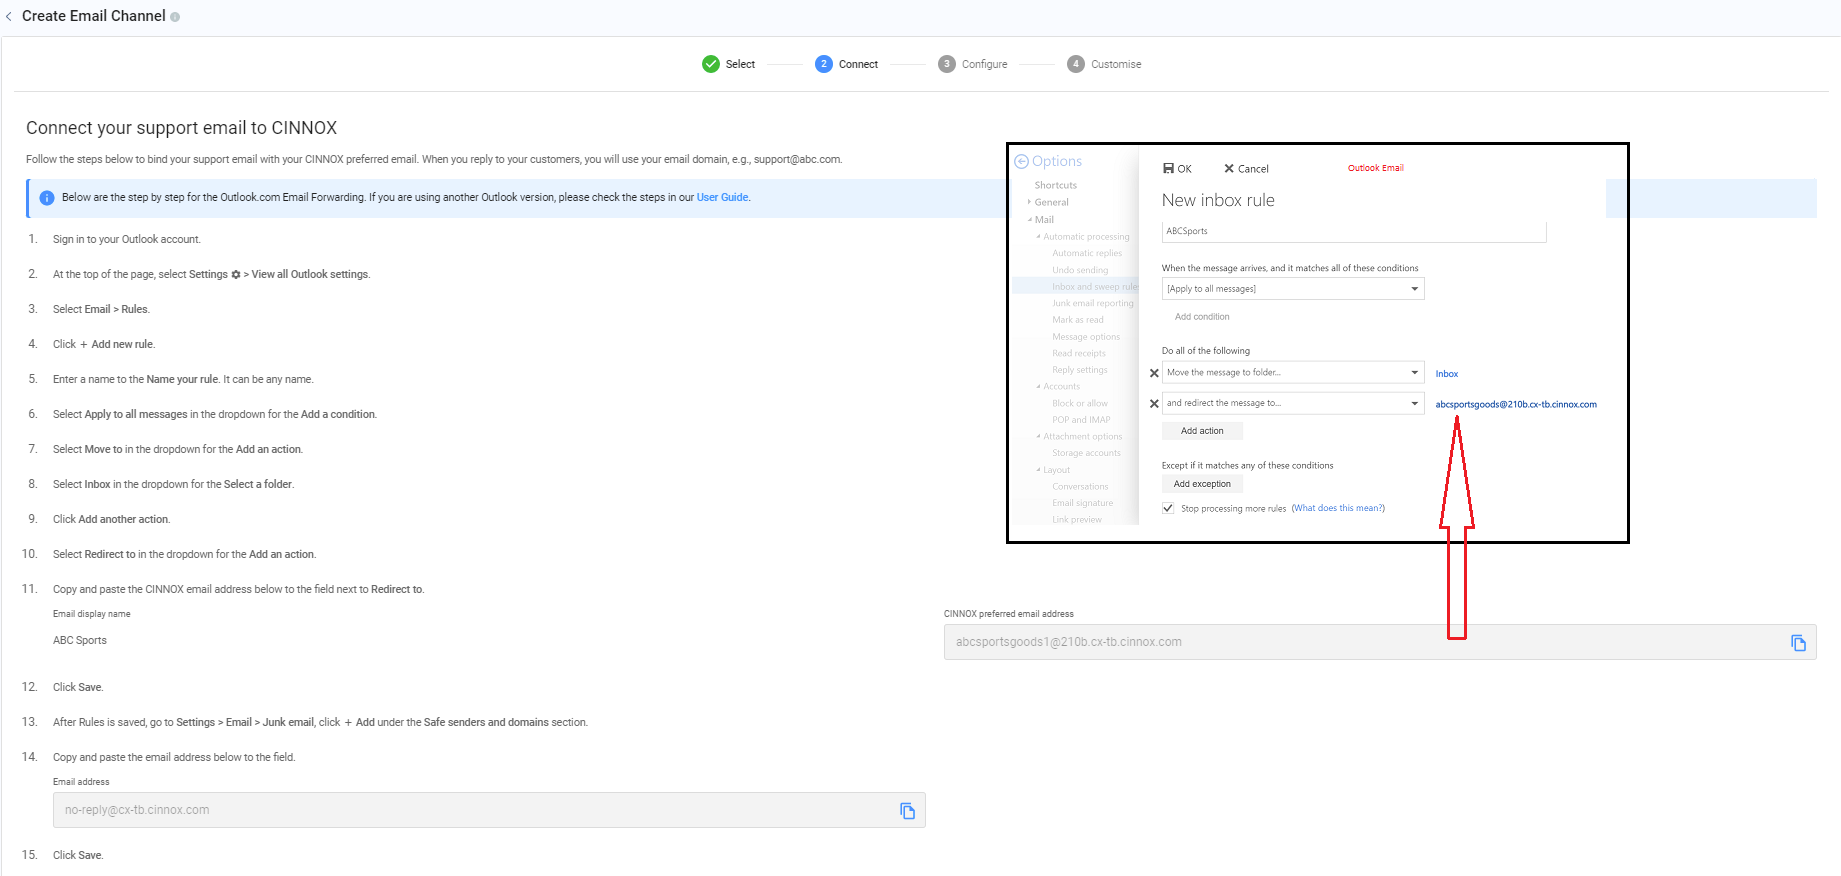
In the Do all of the following drop-down, select Move, copy, or delete, select Move the messages to folder..., select Inbox and click OK.
-
In the drop-down, click Add action, select Forward, redirect, or send, then select Redirect the messages to....
-
Copy and paste the CINNOX preferred email address to the , redirect the message to, and click Save.
-
Click OK on the New inbox rule to save the new rule.
-
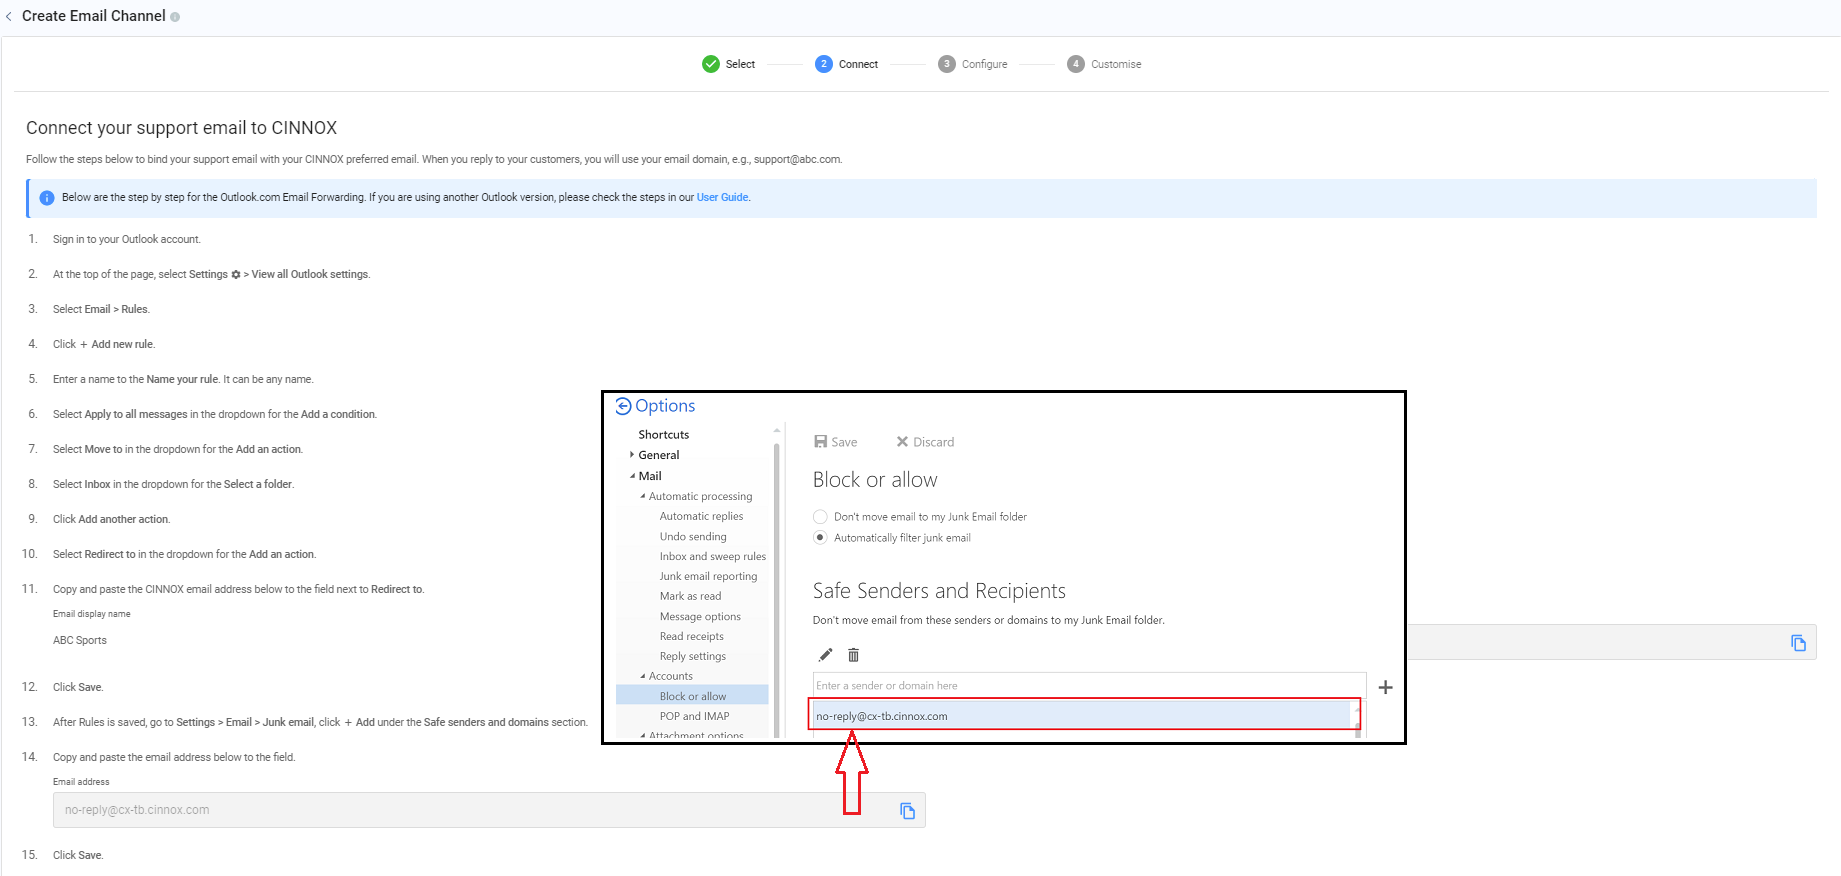
On the Options menu, go to Block or allow
-
Copy and paste the CINNOX no-reply email address to the Safe Senders and Recipients, then click ➕.
-
Click Save
- In your CINNOX Dashboard, click Next.
Setting up records in your Email DNS Settings
🚧
Setting up email records can be complex since we don't usually do it. Different domain providers might have different settings, but the purpose is the same. Contact your IT admin or email provider for help.
- Sign in to your Domain Provider account.
- Add the given TXT value and Host Name to the SPF of your Domain provider.
- Add the given CNAMEs and Host Names to the DKIM of your Domain provider.
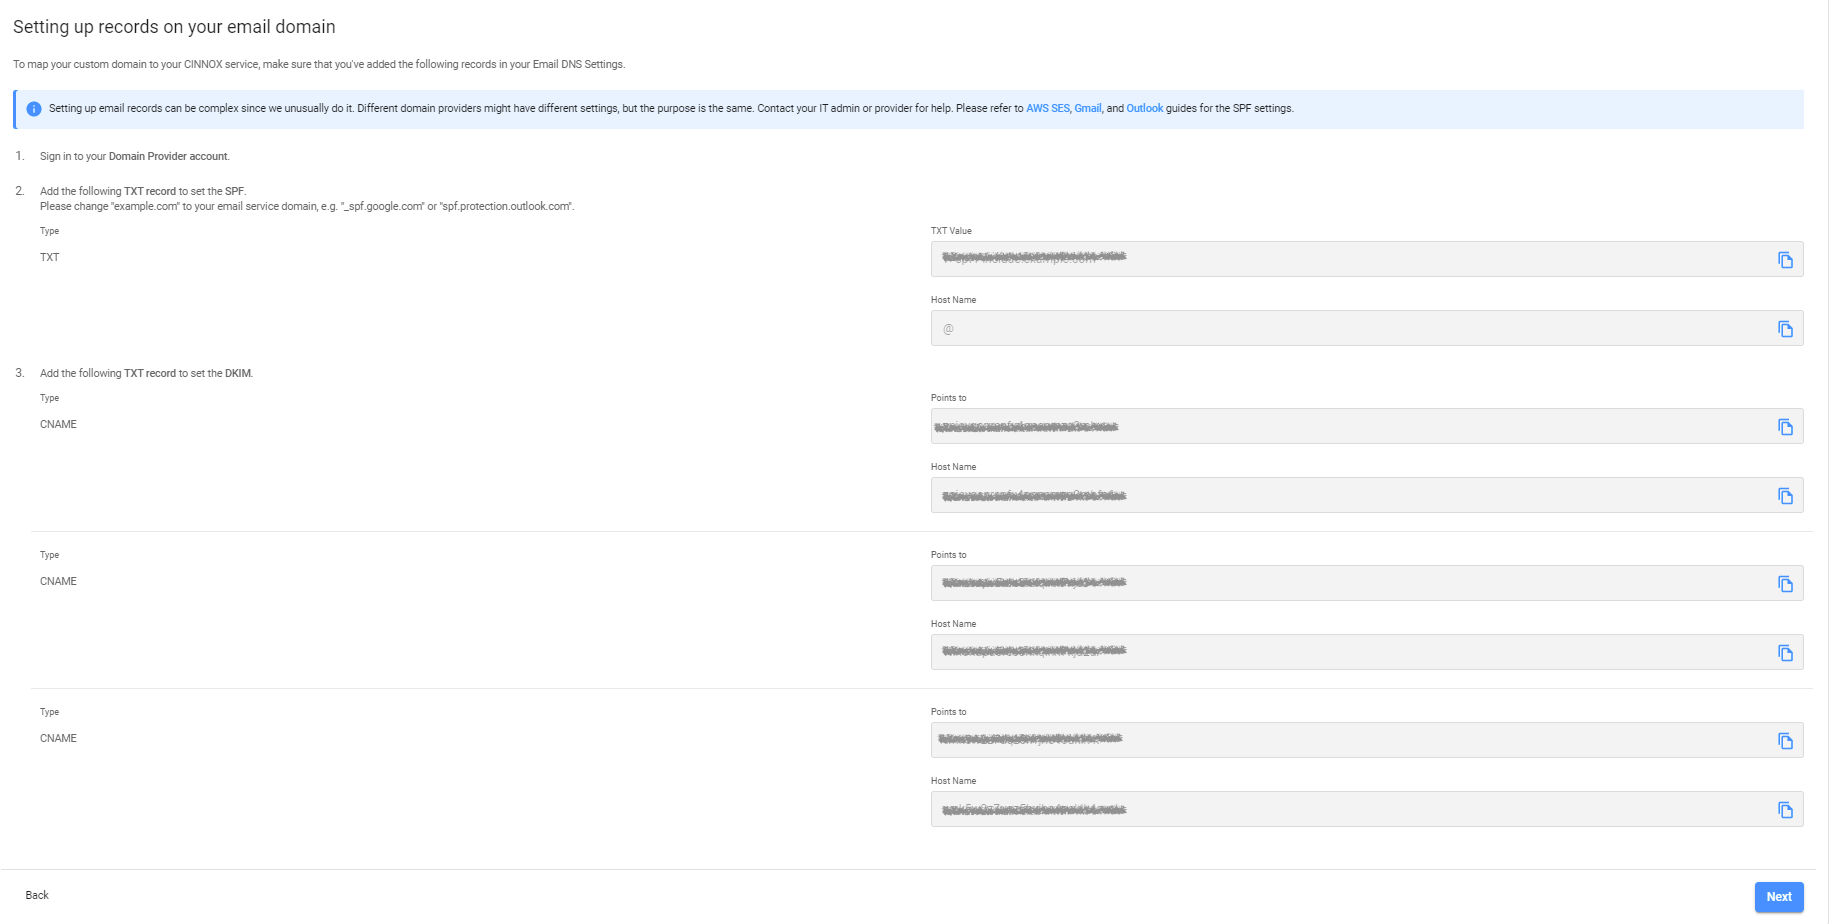
- Click Next when the TXT records are added to your Domain Provider account.
🚧
The DNS changes take place within a few hours to 72 hours.
Receiving email enquiries in your CINNOX service takes place once the DNS changes take effect.
🚧
Updating the DNS settings is just one time. You don't need to update it again when adding your second or more email support addresses to your CINNOX.
Configure the Email Channel and Routing Settings
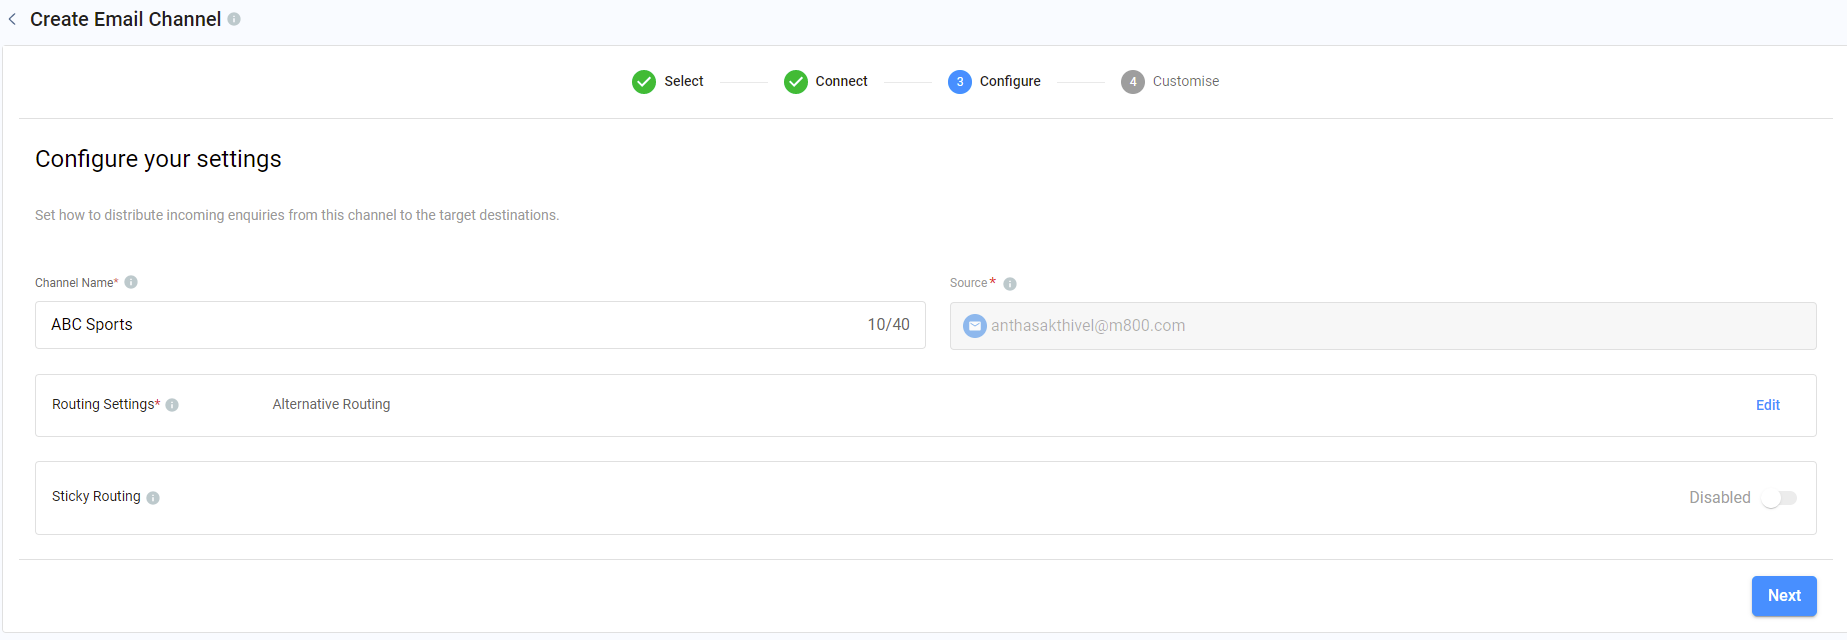
Channel Name
Add a name for your Email channel. The channel name can be up to 40 characters.
Channel Name
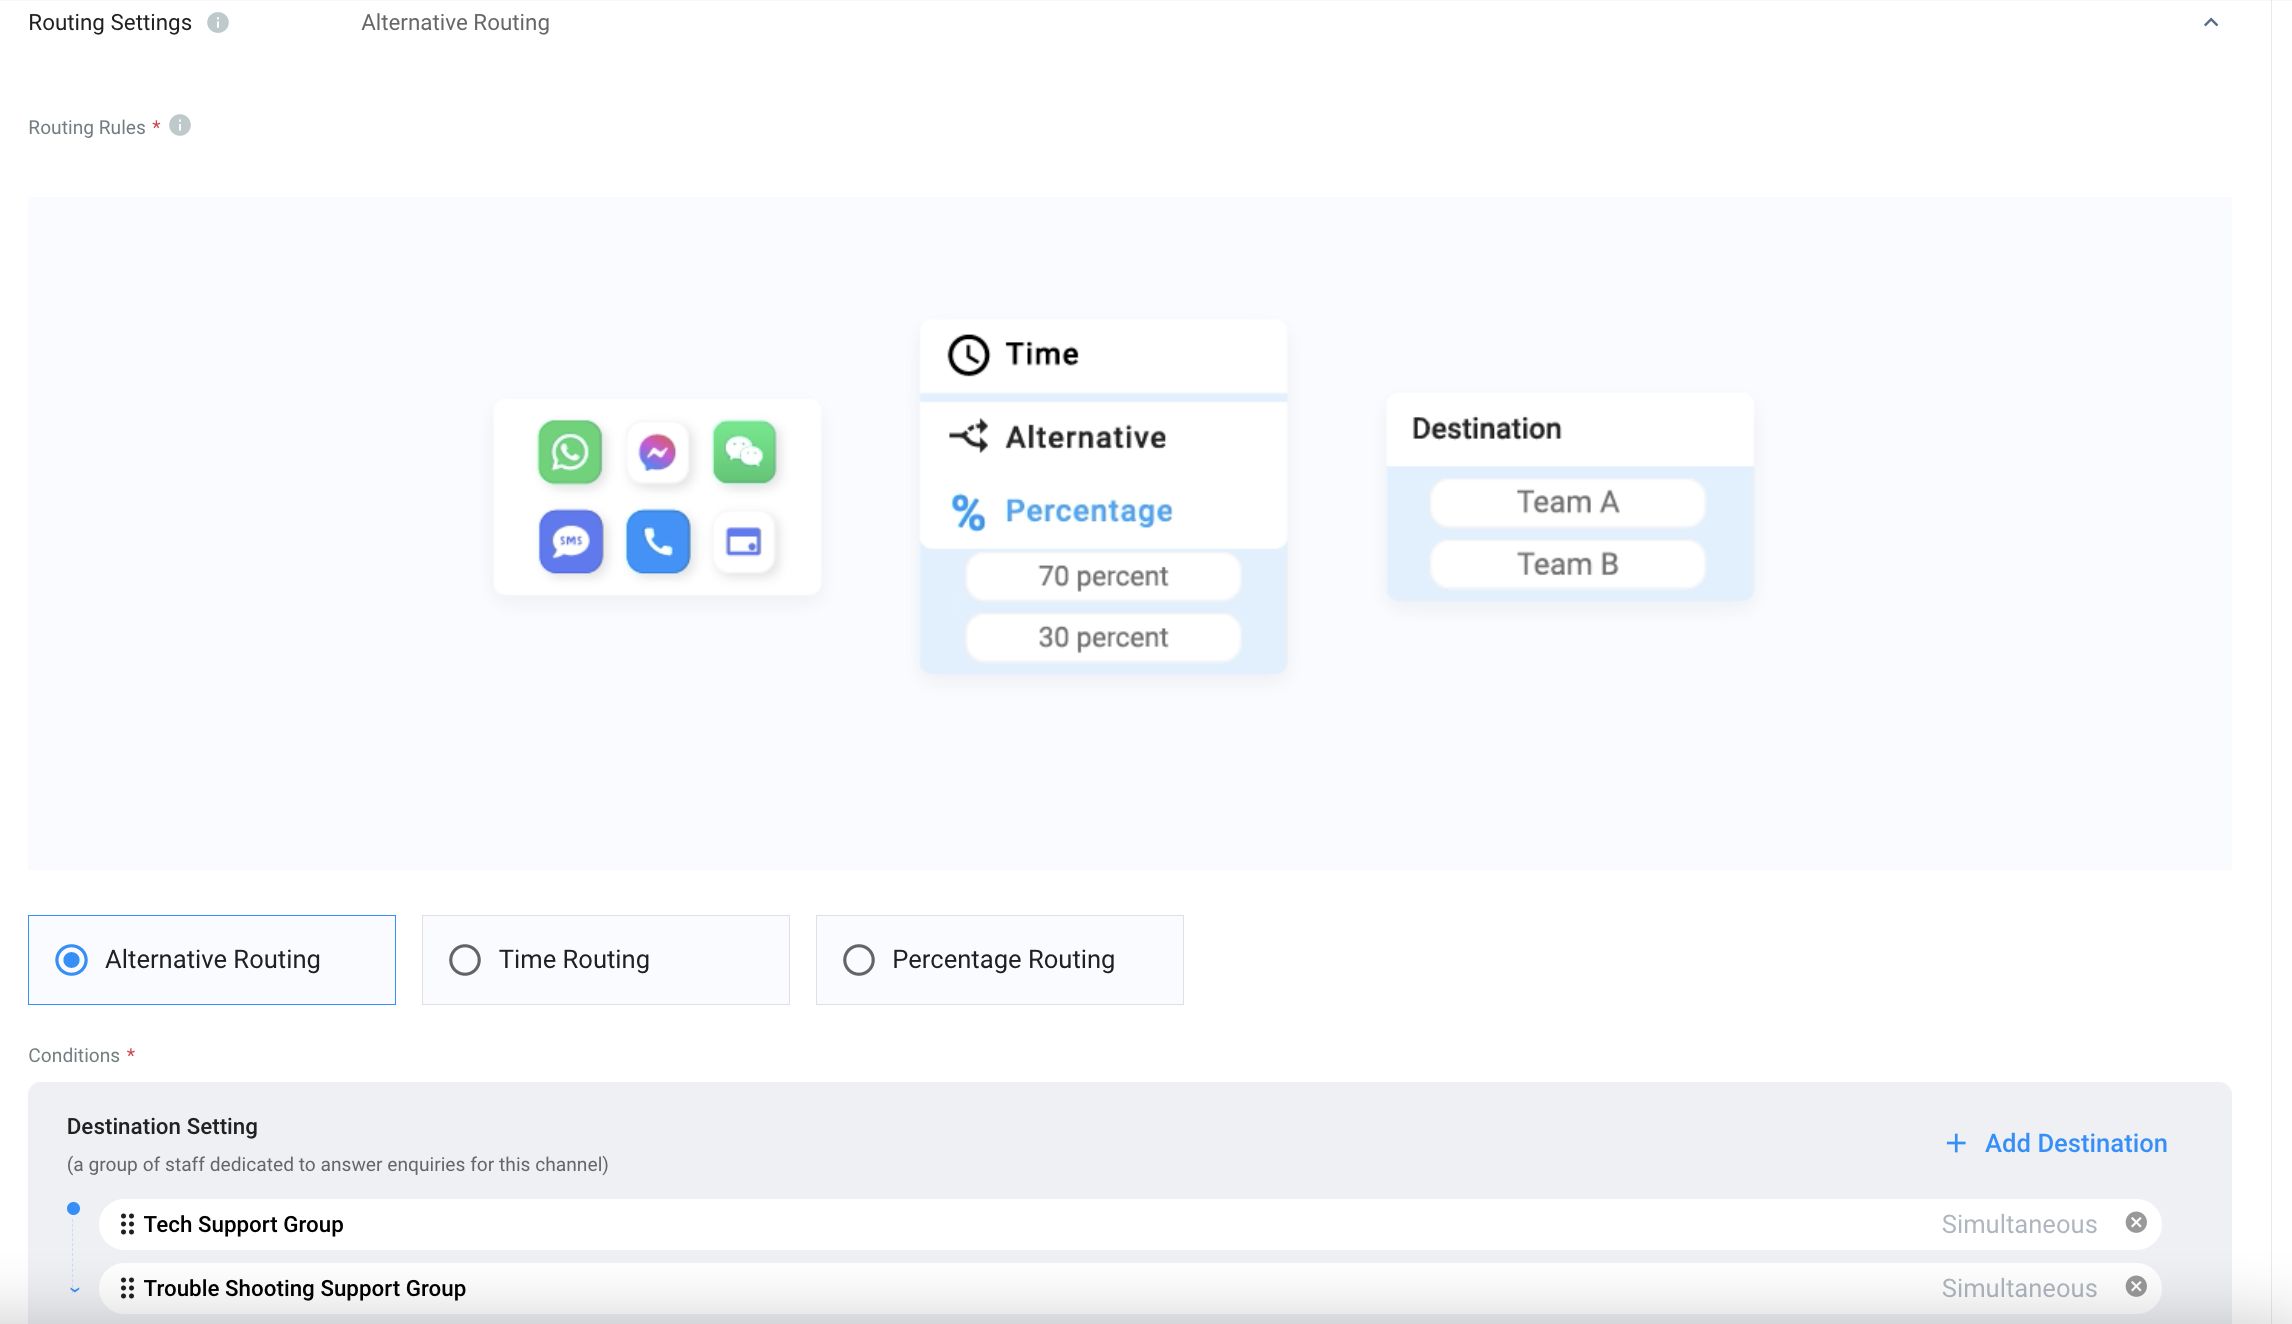
Routing Settings and Sticky Routing
Select the Routing Rule and add Destinations based on the operational support to your channel.
For more information, please check our detailed guide Alternative, Percentage, Time and Sticky Routing.
Engagement
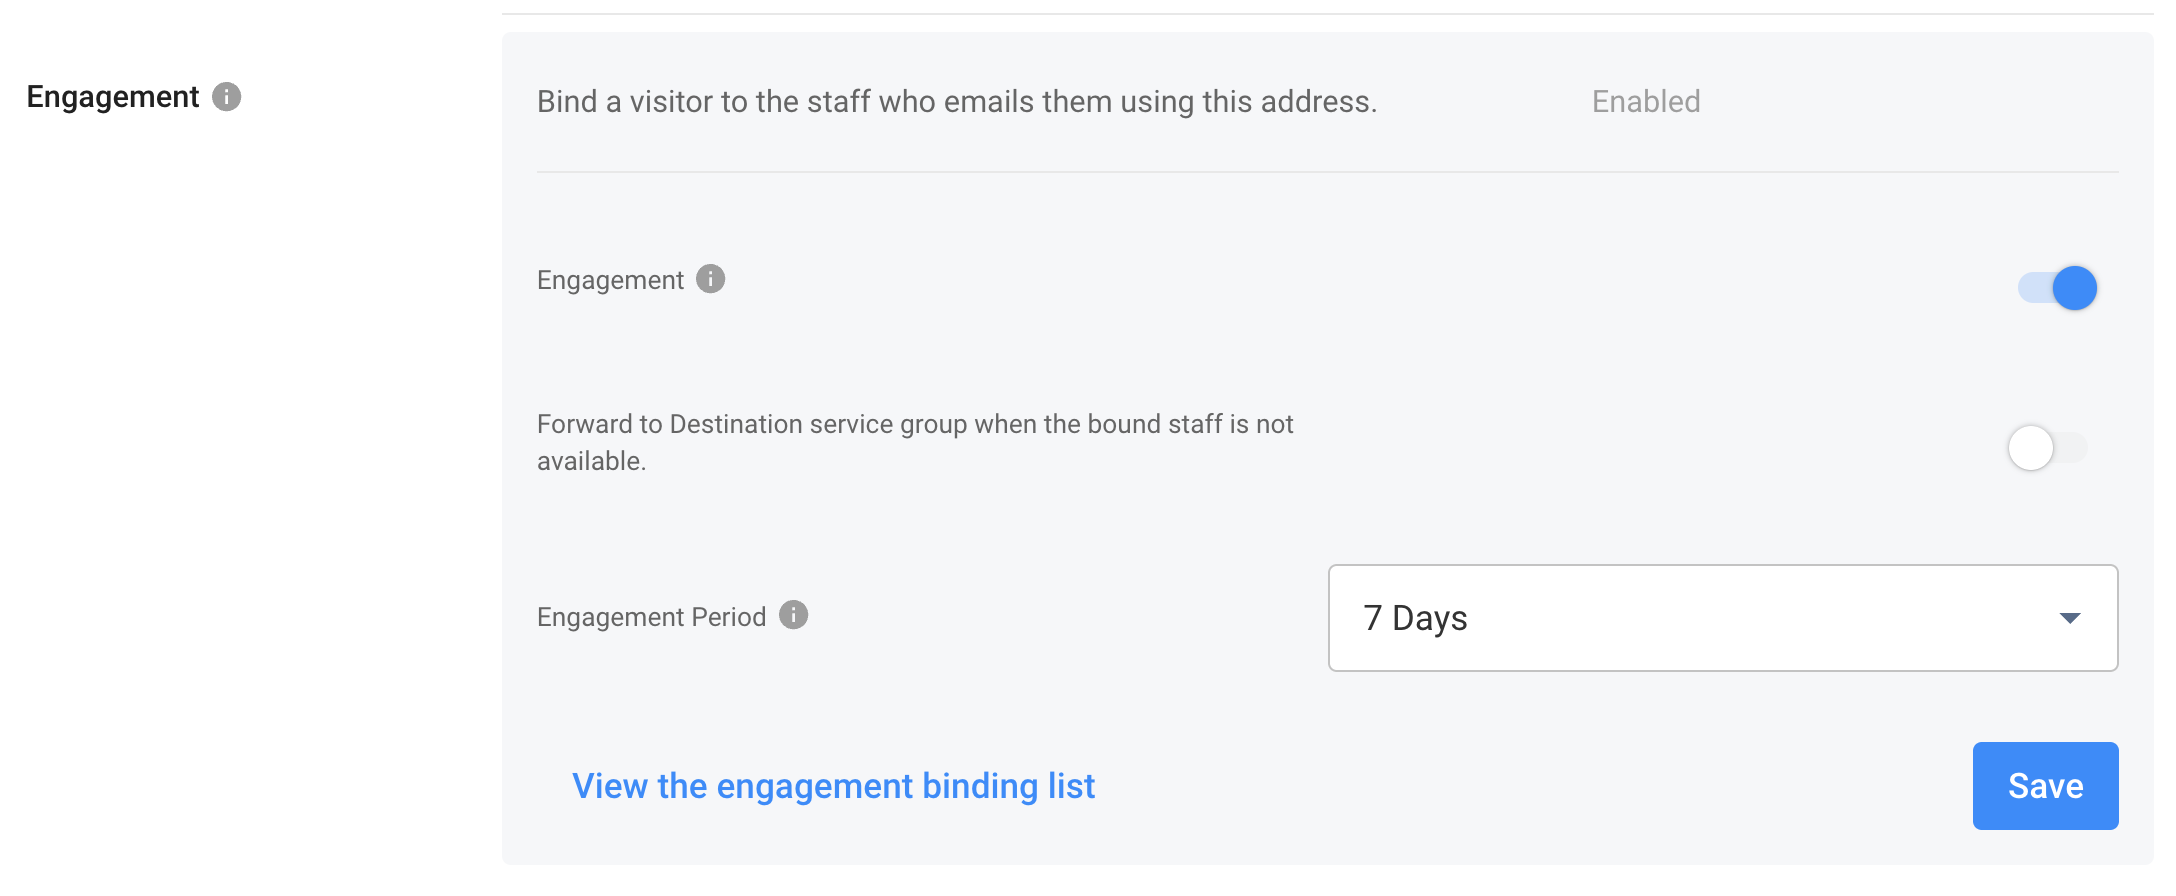
When enabled, a binding is created between the customer and the staff who emails them using this address. The next time the customer emails this address, they will be routed directly to the same staff who emailed them the first time.
- Toggle ON the switch to enable Engagement to send reply emails to your customers' enquiries.
- Toggle ON the switch to forward emails to the Destination service group when the bound staff is unavailable.
- Please choose from the drop-down list the number of days to bind the customer and the staff when there is no interaction between them.
Engagement Period
The engagement binding will expire when there is no interaction between the bound customer and staff beyond the set period.
View the engagement binding list
This lists the active email binding between contacts and agents.
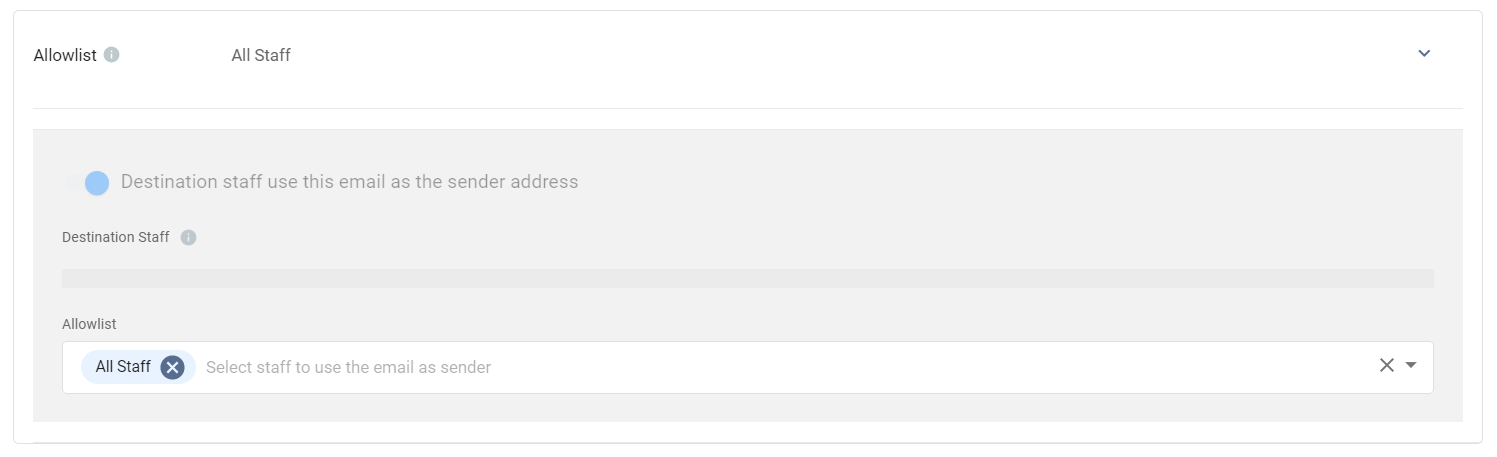
Allowlist
The staff in the Allowlist can send emails to the customer from the created CINNOX support email if the engaged or bound staff is unavailable or suspended.
CINNOX Auto-Email Message Settings
You can configure the Welcome Email, the Auto-Close Notification Email and the Close Enquiry Email to automatically reply to the customer's email.
- To enable customisation of the Welcome Email and Close Enquiry Email sections, toggle ON the switches for each.
- Click the downward arrow icon for the Custom Auto-Close Notification Email to access the customisation options.
📘
Reminder
- The limit of Welcome, Auto-Close Notification and Closed Enquiry Emails is 500 characters.
- Before configuring the Custom Auto-Close Notification Email function, enable the auto-close feature for handled enquiries without new messages. For more information, please refer to the Managing Auto Close Enquiry page.
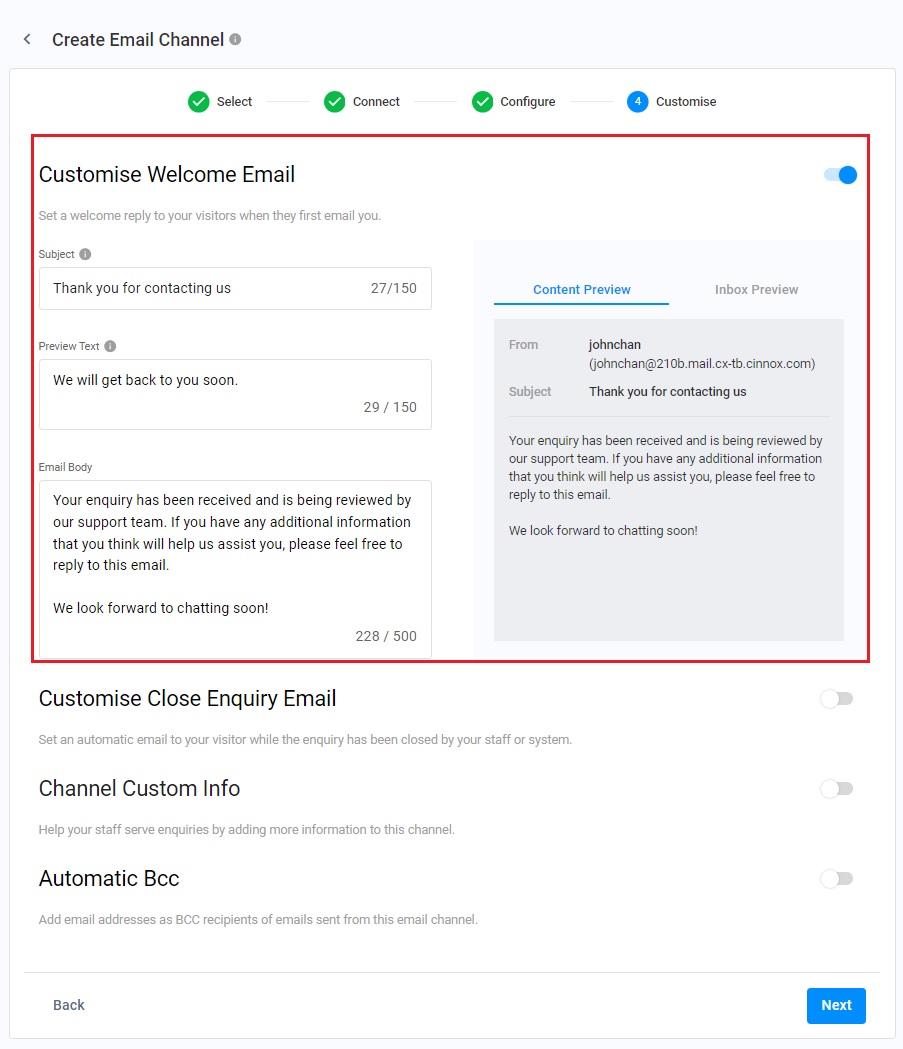
Welcome Email
- It will be sent to the customers when they send a new email to seek your support.
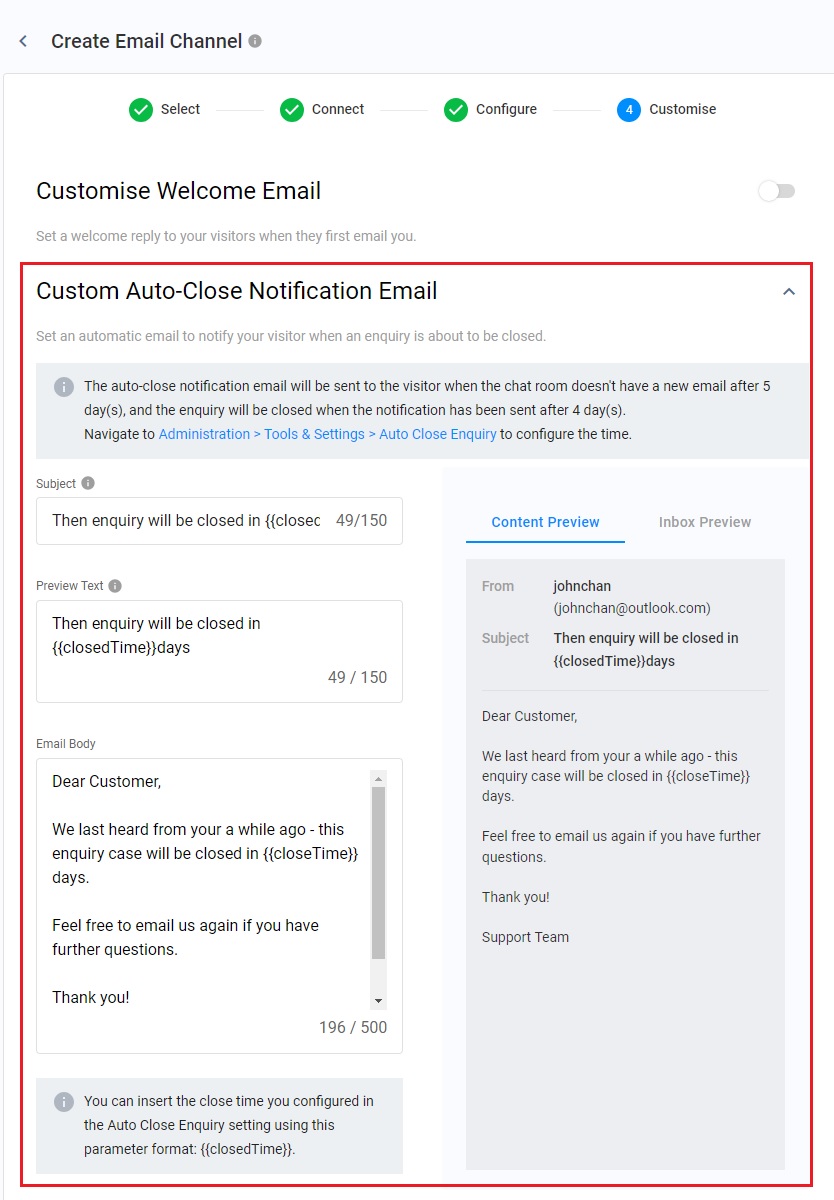
Auto-Close Notification Email
- The auto-close notification email will be sent to the visitor when the chat room doesn't have a new email after 5 days, and the enquiry will be closed when the notification has been sent after 4 days.
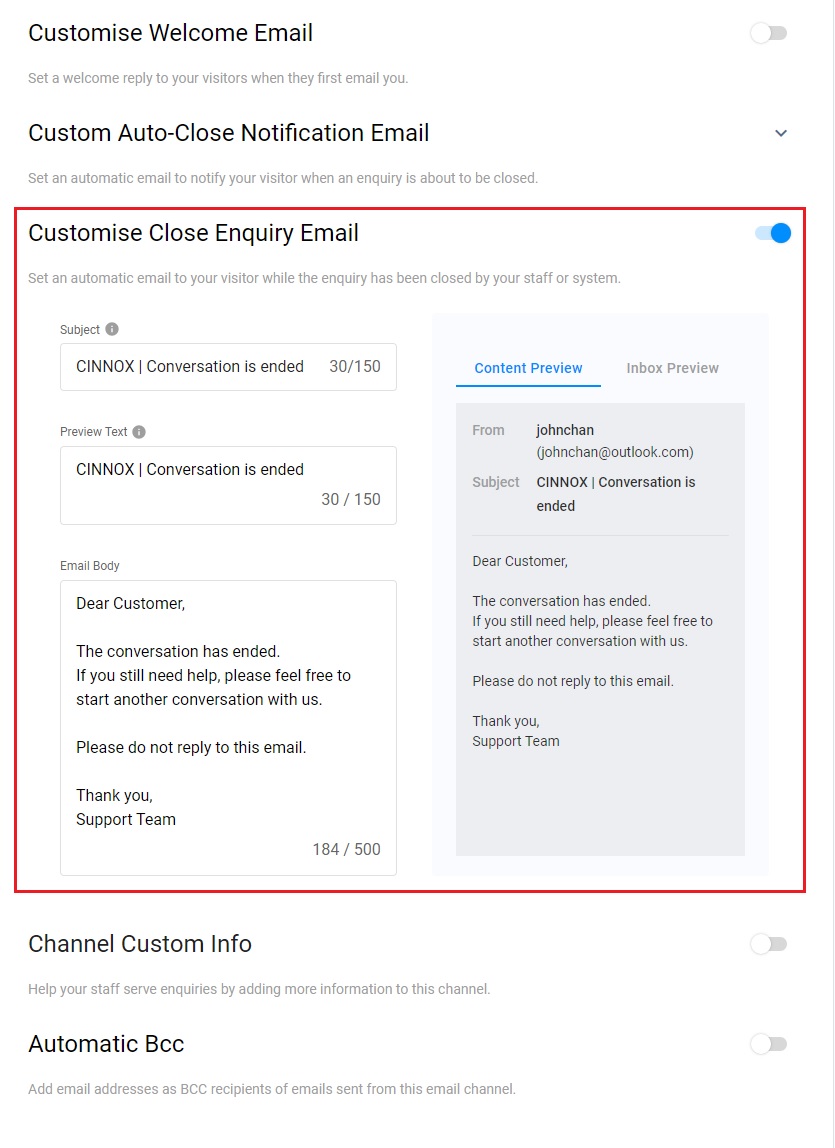
Close Enquiry Email
- It will be sent to the customers when the enquiry has been closed by the staff or the system.
-
The Welcome Email and the Close Enquiry Email have the default values and are ready to use. You are free to change them to fit your business support operation.
-
To set up the Auto-Close Notification Email, provide the content for the Subject, Preview Text, and Email Body fields. You can insert the close time you configured in the Auto Close Enquiry setting using this parameter format: {{closedTime}}.
-
You must fill out the following fields for customisation of the Welcome Email, the Closed Enquiry Email, and the Auto-Close Notification Email.
Subject
The subject line communicates precisely what your email is about so the recipient can prioritise the email's importance without opening the email.
Preview Text
The Preview Text appears next to the subject line like a sub-subject line. This occurs in the inbox; your customer can view this without opening the email.
Email Body
The body of an email message is essentially the letter inside the envelope, which is the actual text of the email. Type the elaborate message that you want to convey to your customer.
CINNOX Channel Custom Info
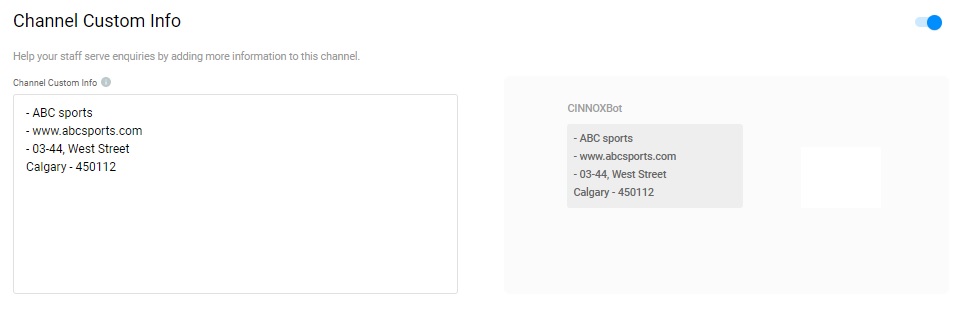
Channel Custom Info allows you to add your channel details that your staff would see in the call screen and chat room whenever they are serving an enquiry. The custom info can be about the standard procedure or operation details of handling the enquiry.
- Toggle ON the switch to enable the Channel Custom Info.
- A blank space appears to add the required basic information about the channel.
- The customised info appears on the Channel Custom Info.
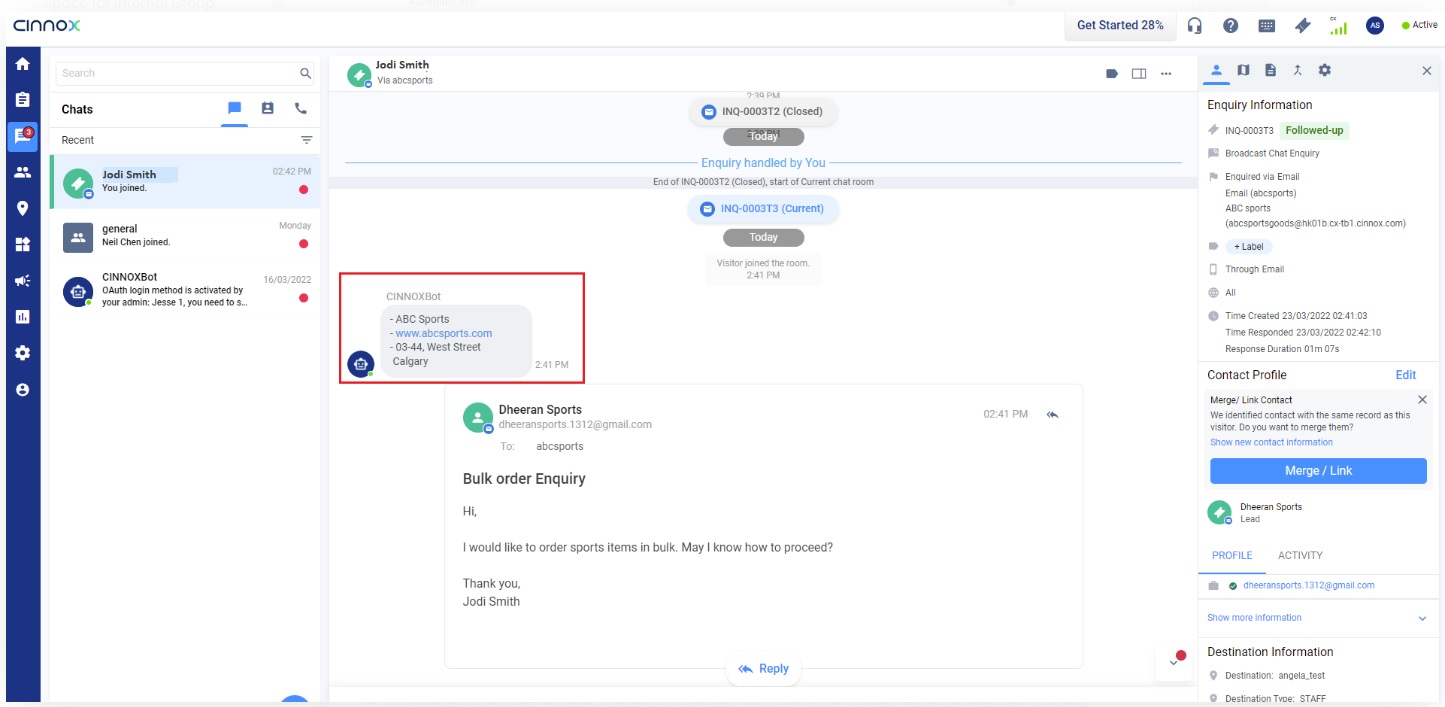
The custom info is displayed on the staff side in the chat room section for the chat enquiry.
📘
Important Notes
- Channel Custom Info can be customised per Channel.
- Channel Custom Info is only available for inbound service.
- In addition to the Directory weblink, Channel Custom Info does not apply to other agents' and campaigns' weblinks.
- The system is limited to 10,000 characters; if exceeded, the chatbot message will not be sent.
- Channel Custom Info will still be displayed as chatbot messages in the room of missed enquiries.
Automatic BCC
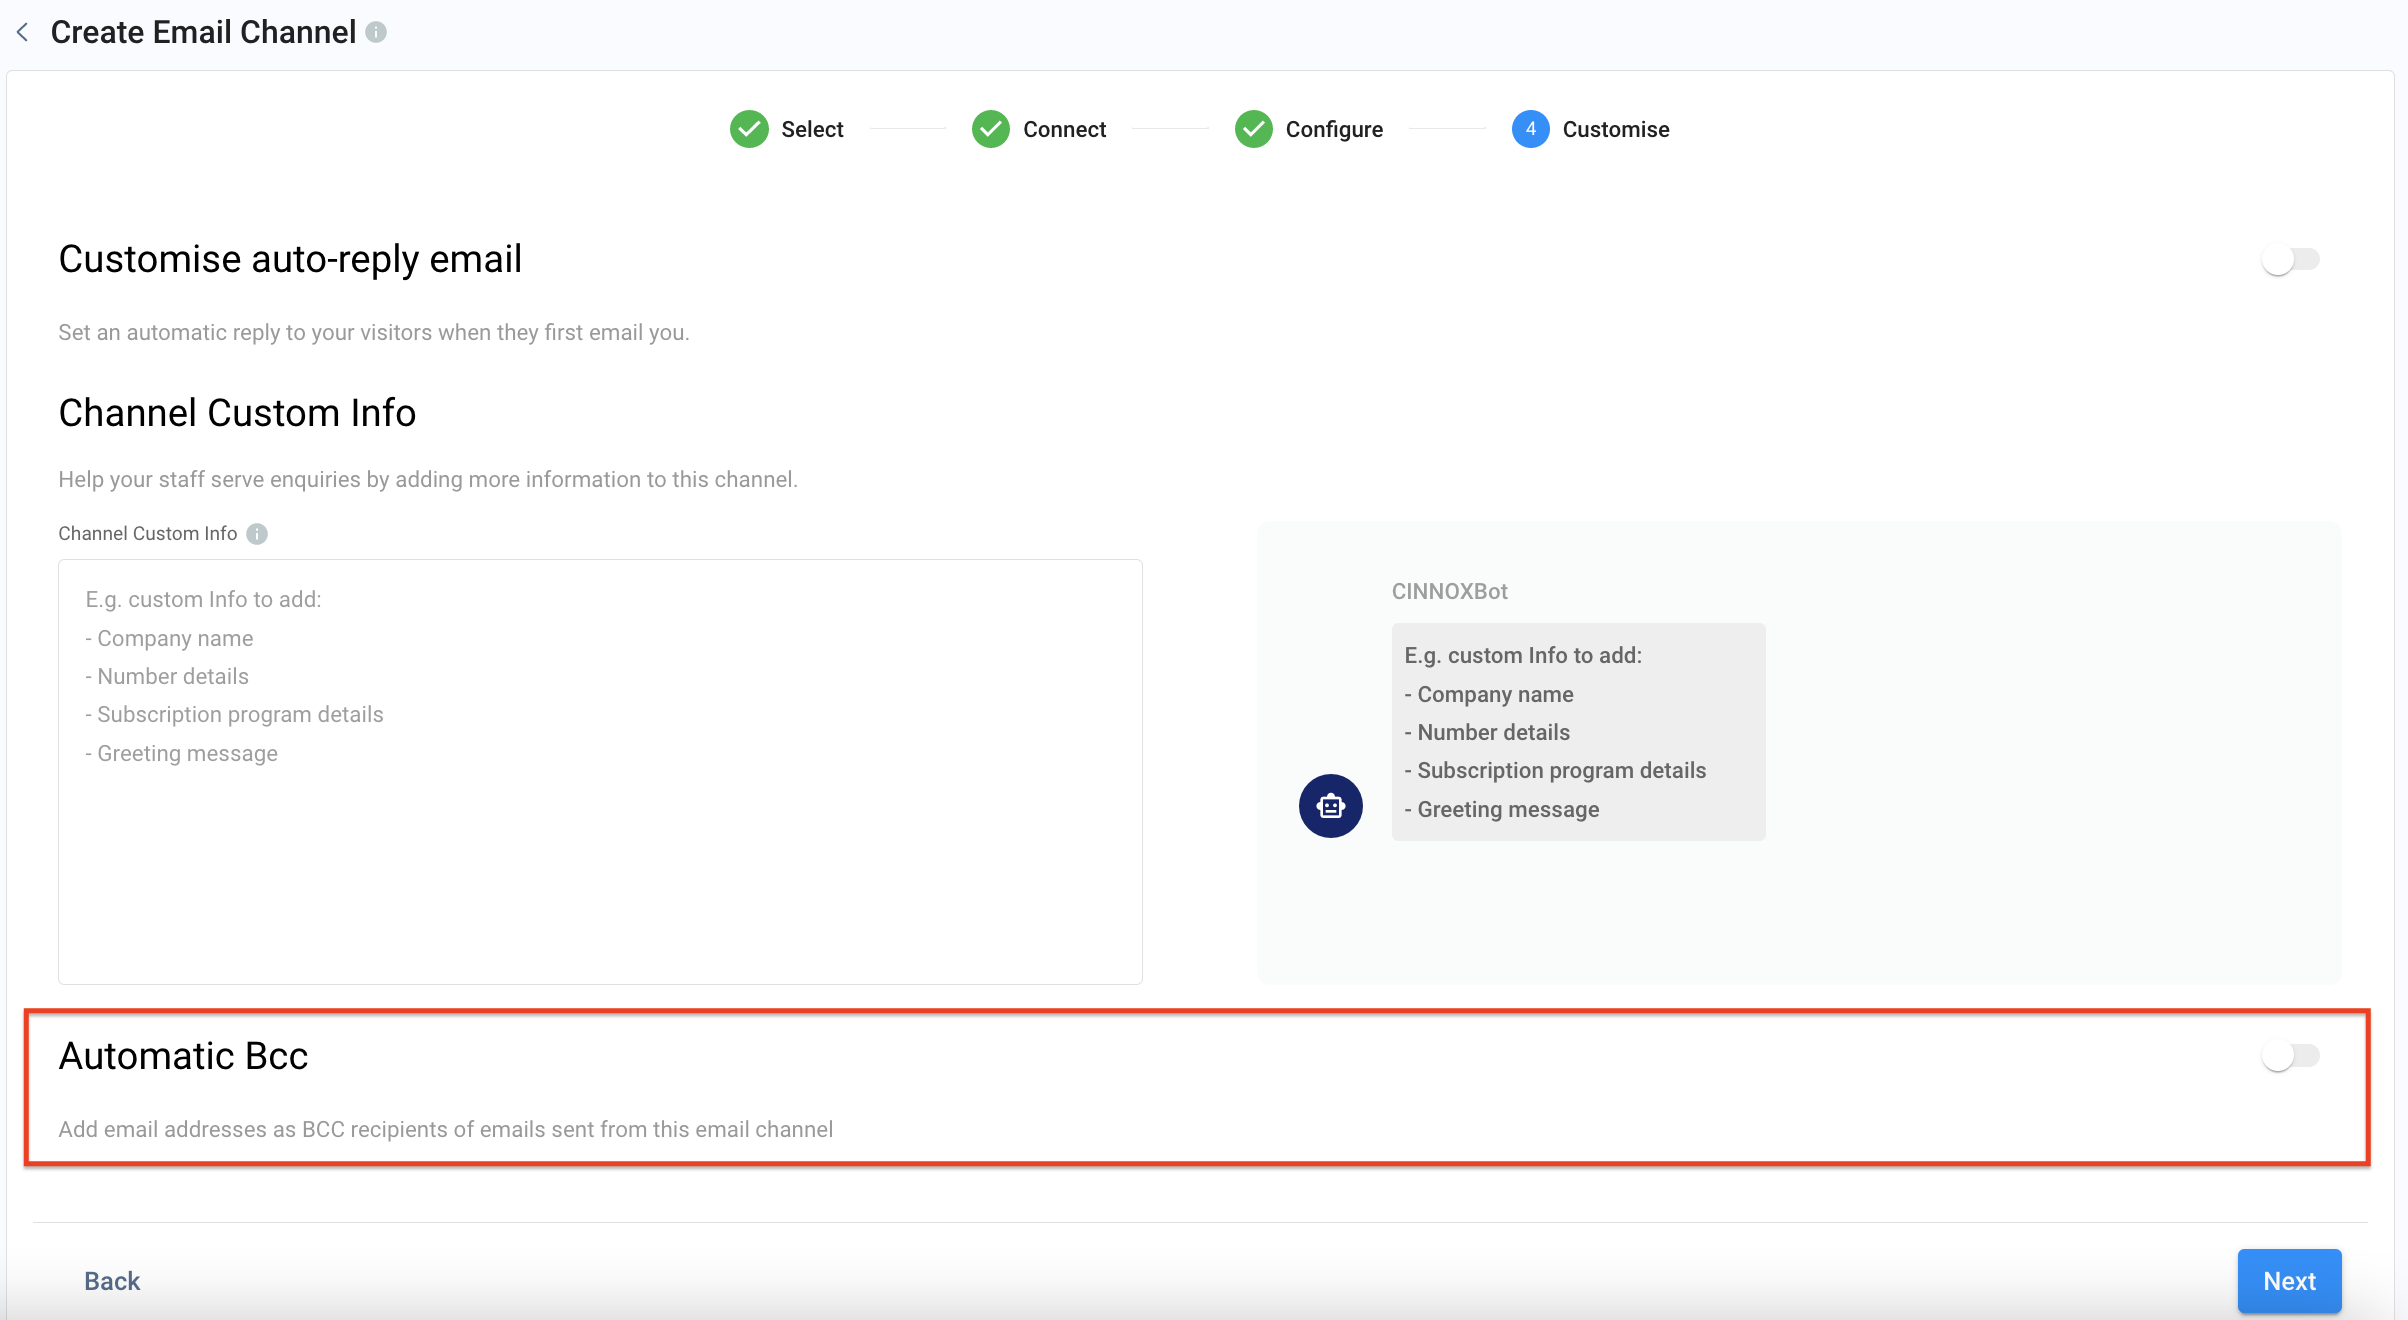
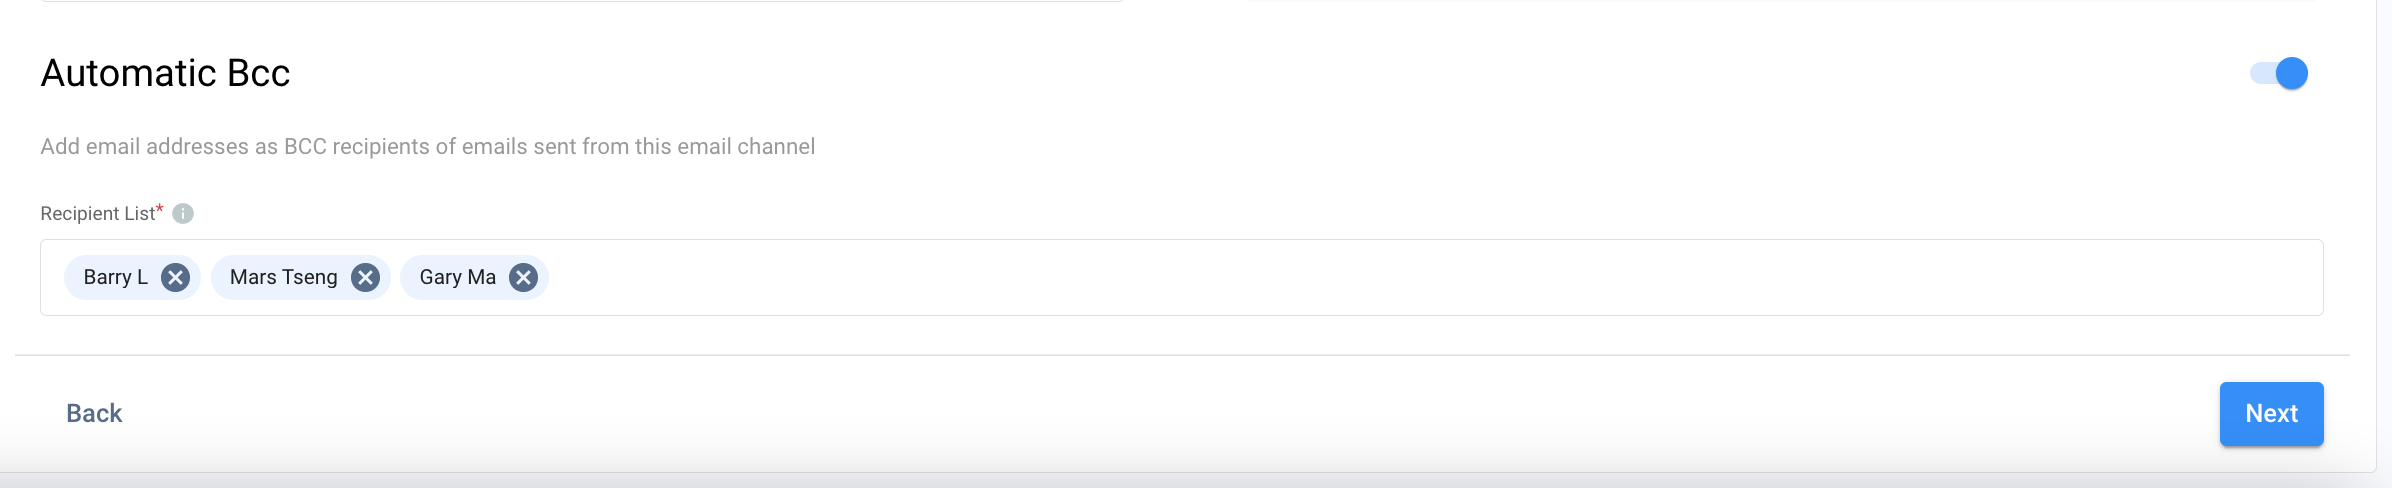
The automatic BCC setting allows you to add your and your teammates' email addresses as BCC for every email your staff replying to.
-
Toggle on the switch to enable the Automatic Bcc function.
-
In the Recipient List, search for the staff name or email address to add. You can add up to 10 email addresses in the BCC.
-
Click on the Next to complete all configurations.
Serving Email Enquiry
Refer to Serving Chat Enquiries for more information on how to serve an enquiry via the Email channel.
All email enquiries and stats can be searched and viewed in your CINNOX Dashboard, Enquiry Overview and Enquiry Detail Report.
When a staff member closes an email enquiry, the visitor will get an email notification that the enquiry has been closed. Hereafter, the visitor cannot respond to the email thread; instead, they must contact the staff through a new email.
📘 Known Limitations
- For Microsoft 365 users, to allow forwarding of Emails to CINNOX, the staff must Enable External Forwarding in the Microsoft 365 account.
- Organisations may block unauthenticated emails from outside organisations or individuals for security purposes. The administrator must check and customise the anti-spam policy to receive enquiries through CINNOX.
- The visitor has to add the @cinnox.com domain to their email box safelist. Otherwise, there is a chance to receive the email enquiry responses in their Spam/Junk Email folder.
- The DNS changes occur within a few hours to 72 hours for your own mail server. New emails are received in CINNOX as email enquiries when the changes take effect.
- When binding emails with CINNOX, a failure error may be encountered while sending the verification email; this error may happen if the forwarding time is longer than 5 minutes. In this situation, the administrator or the staff has to wait and bind the email again later.
- When staff receives an enquiry from a new visitor, the visitor's full name will appear in the Last name column of the Enquiry Information panel. The staff can edit the first and last names before saving the contact.
- When a staff copy and paste the email enquiry from a visitor to another staff or admin workspace, it may appear as HTML codes. This is because the email body language uses an HTML body to show the original HTML code when copied.
Help and Support
Please ensure the email forwarding settings correctly bind your support email and CINNOX email address.
When using your mail server, please ensure that the DNS Records for your SPF and DKIM in your DNS settings are correctly copied and pasted.
If your CINNOX service is still not receiving emails, contact our CINNOX Support Team.