Managing Visitor Forms
Pre-Chat and Offline Support Forms
Enhance customer experience by personalizing interactions
With CINNOX visitor forms, you can capture essential information from your customers before interacting with them, foster a strong relationship, and improve the support process by allowing your staff to attend to inquiries immediately and efficiently. Leave a lasting impression on your customers through CINNOX.
Start for FREE Get a Demo
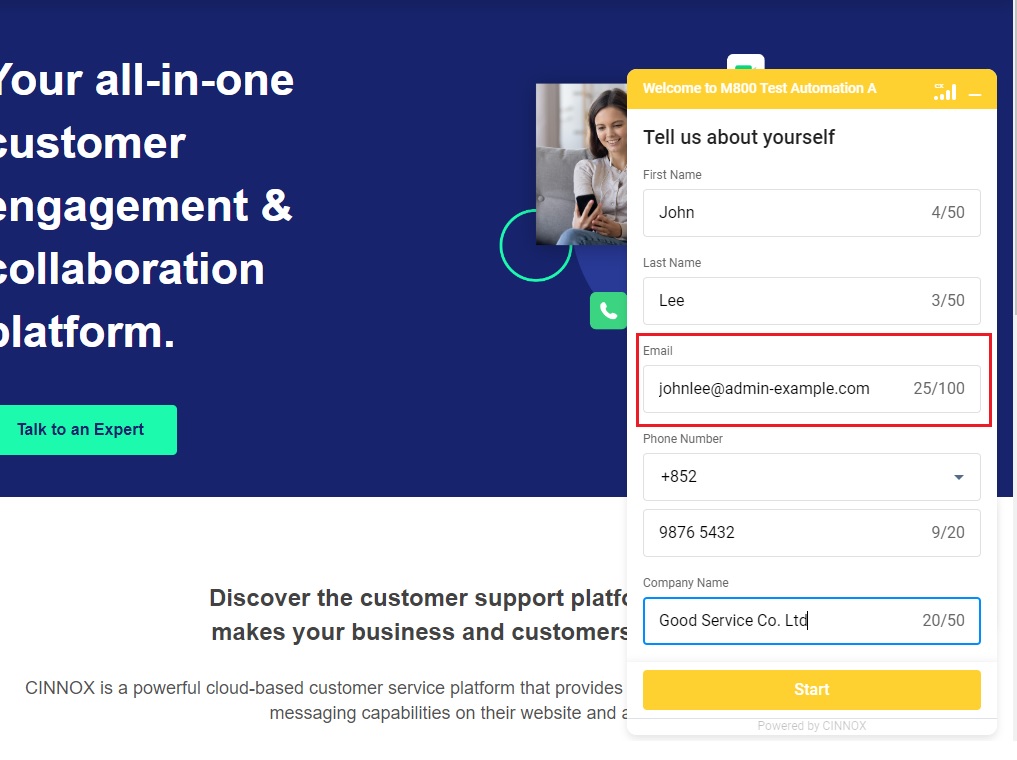
CINNOX Visitor Forms has the Pre-Chat Form, and Offline Support Form lets you gather preliminary information from your visitors before interacting with them. These forms help your staff attend to enquiries immediately and efficiently and reduce the time they spend collecting the following details:
- First Name
- Last Name
- Email Address
- Phone Number
- Company Name
- Job Title
- Department
- Other fields (from the created Custom Field)

When the Auto-save to Contacts is enabled, it automatically saves the visitor profile as a new contact in your CINNOX External Contact list.
Pre-Chat Form
CINNOX displays the Pre-Chat Form when a visitor clicks on the Widget, opens the web link, or scans the QR code of a tag. This feature is disabled by default.
Enabling Pre-Chat Form
- Go to Administration > Widget > Visitor Forms, then click the Pre-Chat Form tab.

Visitor Forms
- Toggle the button ON.
The page will expand the additional settings for the following:
- Auto-save to Contacts
- Greetings
- Terms
- Form Field

Auto-save to Contacts
When disabled, you can manually select the visitor details to save as a new contact.
To enable the auto-save contact, toggle the button ON.
Greetings
- Click on Edit.
- Click on Add Greetings.
- Select a language in the dropdown list.
- Type your text greeting in the textbox according to the selected language.
- Click on Save.
- Repeat the same steps to add another greeting for other languages.

Terms
Terms refer to your Company's Terms and Conditions, Terms of Use or Policies you want to be acknowledged by your visitors.
To enable the Terms:
- Click on Edit.
- Toggle the button ON.
- Enter the URL that links your company's Legal page.
- Click on Save.

Form Field
Add fields in the Form to gather visitors' information before interacting with them.
- Click on Edit.
- There are suggested fields that you can keep, such as the First Name, Last Name, Email Address, Phone Number and Company Name.
- Click the bin icon to remove the field.
- Click on Add New Field, and a pop-up window will appear. Add more fields such as Job Title, Department and other fields created from the Custom Fields for External Contacts.
- Click on the checkbox of each field to add in the form field, then click Add.
- Click the Required checkbox to make the field mandatory for the visitor to fill.
- Click the Verification checkbox for the Phone Number field to verify the visitor's phone number.
- Click on Save.

Preview Panel
The preview panel on the page's left side displays what the Form looks like for your visitors.

Receive Emails after Enquiries have been Closed
To ensure a satisfactory visitor experience, summary emails containing enquiry details will be sent to the email addresses provided in the pre-chat Form as records once the enquiries are closed. Additionally, agents handling these enquiries will receive summary emails for their records.
- Visitors initiate enquiries and leave their email addresses in the pre-chat visitor form.
- Visitors will receive summary emails sent to the email addresses in the pre-chat Form.
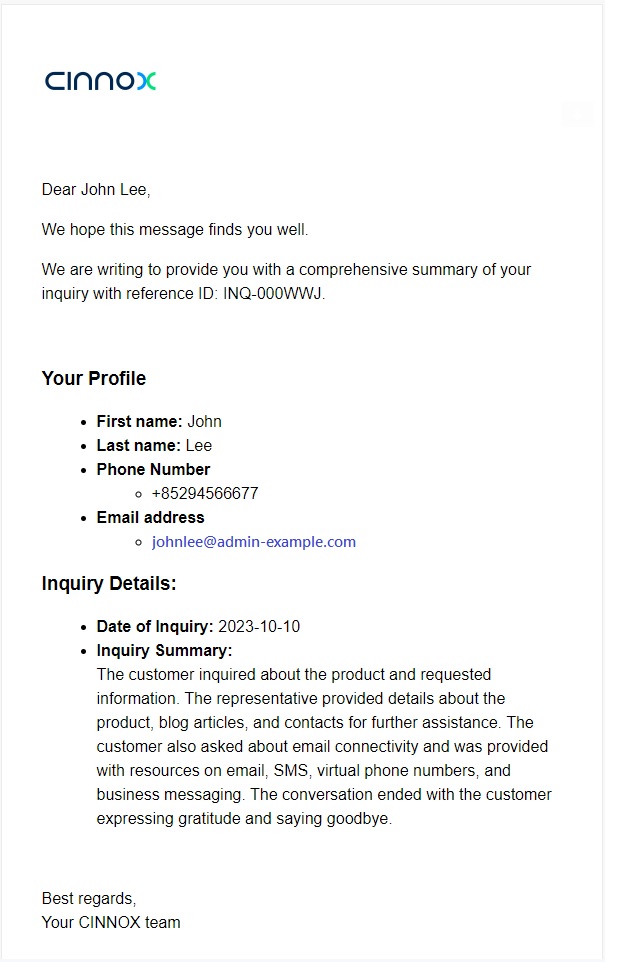
- Agents will receive summary emails containing visitors' profiles and enquiry details.

The emails will only be sent if the email addresses provided in the pre-chat form are automatically saved in the pre-chat form, saved as a contact, or merged/linked to the existing contacts in the enquiry rooms.
Disabling Pre-Chat Form
To disable the Pre-Chat Form:
- Go to Administration > Widget > Visitor Forms, then click the Pre-Chat Form tab.
- In the Pre-Chat Form, toggle the button OFF.
Offline Support Form
CINNOX displays the Offline Support Form whenever staff members cannot answer a visitor enquiry on time. This feature is disabled by default.
Enabling Offline Support Form
- Go to Administration > Widget > Visitor Forms, then click the Offline Support Form tab.

- Toggle the button ON.
The page will expand the additional settings for the following:
- Auto-save to Contacts
- Greetings
- Message
- Terms
- Form Field

Auto-save to Contacts
When disabled, you can manually select the visitor details to save as a new contact.
To enable the auto-save contact, toggle the button ON.
Greetings
- Click on Edit.
- Click on Add Greetings.
- Select a language in the dropdown list.
- Type your text greeting in the textbox according to the selected language.
- Click on Save.

Message
The Message box is the space for the visitor to provide more information, e.g., enquiry, help, support and other details.
- To make it mandatory, click the Required checkbox.
Terms
Terms refer to your Company's Terms and Conditions, Terms of Use or Policies you want to be acknowledged by your visitors.
To enable the Terms:
- Click on Edit.
- Toggle the button ON.
- Enter the URL that links your company's Legal page.
- Click on Save.

Form Field
Add fields in the Form to gather visitors' information before interacting with them.
- Click on Edit.
- There are suggested fields that you can keep, such as the First Name, Last Name, Email Address, Phone Number and Company Name.
- Click the bin icon to remove the field.
- Click on Add New Field, and a pop-up window will appear. Add more fields such as Job Title, Department and other fields created from the Custom Fields for External Contacts.
- Click on the checkbox of each field to add in the form field, then click Add.
- Click the Required checkbox to make the field mandatory for the visitor to fill.
- Click the Verification checkbox for the Phone Number field to verify the visitor's phone number.
- Click on Save.

Preview Panel
The preview panel on the page's left side displays what the Form looks like for your visitors.

The visitor's details in the Pre-Chat Form will appear in the chat room conversation details to the staff handling the visitor enquiry.
As a staff, you can retrieve the visitor details from the Offline Support Form in the Enquiry Overview and the chat room when following up on a missed enquiry.
When the visitor sends multiple offline support forms, all their enquiries are aggregated and display the latest contact details in the Missed Enquiry window - Enquiry and Visitor Details.

Missed Enquiry - Enquiry and Visitor Details

Chat room - when following up on a missed enquiry
Disabling Offline Support Form
To disable the Offline Support Form:
- Go to Administration > Widget > Visitor Forms, then click the Offline Support Form tab.
- In the Offline Support Form, toggle the button OFF.
Updated 2 months ago